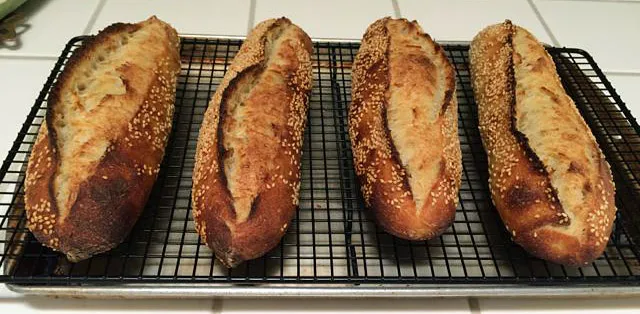
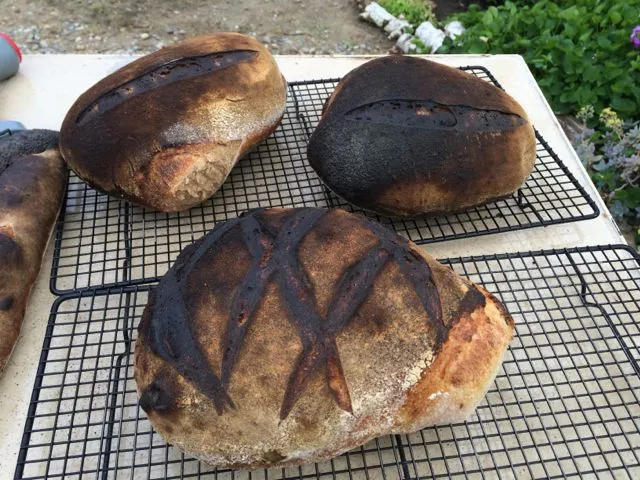
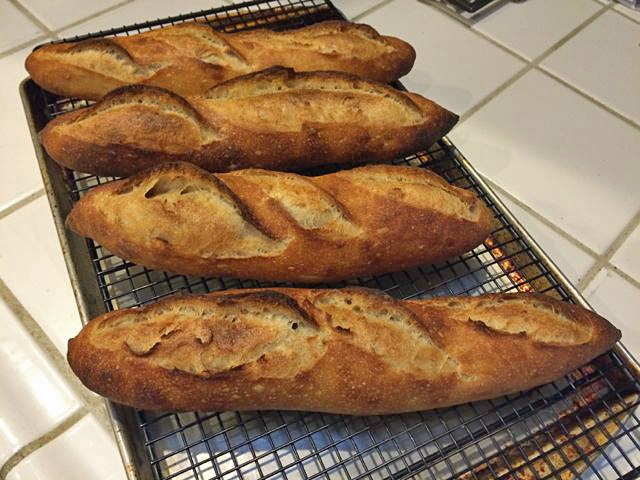
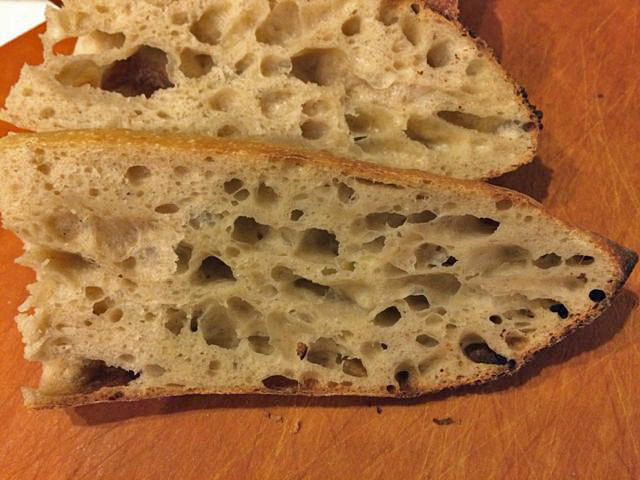
The Fresh Loaf

A Community of Amateur Bakers and Artisan Bread Enthusiasts.

dmsnyder's blog

dmsnyder's picture
dmsnyder

Warning!: This report contains graphic images of misshapen loaves and loaves subjected to extreme thermal trauma. Young children and those easily upset by pictures of charred crust are advised to immediately go on to the next blog.

My long-awaited first bake in a wood-fired oven occurred yesterday. The day before had been hopping from dough to dough. I had mixed one large liquid levain to use in both San Joaquin Sourdough baguettes and the miche from the San Francisco Baking Instute's "Artisan II" workshop. That was made with a mix of AP and CM T85 flours. A 100% Whole Wheat liquid starter was mixed to make Hamelman's "Whole Wheat Levain."

For most of the day, I was a slave to my kitchen timer.

By late afternoon, I had the SJSD dough in the fridge and was shaping the other two doughs, the WW levain as two 940g bâtards and the miche dough divided into two 1010g boules. I figured that, except for the baguettes, all the bread should be in the same size loaves, so the bake times might be the same.

An hour before going to the WFO venue, I divided and pre-shaped the SJSD into rounds, and, just before loading the car, I shaped the pieces into 4 demi-baguettes. So, we loaded the car with 4 baguettes en couch on a proofing board, 4 loves in bannetons and a box with assorted bread baking paraphernalia - oven gauntlets, a lame, my super peel, cooling racks and more. We drove the 20 minutes to J.S.'s house and unloaded the car.

I was introduced to the WFO. I thought it was pretty neat.

J. had fired her oven the night before. When I arrived, the wood was burned to coals and ashes and raked to one side. The oven flour was at about 650dF. The "roof" was about 100dF hotter. We discussed raking out the ashes. I didn't want J. to go to too much trouble, so we left them in the oven. That was a big mistake. I wanted the oven somewhere between 480 and 580dF, and the oven floor could be brought to that range by leaving the oven open for a while. But, as soon as the door was put up, the oven floor temperature went right back up.

We discussed options for humidifying the oven. Since I wasn't going to come close to filling it with bread, there was no question that we needed to do something. We decided to fill a cast iron skillet with water and place it deep in the oven before loading the breads. That worked reasonably well.

I decided to bake the baguettes first. I transferred them from the couche to my SuperPeel. I then discovered that the oven door was narrower than the SuperPeel was wide. The loaves were therefore transferred to a semolina-dusted aluminum pizza peel and loaded to the oven deck with only moderate distortion of their shape. I would call the result "a movement disorder." (That's a medical joke. Sorry.)

All the advice I had read told me to not even peek at the loves for the first 20 minutes, so the steam in the oven isn't let out. Well, I figured the baguettes would probably bake in much less time than that, so I "peeked" in 15 minutes. And quickly removed the baguettes from the oven.

The second transfer clearly damaged my baguettes' structural integrity and provided a very nice illustration of how oven spring will always find the weak spots in your gluten sheath and expand at those spots. Anyway, the two baguettes on the outsides of this pathetic line-up were judged worth trying. 

The crust was very crunchy and the flavor was delicious. That was a relief!

Before loading the other loaves, I left the oven door open until the floor was down to 640dF. I then refilled the cast iron skillet, loaded the 4 loaves and closed the oven door. After 15 minutes, I opened the door, expecting to rotate the loaves, but they appeared quite well-baked. I took them out, knocked their bottoms and checked their internal temperatures with an instant read digital thermometer. In fact, 3 of the 4 loves were done, with internal temperatures over 205dF. The 4th was almost done. I gave it another 5 minutes in the oven, and that was plenty. 

As had been mentioned, oven spring in a wood-fired oven is exuberant. That was nice. Having the experience with the baguettes, I was more cautious with the larger loaves. all were somewhat charred in places, but none was ruined.

On slicing (still warm), I saw that the loaves were not cooked evenly. No part was totally under-cooked or gummy, but some could have used a few minutes' more baking at one end, at least. 

Appearances aside, the eating quality of all the breads was very good, and the WW Levain was amazingly good. The crusts were very crunchy. The crumbs were tender and slightly chewy. The flavors of the WW levain and of the baguettes were as good as I have every had. I think the "miche" would have been improved by more whole grain flour.

While the breads were baking, J.S. opened bottles of Chablis and Sangiovese and did the final cooking of a cioppino with talapia, shrimp, clams and mussels. The chef from her deli had made the sauce for her, and it was by far the best fish stew I have ever tasted. J. had decided to make it with the thought of having a delicious sauce for dipping bread into. An excellent decision! I apologize. By the time we sat down to eat, I was too tired and too hungry to even think about taking more photos.

We all had a delightful afternoon. I was disappointed in how the breads looked, although I really cannot complain about their eating quality. I did learn a lot, and I think I won't make the same mistakes again. (I'll make new ones!) The most important mistakes were not sweeping out the coals and not waiting until the oven was cool enough. If I am to try baguettes again in a WFO, I need to get an appropriate peel. The oven steaming method I used was adequate and a lot easier than using a mop or a garden sprayer.

I want to thank all those generous TFL members who responded to my request for advice on WFO baking. I collected all the suggestions into a single document and left a printed copy with my hostess. 

She invited me to use her oven whenever I wanted to, and I am eager to apply what I learned yesterday.

Happy baking!

David

dmsnyder's picture
dmsnyder

This week, I baked a batch of SJSD baguettes. They aren't the prettiest I've ever baked, but I'll post a couple photos of mine, since there have been so many folks baking these and enjoying them recently.

I also baked another couple loaves "in the spirit of FWSY" - loosely based on Forkish's "Pain de Campagne."  I fed an activated liquid starter per Forkish one afternoon, let it ferment at room temperature and then refrigerated it overnight. The next day, I let the starter warm up for a couple hours,  I mixed the dough, bulk fermented to 2.5X the original volume, divided, shaped and cold retarded over another night. Then, baked the following late afternoon. The flour mix of the final dough was 500g AP, 200g WW and 100g Medium Rye.

Both breads are really delicious.

Happy baking!

David

dmsnyder's picture
dmsnyder

Pan de Horiadaki

(Greek Country Bread)

based on a formula in Maggie Glazer's A Blessing of Bread


Maggie Glazer wrote that she got the recipe for this bread from Rica Sabetai, a woman fromThessaloniki who escaped the murder of the vast majority of its Jewish community by the Nazis and emigrated to the United States.

I have made at least two other versions of a Greek village bread before. Neither was really a keeper, but I learned a few things about traditional Greek breads in the process. As elsewhere, prior to the last 100 years or so, most breads used local, whole grain flours predominantly and were leavened with wild yeast. That is, they were sourdough breads. From several descriptions I have read, I strongly suspect that durum flour was used, at least as part of the flour mix.

Glezer includes a sourdough version of most of the breads in this book. That is the version I made. However, Glezer's formula calls for bread flour entirely. I substituted whole wheat flour for 25% of the bread flour. I expect to make the bread again but with the addition of at least some durum flour.

What I describe below is the formula and procedures I actually followed for this bake.


Total Dough

Baker's %

Wt (g)

Bread flour

9.6

99

AP flour

65.6

673

Whole wheat flour

24.9

256

Water (85-90ºF)

67.7

696

Salt

1.9

20

Turbinado sugar

2.9

30

EVOO

2.9

30

Total

175.5

1804


Starter

Baker's %

Wt (g)

Bread flour

64.7

99

AP flour

11.8

18

Whole wheat flour

23.5

36

Water (85-90ºF)

58.8

90

Total

158.8

243

Note: The starter consists of 30g of a 50% hydration starter that had been fed with mixed flours. This is mixed with 80g of water, 99g of bread flour and 36g of whole wheat flour.


Final Dough

Wt (g)

AP flour

655

Whole wheat flour

220

Water (85-90ºF)

606

Salt

20

Turbinado sugar

30

EVOO

30

Active starter

243

Total

1804


Procedures

  1. The evening before mixing the final dough, make the starter by mixing 30g of active, firm starter with 80g of warm water, 99g of bread flour and 36g of whole wheat flour. Cover and ferment overnight at room temperature.

  2. In the morning, mix the flours and water in the final dough to a shaggy mass. Cover and autolyse for 20-60 minutes.

  3. Add the levain to the autolyse in chunks. In a stand mixer with the dough hook, mix at Speed 2 until you achieve a medium window pan. About 6-10 minutes. (Note: At this stage, I did add about 11g of water to what Glezer's formula called for. This was to achieve the desired dough consistency and was necessary because I had substituted some WW flour for some Bread flour.)

  4. Add the salt, sugar, and olive oil. Mix at Speed 1 until all ingredients are thoroughly incorporated.

  5. Transfer the dough to a lightly floured board, stretch it into a rectangle and do a letter fold. Form a ball and transfer it to a lightly oiled bowl.

  6. Ferment at 76ºF for 2 hours. The dough will not have expanded much, but it should be full of tiny bubbles.

  7. Oil two 8 inch cake pans generously with olive oil.

  8. Divide the dough into two equal pieces. Preshape into rounds. Cover with a damp cloth and let rest for 10-20 minutes.

  9. Form the pieces into tight boules. Roll one in each of the prepared cake pans to coat with oil.

  10. Place each pan in a large, food safe plastic bag or cover with plasti-crap.

  11. Proof at 76ºF until the loaves have domed over the top of the pans and the dough does not spring back when poked with a finger tip. (Note: This is a fuller proof than done for most bread, but it will not be scored. If proofed just right, there will be good oven spring but no bursting of the loaves.) This took about 3.5 hours. (Glezer says the proof should be for 5 hours, but at room temperature.)

  12. Preheat the oven to 400ºF with a baking stone in place.

  13. Brush the tops of the loaves lightly with olive oil. Bake in the cake pans at 400ºF for 50-55 minutes. (Note: No oven steaming is called for.) If needed, turn the loaves around to get even browning and turn down the oven if it is becoming too darkly colored. It should be a deep brown when done. The bread is done when thumping the bottom of a loaf gives a hollow sound and the internal temperature is at least 205ºF.

  14. Transfer the loaves to a cooling rack. Cool thoroughly before slicing.


The aroma of this bread is heavenly, I think because of the olive oil. Tasted when almost completely cooled, the crust was chewy on top and crunchy on the bottom. The crumb was pleasantly chewy. The flavor was slightly sweet, very slightly sour and quite wheaty. I liked it a lot. My wife loved it.

 This version of Pan de Horiadaki is by far the best I've made to date. But I'm going to try a few tweaks – maybe boost the whole wheat to 50%. Maybe substitute some Durum flour for some AP. Substitute honey for the sugar. How about sesame seeds?

What I will definitely keep is the procedures. The autolyse and doing most of the gluten development before adding the ingredients that can interfere with that – both salt and sugar compete with gluten for water – definitely improves the crumb structure.

I'm happy with this bread, and I'm looking forward to having it toasted tomorrow morning. I'm thinking it would be a great bread for panini. And for bruschette! Oooooh! Toasted, rubbed with garlic, floating in onion soup with a heap of melted gruyere. Sheesh! And I just finished dinner!

Happy baking!

David

Submitted to yeastspotting

dmsnyder's picture
dmsnyder

This particular version of my San Francisco-style Sourdough, with 30% whole wheat, has become our favorite. I will confess that the version with mostly white flour does get made (and enjoyed), but we are enjoyed breads with increased whole grains more often, in recent years. The basic formula and procedures for the bread I made today can be found here: San Francisco-style Sourdough Bread with increased whole wheat flour

The changes in the bread I made today were:

1. I made a single loaf of a bit over 1 kg dough weight before baking.

2. I increased the water in the final dough to about 370 g. This raised the dough hydration to 80%.

3. I machine mixed the dough following the autolyse for about 10 minutes, did one stretch and fold 1 hour into the bulk retardation and bulk retarded in my 68 dF kitchen for a total of 4 hours before shaping and cold retarding overnight.

3. I baked the loaf in a Lodge Combo Cooker cast iron Dutch oven at 460 dF, covered, for 15 minutes. Then at 440 dF convection-bake, uncovered, for another 30 minutes.

I am very happy with the appearance of the loaf as it came out of the oven. The crust is shinier than when this bread is baked on a stone with my usual oven steaming method.

Compared to my previous bakes of this bread, the crust softened more, presumably due to the higher hydration. A half hour sitting in a turned off oven might have kept it crisper.

The crumb was nice but, interestingly enough, less open than previous bakes, in spite of the higher hydration. I think there are two reasons: The longer mechanical mixing and, perhaps, more aggressive de-gassing during shaping.

The crust has a bit of crunch but is mostly chewy. The crumb is nice and moist and moderately chewy. The flavor is mildly tangy but well-balanced with no bitter or grassy overtones. It is quite delicious and should go very nicely with the winey daube de boeuf I have reheating for dinner.

Happy baking!

David

dmsnyder's picture
dmsnyder

The Sourdough Seed Bread was one of the first formulas I baked after buying Hamelman's Bread, and I thought it was one of the best tasting breads I had every had. I believe it's been  more than two years since I have baked it, and I wondered why I hadn't made it more often after tasting a slice last night. It is really good.

I made a bit over 2 kg of dough and divided it into 3 equal pieces. In order to bake all three at once on my baking stone, I shaped two bâtards and one boule and placed them with the bâtards kind of in an L configuration and the boule between the two arms. It worked well. 

This bread always has really great oven spring and bloom for me.

The crust is very crunchy.The crumb was quite tender and pretty open. The aroma and flavor of the flaxseeds is very present in this bread. I happen to like that a lot.  The bread is delicious plain or toasted. I had a slice last night with a thin spread of sweet butter and had a couple more slices toasted for breakfast with almond butter and apricot preserves. It's also very good with cheese. Just good bread.

David

dmsnyder's picture
dmsnyder

Ken Forkish calls this "Overnight Country Blonde," but that doesn't describe the method I used.

Two days before baking, I activated some levain from my refrigerated mother starter. I let this ripen to a "young" stage, where it had doubled in volume. Bubbles were just starting to appear on the surface and, the aroma was fruity, not vinegary. I then mixed a half batch of Forkish's levain (which is still about double what I needed for the bread I was making). This was mixed at about 11pm and fermented overnight. The day before baking, I mixed the final dough at about 8 am. At about 7 pm,  I divided and shaped the dough. After about 45 minutes at room temperature, I refrigerated the loaves. They were baked today at 4 pm, after sitting at room temperature for about 90 minutes.

I haven't tasted it yet, but it sure smells delicious. In fact, the whole house smells delicious with the aroma of fresh-baked bread, complimented by the smell of fresh-baked chocolate chip cookies.

I gotta go wash some chard, fry some fish, pour some pinot grigio and slice some bread. 2015 is getting off to a pretty good start chez nous. I hope it's the same for you all!

Happy baking in 2015!

David

dmsnyder's picture
dmsnyder

My Sourdough Starter Routine: FAQ

December 30, 2014


I get questions about how I manage my sourdough starter frequently enough that I decided to put the information in a single blog entry to which I can refer in the future. What follows applies to a sourdough starter/levain containing mostly white wheat flour. Mostly rye and mostly whole wheat starters are different beasts.

Please understand that this is my routine. It has worked well for me for a number of years. I am not presenting it as the only way to manage sourdough starters. It may not be the best way at all for some one else. But, as I said, it works for me, and here it is:

My starter was originally was purchased from KAF in about 2008. (See: Classic Fresh Sourdough Starter - 1 oz.).

Taking care of mother

I keep my "mother starter" in the refrigerator. It is fed at a ratio of 1:2:4 (Starter:Water:Flour). When feeding the mother, I mix 50 g starter, 100 g water and 200 g flour to make 350 g total. This is refrigerated imediately after mixing. I refresh the mother every 2 to 3 weeks. The flour feeding is a mix of 70% AP, 20% WW and 10% Medium or whole rye.

Getting active

When preparing to make bread, I generally refresh the starter as a liquid starter at a ratio of 20:50:50 (Mother starter:Water:Flour) using the same flour mix described above. This is fermented to peak activity at room temperature (generally about 12 hours). 

This refreshed liquid starter is then fed again according to the specific formula I am following. In other words, the degree of hydration, the flour mix, the ratio of levain:water:starter and the fermentation time and temperature are variable.  When posting a formula, I specify these variables. This may involve converting the refreshed liquid starter to a firm starter.

Ripening

How long it takes to ferment a starter before it is ready to feed again or mix in a final dough depends on four variables (at least those are the ones I can think of at the moment):

  1. What flours you put in the starter. For example, flours with whole grains ripen faster because of their mineral content.

  2. The ratio of seed starter:flour:water. If you introduce relatively more seed starter, it has a “head start” and will ripen faster. All other things being equal, a more liquid starter will ripen faster than a more firm starter.

  3. The ambient temperature. A warmer temperature speeds up metabolic processes, including fermentation, at least within the usual range of kitchen temperatures. (The Temperature/Metabolism curves for fermentation and acid production are beyond the scope of this FAQ.) This effect can be rather dramatic. As a consequence, any instruction for how long to ferment a levain without specifying the ambient temperature should be taken with a grain of salt. (In fact, adding salt to the levain is one way of slowing fermentation down, but that's another topic for another day.)

  4. The flavor profile you want for the bread you are making. A “younger” levain will generally be less sour. A more “mature” levain will have more acid and make bread that is more sour. (Assuming the formula for the bread is otherwise the same.)

 How can you tell how ripe a levain is?

There is a lot of confusion about the criteria to use in judging the ripeness of a levain. The most common criterion I see is how much it has expanded, and “doubled in volume” is most often the specific criterion. The problem with this is twofold. First, unless you are fermenting your levain in a graduated container or have marked your container yourself, doubling is hard to measure accurately. Second, I don't think doubling carries the same meaning for liquid as for firm levains. And, at no extra charge, here is a thirdfold: Depending on the flavor profile you want, doubling (even if you could measure it accurately) may be too much or not enough.

So, as implied, I use somewhat different criteria depending on the levain's hydration, and I do use a container that is graduated, and I do use a semi-transparent container, so I can view the internal structure of the levain, not just its surface. My container is also tall relative to its diameter and has relatively straight sides. It is more like a cylinder than a bowl. This provides support to the ripening levain that permits greater expansion.

My Sourdough Starter Fermentation Container

Ripeness criteria for a firm levain

A firm levain is one with a hydration level of around 50%. That is, it contains half as much water, by weight, as flour. A firm levain can expand in volume a lot more than a liquid levain. So, volume expansion is actually a useful criterion for ripeness. A doubling in volume is generally associated with enough yeast activity to raise your dough well, but it may not be ripe enough to have fully developed flavor. I usually let my levain triple or quadruple in volume before I mix it in the final dough. In addition to volume expansion though, I look for an extensive network of large and small bubbles throughout the levain. I can see these through the walls of the container. I look for a well-domed top of the levain. And, last but not least, I look for any signs that the levain has had a decrease in volume, which indicates excessive ripeness. This is indicated by a concave surface, rather than a dome.

There is a lot of wiggle room between “ripe enough to raise dough” and “peak of fermentation, just short of collapse.” A less ripe (“young”) levain will make a sweeter bread, one with more creamy flavor from lactic acid formation. A riper (“mature”) levain will have relatively more vinegar-like, acetic acid sourness. Besides the criteria already mentioned, the aroma of the levain tells you the relative prominence of lactic versus acetic acid. You could use your sense of smell alone to judge when your levain is at the point of maturity you desire, in order to achieve the flavor profile you want for your bread.


Firm Levain, just fed

Firm Levain, 10 hours after feeding. Note: Approximately doubled in volume. Full of bubbles. Domed surface. I regard this as a still "young" levain.


Firm Levain, after 10 hours. Note: Domed surface. Some bubbles on surface.

Ripeness criteria for a liquid levain

A liquid levain is one with a hydration level of around 100%. That is, it contains equal weights of water and flour. A liquid levain cannot expand as much as a firm levain. Quite simply, all those water molecules get in the way of connections between folds of the long gluten molecules that provide structure to a firm levain and a bread dough. Now, a liquid levain does expand as fermentation produces CO2 gas, but this forms bubbles that rise to the levain surface and pop rather than getting trapped in a gluten web and causing levain expansion. If you use a glass container or a semi-transparent plastic one to ferment your liquid levain, as it ripens you can see the internal structure of the levain become full of tiny bubbles – almost like a mousse.  On the surface, you see bubbles forming, faster and faster as the levain gets riper, until they actually form a froth on the levain's surface. The surface of the ripe levain often has a "wrinkled" appearance.

As with a firm starter, one can choose to use the liquid starter “young” or more “mature.” With a liquid starter, as with a firm starter, levain recession or collapse indicates that you have let your levain over-ferment.


Liquid Levain, just fed.


Liquid Levain, just fed.


Liquid Levain after about 9 hours fermenting at room temperature. Note: Bubbly interior.


Liquid Levain surface after about 9 hours fermenting at room temperature. Note: Bubbles forming. Surface just beginning to wrinkle. This would still be "young."

The consequences of levain over-fermentation

Over-fermentation implies any combination of several bad things. The yeast may have fermented all the free sugars they can get at. Reproduction and fermentation will both slow down. The levain may not be as potent in raising the dough to which it is added. The levain may also contain excessive amounts of metabolic byproducts, especially organic acids. A little acid is good for both flavor and gluten strength. Too much acid is bad for yeast growth. An optimally ripened levain has positive effects on gluten structure, but, over time, protease activity increases, and those enzymes will degrade gluten. (That's why a very over-ripe sourdough starter that hasn't been fed new flour for a long time gets more and more liquified.)

What's missing?

There is another important variable in my routine for sourdough starter feeding and use, and that is the manipulation of fermentation temperature. Temperature effects the rate of yeast and bacterial growth and metabolism dramatically. Different metabolic processes are favored by different temperature ranges. Temperature changes can change the flavor of your bread. However, that is an advanced topic which is beyond the scope of this FAQ.

 The one temperature manipulation I will discuss is cold retardation. I often refrigerate my levain, usually at the point that it is nearly fully mature. I do this for two reasons, primarily. The first is, quite simply, my convenience. If I have to go out (or go to bed) at the point that a levain is going to be optimally ripe and ready to mix into a dough, I will stick the levain in the refrigerator, maybe for a few hours, maybe for a day or even two. The other reason I refrigerate a levain is to make it more sour. Especially a firm levain will generate more acetic acid in a cooler environment.

If I have refrigerated my levain, before mixing it into the final dough, I will usually let it come to room temperature. Sometimes, I will let it ferment further at a warm temperature, for example 86 dF in a proofing box. It is appears almost over-ripe already when it comes out of the refrigerator, I usually use warmer water when I mix the dough, so the over-all dough temperature is no excessively lowered by cold levain.

 I believe I have addressed the questions I get asked most often about my sourdough starter care and feeding. As indicated, there are additional more advanced topics I have not addressed in this FAQ. Maybe I will another day. 

I hope this helps.

Happy baking!

David

dmsnyder's picture
dmsnyder

We were invited to some friends annual Boxing Day party. It's always fun. It's a pot luck with wonderful food. There is always live music. This year it was a Celtic string band. I get to visit with friends that, since I retired, I seem to see only once a year, at this party.

I was asked explicitly to bring bread. I brought a large loaf last year, and they never served it. Oh, well. This year, my wife made a delicious shrimp dip, and I baked SJSD demi-baguettes to slice for the dip. I also made a couple small miches using the original SFBI formula.

We put out the baguette slices and dip ourselves, but, as we left at the end of the party, I saw my miche sitting there, still in its bakery bag. As we were saying good night and thanking our hosts, both thanked me profusely for the bread. 

I think I'm catching on.

I hope everyone is having a happy holiday season and Happy Baking!

David

dmsnyder's picture
dmsnyder

My wife and I have always enjoyed whole wheat bread. For many years, our favorite one has been Peter Reinhart's "100% Whole Wheat Bread" from BBA. Although a lot of my breads have 10 to 30% whole grain flour, I've really been thinking I need to be baking higher percentage whole grain breads, both for health reasons and because that's the way our taste is trending. So, I've been thinking about making Reinhart's WW bread for weeks. But I just finished reading Sam Fromartz's "In Search of the Perfect Loaf" (Highly recommended!), in which he reviews, among many other issues, the health benefits of sourdough breads and the increased health benefits of whole grain breads when made with pre-fermented flour, specifically, as sourdough bread.

Now, my experience with sourdough whole wheat breads has been mixed. Some - generally those that turn out very sour - have been unpleasant to my taste. I have made several sourdough breads with about 50% whole grain flour that I liked a lot, but I wanted to go for 75 to 100% whole grain. My search of TFL revealed that I had, in fact, baked Ken Forkish's "75% Whole Wheat Levain Bread" in September, 2013, and found it very good. (See: 75% Whole Wheat Levain Bread from FWSY) I am amazed and chagrined that I have not made it even once since! 

I did make it again today. I altered Forkish's procedure to fit my schedule. I did the final feeding of the levain the day before mixing the final dough and refrigerated the levain overnight.  This time, I was able to  monitor the bulk fermentation more closely. I did let it go to a full 2.5X volume expansion before dividing and shaping. (But not to 4X expansion, as I did the last time!) I retarded the shaped loaves for about 16 hours, then let them complete proofing at room temperature for about 90 minutes before baking.

We had a few slices with our dinner, after the breads had completely cooled. It was just as delicious as I described my first bake of this bread. It was moderately tangy, but the dominant flavor was sweet, nutty wheatiness. I had it with a very tasty, winey beef stew and, after, with a slice of Gorgonzola Dolce. This bread stood up to those assertive flavors and held its own. I was pleasantly surprised how well the forward whole wheat flavor of this bread complemented that of the gorgonzola.

I expect to enjoy this bread toasted for breakfast in the morning too. And I hope I don't let another year go by before I bake this one again!

Happy baking!

David

dmsnyder's picture
dmsnyder

Modena Mountain Bread

Pane Montanaro

from

The Splendid Table: Recipes from Emilia-Romagna, the Heartland of Northern Italian Food

by

Lynn Rossetto Kasper


The Splendid Table is a wonderful book for anyone who loves to prepare and eat Italian food, as I do. Others apparently agree, as it won both the James Beard Foundation Cookbook of the Year award and the IACP Cookbook of the Year award. The author's aim was to collect and preserve the culinary heritage of this region before it disappears due to the encroachment of modern industrial food production and the accelerated pace of modern life. The book has a chapter on breads of the region, which is very interesting. This recipe was the one that appealed to me. Most of the other breads she described have been included in other books I already have, such as Carol Field's The Italian Baker. And when she introduces the recipe by writing, “If I could make only one bread for the rest of my life, it would be this loaf.” How could I not make it, at least once?

Ms. Kasper reports that, until quite recently, most homemade breads in Emilia-Romagna were made with what we would call pâte fermentée (a piece of dough saved from the prior day's baking. The Italian term for this is pasta di riporto, or “dough that is carried over.”) However, all her bread recipes are made with a yeasted pre-ferment she calls a “sponge,” which is equivalent to a French poolish, actually.

After consideration of various approaches, I decided to make this bread with a biga naturale, figuring that would be closer to the original bread than Ms. Kasper's recipe. I kept the proportion of pre-fermented flour and the total dough hydration the same. I would assume that, in the past, a higher extraction flour or even whole wheat flour predominated. For this first bake, I kept to Ms. Kasper's formula. Pretty much. I did increase the percentage of whole wheat flour a bit. I have also modified her procedures somewhat. For example, I do an autolyse, specify a shorter mix and add a Stretch and Fold during bulk fermentation.

I converted the “English” weights Ms. Kasper provides to grams, calculated the bakers' percentages (after my slight modifications in proportions and switch in pre-ferments) and scaled the formula to make a one kilogram loaf.


Total Dough

Wt. (g)

Bakers %

All purpose flour

440

80

Whole wheat flour

110

20

Water

275

50

Red-skinned potatoes

110

20

Wheat berries

55

10

Salt

11

2

Total

1001

182

Pre-fermented flour = 27% of total flour


Biga Naturale

Wt. (g)

Bakers %

DMS Sourdough feeding mix*

175

100

Water (100ºF)

87

50

Firm (50% hydration) starter

35

20

Total

297

170

  1. Dissolve the firm starter in the water. Add the flours and mix thoroughly.

  2. Cover tightly and ferment at room temperature for 12-16 hours.

* My sourdough feeding mix is 70% AP, 20%WW and 10% Whole or medium rye flour.


Final Dough

Wt. (g)

All purpose flour

265

Whole wheat flour

110

Red-skinned potatoes

110

Wheat berries

55

Salt

11

Potato water

188

Biga naturale

262

Total

1001

Procedures

  1. Boil the unpeeled potatoes in water to cover until very tender. Cool and peel.

  2. Reserve 188g of the water in which the potatoes were boiled, cooled to room temperature, and purée the potatoes in it. (I mashed the potatoes with a fork, added the reserved water and stirred.) Reserve.

  3. Put the wheat berries in a sauce pan and cover well with water. Bring it to a boil and boil for 10 minutes, or until tender. Drain and cool. Use a blender, food processor or mortar and pestle to lightly crush the berries. Set aside at room temperature.

  4. In the bowl of a stand mixer fitted with the paddle attachment, combine the potato purée, whole wheat flour and the all purpose flour. Mix at low speed for a couple minutes to combine the ingredients well. Cover the bowl and let it stand for 20-60 minutes. (Autolyse)

  5. Switch to the dough hook. Add the salt and the biga and mix at Speed 2 to achieve good gluten development (about 6 minutes). The dough should clean the sides and the most of the bottom of the mixer bowl. It should be elastic but still soft and tacky.

  6. Add the wheat berries to the bowl and mix at Speed 1 for 1 to 2 minutes to distribute the berries evenly. If needed, transfer the dough to a lightly floured board and knead an additional minute or so to better distribute the berries.

  7. Transfer the dough to a lightly oiled bowl and cover tightly.

  8. Ferment at room temperature until the dough has increased to 2.5 to 3 times the original volume (2-3 hours). Do a Stretch and Fold at 1 hour. (It was 68ºF in my kitchen – a bit cool – and the fermentation was moving slowly, so, after an hour, I put the dough in my proofing box, with the temperature set at 76ºF.)

  9. Transfer the dough to a lightly floured board and pre-shape round. Cover the dough with a towel and let it rest for 15-20 minutes.

  10. Shape the dough as a boule and proof at room temperature on a peel coated with polenta, on a linen couche or in a lined banneton. Cover with a towel or place in a plastic bag. Proof fully (until doubled in volume). This should take about 90 minutes. Note: Kasper calls for proofing on the peel. The other options (couche or banneton) are my suggestions.

  11. 45-60 minutes before baking, pre-heat your oven to 480ºF with a baking stone and your steaming apparatus in place.

  12. Transfer the loaf to a peel. Turn down the oven to 400ºF. Steam the oven. Transfer the loaf to your baking stone. Note: Kasper does not mention scoring the loaf. With the very full proof, this may not be needed, as there will be less oven spring than in a less fully proofed loaf. (For this first bake, I proofed the loaf to the point that a finger poke resulted in the dough springing back very slowly. I chose to score the loaf with a simple cross, and got exuberant oven spring.)

  13. After 15 minutes, remove the steaming apparatus. Continue baking for another 45-60 minutes or until the loaf is fully baked. (The loaf sounds hollow when thumped on its bottom. The internal temperature is at least 205ºF.) Note: If you have a convection oven, after the first 15 minutes, you can switch to convection-bake and reduce the oven temperature setting 25ºF. This will result in a crisper crust and more even browning.

  14. Remove the loaf to a cooling rack and cool completely (90-120 minutes) before slicing.


Note: My wife's persimmon cookies photobombed my crumb photo!

The crust developed some nice crackles. It was very crunchy, and when you bite into a wheat berry you get a pronounced nutty flavor hit! Yum! The crumb is not as soft as expected and rather chewy. A shorter mix next time, perhaps. The wheat berries within the crumb are nice and chewy. The flavor of the crust was sweet and nutty. The crumb was wheatier than expected, given the low percentage of whole wheat. Perhaps the wheat berries contribute more flavor than expected. I think I would still increase the percentage of whole wheat the next time I bake this bread. The bread was moderately sour.

This is a delicious bread, and I expect it will be even better tomorrow. I think it's a keeper! I'll be making it again.

Happy Baking!

David

Submitted to yeastspotting

Pages

Subscribe to RSS - dmsnyder's blog