The Fresh Loaf

A Community of Amateur Bakers and Artisan Bread Enthusiasts.

dmsnyder's blog

dmsnyder's picture
dmsnyder

Light Rye & pumpernickel

Light Rye & pumpernickel

Silesian Light Rye from Leader's "Local Breads"

Silesian Light Rye from Leader's "Local Breads" 

Silesian Light Rye crumb

Silesian Light Rye crumb 

Pumpernickel crumb

Pumpernickel crumb 

The Silesian Light Rye from Daniel Leader's "Local Breads" is even lighter than the usual "Jewish Sour Rye." It is a lovely bread that my wife and I always enjoy fresh or toasted.

 Leader's recipe calls for free form loaves, but I've usually made it in brotformen. I recently bought a couple of oval brotformen from SFBI, and this was their maiden voyage. The dough was quite extensible. It was hard to form the loaves short enough for the brotform, so they ended up sort of brot-deformed. 

Also, Leader calls for caraway seeds as an optional coating, but I like them in the bread, so I added them for the final minute of mixing.

Greenstein's pumpernickel is another favorite of mine. It is made with rye sour, pumpernickel flour, first clear flour and altus (stale rye bread, soaked in water, then wrung out and added to the dough). I use granular caramel coloring, which not only makes the color "black" but adds a bitter flavor without which this bread just doesn't taste "right" to me. This is a bread that makes good sandwiches, but my favorite way to eat it is spread with cream cheese , untoasted, as an accompaniment to scrambled eggs. That's my breakfast for tomorrow morning.

Dough for Nury's rye is retarding to bake tomorrow. I'm thinking of cutting some of the dough into squares to bake as rolls (hamburger buns?). I may set up another bread or two, if time allows.

Hey! I haven't baked for the past two weeks. I was getting kind of twitchy. I feel so much better now. :-)

David

dmsnyder's picture
dmsnyder

SF Sourdough Baguettes 6-29-08

SF Sourdough Baguettes 6-29-08

SF Sourdough Baguettes Crumb 6-29-08

SF Sourdough Baguettes Crumb 6-29-08

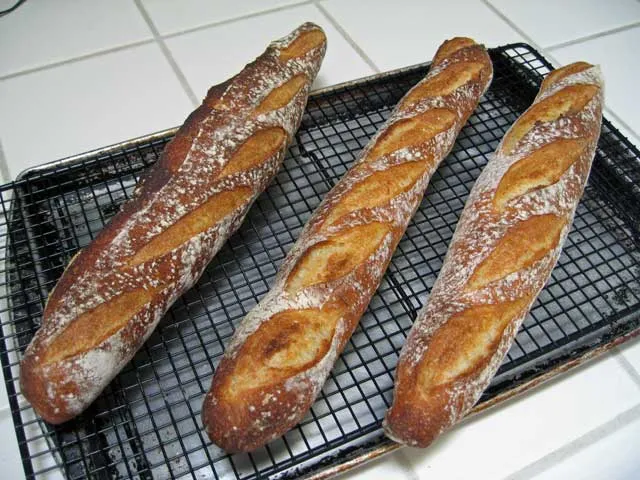
These baguettes were made with the formula for San Francisco Sourdough from Peter Reinhart's "Crust&Crumb." The firm starter was made with a mixture of Guisto's Organic (whole) Rye and King Arthur Bread Flour. The final dough was made with King Arthur European Artisan Flour.

The recipe makes 4-1/2 pounds of dough. I made two 1.5 lb. boules and these two baguettes. The dough was on the dry side, although I added about 1/4 cup of water during mixing. I cold retarded the formed loaves for about 18 hours. The baguettes were baked with steam for the first 10 minutes, then dry for another 15 minutes. The crust is crunchy, thicker than a traditional baguette. The crumb is less open than I wanted. The taste is typical of breads made with this dough - moderately sour and complex.

A word about the scoring, since that has been a source of frustration for me: These results are as good as I have ever obtained. I think the factors that contributed to it were 1) The dryer dough is easier to slash, 2) I was careful not to over-proof. They were baked 2 hours after being taken out of the refrigerator, 3) I consciously attempted to implement what Proth5 calls "Mental mis en place." I take this to mean clearing your mind of any other thoughts, then reviewing the procedure elements and visualizing the procedure before starting to slash, then executing the slashes quickly and smoothly according to the chosen procedure. I did not achieve perfection, but I feel I have progressed. What's needed is practice, practice, practice.

Here is one of the boules made with the same batch of dough:

SF Sourdough Boule 6-29-08

SF Sourdough Boule 6-29-08

David


dmsnyder's picture
dmsnyder

Rustic Baguettes made with Nury Light Rye dough

Rustic Baguettes made with Nury Light Rye dough

Rustic Baguettes Crumb made with Nury Light Rye dough

Rustic Baguettes Crumb made with Nury Light Rye dough 


As promised, I made some baguettes using Nury's Light Rye dough from Daniel Leader's "Local Breads." I followed Leader's recipe except for using a couple tablespoons less water, thinking it might work better for baguettes. In hindsight, I don't think this improved the product.

For those not familiar with the recipe, it is documented in Zolablue's original posting of her baking of this bread.

 http://www.thefreshloaf.com/node/5500/pierre-nury’s-rustic-light-rye-leader

This was an excellent thread. It led me to make this bread myself for the first time, and it remains one of my very favorites.

Leader's recipe calls for patting out the mass of fermented dough into a 10 x 10 inch rectangle, cutting it in half with a bench knife and gently transferring the cut pieces to floured parchment, then immediately baking it on a stone with steam. For these "baguettes," I simply sliced off 3 portions, about 2.5 cm wide each, and stretched them gently to 12 inches as I laid them on the parchment. I baked with steam at 500F for 10 minutes, then removed the skillet and loaf pan with the water and turned down the oven to 440F. The bake time was 17-20 minutes, total.

The baguettes are beautiful, in a very rustic way. The crust was very nicely crunchy, and the crumb was chewy. The taste was wonderful, as it always is with this recipe. The main difference between these baguettes and the "proper" Nury Light Rye is that the baguettes have proportionally much more crust, and the crust stays crisp rather than softening.

 My efforts to make traditional baguettes will continue, but this version is one I'll be making again. 


David 

dmsnyder's picture
dmsnyder

Nury Light Rye baked 6-21-08

Nury Light Rye baked 6-21-08

Nury Light Rye crumb baked 6-21-08

Nury Light Rye crumb baked 6-21-08

Delicious as always!

 But ... I've never baked a loaf that came out of the oven winking at me before.

David

dmsnyder's picture
dmsnyder

Hamelman's Poolish Baguettes with pate fermente

Hamelman's Poolish Baguettes with pate fermente

Hamelman's Poolish Baguettes with pate fermente crumb

Hamelman's Poolish Baguettes with pate fermente crumb 


These baguettes were made with Hamelman's formula for Poolish Baguettes in "Bread." I used Guisto's Baker's Choice flour for the poolish and the final dough. I made a half recipe. My only modification in ingredients was to throw in about 4 oz of pate fermente - dough left over from the last batch of baguettes I made a couple of days ago.

I also modified Hamelman's baking method in that I preheated the oven to 500F. After loading the loaves and pouring boiling water in the skillet, I turned the oven down to 460F. I baked 20 minutes then left the loaves in the turned off oven with the door ajar for 10 minutes more. (See my previous blog entry for details of Hamelman's method of steaming the oven.)

I got satisfactory oven spring, but it might have been better if I had baked 15 minutes sooner. As it was, these proofed for about 60 minutes. I wonder if the cuts would have opened up more also.

Other than the paltry bloom, these were the best (traditional) baguettes I've made to date. They "sang" while cooling. The crust was perfectly crackly, which thrilled me. The crumb was more open than most baguettes I've made. Not as open as I'd have liked, but I'm getting there. The taste was as good as any baguette I've tasted. I wonder if the pate fermente, as little as it was, added a depth of flavor.

I think I am going to stick with this formula for a while. I'm going to stick with this oven temperature and steaming method. I expect to try different flours and tweak the hydration level and the proofing some.

Now, I've got to go deal with 7 freshly baked baguettes.

David

dmsnyder's picture
dmsnyder

SF Sourdough baguettes

SF Sourdough baguettes

SF Sourdough baguettes crumb

SF Sourdough baguettes crumb 

These baguettes were made with the same dough I have described in http://www.thefreshloaf.com/node/7446/reinhart039s-san-francisco-sourdough-quotcrust-amp-crumbquot-some-new-variations.

I have been trying various formulas and techniques to make baguettes that have "classic" crust, crumb and taste. This is not them, of course, but I have also wanted to see if the pain de compagne dough, which has such a wonderful taste in a boule, would also make a good baguette. Well, the crumb structure and the taste are essentially identical to the boule. The baguette just has proportionately more crust.

The baguettes were scaled to about 10 oz. I preshaped them according to Hamelman's technique in "Bread," let them rest for 10-15 minutes, then formed the baguettes. I should have let them rest longer. The dough was very elastic. I attempted to be as gentle as possible in handling the dough. I proofed them for about 45-50 minutes only, until they were just swelled a bit, then baked with steam, starting at 500F and reducing the oven to 460F after 10 minutes. The total bake time was 25 minutes. They rested in the turned off oven with the door ajar for 10 minutes more.


The combination of the stingy proofing and the hot oven resulted in enormous oven spring. The bloom practically obliterated my cuts. For this "rustic" baguette, I'm not unhappy with the effect.

A word about how I steamed the oven: Hamelman's suggested method of oven steaming for the home baker was used. The oven was preheated with a pizza stone on the middle shelf and a loaf pan and a cast iron skillet on the bottom shelf. Just before spraying the loaves with water and scoring them, I placed about a cup of ice cubes in the loaf pan. Just after loading the loaves, I poured about a cup of boiling water into the skillet. The door was opened briefly at 10 minutes to remove the loaf pan and skillet. I did not spray water into the oven. 

David 

dmsnyder's picture
dmsnyder

SF SD Pain de Compagne

SF SD Pain de Compagne

SF SD Pain de Compagne crumb

SF SD Pain de Compagne crumb

This came out of the oven this evening in time to cool ... almost cool ... for our obligatory bedtime snack.

It is basically the same bread as that described in my last blog entry except that I built the dough directly from the starter rather than elaborating an "intermediate starter," and I made it with slightly higher hydration. As a result, it did not have the first clear flour, and it had proportionately more whole wheat and rye in the starter. This was a sticky dough that I avoided over-kneading. It fermented for 3.5 hours with one folding at 90 minutes. I shaped a single boule of about 830 grams. It was retarded in the refrigerator for 18 hours.

The boule was proofed in a linen-lined banneton and baked on a stone, covered with a stainless steel bowl for the first 15 minutes of a 40 minute bake. It was left in the turned off oven with the door ajar for another 10 minutes.

The crust was really crisp after 90 minutes of cooling. The crumb is tender but chewy, how I like it. The taste is medium sour with clear notes of whole wheat and rye which I expect to be more subtle by the morning.

My next project is to use the same dough at a lower hydration to make sourdough baguettes.

David

dmsnyder's picture
dmsnyder

Baguettes with Poolish

Baguettes with Poolish

Baguette crumb

Baguette crumb 

In my ongoing efforts to make wonderful baguettes at home, today I baked the Poolish baguettes from Hamelman's "Bread."

 The poolish was made late last night. This morning it was about doubled and very bubbly. I used King Arthur AP flour for the poolish and for the dough. This worked well. I think the dough had the desired consistency with the exact amounts of ingredients called for in the formula. No adjustments were necessary. I mixed the dough for 3-3.5 minutes in a KitchenAide mixer, fermented 2 hours with one fold at 60 minutes. The dough was scaled and preshaped, then rested 10 minutes before shaping. I proofed the baguette for 60 minutes and baked 24 minutes at 460F with steam. I propped the oven door slightly open after I removed the skillet with water at 10 minutes in hopes of a thinner, crisper crust. I think it helped some.

 I think the result was my best baguettes to date. I attribute this to less mixing, gentler shaping and not over-proofing the loaves. My scoring is better but still far from what I would have liked. The crumb color was distinctly yellowish. I assume this is from the carotene I usually oxidize by over-mixing dough. The cut baguette had a somewhat yeasty smell, which is not desirable, but it didn't taste yeasty. The taste was less sweet than some baguettes, but nice and wheaty. 

Hamelman's recipe makes 3 lb 6 oz of dough. I scaled 2 portions at 12 oz. The rest I make into one batard shape and tried to cut it to make a "Viverais," one of the fancy shapes in "Advanced Bread and Pastry." It didn't really work, but the result was ... interesting ... and the bread was very good tasting.

 Viverais made with baguette dough

Viverais made with baguette dough

Viverais crumb

Viverais crumb 


The photo of the crumb doesn't do justice to the lovely yellow color it had. 

 David

dmsnyder's picture
dmsnyder

Rusian rye bread 2 boules

Rusian rye bread 2 boules

Russian Rye Boule

Russian Rye Boule

Russian Rye Crumb

Russian Rye Crumb

Sauve posted the formula for this bread in Kosher-Baker's blog topic, "Diary of a Starter." As a confirmed rye bread lover, I was curious about how it would compare with the Jewish, Czech and Polish ryes I had already baked. I'm glad I tried it.

Formula: 

Firm starter (73% hydration):

43 g. rye starter
195 g. whole rye flour - must be finely groud
142 g. water

Mix, cover and leave for 6-7 hours at 85-90 F.  The original recipe calls for 1/3 of the mother starter and fermenting for 3-4 hours, but I find that using more traditional proportions and doubling the fermentation time works equally well.

Dough (69% hydration):
97 g. whole rye flour
290 g. high extraction flour
333 g. starter
261 g. water
9 g. salt
17 g. sugar
1 g. instant yeast

Mix all ingredients and knead until you have well developed gluten.  In KA it takes me about 12 minutes at second speed.  Ferment 80 min at 85-90 F.  Flatten the dough and shape a tight boule.  Proof in basket, seam up, 50 minutes at room temperature.  There's no need to slash.  Spray with water before baking and 1 minute before taking out of the oven. Bake with steam 50 minutes at 440-450.  Let the bread cool thorougly, 2 hours at least.  The loaf should have shiny surface without tears and tight uniform crumb.  Using medium rye flour instead of whole rye and/or bread flour instead of high extraction flour also works well.


I used my white rye starter and fed it with Guisto's Organic (whole) rye flour. I used this rye flour and KA First Clear flour in the dough. I mixed in a KitchenAid Accolade. Rather than making one large boule, I divided the dough in half and made 2 boules of 525 gms each. They proofed in wicker brotformen. I baked them on a stone with steam from hot water into a hot cast iron skillet. The boules were baked for 25 minutes at 450F. I turned the oven down to 440F, because the boules were getting pretty dark pretty fast, and continued to bake for a total of 40 minutes.

The crust remained very firm, even after the loaves were fully cooled. The crumb is like that Suave showed - rather dense but not dry or "heavy" in the mouth. The taste is decidedly sour (surprisingly so). If I were doing a blind taste of this bread, I would not identify it as a rye. It tastes more like a whole wheat sourdough bread to me. There is a noticeable sweet taste, too. I assume this is from the sugar. I don't think I have ever baked a sourdough bread with added sugar before, although I have used malt and honey in sourdoughs, when the recipe called for them. I expect the bread to mellow overnight and taste significantly different tomorrow.

My thanks to Suave for sharing this recipe. If he (or others) would like to tell us more about the background of this bread, I'm sure it would be appreciated.

 David

dmsnyder's picture
dmsnyder

San Francisco Sourdough variation Boule

San Francisco Sourdough variation Boule

SF-SD-Variations-Boule Crumb

SF-SD-Variations-Boule Crumb

San Francisco Sourdough variation Batard

San Francisco Sourdough variation Batard

San Francisco Sourdough variation Batard Crumb

San Francisco Sourdough variation Batard Crumb

San Francisco Sourdough: Variations on a theme

The formula for San Francisco Sourdough Bread in Peter Reinhart's "Crust & Crumb" has been my favorite recipe for my favorite bread for some time. I have varied the formula, using different starters and various mixes of white wheat, whole wheat and rye.

All of the breads have been good. I can say that my favorite loaves have been made with bread flour with a small amount (10-12%) of rye flour.

I have not varied the techniques for mixing or proofing in Reinhart's instructions to date, and, with a single exception, I have always baked this bread as boules. Reinhart's instructions indicate that this bread can be formed as boules, batards or even baguettes.

This time, I decided to try some new variations in ingredients, procedures and loaf shape. The dough was mixed in a Bosch Universal Plus.

Starter Feeding

1 part mother starter

3 parts water

4 parts flour (70% AP flour, 20% whole wheat and 10% rye)

Intermediate firm starter

3 oz starter (formula above)

9 oz water

13 oz First Clear Flour

Dough

All of the intermediate firm starter

2 cups of water

23.50 oz King Arthur European Artisan Flour

3.5 oz Guisto's Organic Whole Rye

0.25 oz Diastatic Malt powder

0.75 oz salt

Procedure

Day 1 - Make the intermediate starter

Mix the Intermediate firm starter. Ferment tightly covered for 9 hours (overnight) at room temperature, then refrigerate for 10 hours.

Day 2 - Mix, Bulk Ferment, Divide and Scale, Shape and Retard

Take the starter out of the refrigerator 1 hour before use.

Mix the water, the diastatic malt and the flours until it forms a shaggy mass. Cover and autolyse (let the flours absorb the water and the gluten start to develop) for 20 minutes.

Add the firm starter cut into 10 pieces to the dough and mix at Speed 1, adding the salt while mixing. Continue to mix at Speed 2 until the gluten is well developed and a window pane can be formed. (7 minutes).

Empty the dough onto the bench and fold the dough into a ball. Place the dough in a lightly oiled bowl, at least twice its size. Roll the dough ball around to coat with oil, cover the bowl tightly, and allow the dough to ferment for at least 4 hours. (If rising too quickly, do a fold to de-gas the dough, but plan on leaving the dough alone for the last two hours, at least.)

Gently transfer the dough to the bench. Scale and divide the dough as wished, according to the type and size of the loaves you want to bake. (The total weight of the dough is around 4-1/2 pounds.)

Let the dough rest, covered with plastic wrap, for 10 minutes, then form loaves. These can be place in bannetons or on parchment or canvas "couches." In either case, cover the loaves air tight and refrigerate overnight.

Day 3 - Proof and Bake (two methods)

Take the loaves out of the refrigerator and allow to warm up and rise for 3-4 hours until expanded to 1-1/2 times their original volume.

Baking method 1

One hour before baking, pre-heat the oven with a baking stone and cast iron skillet in it to 475F.

Slash the loaves as desired, spritz with water and transfer the loaves to the baking stone.

Immediately pour 1 cup of boiling water into the skillet and close the oven door. If desired, spritz the oven walls with water 2-3 times spaced over the first 5 minutes of the bake. After 5 minutes, carefully remove the skillet from the oven, empty any remaining water and dry it. Put it somewhere to cool. After the last spritzing, turn the oven temperature down to 450F.

Baking method 2

Alternatively, set the oven to 450F.

Slash the loaves as desired, transfer them to the stone and bake the loaves covered with a bowl or a roaster for 15-20 minutes. Then remove the cover.

Continue baking until the loaves are nicely colored and their internal temperature is at least 205F. The loaves will be done in 30-40 minutes total time, depending on their size and shape. Then, turn off the oven but leave the loaves on the stone for another 5-10 minutes to dry the crust. Allow the loaves to fully cool (1-2 hours) before slicing.

Comments:

With this particular combination of flours and the procedure as described, the dough was quite sticky at the end of mixing. After a couple of foldings, it was extremely elastic, and I wondered if I had mixed it more than I should have. However, after bulk fermentation and dividing, the dough was quite relaxed and remarkably extensible. It was not at all sticky at this point. This has been characteristic of doughs made with KA European Artisan Flour, in my experience.

The batard pictured above was baked uncovered with steam from water poured into a hot skillet. The boule was baked under a stainless steel bowl without additional steam. Although the boule was baked about 45 minutes after the batard, the latter rose more quickly on parchment and acted as if over-proofed. The boule rose more slowly in a banneton. It did not seem over-proofed, and it had much better oven spring and bloom. The batard had a more open crumb. My hunch is that how I shaped the boule (too tight) was the major determinant of the differences in proofing time and crumb openness. (Other analyses would be welcome.)

Eating (Batard)

The crust is crunchy but not at all tough. The crumb is tender with a delicious complex pain de compagne-type flavor, except with more assertive sourness.

David

Pages

Subscribe to RSS - dmsnyder's blog