The Fresh Loaf

A Community of Amateur Bakers and Artisan Bread Enthusiasts.

dmsnyder's blog

dmsnyder's picture
dmsnyder


Last week, I baked Susan from San Diego's “Original Sourdough.” My description can be found at:

http://tfl.thefreshloaf.com/node/11321/susan-san-diego039s-quotoriginal-sourdoughquot

Susan also shared her formula for her “Ultimate Sourdough,” which has replaced the “Original Sourdough” as her personal favorite, I gather. The “Original Sourdough” was so good, it was hard to imagine a bread that would outdo it, and I was tempted to just make it again. But I thought the other deserved a try. So, this week, I baked Susan's “Ultimate Sourdough” - again, with some variations I will describe.

Susan's formula for her “Ultimate Sourdough” is described in her blog, here:

http://www.thefreshloaf.com/node/6927/well-i-finally-did-it

Susan's formula makes “one small boule.” I doubled the recipe. I wanted to make two boules, one to bake after overnight cold retardation, as I did with the “Original Sourdough.” I also added a bit more WW flour than Susan called for and used a different mixing and fermentation approach.


Ingredients


Active 65% hydration starter

24 gms

Water

350 gms

KAF White Whole Wheat Flour

75 gms

KAF Bread Flour

425 gms

Sea Salt

10 gms


Procedures

  1. I dissolved the starter in the water in a large bowl.

  2. Both flours were added to the water and mixed thoroughly.

  3. The bowl was covered tightly and the dough was allowed to rest (autolyse) for 60 minutes.

  4. The salt was then added and folded into the dough using a flexible dough scraper.

  5. After a 20 minutes rest, the dough was stretched and folded in the bowl for 20 strokes. This was repeated twice more at 20 minute intervals.

  6. The dough was then transferred to a lightly oiled 2 liter glass measuring “cup” with a tightly fitting plastic cover and allowed to ferment, undisturbed, until doubled. (10 hours, overnight).

  7. The next morning, the dough was very soft, puffy and full of bubbles. I divided it into two equal pieces, gently rounded them, and allowed them to rest for 10 minutes.

  8. The pieces were then formed into boules and placed in well-floured coiled reed brotforms, each of which was then placed in a food-grade plastic bag.

  9. At this point, one loaf was allowed to proof on the bench, and the other was placed in the refrigerator to retard until the next day.

  10. The first loaf was allowed to expand by about 75% (3 hours).

  11. The oven was preheated to 500F, with a baking stone in place for1 hour.

  12. The loaf was transferred to a peel dusted with semolina, transferred to the baking stone and covered with a stainless steel bowl preheated with hot tap water. The oven was turned down to 460F.

  13. After 15 minutes, the bowl was removed. The loaf was baked for another 10 minutes, then left in the turned-off oven with the door ajar for another 5 minutes to dry the crust.

The retarded loaf was baked the next day. It was allowed to proof in a warm (75F) place for 4 hours. It was baked covered for 12 minutes, then another 15 minutes uncovered. It rested in the turned off oven for 10 minutes.

Susan's Ultimate Sourdough (Not retarded)

Susan's Ultimate Sourdough (Not retarded) - Crumb

Susan's Ultimate Sourdough (Retarded)

Susan's Ultimate Sourdough (Retarded) -Crumb

The boule that was baked without retardation was very similar in taste to the one I had made using Susan's “Original Soudough” formula. It had a nice flavor and was mildly sour. The sourness increased the next day, as expected. The crust was relatively thin but crunchy the first day and chewy the second day.

The boule that was retarded had a lot less oven spring. I think it was proofed more fully than the other had been. It was a bit more sour than the un-retarded loaf, as expected, but less sour than the “Original Sourdough” retarded loaf was. Tasted 5 hours after baking, the whole wheat flavor was coming through. I expect this to mellow out by tomorrow.

Bottom line: Both of Susan's sourdoughs are wonderful. I can't say I prefer one over the other after making each once. I expect I'll be making both regularly.

Thanks again, Susan!

David


dmsnyder's picture
dmsnyder

In 1904, Sir William Osler, one of the greatest physicians of his time, was asked to address the graduating class of The Johns Hopkins School of Medicine on the topic, “What is the most important personal attribute for a physician to cultivate in himself?” Sir William's address was entitled “Aequanimitas,” which roughly translates into modern American English as “Chill, dude!” I have always tried to follow Sir William's wise advice.

This afternoon, I made a batch of baguettes, according to Anis Bouabsa's formula. I thought they were the most perfectly shaped and scored baguettes I've every made. As I was loading the three baguettes into my pre-heated and humidified oven, one fell off the back of the baking stone. As I tried to grab it, the other two baguettes fell off the peel onto the oven door. What a mess!

Uttering a few words which my wife has asked I not speak in the presence of our grandchildren, I scooped up the twisted heaps of formerly gorgeous baguette dough. Should I scrap the bake as a lost cause or attempt a salvage operation? What could I lose by trying?

Aequanimitas, aequanimitas, aequanimitas ... 

I was able to separate the three pitiful pieces from each other. I reshaped them quickly – one folded as one might fold a ciabatta, one coiled and one formed into a figure 8 knotted “roll.” I immediately loaded them onto the stone and baked for 10 minutes with steam at 460F and 8 more minutes dry.

Anis Bouabsa Not Baguettes

Anis Bouabsa Not Baguettes - Crumb

Delicious! 

I hope you all have a great week and that all your "disasters" are really "opportunities," when you look back at them.

David

dmsnyder's picture
dmsnyder


Susan from San Diego, of “Magic Bowl” fame, has posted two of her basic sourdough bread recipes. These have been on my lengthy “to bake list” for a long time. The photos of her breads are stunning, and many other TFL members have baked from her recipes and enthused about their results.

This weekend, I baked two boules of her “Original Sourdough” - to be distinguished from her “Ultimate Sourdough.” The latter can be found here:

http://www.thefreshloaf.com/node/6927/well-i-finally-did-it

I made some modifications in procedures which I will describe, but Susan's original “Original Sourdough” formula can be found here:

http://www.thefreshloaf.com/node/8884/susan039s-original-sourdough-3262007


David's Un-original Sourdough after Susan from San Diego's Original Sourdough

Note: This recipe involves 3 “builds” - a “starter,” a “sponge” and the “dough.”

Starter

Active starter 1Tablespoon

Water           15 gms

Bread flour    25 gms


Sponge

Water           240 gms

Bread flour    173 gms

Whole wheat flour 50 gms (I used KAF White Whole Wheat.)

Starter All of the above


Dough

Bread flour      284 gms

Water              60 gms

Olive oil           14 gms

Salt                7.5 gms


Procedures

(I did my mixing in a KitchenAid Accolade.)

Make the Starter by dissolving the active starter in the water in a small bowl, adding the flour and mixing until all the flour is well hydrated. Cover tightly and allow to ferment for about 8 hours. It should be puffy and slightly bubbly. Refrigerate for up to 3 days if you are not ready to use it immediately.

Make the Sponge by dissolving the Starter in the water in a medium-sized bowl. Mix the flours and add them to the dissolved starter. Mix thoroughly and then cover the bowl tightly. Allow the Sponge to ferment until it is bubbly and has expanded - about 8 hours.

Make the dough by dissolving the Sponge in the water and mix in the olive oil in the bowl or your mixer. Mix the flour and salt, add it to the wet ingredients and mix with a spoon or spatula or with the paddle at Speed 1 to a shaggy mass. Cover the bowl and let it rest for 20 minutes to an hour. (This will allow the flour to hydrate and the gluten to start developing.)

Switch to the dough hook and mix at Speed 2 until you have moderate gluten development. (This took me about 10 minutes.) The dough should clean the sides of the bowl but stick to the bottom with a diameter of about 6 inches.

Scrape the dough onto your lightly floured bench and do a couple of stretch and folds. Transfer the dough to a lightly oiled bowl and cover tightly. (I use a 8 cup glass measuring “cup” with a tight-fitting plastic cover.) Stretch and fold the dough 3 times at 30 minute intervals, then allow to rise in the bowl until double the original volume – about 4 hours in my coolish kitchen.

Divide the dough into 2 equal parts and pre-shape into rounds. Cover and allow to rest for 10-15 minutes. Then, shape the pieces into boules and place each in a floured banneton. Cover with plastic wrap, a towel or place the bannetons in food grade plastic bags.

At this point, you can either allow the loaves to proof until 1.5 times their original size or retard them for 8-12 hours in the refrigerator. (For this bake, I proofed and baked one boule immediately and retarded the other.) If you retard the loaves, allow an extra hour or two for proofing – about 4 hours from when you take them out of refrigeration until you bake them.

Forty-five minutes (or 45-60 minutes, if using a baking stone) before baking, pre-heat your oven to 480F with a sheet pan or baking stone in the oven. (Make sure your sheet pan is large enough to form a base for the cover you will be placing over the loaf. See below. I used a heavy-gauge black steel, non-stick sheet pan that is larger than the standard “half sheet” size.)

When the loaf is proofed, transfer it to a peel dusted with semolina or corn meal, load it onto your sheet pan or stone and immediately cover it with a stainless steel bowl that has been pre-heated with hot tap water. (Dump the water but do not dry the bowl just before loading the loaf in the oven.)

Bake for 15 minutes, then remove the bowl from the oven, close the door and lower the temperature to 450F. Bake for another 15-18 minutes until the loaf is nicely colored and its internal temperature is at least 205F. Turn off the oven and leave the door ajar with the loaf in it for another 5-10 minutes to dry the crust.

Cool the loaf on a rack completely before slicing.


The loaf that was baked without overnight cold retarding was much like a French pain au levain. Right after cooling, it was only very mildly sour and had a nice wheaty flavor. Thirty-six hours later, it had a more pronounced but still mild sourness. The flavors had melded and were improved, to my taste. As you can see, the crust was rather light-colored. There was almost no coloration at the point I removed the bowl. The boule had moderate oven spring but great bloom. This is typical of the results I get when I bake loaves covered in this manner. The crust was crisp, and the crumb was nice and open but chewy.
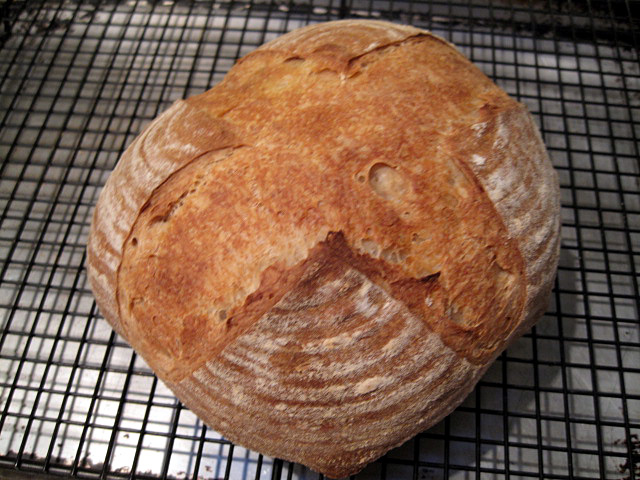
Susan from San Diego's SD boule

Susan from San Diego's Sourdough (Not cold retarded)

Susan from San Diego's Sourdough (Not cold retarded) Crumb

I baked the cold retarded loaf the next day. This time, I baked the loaf covered for the first 15 minutes, but on a baking stone rather than a sheet pan. Also, I preheated the oven to 500F then turned it down after loading the loaf. I baked at 450F for 30 minutes total, then left the loaf in the turned off oven with the door ajar for another 5 minutes.

As you can see, the second loaf had significantly greater oven spring. I think this was due to the hotter initial temperature and, maybe, the stone. Also, the crust is significantly darker, which I prefer in this type of bread.
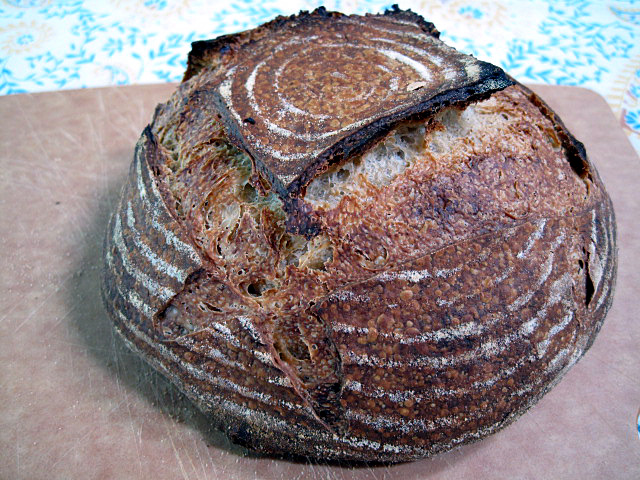
Susan from San Diego's "Original Sourdough" baked after cold retardation.
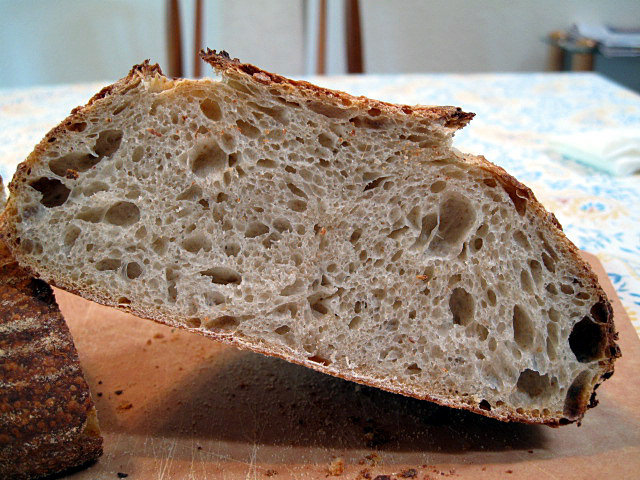
Susan from San Diego's "Original Sourdough" baked after cold retardation - Crumb

This loaf had a crunchier crust and significantly more sour flavor than the loaf that had not been cold retarded. The crumb was chewy but maybe a bit less than the loaf baked the night before.  To my taste, this loaf was just about perfect - very close to my personal ideal sourdough bread. I bet it's going to be even better the next day.

Thanks Susan!

David


dmsnyder's picture
dmsnyder

It was 1 year ago that I last made cheese pockets. I've been good, even if the scale disagrees. So, prompted by Norm's posting his Crumb Buns, I made my annual indulgence. 

These are made with a sweet, coffee cake dough and filled with a mixture that is mostly hoop cheese, which is a non-fat cheese somewhat similar to ricotta. (Recipe follows.) For some background on these pastries, please surf to my previous blog entry:

http://www.thefreshloaf.com/node/6215/cheese-pockets

I won't repeat all the history, but I will mention of few differences in this bake which resulted from my prior experience and helpful tips from Norm (nbicomputers). But, first, the recipe:

Cheese Pockets

Coffee Cake Dough (Formula thanks to Norm)
Sugar                                     4 oz (1/2 cup)
Sea Salt                                  1/4 oz (1 1/2 tsp, or table salt 1 tsp)
Milk Powder (skim)                   1 oz (3 T)
Butter or Shortening                  4 oz (8 T or 1/2 cup)
Egg yolk                                  1 oz (1 large egg's yolk)
Large eggs                              3 oz (2 eggs)
Yeast (fresh)                            1 1/4 oz (or 3 3/4 tsp instant yeast = 0.4 oz)
Water                                      8 oz (1 cup)
Vanilla                                     1/4 oz (2/3 tsp)
Cardamom                               1/16 oz (1/2 tsp)
Cake Flour                               4 oz (7/8 cup)
Bread Flour                              13 oz (2 3/4 cups)

Other flavors can be added such as lemon or orange rind grated

Note: Using other size eggs or other flours will result in substantial changes in the dough consistency require adjustments in flour or water amounts.

Cheese Filling 
Hoop cheese or Farmer's cheese 12 oz
Sour Cream                              1/4 cup
Sugar                                       2 T
Flour                                        2 T
Egg                                          1 large
Zest of 1 lemon, finely grated

Mix all ingredients well. Refrigerate until needed, up to 24 hours.

Egg Wash
Beat 1 egg with 1 T water

Streusel Topping 
Sugar (all white, or part brown) 2 oz (4 T)
Butter                                    2 oz (4 T)
All purpose flour                     4 oz
Cinnamon                              1/2 tsp. 

1. Cream the sugar and butter. 
2. Add the flour and mix with your fingers, rubbing the ingredients to a coarse crumb. (This can also be done entirely in a food processor.)

Mixing and Fermenting the Dough
1. Mix the sugar, butter or shortening, salt and milk powder to a paste.
2. Add the eggsbeaten with the vanilla and cardamom and stir.
3. If using powdered yeast, mix it with part of the water. If using cake yeast, crumble it in with the flour.
4. Add the water (the part without the yeast, if using powdered yeast, otherwise all of it),  cardamom and vanilla.
5. Add the flour. (If using powdered yeast, add the yeast-water now. If using cake yeast, crumble it on top of the flour now.)
6. Mix well into a smooth, soft dough. (20+ minutes in a KitchenAid at Speed 3 using the paddle.) The dough should form a ball on the paddle and clean the sides of the bowl.
7. Cover the dough and let it rise to double size. (2 1/2-3 hours at 60F.)
8. Punch down the dough, and allow it to rest 10-20 minutes.

Making up the Pastries
1. Divide the dough into 2.25 oz pieces and roll each into a ball. (My dough made 18 pieces weighing 2.35 oz each.)
2. Place dough pieces on a sheet pan or your bench. (I used a lightly floured marble slab.)
3. Stretch or roll out each piece into a square, 4 inches on a side. 
4. Take each dough piece and press the middle with a round,  hard object such as the bottom of a small measuring cup to form a depression in the center.
5. Place about 1 T of cheese filling in the center of each piece.
6. Take each corner of the square pieces and fold 3/4 of the way to the center, pinching the adjacent edges of the folded dough together to seal the seams. (See Note)
7. Cover and allow to rise to 3/4 double. (30-40 minutes at 70F.) Do not underproof! 
8.  Brush the top dough of each pastry with egg wash. Do not get egg wash on the exposed cheese filling.
9. Sprinkle streusel over each pastry.

Baking
1. Preheat oven to 350F.
2. Bake pasties on parchment lined  sheet pan until golden brown. (25-35 minutes)
3. When pastries are cooled a little, sift confectioner's sugar over each, if desired.
           

Note: The pastries can be refrigerated overnight or frozen at this point. If refrigerated, allow them to rise at room temperature to 3/4 double, and proceed as above. If frozen, thaw at room temperature, allow to rise to 3/4 double, and proceed as above.

One thing I learned last time was that under-proofing these pastries results in exuberant oven spring, with the pastries bursting open. So, I really proofed these puppies. Maybe a little bit more than was necessary. But maybe not.

Another thing I changed was to pick up on a suggestion for speeding up proofing by putting the made-up pastries in a humidified, warm oven. I found that my KitchenAid conventional/convection oven has a proofing setting! It is actually a "dehydrating" setting, but I set it for 100F and put a pan of just-boiled water in to create a humid environment. This probably cut my proofing time in half, compared to my 70F kitchen.

As you can see, the pastries had just a bit of oven spring, which is good in this case, and they did not burst, which is also good.

Previously, I had topped the pastries with streusel. This time, I just egg washed them and sprinkled on a few sliced almonds. I skipped the painting with syrup to make them shiny. So, I could tell my wife these are the "low-cal version."

I had only one for dessert. Pretty good stuff. It will be even better with coffee for breakfast.

David


dmsnyder's picture
dmsnyder

The Roasted Potato Bread from Jeffrey Hamelman's "Bread" is another bread that has been on my "to bake list" for a long, long time. It is a yeasted, lean bread made with pâte fermentée. It uses a mix of bread and whole wheat flour, and, of course, roasted potatoes.

I made these in the recommended, traditional "pain fendu" (split bread) shape. It looked cool in the pictures and gave me an excuse to buy yet another wooden rolling pin, because my others are too thick, and the dowling I have is too thin. I'm sure you all understand.

This is a very good bread, considering it's not a sourdough. The crumb is cool and tender, yet a little chewy. It has a lovely, straight ahead wheaty flavor. There is no potato taste per se. It would make a wonderful sandwich bread or toast. Hmmm ... or bread to soak up sauce.

David

dmsnyder's picture
dmsnyder

Last week, I made baguettes using Pat's (proth5) recipe. They were good. I was amazed at the open crumb I got from a 65% hydration dough. See my blog entry:

http://tfl.thefreshloaf.com/node/10852/baguette-crumb-65-hydration-dough

Today, I made them again, but included an overnight cold retardation during bulk fermentation. The dough was mixed last night and refrigerated. It expanded little, if at all, overnight. I decided to let it double before dividing and shaping. After 6 hours at room temperature, it had only expanded by 50%, although I could see lots of little bubbles through the glass of the 2 quart measuring cup in which I was fermenting the dough. So, I decided to go ahead and divide it. I preshaped and let the pieces rest for 15 minutes, then shaped the baguettes and proofed them for about 70 minutes. Scored, loaded and baked at 460F.

Being a sourdough kind of guy, I found the increased sourness more to my liking than the batch I had not cold retarded. The crumb was a bit less open, no doubt due to the less complete dough expansion during bulk fermentation. I will try this again but do the cold retardation of the formed loaves next time.

David

dmsnyder's picture
dmsnyder

My usual sourdough starter is semi-firm. I make it at a 1:3:4 ratio of starter to water to flour. Many of the sourdough bakers on TFL favor a 1:2:2 ratio, but fewer seem to use a true "liquid levain" which is more like 125% hydration. I was curious to try a pain au levain using a liquid starter and found the Pain au Campagne recipe in Leader's "Local Breads."

This recipe calls for a 50% hydration dough to which you add 62% (baker's percentage) liquid levain, ending up with a moderately tacky dough. The levain is added after the flour and water are mixed and allowed a 20 minute autolyse. The autolyse mixture is very, very stiff, and it takes a lot of mixing to get the very liquid levain incorporated into the dough. 

The resulting bread has a very nice flavor, but not significantly different from the pains de campagnes I make with my usual starter.

Of greater interest was the final shape of the loaves. They are formed as boules, and I proofed them in round, linen-lined wicker bannetons. I scored them with 3 parellel cuts, as Leader recommends. The loaves took an oblong form even before I could load them in the oven. This is a graphic illustration of the effect of this pattern of scoring on loaf shape, as described by Suas in "Advanced Bread and Pastry" and referenced in my Scoring Tutorial. (See the TFL Handbook.)

http://tfl.thefreshloaf.com/handbook/scoring

David

dmsnyder's picture
dmsnyder

SusanFNP of www.wildyeastblog.com fame posted a photo of her "Semolina bread with fennel, currants and pine nuts" on TFL in November, 2007. She provided a link to the recipe on her Wild Yeast blog. I immediately added this bread to my "to bake list." Well, my wife could tell you, I seldom throw out anything, and that includes my to do lists. Sometimes it takes me a little while to get around to a particular item, and today I got around to baking this bread.

Mine didn't turn out as pretty as Susan's, but this is a delicious bread. The combination of flavors and textures is wonderful - The contrasting sweet currents and savory fennel seeds and the soft crumb and chewy pine nuts and currents. Wonderful bread. 

This is snacking bread. I ate a couple slices while I was making dinner and could have finished the loaf right then and there. Yummy!

The recipe can be found at:

http://www.wildyeastblog.com/2007/11/06/semolina-fennel-currants-pine-nuts/

David

dmsnyder's picture
dmsnyder

Today, I baked SusanFNP's Currant, Fennel and Pine nut levain, Pain de Campagne from Daniel Leader's "Local Breads" and another batch of proth5's baguettes (with cold retardation).

David

dmsnyder's picture
dmsnyder

Some time ago, Pat (proth5) posted her formula for baguettes. This was in the context of our "great baguette quest" of some months back. We were playing with higher hydration doughs and cold fermentation à la Gosselin and Bouabsa.

Pat's formula is levain-based and employs a 65% hydration dough. She has insisted repeatedly that, while higher hydration is one route to a more open, holey crumb, fermentation and technique in shaping the baguettes are at least as important and that good technique can achieve the desired open crumb even with a dryer dough.

Okay. It was past time I tested my own technique against Pat's claim.

Pat's formula is as follows:

This is for two loaves at a finished weight of 10.5 oz each

.75 oz starter

1.12 oz flour

1.12 oz water 

Mix and let ripen (8-10 hours) 

Bread

All of the levain build

10.95 oz all purpose flour

.25 oz salt

6.6 oz water 

Dough temperature 76F 

Mix to shaggy mass (Yes! Put the preferment in the autolyse!) – let rest 30 mins

Fold with plastic scraper  (30 strokes) – repeat 3 more times at 30 min intervals 

Bulk ferment at 76F for 1.5 hours – fold

Bulk ferment at 76F 2 hours

Preshape lightly but firmly, rest 15 mins

Shape.  Proof 1 hour or so

Slash

Bake with steam at 500F for about 20 mins


I followed this except I baked at 480F. I used Whole Foods 365 Organic AP flour. The result was an excellent, classic baguette with a crunchy crust and cool, creamy crumb. It was slightly sweet with imperceptible sourness when eaten just ... well, almost ... cooled.

Here's  the crumb:

I'll let you draw your own conclusions.

Thanks, Pat!

David

Pages

Subscribe to RSS - dmsnyder's blog