This is my entry into the Freshloaf.com Community Bake Flatbread challenge. About a year ago another baker on TFL, Tom Passin (Tpassin) posted a yeasted version of this unique style of flatbread here. He goes over some of the history of the bread and has some cool links with videos. There are many ways to make this one with different styles.
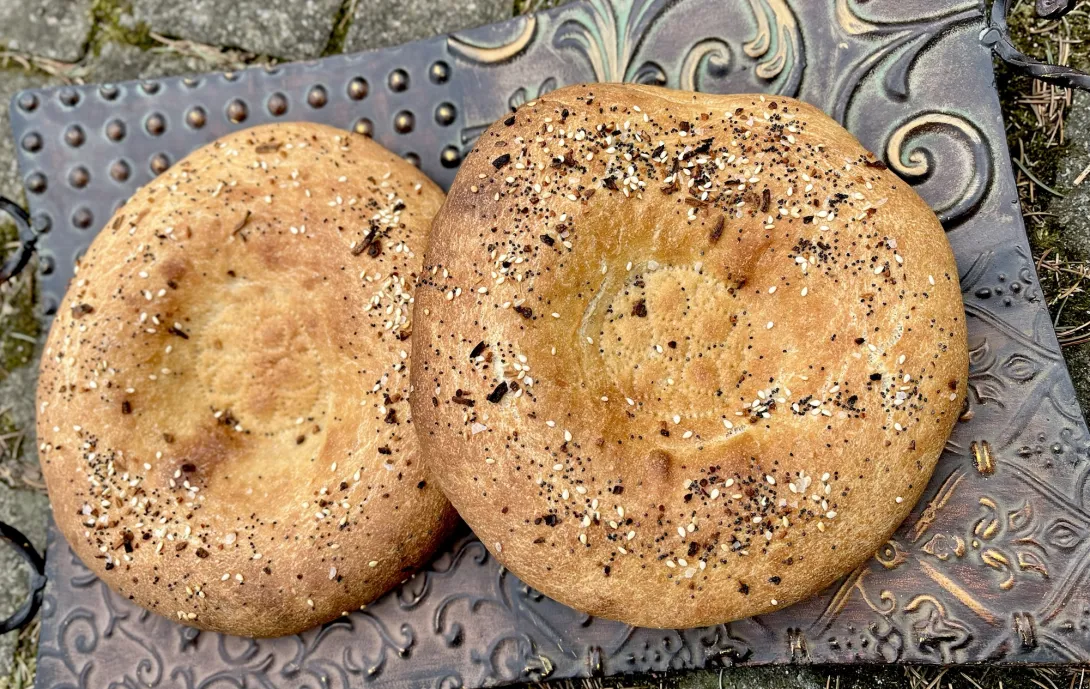
This version uses a unique bread stamp which leaves a beautiful impression in the center of the dough. You need to flatten out the middle of the dough using a ladle or in my case I used my meat tenderizer (heavy round stainless steel version with handle). I then used the stamp to make the decoration. I bought this stamp with the intention of using it over a year ago but never got around to it. Finally, I had an excuse to try it :).

I almost never use commercial yeast, so I had to of course convert this to sourdough. I used a combination of several recipes I found and used fresh milled Purple Straw whole wheat from Barton Springs Mill. I used my Mockmill 200 and milled the wheat twice and sifted with a #30 and #40 drum sieve.
Most of the hydration in this formula comes from the Greek Yogurt and water content of the starter. I used a 65% hydration starter but you can use a 100% starter and adjust the water and flour content accordingly.
The dough was mixed using my trusty Ankrusrum and open-baked with steam. I let the dough bulk ferment at 80 F until it achieved a 30% rise and then refrigerated it overnight.
I topped the dough off with some everything bagel seasoning but you can use poppy seeds, sesame seed, onions or leave it plain.
For my first time baking this style of dough, I think it came out pretty good. The stamp pattern is noticeable and bread is perfect dipped in some olive oil or if you have a stew or curry it would be amazing.

Formula

Levain Directions
Mix all the levain ingredients together for about 1 minute and cover with plastic wrap.
Let it sit at room temperature for around 6-7 hours or until the starter has almost doubled. I used my proofer set at 76 degrees so it took around 5 hours for me. Either use in the main dough immediately or refrigerate for up to 1 day before using.
Main Dough Procedure
Note: I use an Ankarsrum Mixer so my order of mixing is slightly different than if using a Kitchenaid or other mixer. Add all your liquid to your mixing bowl except 25 grams. Also, add the yogurt and starter. Next, add all your flour to the bowl and mix on low for a minute until it forms a shaggy mass. Cover the mixing bowl and let it rest for 20 – 30 minutes. Next add the salt, olive oil, and half the remaining water and mix on medium-low (about speed 3) for a few minutes until the water is absorbed and turn the speed up a couple of notches for a few minutes until the dough starts to come together. I mixed for another 12 minutes and ended up with a nice fully developed dough.
Remove the dough from your bowl and place it in a lightly oiled bowl and do several stretch and folds. Make sure the dough is as flat as possible in your bowl/container and measure the dough in millimeters and take the temperature of the dough as well. Based on the chart from www.thesourdoughjourney.com, determine what % rise you need and make a note. If you have a proofer decide what temperature you want to set it at and what rise you are aiming for. If the dough is fully developed you don’t need to do any stretch and folds, but if it’s not, do several sets 15-20 minutes apart. My dough was pretty cold at 65F, so I set the proofer for 80F and let it rise 30%.
Refrigerate the dough and the next day let it sit out at room temperature for an hour or so. When you are ready to bake, an hour beforehand pre-heat your oven to 540 F and prepare for steam. I have a heavy-duty baking pan on the bottom rack of my oven with 1 baking stone above the pan and one on the top shelf. I pour 1 cup of boiling water into the pan right after I place the dough in the oven. I then lower the temperature of the oven to 455 F.
Right before you are ready to bake spray your prep surface with a little water. Divide the dough in half and shape it into a ball. Flatten each ball out with your hand (do not use a roller!!). Place both on a piece of parchment paper and use either a spoon, ladle or round meat tenderizer and flatten a circle in the middle of the dough. Dip your stamp in a little water to prevent sticking and press down in one smooth motion and remove the stamp.
If desired mist some water on the edges and sprinkle on some seeds or topping of choice.
Bake them until they are nice and golden brown and let cool on a wire baking rack if you can resist before eating.

- Isand66's Blog
- Log in or register to post comments
What a good-looking rendition! You seem to have gotten the stamp to release more cleanly than I did. These breads are a fun chance to bake something a little different.
TomP
It only took me a year 😂🫣. Thank you for the inspiration. I read somewhere to dip it in water which helped it release easier. I wish I had a curry or stew to eat it with. My wife is making a nice pot roast which this should work with.
Beat regards,
Ian
The flatbread looks amazing. I will definitely look into this for a Future bake. I can see why Tom's blog entry caught your attention!
Glad you like it. Hope you give it a try soon.
Best regards,
Ian
What a great combination! I love the Purple Straw and find ways to sneak it in. This will be perfect. Have to think of lots of dipping opportunities. I make a lot of hummus so that’s an obvious first. c
I love humus and I’m going to have some for breakfast with the caramelized onion humus I bought the other day.
Hope you try this when you return from your trip.
Best regards,
Ian
Just 8 PM !! Anyway I make my own hummus but first I make the tahini. Ever since I found this amazing guys " how to" I have never looked back . It is a game changer and keeps FOREVER in your fridge. The flavor is other worldly. Will link if I can find it .
https://www.graciousvegan.com/recipe-recommendations/2020/6/13/make-your-own-tahini
the KEY is donot let them get pasr blond color. Then DO NOT add oil ...never ever. It takes 10 minutes with the food processor approx. you can't mess up , Keep going and it comes together and is amazing. You will never buy in a store again. Make sure and use hulled raw sesame seeds.
Impressed, I thought up until now that I couldn't make tahini at home, Caroline.
Here I was so happy that I could make my own hummus, and now I read you can do the tahini too! Always thought you needed a stone mill to process the sesame seeds and that was capable of squeezing the oil out.
Also, what does a hulled sesame seed look like? Not sure if a hulled sesame seed is the same as the seeds I normally put on top of my breads or not, I assume it is?
-Jon
I like it better than the ones that aren't hulled. It's easier to tell when they are browned as well as the fact that the ones with hulls never have the same flavor after roasting as the hulled.
The key is the food processor and letting it go long enough. You can stop it and scrape down . It really does take about 9-10 minutes. You think it's a mistake and then suddenly it changes and voila it's the most amazing tahini. It will keep in the fridge for week and weeks. Never spoils or molds or loses it's great flavor. So I make a LOT when I make it and use it in everything.
I have a very very old Cusinart DLC7 Pro . It's been a work horse since the 70's.
Thanks for the link. What model food processor do you have? I have a Cuisinart with a fairly large bowl. I has a smaller acessory bowl but the challenge is small quanties sit below the bottom blade and are not well-processed.
What is your batch size (how many grams or ounces of seeds) when making tahini?
It's from the 70's. It's been a work horse for me. I have a large Teflon skillet. I heat it with the white sesame seeds ( hulled) very slowly it only takes til they JUST become fragrant. It is very easy to spoil them . No oil etc in the skillet and shake them a bit. They barely color. The oven gets too hot and is so much harder to use for this purpose so that's why I use the stove top.
I use about 1 cup of seeds in the skillet at a time. I make 3-4 c of seeds into tahini at once in the Cuisinart. It works great and if you think it's overheating just stop and let it cool a minute. Big batches keep perfectly for weeks and weeks covered in the fridge. No problem ever and never loses it's flavor.
Back to brass tacks, approximately what diameter are the Uzbek stretched out too? Thanks. Look for the blog entry tomorrow. ( Disregard the tape.)
The ones I've made, it's more what diameter I get when I form the rim, flatten the body, etc. I think the flattened center will be about 1/4 inch/0.3cm or somewhere in that vicinity. I'm basing that guess partly on the videos I've seen and partly the rounds I've made.
One thing that fascinates me in the videos is how the bakers casually toss fully formed loaves across the room like frisbees.
TomP
I divided the dough in half and shaped them into a ball before flattening them into discs. I then stretched them similar to bialys and further flattened the middle with my heavy stainless steel meat pounder. I’m curious to see how yours come out. The stamp is cool but certainly not going to effect the flavor.
To make sure. There is no proofing after the shaping. Is that correct? I might bake them off tonight. Let's see how I feel. I want to wait until the electric rates go off peak.
No need for further proofing if your bulk was done correctly.
I followed the 🔗 to your bake that I had missed before. Very helpful videos. A hybrid pizza, Bailey stretch. Smile 😁