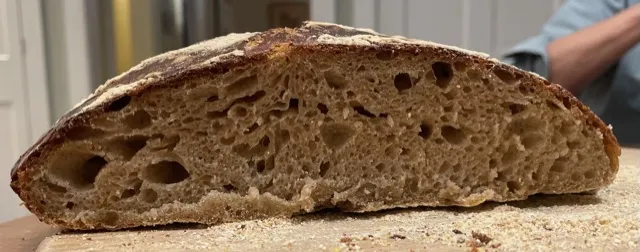
Today's bake is loosely based on Ken Forkish's "Overnight Country Brown." I increased the levain and did the "overnight" in the fridge after dividing and shaping rather than in bulk at room temperature. Well, the hydration is higher too - 85.5 versus 78%. The result is a moderately sour, crusty loaf with a fairly open, deliciously moist and tender crumb. The flavor is more straight ahead wheaty than my favorite multigrain sourdough, but this is also a spectacularly delicious bread. I had some almost cooled with a light smear of butter, along with a bowl of split pea soup for lunch.
Here is the formula and method and some photos:
Sourdough Bread with 31% Home-Milled Whole Wheat Flour
David M. Snyder
January, 2022
Total Dough | ||
Ingredient | Wt (g) | Bakers' % |
Bread Flour | 675 | 67.5 |
Whole Wheat flour | 314 | 31.4 |
Water | 855 | 85.5 |
Salt | 21 | 2.1 |
Total | 1865 | 186.5 |
Note: The whole grain wheat,is milled in a Mockmill 100 mill set at its finest setting. The flour is milled immediately before mixing.
Levain |
|
|
Ingredient | Wt (g) | Bakers' % |
Bread flour (hi protein) | 144 | 75 |
Whole Wheat flour | 36 | 25 |
Water | 144 | 75 |
Active starter | 36 | 25 |
Total | 360 | 200 |
Dissolve the starter in the water. Add the flours and mix thoroughly.
Transfer to a clean container, cover and ferment until ripe. If you don't use it immediately, it can be kept in the refrigerator for up to 3 days.
Final Dough |
|
Ingredient | Wt (g) |
Bread flour (AP) | 524 |
Whole Wheat flour | 276 |
Water (85-95ºF) | 684 |
Salt | 21 |
Active levain | 360 |
Total | 1865 |
Procedures
Mix the flours with the water to a shaggy mass.
Cover and let sit at room temperature for 20-60 minutes. (Autolyse)
Sprinkle the salt over the dough surface and add the levain in 4 to 6 portions.
Mix thoroughly. (I start by folding in the salt and levain with a silicon spatula. Then, I use the method Forkish specifies – squeezing the dough between my fingers alternating with stretch and folds in the bowl. I wear a food service grade glove and dip my working hand frequently in water.)
Transfer the dough to a lightly oiled, clean bowl large enough to accommodate doubling in volume. Cover well.
Ferment at 80ºF for 3 – 3.5 hours with stretch and folds in the bowl at 30 and 60 minutes, then a stretch and fold on the board at 1:45-2:00 hours. The dough should have nearly doubled in volume and be quite puffy.
Transfer the dough to a well-floured board.
Divide the dough as desired and pre-shape in rounds. Cover with a cloth and let rest for 20-30 minutes.
Shape as boules or bâtards and place in floured bannetons. Place these in food-grade plastic bags sealed with ties and let proof for 30-60 minutes at room temperature. Refrigerate 8 hours or up to 36 hours at 40ºF.
The next day, pre-heat oven. Let the loaves sit at room temperature while the oven pre-heats. You can bake on a baking stone with steam for the first part of the bake, or in Dutch ovens, as you prefer. The oven temperature and length of the bake will depend on which of these methods you choose and on the weight and shape of your loaves, as well as on how dark you prefer your crust. When done, the loaves should sound hollow when thumped on their bottoms. The internal temperature should be at least 205ºF.
Let the loves cool completely on a rack for 1-2 hours before slicing.
I baked in Cast Iron Dutch ovens at 475ºF for 30 minutes covered, then 20 minutes un-covered at 460ºF.


Happy baking!
David
- dmsnyder's Blog
- Log in or register to post comments
Wow... that crumb looks deliciously "creamy" if that makes any sense.
I played with fresh-milled whole grain flour awhile back and I think I know the "wheaty" flavour you refer to. I quite enjoyed it as it tasted really light and fresh.
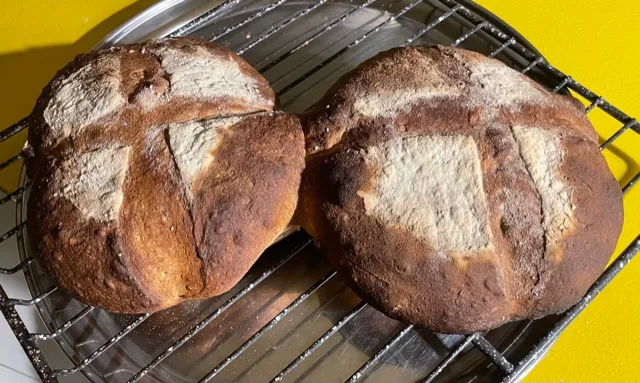
Cool use of a stencil in the "frame" of the slashes :)
"Creamy" is actually a good description of the mouth feel of this crumb.
Whole wheat changes flavor so much, depending on fermentation. It takes a full fermentation to bring out the full goodness of the grain.
David
Lovely bake David, it looks and sounds delicious. I agree the stencil art is a nice touch as well.
Benny
David
Lovely crumb there, especially with the higher percentage of WW...perfect for some winter meals. The stencil has as much character as the loaf!
David, your posts always display great creativity and results. I have some questions. Do you think that the increase in levain changed the flavor from the Overnight Country Brown (OCB)? Didi you use bread flour as opposed to the all-purpose in OCB because of the increased hydration? Did the final stretch-and-fold on the board accomplish something that doing it in the bowl would not?
That lacy crumb is alluring. The scoring is neat too. Lastly, I assume that you hit the "1" key twice to get November 2022 (instead of January) and that the temperature should be above 205F (rather than 105F). This looks like a neat recipe to try.
Happy baking (and stay safe).
Ted
The increase in levain was because I didn't want to do an over night bulk fermentation at room temperature. I have always had that result in over-fermentation. So, there were enough changes in the procedure to make it hard to know how the increase in levain, specifically, impacted the flavor. My hunch is the combination of changes resulted in more acid production.
I have been using a high-protein flour (12.5% protein) for my levains to avert proteolysis. I often refrigerate the levain a day or two before using it. I use a 12.7% protein white flour for the final dough. I almost always use either King Arthur AP or Central Milling "ABC" flour. I am undecided about the high hydration and the cold retardation. I think I may play with the procedure a bit. That said, there is nothing wrong with the eating quality of this version.
On a more specific note: The dough seemed really well developed when I shaped, but it stuck to the floured bannetons more than usual when I transferred the loaves to the DO's. Obviously, this did not result in excessive de-gassing, which was my worry. I think this is may have been a case where DO baking saved the day.
This bake, I actually skipped the S&F on the board. I had to go out on an errand, and the fermentation moved faster than expected. Anyway, I think that is just a bit more of a workout for the dough than the S&F in the bowl.
Thanks for pointing out the typos! I have corrected them.
Happy baking!
David
I always know I have to try a formula you post - and this one was no exception.
Image

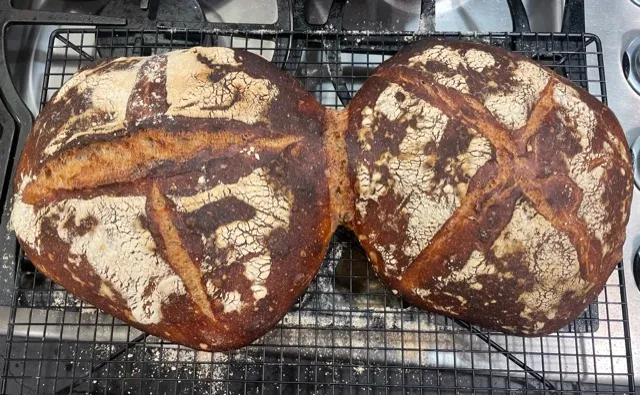
I had no fresh wheat & used King Arthur instead. I wouldn't mind getting more vertical rise (I prob need to do a few more folds to build structure ... or cut the hydration a tad), but the taste is revelatory.
thanks for the inspiration.
Rob
Thanks for sharing!
Happy baking!
David
... doing more kneading and folds and taking more care to develop tension when I shaped the boules. This time I only cold proofed for 8 hours. Still they creeped laterally and didn't spring in the oven like I wanted them to. The flavor's great. But I wonder if you have any suggestions how to get my loaves spreading up instead of sideways. Thanks. Rob
Image

Image

Just looking at your photos, the only thing I can suggest with confidence to increase vertical spring is to score differently, but let's consider all the factors that contribute to oven spring and loaf height:
1. Good gluten development through time, stretch and folds.
2. Adequate fermentation but not over-fermentation.
3. Shaping to construct a good gluten sheath around the loaf.
5. Proofing with good lateral support of the loaf, in a banneton or a couche with supporting folds. Note that a smaller banneton may help with loaf height.
6. Avoid over proofing.
7. Preheat the oven well and use a baking stone. I pre-heat for an hour usually, unless I am using Dutch ovens.
8. Score loaves to enhance vertical expansion. (Your cross-shaped score actually encourages spread.) Three parallel slashes across the loaf would result in less spread. Or a slash half way around the circumference of the loaf would be even better.
9. Steam your oven well for the first third of the bake, unless baking in Dutch ovens.
I hope you appreciate that your problem could stem from any one or any combination of these factors. Everything matters in bread baking. Note that baking in a Dutch oven solves a number of these problems.
I hope this helps.
David
Big thanks, David. This does help. Part of what I love about bread-baking is that it's got so many interlocking possibilities.
Lots to consider as I move forward. Yea!
Rob
So I baked them again.This time I cut the hydration by 3 percent, did more stretch & folds and took more care with shaping, used better bowls for proofing & rice flour to prevent sticking. I cold proofed them for 18 hours, and baked them straight from the fridge, slashed 180 degrees along the circumference.
Somewhat taller. I'm learning.
Thanks again for sharing your great formulas and your knowledge.
Rob