This is a formula originally posted on usenet in the great alt.bread.recipes group by Jason Molina all credit to him and the 'King of Gloop', I'm reposting it here for those that missed it there. I've made this quite a few times and it's always a huge hit. Giant bubbles and a golden crust. Best part is you can do the whole thing in about 4-5 hours. It does not use the traditional stretch/fold method for a ciabatta because it's so damn wet, the only stretch is the final shaping.
THIS WILL NOT HURT YOUR PRECIOUS KITCHEN AIDS
Ciabatta BreadVariaton 1
500g bread flour
475g (~2 cups) water
2 tsp. yeast
15g salt
Varation 2 (Semolina)
350g bread flour
150g semolina flour
475-485g (~2cups) water
2tsp. yeast
15g salt
- In Kitchen Aid style mixer: Mix all ingredients roughly till combined with paddle, let it rest for 10 minutes.
- With the paddle (I prefer the hook to prevent the dough from crawling into the guts of the mixer), beat the living hell out of the batter, it will start out like pancake batter but in anywhere from 10 to 30 minutes it will set up and work like a very sticky dough. if it starts climbing too soon, then switch to the hook. You'll know it's done when it separates from the side of the bowl and starts to climb up your hook/paddle and just coming off the bottom of the bowl. I mean this literally about the climbing, i once didn't pay attention and it climbed up my paddle into the greasy inner workings of the mixer. It was not pretty! Anyway, it will definately pass the windowpane test.
- Place into a well oiled container and let it triple! it must triple! For me this takes about 2.5 hours
- Empty on to a floured counter (scrape if you must, however you gotta get the gloop out), cut into 3 or 4 peices. Spray with oil and dust with lots o' flour. Let them proof for about 45 minutes, which gives you enough time to crank that oven up to 500F.
- After 45 minutes or so the loaves should be puffy and wobbly, now it's iron fist, velvet glove time. Pick up and stretch into your final ciabatta shape (~10" oblong rectangle) and flip them upside down (this redistributes the bubbles, so you get even bubbles throughout), and onto parchment or a heavily floured peel. Try to do it in one motion and be gentle, it might look like you've ruined them completely, but the oven spring is immense on these things.
- Bake at 500F until they are 205F in the cnter (about 15-20 minutes), rotating 180 degrees half way through. Some people like to turn the oven down to 450F after 10 minutes, but whatever floats your boat. I usually bake in 2 batches.
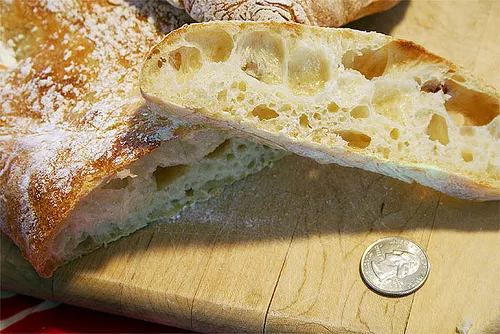
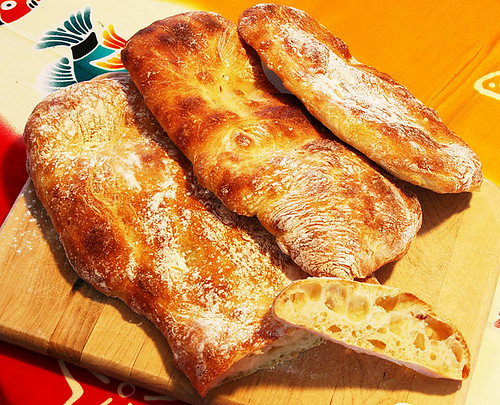
Here's my crumb:
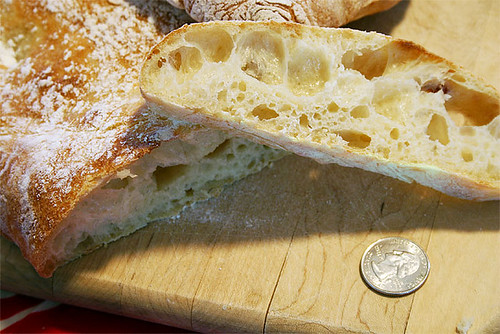
And my loaves:
Original usenet thread with extensive discussion and Q&A - http://groups.google.com/group/alt.bread.recipes/browse_thread/thread/ad0e477790ef4f03/a644f520f4b3cd48?rnum=2#
VMG... I too learned to bake Ciabatta bread from this recipe. I however found it to be to salty and @ 95% hydration the crumb was too wet. So... I converted it to a sourdough recipe. I reduced the salt content to 2% of bread flour and reduced the water content from 95% to 80% and I added 5% fat/butter.
350 grams of bread flour... 500 grams of flour when you add the flour in the starter.
300 grams starter... 100% hydration.
250 grams water... 80% hydration, when you add the water in the starter.
10 grams salt... 2% of flour.
25 grams butter... 5% of flour.
Ciabatta usually has some fat content in the recipe. Jason left that out of this recipe. If you add 3% to 5% of fat, you will get better color to your crust, a better taste and a sheen to your crumb.
Stumbled upon this thread and decided to give it a try. Made a ciabatta with poolish a couple weeks ago and was amazed at the holes, taste and texture. Felt a little guilty eating white bread so decided to make this with 100% fresh milled whole wheat and see what would happen. I thought the flour from my kitchenaid mill attachment would probably be too course so didn't expect much to be honest.
I knew the whole wheat would need more water so upped the hydration to 100%- kind of scary! I used 50% red winter and 50% white winter berries. Followed the rest of the recipe exactly, including the kitchenaid kneading. It took 17 minutes for the dough to go from batter to ball on speed 5.
It was pretty tricky to handle of course being so wet, but manageable with some patience and planning. I was thrilled with the result. Texture and holes were best I have achieved even with bread flour. Nice stretchy chew and holes were shiny. Best tasting 100% whole wheat I have made to date- thanks for posting this!!!!
Stu
Sorry if I missed it but are these baked on parchment on a sheet pan or transferred to a stone from a peel?
You turn your back for 5 minutes and look what happens...
It is truly a "bread doughnut" or as my wife calls it, a "bonut"
I haven't made this bread in over a year, and got a craving for it. Looked around for my starter and hmm, couldn't find it. Luckily I had frozen some dried out starter so broke it out. Took 10g, crumbled it, added 10g water and BF. Let it sit for 24 hours, no activity, so another 20g w/BF, and another, finally some activity. One more dose of 20g w/BF and within 2 hours it had doubled.
So, I added 430g of BF, 405g water, and 15g salt. I like my ciabatta on the salty side. KA with paddle @ 1 for 5 mins, rest for 10 mins, then KA with paddle @ 6 for 5 mins. KA with hook @ 8 for 5 mins and it pulled off the sides and bottom (momentarily). Sprayed my rising bowl with Pam, turned the dough into it, and covered.
My triple rise took nearly 20 hours. Oiled a peel, divided the dough, then flipped them over onto parchment. Let them sit till the convection oven got to 500F, popped them in. In 15 minutes, voila, perfect ciabattas.
Thanks Stu!
I've made this four or five times now, and it's one of the harder to shape doughs I work with. It really is gloopy after the rise. But it ends up so delicious. It's got a little crisp to the crust, which is fairly thin and breaks away to a moist chewy crumb with large holes and a great pull. I haven't found the flavor lacking any more than any other same day bake. Today, I made the semolina version and thought the flavor was quite good, actually.
Thanks for the recipe. I love the way the dough transforms. And it did not hurt my precious Kitchen Aid!
I finally made ciabatta with big holes! Perfect. I had started out yesterday making the recipe from King Arthur but this morning after reading this recipe I decided to try to follow it. I still used my starter and had a bit of trouble figuring out the amount of flour since the battery on my scale decided to quit. I am surprised it came out at all. But the tips here on how to handle the dough is what I think the other recipe is kinda missing. I have never made a more perfect loaf of bread. Thank you so so much.
I beat it till it pulled off the bowl properly, then I left it to rise, it didn't. So I beat it again, it didn't come off the bowl. So I added 20g of BF and 2 tsp's of yeast (I started with my SD starter) and beat it again for 60 mins...nothing happened, still soup.
Looking for comments on what I did wrong, and hopefully how to recover.
I guess no one answered you. Did you figure out what you did wrong? Maybe just bad yeast?
Can anyone tell me how to change this recipe to incorporate a preferment biga in to it?
This has to be one of the easiest breads to make. It always turns out and is absolutely fantastic! I use cheap No Name [Canadian] AP flour and regular active yeast. Crisp on the outside and chewy in the middle. Delicious! One of my go to breads now.
For me, mixing time is ~10 minutes. First rise (to triple) is maybe an hour. It rises really fast for me. I don't use steam or cover it at all, doesn't need it.
Now I have to figure out a WW version. There is a grocer near me that sells a 100% WW Ciabatta that's incredible. I can't even tell it's WW. I need to replicate it!
This is a great, easy recipe for ciabatta. I took time out (about a half hour)for a coffee after I had finished the mixing stage, but it still worked great. Using a hook, I beat it for about 10 minutes on 6 in the kitchenaid and it was leaving the sides of the bowl clean. I have just one question: how do you come up with something like this? Where does the brilliant idea for extended beating come from? Beats me!
my first go at this one - made with my Ankarsrum Assistent - 18 minutes at high (but not max) speed - not as much oven spring as anticipated but very tasty
First of all a big Grazie Mille!!! to Jason Molina and to the OP, LilDice, for sharing this recipe. I have been baking bread for only 3 years or so, and right from the get-go I have been trying to make a true ciabatta with the proper crust, crumb, flavor and chew. Until I tried this recipe, I had little success. I made many loaves of otherwise tasty bread, some even shaped like “slippers,” but the true ciabatta, with its huge holes and characteristic chew, has eluded me. I lived in Florence, Italy for a couple of years, so I got to try and enjoy “slippers” from many bakers in the city. Those huge holes, the chewy crumb and the unique crust were to die for. This recipe brings me not only to the right ballpark, but darn close to a home run. Again, thank you.
In hindsight, I see that the chief problem was that I was using nowhere near the right baker’s percentage of water. In this recipe, the water is 95 % [475/500 x 100]. Virtually all of the so-called ciabatta recipes I had tried before had a hydration on the order of 65-75 baker’s percentage. In some recipes which employed a poolish or biga, it was not possible to compute hydration accurately, but I doubt that any recipe which I’ve tried had more than 75% or so.
The only substantive difference between this recipe and the breads of Florence, Italy is the amount of salt. In the Tuscan region of Italy, people prefer their bread senza sale, without or with very little salt. It’s an acquired taste. I’ve made this recipe twice following the instructions to the T, and the outcome has been splendid both times. Next, I will try reducing the salt little by little as I continue my chase for the perfect Florentine ciabatta.
Has anyone tried this as a sourdough with starter?
To those that advise using a kitchen scale, I would heartily endorse that. In fact, I would suggest looking for one that does “baker’s percentage.” With that feature, you can replicate any bread recipe. I found a battery operated digital scale with that feature on Amazon for under $30.
Hi. Does anyone know if I can half this recipe to make one small loaf? I only need enough ciabatta for two bruschetta for a bread starter. Cheers.
Just halve everything. Watch the baking time though.
I'm curious by what you're going to need it for. You need it for "enough ciabatta for two bruschetta for a bread starter" ?
Can confirm 11 years later this recipe still works!
I baked it today using KAF bread flour and a poolish (10 oz water, 10 oz flour, ~1/21 tsp. instant yeast) that I fermented about 11 hours at room temp.
I folded the risen dough in half after I poured it out of the tub because it was just too big.
I didn't flip the two loafs below because they got stuck to the parchment paper
I did flip this loaf, however. It also proofed about 30 minutes longer because I couldn't fit it in the oven.
I also shaped one into a round, which had smaller air holes but is a nice soft texture to bit into.
I have made this wonderful loaf dozens of times but yesterday, due to time constraints, I almost completed the bulk furmentation (in a tall rubbermaid container) and then put it in the fridge overnight. I was worried it might affect the structure but no! It was perfect and I have fresh loaves to bring to a lunch. GREAT recipe! Thanks.
This is a never fail recipe, almost 12 years after it was first posted. Bravo!
My oven only goes to 230C
Can this work in there ?
By all means, you should be able to bake at 230C. That’s 446F. The OP, as I recall, starts off at 500F and notes that some bakers reduce temp to 450F after initial 10 minutes. Starting off at 230C poses no significant deviation from the general theme here which is a high oven heat. Yes, it may take a few minutes longer, but you will enjoy a great result!
Lildice, I also put my no knead bread in a cold cast iron pot and cold oven, gives it a boost in rising.
I gave it a go and was really impressed. Little flavor lacking but outstanding all other aspects. One thing I forgot to do was give it the 10 minute autolyse. I will try next time and see if any difference.
Great instructions, perfect bread! Thanks so much for this.
Wow that is beautiful!
https://www.thefreshloaf.com/node/67904/best-sd-discard-ciabatta-no-touch
Sorry. Weird double take.
I had the most intense craving for ciabatta after not having it for many years and never attempting to bake it.
I milled up 325 grams of fresh flour and sifted it finely. This gave me about 250g of flour, then I added 250g all purpose because I ran out of bread. Did everything as described. By far the most wet, soft, delicate, almost seemingly insignificant dough I've ever touched. It's hard to describe the feeling of working with the floured, pillowy dough at the end, truly wonderful.
Baked at 475F for 18 minutes with steam on a baking stone with parchment. It's not a work of art like some people's, but sifting fresh flour really helps with form. I had no problem getting a triple sized rise.
Hi - do any of the freshloaf community still follow this thread? Just wanted to say that this recipe is a game changer. My dough did not climb the dough hook. I waited patiently for it but after more than 25 minutes of kneading, it was clearing the sides and bottoms of the bowl, but not climbing, I said "stop".
Yes! I still follow this thread even though it has been years since I found it. I love to see new folks find it and achieve great baking results using it.
My dough rarely if ever climbs the dough hook, and that has never been an issue with the final product.
For Christmas, I used this dough recipe to make a Focaccia. I basically “poured” the dough after the first rise into a well-oiled (EVOO) ~10x14 heavy anodized Detroit-style pizza pan where I let is rise a 2nd time. Then dressed the top with chopped Rosemary, sun-dried tomatoes (in oil- regular ones will burn!) and finishing salt before baking for ~ 18 minutes at 450* End result was especially good. Great crust and an open crumb.
Hi Charlie - thanks for replying. Nice work with the focaccia. Did it have good flavor? I find that the only downside with this quick Ciabatta is the lack of deep flavor. I wonder if anybody has made it and used a poolish, in an effort to enhance the flavor? And if this effort is worth it?
You will find very little deep flavor in any quick recipe, SD flavor develops over time, the more time typically the deeper and more complex the flavor. Have a look around, you will find many flavor recipes here. This recipe is more about the process for making ciabattas quickly, easily, and showing how crumb does not necessarily require a significant investment in time. It's also a great demonstration of the use of a very wet dough. If you make these ciabattas and sit and think about them as you enjoy their fantastic features, you should come up with many epiphanies. I know I did...
I'm confused, are you praising the recipe or criticizing it, sounds like you are criticizing it. Climbing the hook is not a pre-requisite, clearing the sides and bottom is, so stop once you achieve that and put your misconceptions to rest. The climbing talk is a warning is all.
Deleted
Awesome bread
Bread baking has become my nemesis ever since I moved to Denver. At 6,000 ft. my bread always. ALWAYS collapses like a popped balloon on the second rise. It gets good loft when rising, but when I move it to the oven, it deflates before my eyes. I have tried everything. I have even consulted with the local county extension agent. I would love to make this ciabatta with semolina, but I am hoping someone here lives at a similar altitude and has had success. Does anyone have advice?
Sorry to hear about the troubles at altitude, something I’ve read about but never had to deal with. Sounds like you’ve tried a lot of tricks/tips, so I don’t want to burden you with repetition. However, this is a good summary of adjustments that may help:
https://www.wikihow.com/Adjust-Bread-Recipes-for-High-Altitude
Is there an artisanal commercial baker in your region? If so, I’m confident that they could also point you in the right direction. Good luck. Please let us know how things are going.
I haven't given up. This weekend I will try again, some ciabatta or baguettes
Mary Carolyn
I was thinking more about your issues at altitude, Ivorybow, and not mentioned in that link I posted is the use of DIASTATIC MALT. For those unfamiliar, malting is basically sprouting of a grain, usually barley, which brings on the expression of an enzyme, called diastase (aka amylase). If the malted barley is then gently dried, the amylase will remain active. The dried sprouted grain is then ground up and sold as diastatic malt. IMPORTANT: Regular, or non-diastatic malted barley is dried at elevated temps, so it has no amylase activity, and is only used as a flavoring agent
The diastatic malt is added to the dry flour at ~0.5-1.0% (Baker’s %) and then recipe is followed. When water is added to the dry ingredients, the amylase goes to work on the starch of the flour, breaking it down to MALTOSE. The yeast loves maltose, and it is easy for them to digest and thus produce CO2 gas. Yeast can metabolize the maltose far better than they can break down starch itself.
So, you will get more “bang for the buck” out of your flour by using diastatic malt as a “helper” to pre-digest the starch for the yeast to use….Yeast will produce more CO2 and for longer period with the diastatic malt.
Be cautious in how much you use. Too much will lead to a gummy loaf.
Diastatic malt is widely available on Amazon. Just be 100% certain that it states “diastatic” on the label and description. Regular malted barly has no enzyme activity.
Just assume your rise time will be shorter because it will reach maximum rise sooner. Your dough is deflating because it has no rise left, meaning your starter/dough combination will have eaten through all it can sooner. Start by cutting any rise times that say for it to "triple", to "double". You can add more starter to your recipe so there is more food for the combination to eat. The suggestion, also, is to increase the hydration of your mixture so that more water is available to evaporate. Given how high hydrated this recipe is already would make me avoid this suggestion. Just go with more starter in your recipe.