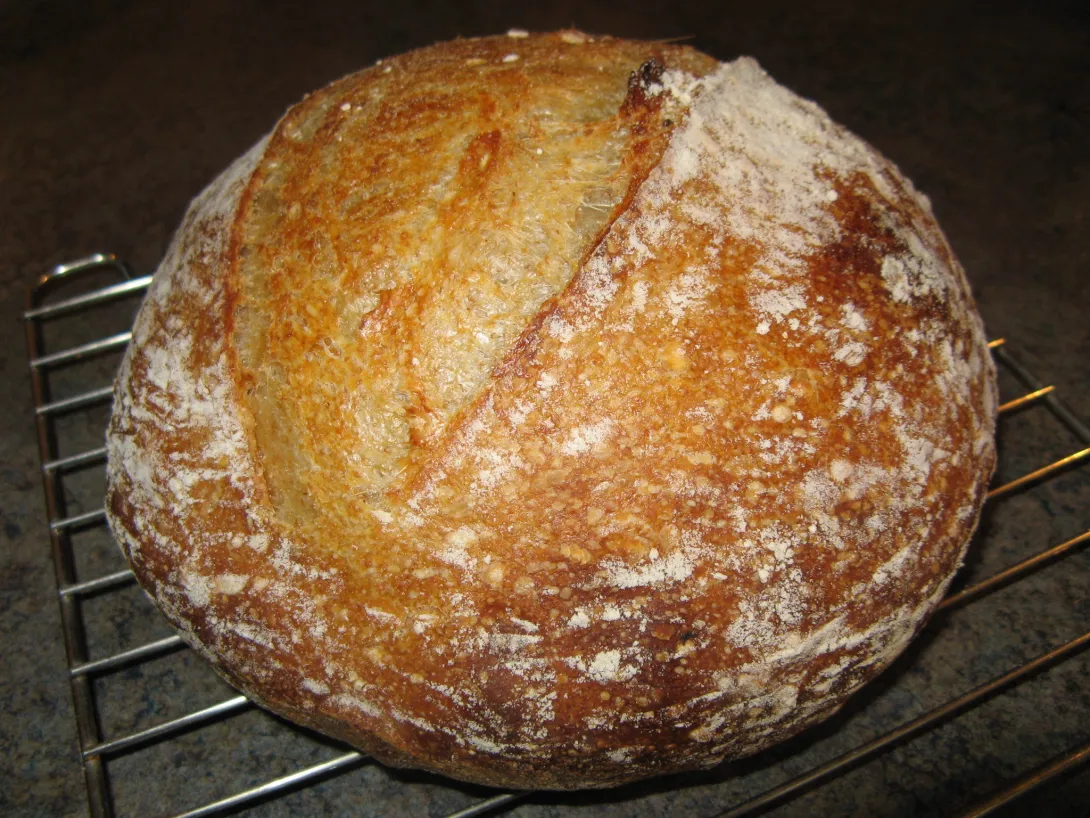
Yay, The FWSY Country Brown turned out beautiful! I did fudge the recipe a bit. I cut down on the initial hydration and then added water back in when I was happy with the consistency of the dough, so not sure of the final hydration but the dough was very soft and stretchy. I used fresh hand-milled stone-ground flour for the whole wheat portion (about 38% overall) so I wasn't sure how much water it would absorb. The grain was hard red spring wheat from a local farmer, and the flour smelled wonderful!
I also changed the proofing times somewhat. Though I did let it bulk ferment overnight, it was in the unheated workshop downstairs. In the morning it was very pouffy and had risen well. I shaped the loaves and let them sit in the baskets for only about one to one and a half hours, not the four or five hours that Forkish recommends. Shaping went quite well but the dough was still very, very soft so I basically pinched all the edges into the middle and lifted it up like a dumpling to put into the basket. Unfortunately that meant it was seam side up, so no natural burst for these ones.
I cut pieces of parchment paper to fit the bottoms of my cast iron pots. When they were hot (45 minutes or so at 475F) I turned the dough out onto the parchment circles, quickly scored (single slash) and then used the parchment circle to pick up the dough (spreading the fingers of both hands and using them to lift under the circle). The dough tried to run off the edges but I just plopped it into the pans and covered them up.
Into the oven - 30 minutes at 450F with the lids on, then lids off, rotate the pots (four of them) and 20 minutes more, reducing the temp to 425F.
I was very happy with the results. The bottom crust was bold but not burnt; the slash opened up nicely and the crust looked wonderful. These were all for customers so no crumb shot, but I did get an email later saying that the bread was amazing. :)
- Lazy Loafer's Blog
- Log in or register to post comments
Lovely indeed.
It's funny how we get so excited over the appearance and behaviour of a bread, without even getting to eat it! It has become and art form in itself. Or an obsession... :)
Well done and happy baking LL.
Hah, I hope there isn't any left to use for stuffing! Happy Thanksgiving, dab.
Well done LL and it was worth to tweak the recipe.
Happy baking!
Joze
well done.
hester
Well done!
By the way, I never thought of turning out the dough onto the parchment circles and then using them to lift the dough into the pots. I drop the circle in the pot first and then the dough. I will have to try it your way.
It does make it easier to get the dough into the pot in some kind of controlled way, so it actually stays more or less round. It doesn't try to run through your fingers when you lift it up this way! :)
That's a great tip for those who bake in pots. Great job too in fitting the process to your own schedule.
Looks great, i'm sure it tasted wonderful too.
Happy baking
Ru
Hi Lazy Loafer, and welcome back! I haven't seen any posts from you in awhile, so I thought maybe you were still traveling, or recovering from travel. Your loaf looks fantastic! I am actually traveling myself now, and you inspired me with some of your last posts to bake with whatever is available. I did that last week, and was pretty happy with the results. I am actually in your neck of the woods right now, on Vancouver Island, visiting from Texas. could you contact me? I haven't been able to figure out how to do that, outside of commenting on a post. I was hoping you could recommend a local bakery. As you know, all bakeries are not created equal! Thanks, marybeth
PS, I would also love to talk baking with you!
You can send me a note to lazyloaferbread@gmail.com. I'm in the little bread shop today from noon until 4:00 PM. If you are in Victoria drop by! Check out The Lazy Loafer on Facebook for details.