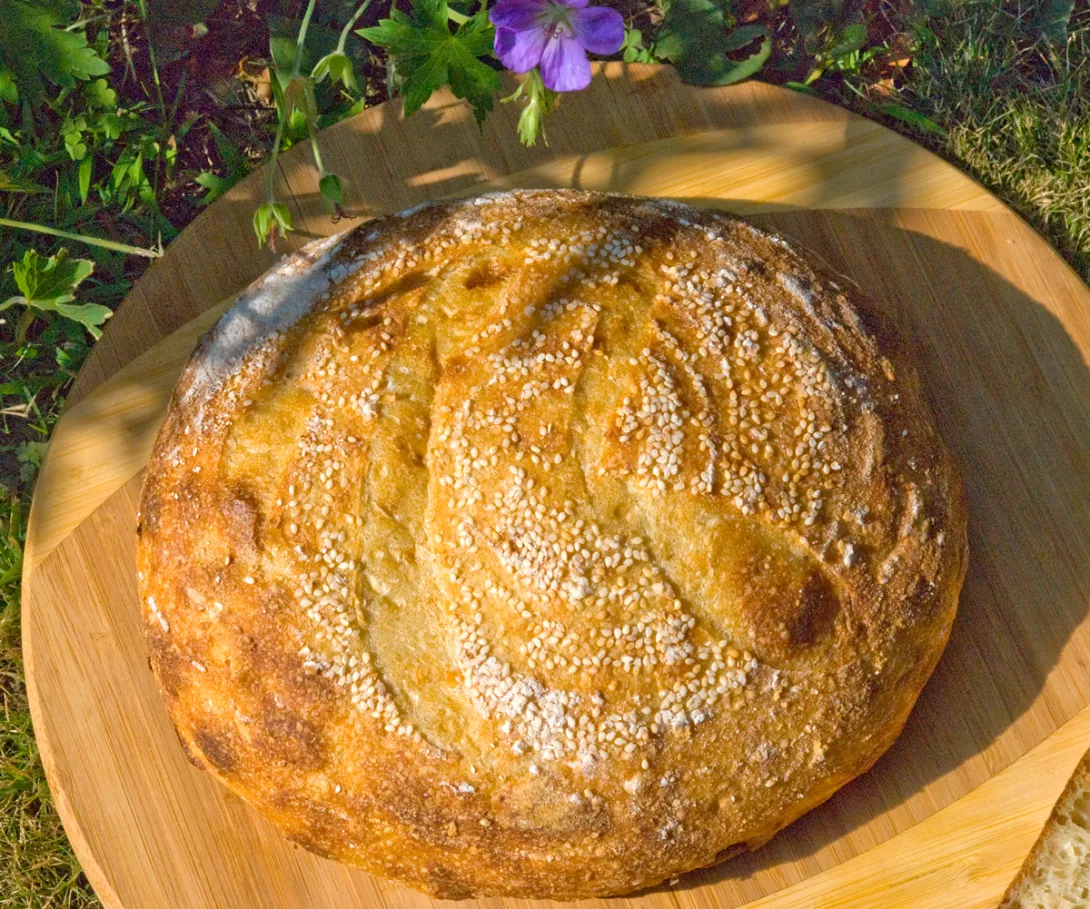
I wanted to make a Semolina bread for my Father-in-law to take back home with him to North Carolina so I figured he would enjoy a porridge version. I've been making some version of porridge bread a lot lately since I love the creamy and moist crumb you get from using this technique.
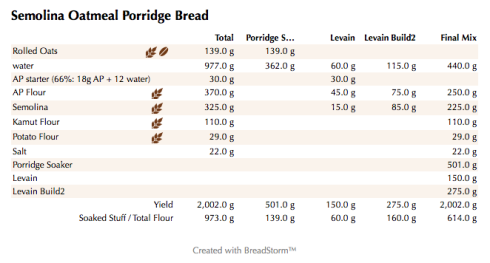
I created a starter using AP flour and Semolina flour and in the main dough I also added some Kamut flour.
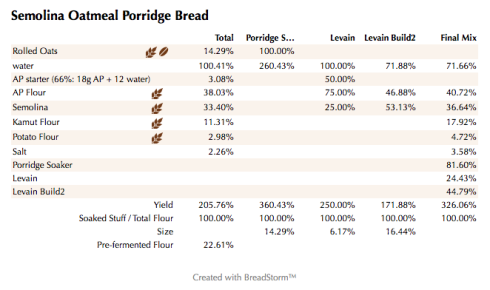
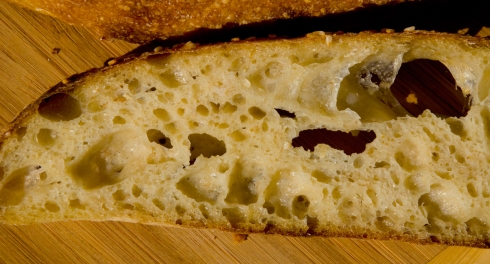
I followed the same basic technique I have been using for this style of bread and cut the water down a little from the last multi-grain version I made. Apparently I didn't cut it down enough since the final dough was very hydrated. I made a mistake and let the dough over-proof slightly and when I went to put them in the oven both breads were very flat. This caused a problem for me since I now couldn't fit both on the bottom stone of my oven so one had to go on the top. The one on the top ended up getting malformed due to trying to fit in on the bottom shelf first. I used this loaf for the crumb shot.
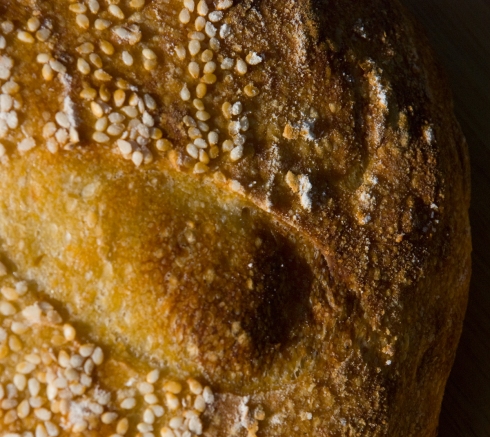
The color of the final baked bread is not as dark as it should be since I ended up letting some steam out of the oven when trying to figure out how to bake both loaves at the same time.
Nevertheless, the bread tasted great and had a wonderful creamy texture inside. An added benefit of this style of bread is that it really keeps fresh for at least 5-7 days.
I added some photos from my gardens below, as now is the time for most of the summer flowers are in bloom.
Enjoy.
Here are the Zip files for the above BreadStorm files.
Levain Directions Build 1 (Using AP Starter at 66% Hydration for Seed)
Mix all the levain ingredients together for about 1 minute and cover with plastic wrap. Let it sit at room temperature for around 7-8 hours or until the starter has doubled. I used my Proofer set at 81 degrees and it took about 4 hours.
Levain Directions Build 2
Add the remaining flour and water to the step 1 build and let set at room temperature of at 81 degrees in your Proofer until ready to use. You can refrigerate it overnight or use it immediately in the main dough. The Levain is ready when it has reached its peak and doubled in size with lots of activity.
Oat Porridge Directions
Add about 3/4's of the water called for in the porridge to the dry ingredients in a small pot set to low and stir constantly until all the water is absorbed. Add the remainder of the water and keep stirring until you have a nice creamy and soft porridge. Remove from the heat and let it come to room temperature before adding to the dough. I put mine in the refrigerator and let it cool quicker.
Main Dough Procedure
Mix the flours and the water for about 1 minute. Let the rough dough sit for about 20 minutes to an hour. Next add the levain, cooled porridge and salt and mix on low for 4 minutes and speed #2 for another 2 minutes or by hand for about 6 minutes. You should end up with a cohesive dough that is slightly tacky but very manageable. Remove the dough from your bowl and place it in a lightly oiled bowl or work surface and do several stretch and folds. Let it rest covered for 10-15 minutes and then do another stretch and fold. Let it rest another 10-15 minutes and do one additional stretch and fold. After a total of 2 hours place your covered bowl in the refrigerator and let it rest for 12 to 24 hours. (Since I used my proofer I only let the dough sit out for 1.5 hours before refrigerating). Note: this is a pretty wet dough so you may need to do a couple of additional stretch and folds.
When you are ready to bake remove the bowl from the refrigerator and let it set out at room temperature still covered for 1.5 to 2 hours. Remove the dough and shape as desired.
The dough will take 1.5 to 2 hours depending on your room temperature and will only rise about 1/3 it's size at most. Let the dough dictate when it is read to bake not the clock.
Around 45 minutes before ready to bake, pre-heat your oven to 550 degrees F. and prepare it for steam. I have a heavy-duty baking pan on the bottom rack of my oven with 1 baking stone on above the pan and one on the top shelf. I pour 1 cup of boiling water in the pan right after I place the dough in the oven.
Right before you are ready to put them in the oven, score as desired and then add 1 cup of boiling water to your steam pan or follow your own steam procedure.
After 5 minute lower the temperature to 450 degrees. Bake for 35-50 minutes until the crust is nice and brown and the internal temperature of the bread is 205 degrees.
Take the bread out of the oven when done and let it cool on a bakers rack before for at least 2 hours before eating.
- Isand66's Blog
- Log in or register to post comments



Who the baker had to be. :)
Looks good Ian.
Thanks Bob!
Crumb looks beautiful. Must be delish
Josh
Thanks Josh. This one does taste pretty good.
I bet it tasted pretty good with the oats and potato in there. It sure looks better than the one we baked on Friday which was mashed and malformed after dropping it out of the clay baker before it set. Even that one tasted very nice:-) I'm sure your father in law loved the bread.
Love your flowers. The garden is really starting to put out some color. Hopefully we will bake better next time around - maybe:-)
Lucy says Hi to her buddies.
Thanks DA. It does taste great with a nice moist crumb. Mixing up another one tomorrow and this time I won't over proof it. Give this one a try when you can.
i feel your pain in regards to your last mishap.
The apprentices all say hi to Master Apprentice Lucy Queen of the Desert.
Happy Baking
Very nice!
Thanks!
Oh, that crumb shot says it all for me. Outstanding flavor, i'm sure.
What a fine baking Ian! Lovely garden too :)
Wishing you all the best,
Khalid
Thanks Khalid. Yes, this one does taste great. I have another one in the proofer right now ready to bake tomorrow. I cut the hydration down a little so I think it will hold it's shape a little better. Hope you give one of these porridge breads a try one day. The crumb is so creamy and moist it's is worth the effort.
Hope your baking business is taking shape and look forward to hearing more about it soon.
Regards,
Ian
I love the golden color that semolina adds to bread. It's another lovely bake, Ian!
Thanks! I just pulled another one out of the oven a few minutes ago. I decreased the water by 56 grams and I only let the shaped dough proof for 1 hour. It still flattened a little but rose beautifully. Will have to wait a few hours to cut into it to see if the crumb is as good as the previous wetter version, but I'm pretty sure it will be.
Give this one a try if you get a chance...I guarantee you will like it.
Regards,
Ian
Ian: I just made the bread and it did flatten out. I should have seen your post about decreasing the water! I froze the other loaf, so I will try some things on that one when I bake it and see if I can get more lift. The first loaf is still baking, so not sure about the crumb. It was very wet and difficult to deal with, but I am sure the taste is amazing as it smells wonderful. Best, Phyllis
Sorry you ended up with a flat bread...hope it still tastes great though. It does take some getting used to with these styles of breads but once you start it's hard to stop.
Regards,
ian
Ian: It was really delicious; my husband loved it. I will definitely try it again and let you know how the frozen loaf turns out. I do think I have learned a bit to apply next time. Here are some photos from today. The sesame seeds are a must. Thanks! Phyllis
Looks very nice Phyllis. Glad you enjoyed it. Next time I'm sure it will be even better. The second one I made with decreased hydration came out perfect.
Have a great weekend.
Regards,
Ian
Ian: I froze the second loaf, and made it today. Turned out very well. I kneaded in more flour (and even sprinkled a little yeast), and it looks great. I am going to do a blog today because I had this success and then a failure with another frozen dough. I am sure this loaf will taste great! Phyllis
Glad you liked the formula and yours looks great!
Regards,
Ian