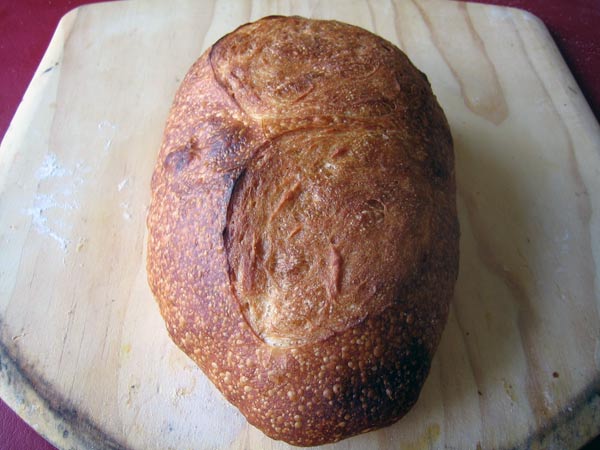
My Daily Bread

Profile picture for user Floydm
my daily bread

If you ever read my baker blog, you'll know that almost every week, regardless of what else I am baking, I bake a batch of pain sur poolish. I began baking a bread like this while reading The Village Baker. I've since adapted it to be even simpler.

This recipe really has become my control, my baseline for experimentation. Whether it be a new mixing technique, a new brand of flour, or a new baking schedule, when I apply a change to this recipe I have the easiest time perceiving how that change modified the outcome of my bread.

I'm offering up this recipe here because a few people have asked for it. But more than advocating this recipe in particular I'm advocating the method of finding something you like and using it as your baseline for experimentation.


My Pain Sur Poolish (Daily Bread)
Makes 2 loaves

Poolish
1 cup flour
1 cup water
1/4 teaspoon instant yeast

Final Dough
1 pound flour
10-12 ounces water
1 teaspoon instant yeast
2 teaspoons salt
all of the poolish


Combine the ingredients for the poolish in a small bowl the night before baking. Cover the bowl with plastic wrap and leave the poolish out at room temperature overnight.

The next day, prepare the final dough, either by using the autolyse method of flour and water first then the rest of the ingredients with minimal mixing or by combining them all and mixing until you have decent gluten development (8 to 10 minutes).

I typically fold the dough once an hour twice during primary fermentation, then shape the loaves and give them a longer final rise, typically around 90 minutes. Meanwhile, my oven and baking stone are preheating as hot as they can safely go.

Baking, with steam, takes me 20 minutes, 5 minutes or so at maximum oven temperature, the remainder at 450-475. I rotate the loaves once half way through the baking.
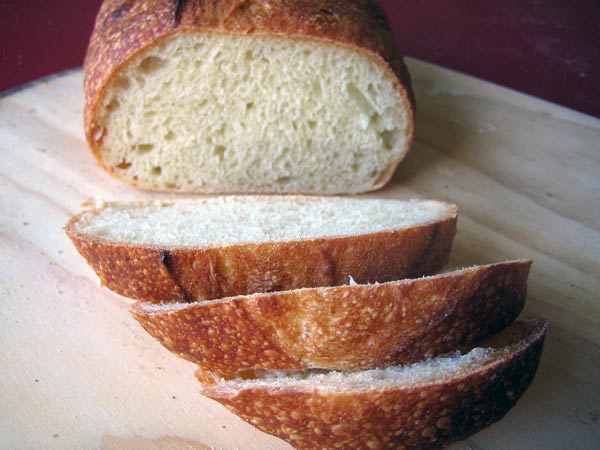
my daily bread

That is it. Simple, tasty, and a great recipe to practice with.

Relate Recipes: Italian Bread, Rustic Bread.

Do you have a bread recipe that is your standard? Please, share it!

Comments

Floyd, I was looking at your recipe, thinking of making baguettes this weekend with it, but when I calculated the hydration, I came up with 90-100% depending on whether one uses 10 or 12 oz of water in the dough. Is the poolish right? I've always used a poolish with roughly even weights of water and flour, and if you use a cup of both, I think that comes out to 4.25 to 4.5 ounces flour and 8 ounces water. Did you mean to say 1 cup flour and 1/2 cup water? If you're wrangling with bread at nearly 100% hydration and getting the beautiful loaves I see, you are truly ... The Man. :-)
Agreed. I am trying this today. I used 12 oz water in the autolyze, which created a nice dough. But when I added the poolish it turned to soup. I added at least 1/2 cup more flour as I mixed, but I still have a dough that is more like that for an Italian flatbread. We shall see how it goes, but I don't think it is going to shape very well ;-( Next time I think I will start with 10 oz water in the main dough. sPh
I'm glad I'm not the only one who found this dough extremely wet...I used only 8 oz water in the autolyze and still ended up with a soup-like consistency once I added the poolish! I have only been making bread for a few months, so I thought maybe I just didn't know how to properly deal with such a wet dough. I ended up adding 1 1/2 cups of extra flour and it was still very wet (I used a mixmaster to knead and it barely started to pull away from the edges of the bowl), but it was more manageable and more what I pictured the "correct" result to be like. I am in the final stages of the last rise right now, so we will see how it turns out... I think next time I will try only 4 oz of water in the dough????
There is no question this is a super wet dough. It is not hand-kneadable, and only after folding a couple of times on a highly floured surface is it even shapeable (and even then, with difficulty). I've found I'm happiest with the results when I leave it that wet, but it'll still make a nice bread at a lower hydration.

Aha! Why didn't I read this whole thread before I tried this recipe? I thought I had screwed something up royally because I couldn't knead it in the smooth, masterful way I remember my grandmother did back when she made bread every day. Did I stop to think she was NOT making artisanal French bread? Nope. And so we learn from our mistakes.

Floyd, your tips, tricks, recipes and instructions are terrific. Thanks for all your hard work!


"I am not a cook. But I am sorta cooky."

Toast

In reply to by Floydm

how long can you leave a poolish sitting out before you use it an how long will it work?

Profile picture for user Floydm

I meant 1 cup to 1 cup on the poolish. I like the flavor I get out of a wet poolish better. I'm guessing end up closer to 65 or 70% hydration by the time I bake it. The combination of a bit of extra flour I throw in when mixing plus the flour it picks up when I am folding it on a *highly* floured surface narrow the difference.
Got it. If I can find time to make a loaf of this, I'll let you know how it goes.
The crust on the loaf in your picture looks like a Panera sourdough crust, but of course this is not a sourdough. Is the crust as good as it looks? Is it chewy or flaky? What do you think creates the good crust - the very high baking temperature? sPh
Does this crust come out softer? I made this today and it came out crisp but thin. I'm trying to figure out if it just comes out that way or if something else caused it.
Um... It typically doesn't come as crispy as a straight up French Bread, but it is still rather crusty.
Ever since I started baking bread(thanks to this faboulous cite) my husband wanted me to bake bread in the loaf style, but i did not have a loaf pan. So last night when he returned from his tour he brought a loaf pan. AND so I had to bake a bread immediately. Well not exactly so. I used all purpose flour n made a poolish n also added some of the dough that I has saved from previous baking. It was bubbly within an hour n smelled yeasty. I did not knead it too much and using a little oil made a ball n placed it in a greased bowl.As soon as the dough was near double I used the folding technique and repeated this once again n then placed the dough in the Refrigerator for a slow rising. In the morning the dough had more than doubled. Then I degrassed the dough and again using the folding method shaped the dough n placed it in the pan. After slashing n glazing I poped the loaf in the ovan with the fan on. I like my crust to be little soft so I sprayed water in the ovan once immediately before placing the pan inside n once after five minutes. The smell of bread was so good. It was baked in 25 minutes.The crumbs was even n the bread was oh so soft inside. The coulor of the bread was not white but slightly pale can some one tell me why was it so. I think the all purpose flour I used was unbleached so the pale(cream) colour but could there be any other reason too. n hubby was so happy to have his loaf. out came the butter n knife Couldn't wait for even five minutes n slathered it with butter n half the bread was gone. I took some to office for my friends n they too loved it. Thanks a ton for this site n for sharing experiences. I have learned so much fom all. shi
Shi - I've always sprayed water in to the oven to obtain a HARDER crust! And a spray five minutes into baking makes it even more so! For a soft crust, I lightly flour the surface of the loaf and don't spary .. it seems to work! So if you find spraying makes a soft crust - it implies we are all being hoodwinked and there's no difference whatever you do!!! Andrew PS did you allow the loaf to rise again after knocking back and folding and placing i the tin~?

I just tried something this week to work with the crust as it was coming out hard and thick for my boules - I saw a poster suggest spraying the loaves with waater and thn covering the bread for about 1/2 of the baking time with a work cover - I had to improvise and used a metal mixing bowl.

I've now tried this technique twice and I think I'm sold in terms of getting that thinner crunchy crust that I associate wiith bread.....  Open to others jumpin in if any other ideas...

andrew actually I did not spray much water just a few squirts on the walls of the ovan for ovan spring.i think for a real hard crust a lot of steam has to be created like by placing a pan of boiling water in the bottom or ice cubes etc. The crust was crunchy n thin not hard. I am really very very new to bread baking but this is how my bread came out. I can say that the kneading i did was only for say 1 minutes(well the dough was quite wet)and then the twice folding, shaping and yes last rising in the pan. The Top was not perfect but after the slashing n ovan spring u couldnt see that. :)) Do u have any suggestion regarding the pale(cream colour) of my loaf(inside)could it be that the all purpose flour was unbleached(is that good). (sigh) in india we get only all purpose flour(we call it maida) no classification whether it is bleached or un bleached. shi
Profile picture for user JMonkey

I've had better luck with 2 cups of boiling water into a pre-headed iron skillet at the bottom of the oven. My oven vents so quickly, that I need the extra water to keep a decent amount of steam inside. I also spray water on the walls at 30 second intervals for the first 2 minutes. Works well for me.

There are reasons that gas ovens are vented.  Like... they need air in order to burn the gas.  Like they need a way to get rid of the combustino gasses.


All in all.... like you said, don't blick the flippin' vents on a gas range.  Electric is OK though.


Mike


I normally give a good water misting on loaf or loaves as they enter the hot oven, or put into cloche. My husband is an electrician say's no way to mist the walls of the oven.. This was sourdough baked under a cloche. qahtan 
Beautify loaf, qahtan. Can you share more about the recipe and the temps at which you baked this? In search of the perfect crust & crumb
Have any of you taken old recipes, that often called for baking the bread an hour at 375 degrees F, and figured out how to bake the loaves in much hotter ovens on baking stones/tiles? I'd appreciate your advise. Sylvia In search of the perfect crust & crumb
You always get a good crispy crust when you use a cloche, before I bought the one in KAF catalogue I used this one that my husband made for me,$7.99 at Home Depot, plus ring crew and washer, I ran the pot through the dishwasher first to remove any nasties that may have been on it :-)) But I always bake at a very high temperature,non convection, and I only mist as breads are entering the oven, never ever the oven walls. qahtan Photobucket - Video and Image Hosting
Your loaf looked great and the idea of a cloche appeals. Do you heat the cloche in the oven with your (appears to be) pizza stone? Then put the loaf on the stone and put hot cloche on top? I can imagine this would simulate an old fashioned brick oven. If so - I shall get a terracotta pot like that and try it! But of course, that would only work with round loaves - my batons would have to be cooked in the oven without a cloche! Andrew
I let the dough, loaf final rise on the what was then a pizza stone, then sprayed the loaf with water put the cover/flower pot cover on, and into a very hot oven. The tricky part is the amount of dough that will NOT touch the wall with it's oven spring. So the bigger the pot and base stone the better. Brown rice flour on the base. qahtan
So do I take it that the cloche and pizza stone are not heated first? In which case is there limited oven spring? Thanks Andrew
I always preheat my oven to 500 degrees with the cloche inside before baking. In my opinion, this is pretty much the whole point of using a cloche - to quickly and easily approach the effect you would get by baking in a wood fired brick oven. Eric
As you can see by the loaf pictured above there was /is no shortage of oven spring. Maybe you would like to take a look at this, or even Google "baking bread under a cloche" This recipe is an adaptation of one that accompanied the La Cloche. CRUSTY COUNTRY LOAF 1 1/2 teaspoons SAF yeast 1 teaspoon honey 1 1/2 cups warm water (100-110 degrees) about 4-5 cups hard white whole wheat flour 1/2 teaspoon salt Place the warm water in a large mixing bowl (I use a Bosch). Add SAF yeast and honey. Mix until yeast is dissolved. Add salt and stir to mix. Add flour 1/2 cup at a time until a dough forms that holds together and cleans the sides of the bowl. Knead by hand for 10- 15 minutes, adding as little flour as possible to keep from sticking. Knead until dough is soft, but supple. If kneading by machine, knead 6-8 minutes. Shape dough into a ball. Place the ball of dough in the center of the La Cloche bottom. Cover with the dome lid and allow to rise in a warm place until doubled, about 30 minutes or more. Preheat the oven to 450 degrees. With a sharp knife or blade, make criss cross slashes in the top of the risen round loaf. Place the La Cloche (lid on) in the preheated oven and bake for 15 minutes at 450 degrees. Reduce the heat to 400 degrees and continue to bake another 30 minutes, or until bread is crusty and brown. During the last 10 minutes, the lid should be removed for a crustier crust. Remove the loaf when done and place on a wire cooling rack.
I needed to bake up a good crusty loaf to be an accompaniment for Cajun Shrimp. The shrimp is baked in a sauce that needs a good bread to sop up all the yummies. This loaf looked so good, but I was hesitant to try it because of everyone's description of working with slack dough. I used 8 oz of water and even though the dough was slack it was easily managed. My only error was that I made it into one loaf...one gigantic loaf! I didn't print off the recipe and I guess I thought since there was a picture of one loaf that was supposed to be the end result. Even though I don't have stone yet..the loaf looks pretty good. I will post a pic later. Don't be intimidated by the talk of wet dough as I was, just try cutting back on the water to begin with. Next time I will try it a bit wetter and see the difference. I also baked a German Chocolate cake for dessert..just a few calories tonight! The gangs all here ..time for dinner.. Happy Father's Day to all our Dads!!
This is for Paddyscake. Can you give us the recipe for the shrimp? This sounds like something I would love. Thanks
This qualifies for the bread site cuz you have to have good crusty bread to eat with this. What's cool is that you bake it all in one big dish. We like to take this outside to eat, dish in the middle of the table, plenty of napkins and bread!! Corn on the cob and you have a great meal. The best part is that it is so simple and tastes like you had Emeril over to cook for you! 3 lbs uncooked large shrimp, unpeeled 3/4 c butter 1 1/2 c italian dressing 1/2 c lemon juice 1/2 c chopped fresh mint (don't skip, use 2 T dried if you have to) 4 crumbled bay leaves 2 T Worcestershire sauce 1 T tabasco 2 t pepper 1 t salt Place shrimp in 13x9 glass baking dish. Melt butter over med heat. Whisk in the remaining ingredients. Cool and then pour over shrimp. Marinate in refrigerator 2-3 hrs, stirring occasionally. Preheat to 450, then bake till shrimp are opaque (for 13-15 count, 20-25 minutes, 15 minutes for smaller shrimp) Hope you like it! PS How goes your sourdough efforts?
I'm one of those lucky people who are not crazy about sour dough so I don't have to continually feed and fret over a starter. Thanks for the shrimp recipe.

I've never baked anything fancy that required something like a poolish. I did know about them though from a book that I gave to my mother-in-law, The Bread Bakers Apprentice. After seeing this recipe and finding other tips for the aspiring home baker of artisan/rustic breads I was inspired. Over the past weekend I made a loaf based on this recipe and it was fantastic.

Without a scale I had to guess the proper measurements of flour. Correct me if I'm wrong but would 1 lb. of flour come out to approximately 2-2/3 cups? Like other members who tried this recipe I too had to add more flour during the kneading process. Can someone offer a suggestion on how to properly add flour? I was adding 1/2 cup at a time and kneaded till the dough was tacky enough to peel away from the bowl without sticking to it. Anyway, below are a few pics on my results with the final being my set up in the oven.


In my oven I purchased six of these 6"x6" unglazed quarry tiles from Home Depot for about $3. I'm very happy with the results so I'll stick with them for now. As you can see I got a small cast iron skillet on the bottom of my oven for the steam part of my baking. Works like a charm.


 Floyd:

 Just wanted you to know that I've been working your daily bread recipe for the last couple of weekends and am just loving it.  I'm using a longer, cool ferment, and I'm shaping more like un-scored baguettes, but in all other ways I'm staying faithful to your recipe.

It's frankly given me the crumb I've always hoped for: lots of air and very elastic, with a great crust.

Will put up a pic later today, if I can get my butt in gear.   

Thanks a bunch!


Prandium longa. Vita brevis.

oolewisoo,

Assuming that your measurements of flour and liquid are correct, here are some things that can help your bread stand up:

1. Autolyse - sounds dangerous, doesn't it?  It's simply the practice of mixing most of the flour and all of the liquid in the recipe together, then letting it sit for 20-60 minutes.  Then you can add in yeast or levain, and salt.  The sitting time gives the liquid an opportunity to hydrate the gluten in the flour, which gives the dough more strength.

2. Adequate kneading - can be done by mixer or by hand.  Whatever technique you use (machine mixing with a dough hook, hand kneading, stretch and fold, French fold, letter fold, other), the objective is to have the finished dough be smooth and elastic.  Whole-grain doughs typically require more kneading than white-flour doughs to achieve full gluten development and their textures will be somewhat rougher.  Doughs with high rye contents are another matter entirely.

3. Surface tension - After the dough has proofed and is ready for shaping, your shaping technique has two objectives.  First, to achieve the shape you want for the finished bread.  Second, to develop enough surface tension in the skin of the loaf to help support it during the final proof and bake.  Most shaping techniques involve stretching the top and side surfaces of the dough down and tucking them underneath.  Note that super-wet doughs, like ciabatta, don't follow the same rules for shaping.

4. Support - while proofing, that is.  You can use brotforms (willow or plastic baskets), bannetons (also baskets, sometimes with cloth liners), couches (can be made of linen, or cotton, or even a non-terry dish towel, or bakers parchment).  the brotforms, bannetons, or cloth couches are usually heavily floured so that the dough does not stick to them.

That's the Readers Digest version.  You can find a lot more detailed material here about the topic by using the search box that is located in the upper left corner of each page.  There are also a number of videos that have been posted here which demonstrate the techniques.

Paul

I'm new to the fresh loaf site and this is my first try at bread with a preferment. I appreciate the wealth of info I've learned so far and the knowledge shared here gave me the confidence to try 'My Daily Bread'.

I'm at the point of my fourth folding. The dough seemed quite wet at first but now it can be handled. I've got some pretty huge bubbles through out the dough, some as large as golf balls, Should I make sure to break them while I'm folding or be carefull not too?  A newbie question! Thanks for the help.

Somewhere in the middle: you want to be rough enough with the dough that you get good tightness on the surface, but soft enough that you leave many of the holes in it.  It's a tough to nail it just right.

Good luck!

Thank you for the good advice Floyd ... and great recipe.  I'm very pleased by this attempt. I've got lots to learn and looking forward to it.


This magic loaf came out of the oven at 5PM. At 530 we received a call that our first granddaughter was born. So we broke some bread in celebration. How sweet it is!

This loaf look just right!  Congratulations with family addition!

Profile picture for user TeaIV

how many cups of flour and water would this be? I would really like to make this bread!

can someone please let me know what these measurements are in cups? I've not a scale, and am clueless when it comes to baking with grams.

Welcome.  The recipe is at the top of the page.  Cups are so variable but 8 fl oz is a cup.  There are 16 dry oz in a pound.  Fluid oz and dry oz are not the same.  Reading the discussion should give you an idea what 1 pound of flour should be... somewhere between 2 1/2 to 3 cups depending on the flour. 

Mini

I just finished baking a loaf of this, and it turned out MAGNIFICENT! I don't think I've ever had better bread! Thank you for the recipe.

-TeaIV

Sorry for the silly question, but in a recipe like this (and typically) when an amount of a liquid is noted in ounces, is that liquid volume or by weight?


I weight all dry ingredients, but I'm never sure if I should be measure weights of liquid or volume.


Thanks.

When it comes to water, liquid volume and weight are the same ("a pint is a pound the world around", as my grandmother used to say).  As for other liquids, I would take a cue from the other measurements.  For example, if the dry ingredients are given in pounds and ounces, it's safe to assume the liquid ingredients are, too.

so a cup of water (8 fluid oz.) should be also 8 regular ounces?