In lesson one we baked the simplest bread one can bake. It was made up of just flour, salt, yeast, and water.
As anyone who has ever looked at the ingredients on a store-bought loaf of bread knows, a lot of other ingredients can be found in loaves of bread. How those ingredients affect the flavor, color and behavior of your bread is the focus of lesson two.
We'll also bake a loaf to compare to the simple one we made in lesson one.
As one would guess, additional ingredients change the flavor of your bread. But many of these ingredients also change the behavior of your dough in ways that are not immediately obvious. Knowing a little bit about what to expect when you add a given ingredient to a dough will increase the likelihood of your experiment being a success.
Common Additional Ingredients
- Sugars (sugar, honey, molasses). Sugars obviously sweeten and flavor the loaf, but bakers need to keep in mind the fact that they also provide additional food for the yeast. It is common to add a tablespoon or two of sweetener to a loaf of bread, both to feed the yeast and to add a touch of sweetness. But yeasted breads rarely contain as much sugar as one finds in unyeasted quick breads, largely because the added sugar interferes with the proper yeast cycle.
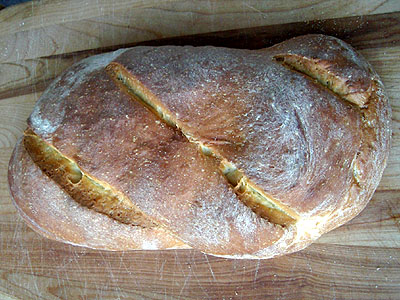
Sugars also carmalize in the oven, resulting in the rich brown color of crust.

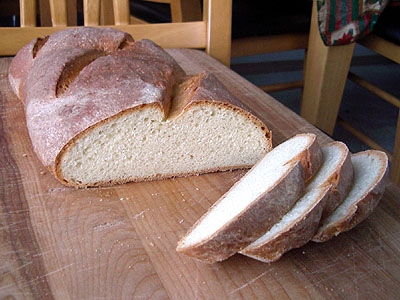
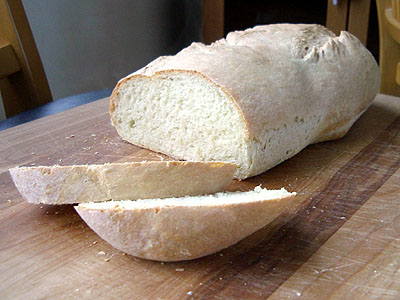
Notice how the bread from Lesson One, which contained no added sugars, had a very pale complexion.
Recipes for sugary breads, such as holiday bread, typically call for fewer and shorter rises. Long rises of highly sweetened doughs can result in beery tasting bread, typically not the result you are after when baking a sweet bread. - Fats (butter, oils, milk, eggs). Fats enrich and flavor the bread. They also soften the dough and preserve it: whereas a fat-free loaf of bread like a French bread goes stale after only a few hours, a loaf of bread with a small amount of olive oil or butter (like a sandwich bread) retains moisture and will stay fresh longer.
Fats increase the bulk of your bread. Rarely do you get the kind of large, irregular holes inside an enriched bread as you do in a fat-free bread.
- Different Flours/Grains. Different grains and types of flour impart different flavors to the bread. They also have varying levels of gluten and sugar: for example, bread flour is higher in gluten than all-purpose flour. Pastry flour is very low in gluten and is typically avoided in yeasted breads because it is incapable of forming proper crumb (the network of air pockets inside of the loaf).
In most recipes, even those labeled "Whole Wheat Bread" or "Rye Bread", the specialty flours make up no more than half of the flour in the loaf. The remainder is, more often than not, plain old All-Purpose Enriched Unbleached or Bread Flour. The characteristics of regular wheat flour are hard to beat when baking, and a little bit of specialty flour can go a long way in changing the profile of your loaf.
Whole wheat flour, rye flour, oats, rice, corn meal, mashed potatoes, and semolina flour are all common ingredients. They contain varying amounts of sugar and gluten, so experimentation and comparison are often necessary to achieve the desired result.
- Other. There really is no limit on what you can add to a loaf of bread: herbs, cinnamon and raisins, garlic, cheese, nuts, dried fruit, olives, even sausage or preserved meats. Use your imagination!
"Homework" for Lesson Two
The recipe
We'll use the recipe from lesson one as the basis for this one, but we'll substitute milk for most of the water, add a little bit butter to soften it up, and add a touch of sugar. I also reduced the salt and yeast from two teaspoons to one teaspoon. When possible, reducing the yeast and increasing the fermentation time results in a better flavor (more on this in lesson three).
The result is a richer, softer loaf that makes an excellent sandwich bread. Typically I would bake a bread like this in a loaf pan, so that it makes nice, square little sandwiches, but in my example I chose to bake this one on a sheet pan so we can compare it to the loaf from lesson one.
2 cups all-purpose enriched unbleached flour
1 cup bread flour (or all-purpose flour, if you do not have bread flour)
1 teaspoon yeast
1 teaspoon salt
1/8 cup sugar
1 cup warm milk
2 tablespoons butter
1/4 - 1/2 cup lukewarm water
Mix the dry ingredients, then add the wet ingredients. Mix and adjust water until all ingredients are incorporated and the dough is capable of forming a ball. Pour the dough onto a flat, floured surface and knead for approximately ten minutes.
Return the dough to an oiled bowl and let rise until doubled in size, approximately 90 minutes. Shape the loaf and then let rise again until the desired size is reached, approximately another hour.*
Bake at 350 for 40 to 45 minutes, until when tapping the bottom of loaf the bread springs back and makes a hollow sound.
*Note that we're only letting it rise one time for this loaf. Because I added the extra sugar in there, I didn't want it to over-ferment and make the bread taste beery. It is low enough in sugar it probably could have handled another rise, I just didn't feel like risking it tonight!

Wrap up
As expected, this loaf was creamier, sweeter, and softer than the loaf we baked in lesson one. The added sugar also carmalized and resulted in a beautiful, brown crust.
A note on storage: sandwich breads like this are best stored in air-tight plastic bags. Paper bags will help keep the crust its crustiest and are better for storing French breads.
I stored this loaf in a plastic bag three nights ago. With a bit of enrichment and proper storage, a loaf like this keeps well for up to a week.
Continue to Lesson Three: Time & Temperature.
Comments
I made this loaf with wholemeal flour.
It turned out lovely and soft. I was surprised at how soft the crust was.
Perfect for sandwhiches!
At first I didnt like the texture and taste, as it was so soft and almost cakey but after eating it over th course of the evening (made4 it for dinner with friends) it grew on me. Now I cant get enough of it!
Yummo!
I just made this bread and it came out great. I made it in a loaf pan and added half whole wheat for the white flour. The milk really gave it an amazing texture (my regular daily bread uses just water) and, like Thegreenbaker said, the crust is so soft. The one "bad" thing that ocurred was when I went to slash the loaf with was I assumed was a sharp knife (I purchased it before Christmas but all that chopping must have worn the blade a bit). It dragged a bit but it didn't completely deflate it.
Thanks Floyd, this bread is wonderful!
Just took "lesson two" out of the oven. It's not even close to being as brown as the loaf in the picture. What do I need to do to correct this? Higher heat or glaze?
Thanks,
Trish in Omaha
T'm eating a slightly warm slice right now with some butter. Taste is great and the texture is good for a sandwich type bread. Trying the sourdough again this week-end.
Trish in Omaha
Is it possible to convert this recipe to weights? It seems like it would be nice to have it in that format vs volumes.
Should the butter be soft for this bread?
TIA,
gary
I've been experimenting a lot with different recipes and techniques for making an everyday sandwich loaf. I decided it was time to revisit this recipe - it was one of the very first I ever made - but now that I'm more sure of what I'm looking for, I thought maybe it would turn out better.
I only used 1/2 cup of milk and replaced the rest with water (cost savings). I didn't miss it in the final result. I also used my KA to do most of the kneading, until the last minute when I would pull it out and pull it all together with a final knead. I made a sandwich loaf with one batch and hoagie-style rolls with another. I brushed the tops with water only. They turned out soft, tender, and delicious. This will definitely be my go-to everyday recipe. It's so easy to remember, too!
This was my first ever loaf and it turned out great thanks to the great recipe and instructions.
I just found these lessons yesterday afternoon. Baked this last evening.
While this is not my first attempt at bread baking, it is my most successful loaf; I am very pleased with the the way it turned out. I substituted one cup of whole wheat flour (hard red winter) for one cup of the all purpose.
I hope to try this again this weekend, but I want to bake it in a camp dutch oven. It might be too big for my dutch oven, so I may make two round loaves.
I also want to try using a little 7-grain flour. I have a bag of whole 7 grain mix, and I'm trying to figure out how to use it.
Thanks. Oh, and thanks for the great site!
This is a great recipe. Here is how mine came out!
I glazed it with egg white.
Here is the crumb.
It turned out great! Thanks for the recipe!
I followed your instructions almost to the T. The only difference I made was to use 1 cup multi-grain flour in place of one cup of the AP flour. This required an additional 1/4c AP flour during the initial kneading. The oven spring was amazing!
http://farm3.static.flickr.com/2534/4118730206_bbba7bcc87_m.jpg
http://farm3.static.flickr.com/2762/4118782136_57de7e7ebc_m.jpg
I just made this and had a slice warm from the oven. it is wonderful, as everyone says.
I re-read the tips on folding and shaping after I had folded and shaped it (duh!) - so it's a bit flat. I don't think I got it tucked well enough underneath. So it's a bit flat. But so what!? It's delicious and light has a lovely even, fine crumb. This just might become a regular.
The only alteration I made was because I didn't have quite a cup of milk in the house, so I substituted a bit of cream and buttermilk to make it up. Mmmm...
How much time should I let the KitchenAid mixer do the kneading and at what speed? I cannot knead by hand due to arthritis, and am having thumb joint surgery in 3 weeks which has a looooong recovery period.
Yesterday I baked a SD loaf at 230C. It was very pale after 40 mins. So I popped it in for another 10 min to get an acceptable hue to the crust. But the cooler oven yielded a very hard crust and a rubbery, gray crumb.
Now I would like to try the loaf from lesson 2. I wondered about the temp. the instructions say:
"Bake at 350 for 40 to 45 mins."
This must be Fahrenheit or about 180 C. If so, then looks like this is to be baked in a moderate oven.
Wouldn't it be very cool for the loaf? Or would the temp of my oven be off?
Can anyone help me with this?
Wow WD.........that's a loaf to be proud of.............
When discussing the hydration percentage of a recipe, is milk included?
yes, milk is included. It is in reference to any liquids.
using 130 g per cup of AP and 140 g per cup of Whole Wheat (my substitute) I got about 74% hydration for this recipe. It was pretty sticky but still formable. Its rising now.
You're welcome! Hope it turns out :)
here it is, tastes great texture is good
I am missing something here. To make the bread in lesson 2, I am told to let the dough rise for 90 minutes, then another hour after shaping the loaf. Later in the recipe I read where I was only to let the dough rise once. Can someone clarify this for me as I want to bake this tomorrow morning?
Hi just curious what kind of milk, skim/1,2,3,4 % butter fat in milkmilk.
Hi just curious what kind of milk, skim/1,2,3,4 % butter fat in milkmilk.
Hi just curious what kind of milk, skim/1,2,3,4 % butter fat in milkmilk.
Thank you for sharing the lessons :) Just needed to know 350 F or 350 C? Thanks :)
I made whole wheat bread the other day and decided to add muesli (combination of oats, nuts and fruits). My question is when is the best time to put these add-ons? I was having abhard time kneading the dough because i mixed it right away. I kneaded it for 15 minutes until everything was well incorporated. I'm not sure if what i did was correct. Had the dough rest for 3 hours, folding the dough every 30-45 minutes. Not sure if this technique is correcr either since i'm just fairly new at baking bread. The bread turned out okay, a bit dense though.
Many years ago - sometime in the 1970's - I met the inventor of a dough kneader at his home in Stamford, Conn. It had a hook quite unlike the KitchenAid's; longer and more angular. He said (and it's written on the bowl) that "We are not a mixer. We are a kneader". He also said that during the kneader's development he got to eat a lot of bread!
I brought six home to Trinidad and sold five. 40 years later the sixth is still going great guns. It is a slow, single-speed machine and what is normally a 10-minute knead takes about 25 minutes. But it does a great job handsfree. The instructions were simple: Open the top of a 5-pound bag of flour and add the necessary dry ingredient: yeast, salt, sugar. Add the wet stuff, water, milk, butter to the bowl. Empty the bag into the bowl, put on the motorized top of the machine and plug it in. In those days we were a family of five so the bread went down with gusto!
Today, that is what I use to make your bread.