Rye Sourdough with a Sunflower and Pumpkin Seed Cold Soaker
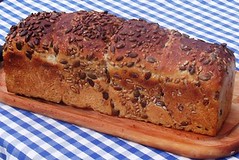
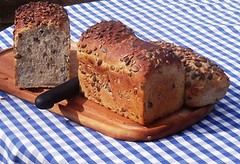
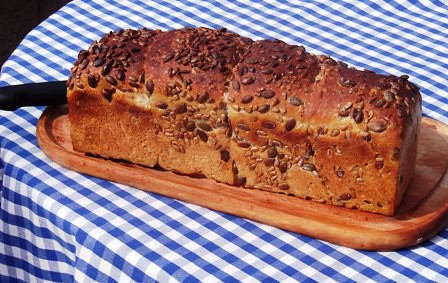
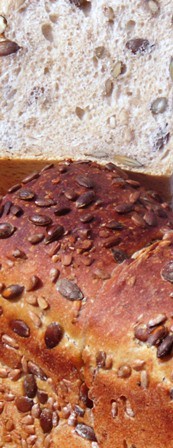
I made these as panned loaves, as seeded bread makes such wonderful sandwiches. The leaven is a rye sour which I refreshed a couple of times and fed with some “altus” along the way too. So, the figures for flour in the built sour will actually include a small amount of “altus”, which I have not declared in the formula below. I soaked the seeds overnight for the Soaker.
I scaled one dough piece @ 465g to make a small tinned loaf, and then used the remaining dough [just over 1500g] to make a loaf in the Pullman Pan, moulded using “4-piecing” rather than the single piece method. See this post for a video of me using this method: http://www.thefreshloaf.com/node/23225/three-flavoured-breads-and-few-fruit-scones
Material | Formula [% of flour] | Recipe [grams] | |
1. Built Rye Sourdough |
|
| |
Bacheldre Organic Dark Rye Flour | 12 | 120 | |
Water | 20 | 200 | |
TOTAL | 32 | 320 | |
|
|
| |
2. Cold Soaker |
|
| |
Sunflower Seeds | 12 | 120 | |
Pumpkin Seeds | 12 | 120 | |
Salt | 0.5 | 5 | |
Water | 30 | 300 | |
TOTAL | 54.5 | 545 | |
|
|
| |
3. Final Dough |
|
| |
Rye Sour [from above] | 32 | 320 | |
Seed Soaker [from above] | 54.5 | 545 | |
Marriage’s Organic Strong White Flour | 88 | 880 | |
Salt | 1.7 | 17 | |
Water | 27 | 270 | |
TOTAL | 203.2 | 2032 | |
% pre-fermented flour | 12 | - | |
Overall % hydration on flour | 77 | % Hydration on flour plus seeds | 62.1 |
Method:
- Pour off any remaining liquor from the soaker, and set the seeds to one side.
- To the liquor, add the remaining required water, the rye sourdough and the flour. Bring this together, then set aside for 1 hour “autolyse”.
- Develop this dough by mixing gently for 5 minutes. Add the salt and mix a further 5 minutes. Rest the dough for 10 minutes. Mix it a further 5 minutes, then add the seeds and complete the mixing gently by hand. If the seeds are still not evenly distributed, then use a metal “Scotch” cutter to cut through the dough a few times to aid better distribution.
- Ferment the dough in bulk for 2½ hours, with one fold after 1½ hours.
- Scale and divide as 1 x 465g for the small tin loaf, and 4 x 390g for the Pullman Pan.
- Mould each piece round and rest 10 minutes, covered. Apply final shaping, brush the dough tops with water, and dip into the remaining seeds combined. Pan the dough pieces and set to prove, covered.
- Final proof is 3 hours. I did not use a lid on the Pullman Pan for this loaf.
- Pre-heat the oven to 220°C. Use steam and set the loaf tins to bake in the middle of the oven. Bake the small loaf for 25 minutes. Drop the heat to 200°C and bake out the Pullman Pan loaf a further 35 minutes. Drop the heat to 180°C along the way, if necessary to prevent the seeds on top from becoming too dark.
- Cool on wires.
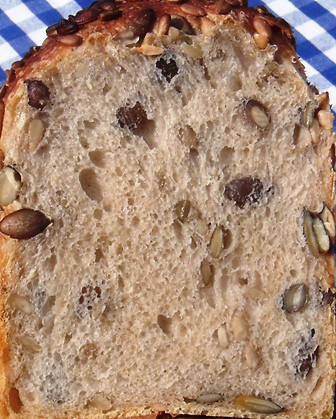
This is one of the tastiest loaves imaginable. There is virtually no sourness, but the seeds, the long fermentation and the bake profile all combine to create a bread soo very tasty!
Here are some photographs, plus the cat! The sun’s back a bit more often just now, too!
All good wishes
Andy
- ananda's Blog
- Log in or register to post comments


I definitely want to try this one - have been planning on experimenting with pan sandwich breads with rye starter for a while now, your breads look like a great place to start!
Hi txfarmer,
I had no problems using the rye starter to leaven the bread. I took the proportion of pre-fermented flour right down to just 12%. This could be increased, although over 20% may limit the gluten potential in the dough.
On reflection, I feel I may add extra wholewheat flour, say at 13-18%, thus cutting the white flour back to 70 - 75%.
Very best wishes and thanks for your comments
Andy
Hi Andy,
The loaf looks brilliant; bursting with flavour, I'm sure.
On your photos, it looks like you've got some nice weather over there. Is that right? I'm hunched over my keyboard, trying to keep warm... having to fight off harsh northerly winds, rain and 8dC on July 1st isn't exactly my idea of summer.
Hi Hans,
Yes, this loaf positively bursts with flavour.
It is sunny here, most of the time, but we have had plenty of heavy showers too.
Don't be deceived, however; it's not really warm, unless the sun is right out and the cool breeze has dropped. Much as she'd like to, Alison can't get to work in sandals, it's not warm enough! That's the test of when the good weather really is here. Still, it's obviously a lot warmer here than it is where you are!
Very good to hear from you, as always
Best wishes
Andy
Great looking bread, Andy! That crumb looks sooo inviting. I bet it makes an excellent sandwich. I must admit, at the moment TFL is serving to distract me rather than inspire me. Everything I see I want to bake with the result that I am baking nothing!
Hope you are feeling better,
Syd
Hi Syd,
Many thanks, I'm getting better now.
I'm really happy with this loaf, although thought I may have achieved a slightly higher volume in the finished bread. Whatever, yes, the crumb is particularly pleasing.
I'm looking forward to your next bake and reading about it on TFL; I'm sure you'll be mixing dough again very soon!
Best wishes
Andy
Andy, with all those tasty seeds and rye it must make wonderful sandwiches, but even alone...
Thank you Nico,
and I'm sure you noticed I used a cold soaker with salt added here!
Yes, it's great just with a small spreading of butter too!
Very best wishes
Andy
Andy,

This bread of yours looks nothing short of fabulous. That seeded crumb, and the seeds so evenly distributed!
And it's bringing back a happy memory of our trip to Della Fattoria and their pumpkin seed loaf...
I think it's remarkable how similar in color both loaves are. I love your version of it!
I hope the warm weather sticks around and that you and the cat enjoy soaking up some sun!
:^) from breadsong
Hi breadsong,
The colour of the crusts in the 2 loaves is indeed very similar. That looks like an English "Bloomer" shaped bread, but without any cuts to the top of the loaf. Did you buy one of these? If so, what did it look like inside?
I so hope it warms up so Alison and I can eat out on the patio over the weekend. Shuffles [the cat] loves to join us and just roll around outside getting far too hot whenever the chance arises. Alas, despite the sun, it's not that warm here yet!
All good wishes
Andy
complements the pumpkin seeds so well!
I did not buy a pumpkin seed loaf...but did buy Della Fattoria's Pane Integral. mmm mmm good!
I hope you're feeling better Andy. Sending good thoughts to you, and hoping for a nice warm weekend
for you, your wife and the cat to enjoy -
:^) from breadsong
Great post Andy on a delicious looking loaf. I'm planning on baking this loaf as a house gift for a 4th of July party we are attending. I have a couple questions if you don't mind.
I'm thinking the seeds on the outside get roasted quite well in the baking process. I'm thinking about roasting the seeds destined to be soaked and mixed in to improve the flavor some. What are your thoughts about this? Will the roasting effect the soaking?
And, could you tell me what the dimensions of your Pullman pan are please? I like the idea of a sandwich loaf and also of having one to keep at home. Thanks for the inspiration on this Andy. I've been off my game for the last months with family and graduation issues and have not had the oven on in a while. This caught my attention.
Cheers,
Eric
Thank you Eric, and, as ever, it is really good to hear from you.
I hope the info I sent by e-mail gives all you need regarding the Pullman Pan. It is almost rectangular, but the width is slightly less at the bottom of the pan than at the top. Interestingly, in a conversation with David, he revealed that the steel used to make these pans is manufactured very close to where he lives; excellent quality pans, for sure!
Yes, Mini is right, as ever, about the seeds in the loaf. Don't roast them and then soak them. I have a feeling the soaking water will become bitter. If you want to use roasted seeds, then I'd try an alternative seed bread, such as Hamelman's, which I made here: http://www.thefreshloaf.com/node/17308/semolina-durum-bread-and-sourdough-seed-bread with a few variations along the way. However, the idea is to use a hot soaker with flax seeds, and use roasted sunflower and pumpkin seeds in addition in the dough. I believe I made this with 2 leavens, and used some retarding during proof as well, when I made the previous seeded loaf at home.
All good wishes
Andy
Andy,
Okay, you got me on this one.....I have seen one too many seeded loaves to not try one myself....
Which brings me to my question about the soaking of the seeds which Eric touched upon.
Is the only purpose of soaking the sunflower and pumpkin seeds to prevent them from burning while baking? I understand soaking flax seeds and have done that but have never considered soaking sunflower or pumpkin ones as it seems like nothing would result from them sitting in water as they are not very porous. Roasting I understand as it brings out flavors but soaking leaves me puzzled....
By the way a side note about your use of a cold autolyse in one of your previous threads. I read the discussion that ensued but hadn't done anything with what I had read. I generally do a room temp. auto with a bit of salt ala Peter Reinhart's technique as outlined in WGB - not a 'true' auto. due to the salt added....Anyway, our temps have been very hot lately so my usual room temp of 70° has skyrocket to 80° and higher depending on the time of day. I prepared my usual soaker and let it sit out...the following morning when I went to mix the dough I simply had a mess.....protease attack.
Because of your thread and the discussion I knew how to remedy the situation with my next loaf. The soaker went straight away into the refrigerator and there it stayed until the following morning. All proceeded as expected and the new loaf was great!
I would have been stumped without what I have learned here and now, while the temps are warm, my soakers are going straight into the refrig! I am so glad I caught your post. I thank you again for posting it!
And now onto my new project - have to buy the seeds first though! Thanks for this post that finally got me to try something different than just fruits in my loaves. :-)
Take Care,
Janet
Very yummy looking loaf! Like that you soaked the seeds to prevent over browning. I had decided to try that after picking off a few burnt seeds using them raw & dry even tho covering them the first half of the bake. I think the winning combo might be to soak and cover. I'm glad to see "kitty" in the second picture has all her tail and it wasn't hiding in a loaf! A Q about placing the dough in the pan... did you place their shaped "grain" across the pan or with the length of the pan?
The combination of pumpkin and sunflower is one of my favorites. I have a snack dish often filled with nuts and such (it has pine nuts and almonds in it atm.) If I have just sunflower or pumpkin seeds it takes me weeks to munch them away but if I combine these two together... they seem to evaporate.
Eric, I would not roast the seeds unless the seeds going into the inside of the loaf. The outside first-impression seeds plump up and roast fast enough, be prepared to cover them. :)
Mini
to answer the dough question. Yes, yes, rolled shaped dough is placed across the pan! ;)
Hi Mini,
Shuffles only bothers me in the kitchen if there is fish or cheese available for her to scrounge. Otherwise she'll just be sleeping in the warmest place she can find!
Good, you found the video. The logic of turning the dough pieces through 90 degrees is to alter the direction of the gas bubbles in the dough. This way, the gas bubblesopen to the face of the crumb, thus the light is reflected from the crumb surface, giving a much brighter appearance. That is the theoretical basis for the [in]famous British "white-sliced" loaf!
All good wishes
Andy
Mouthwatering Andy, it looks so good!
Next time I make a pan loaf I have to remember to try the "infamous" sideways panning method. I quite like the effect it has on the look of the crumb and the overall appearance of the loaf. As for the sunflower seeds and even the small % of rye in your loaf, I can just imagine how great it tastes, having done a sour rye and sunflower seed bread earlier this year. Rye and sunflower seeds seem to have a natural affinity for each other, more so than any other grain/seed combination I've tried. I still regard it as one of the best tasting flavour combinations for a bread I've had so far. This is one of those breads that needs nothing on top to enjoy it, but a good slice of sharp cheese or tomato from the garden wouldn't hurt either.
Informative and inspiring as always Andy.
Franko
Many thanks, Franko, I do agree about rye and sunflower seeds being made for each other.
As fo cheese, well it made a superb sandwich with some salad and Port Salut!
I really like the four piecing method, and the effect it has on the appearance of the final crumb. It's just the industrial sliced white bread that I don't like!!!
Very best wishes
Andy
Not to mention the virtues of having a loaf dome with no cracks..! I'll be trying this in no time, thank for the reminder.
With this bake, i'am all encouraged to go with the Rye leaven, rather than the white... if it is not an all white sourdough.. Rye leaven is best.. you can use it from stock! how convenient is that!!
BTW, scorching desert winds are sizzling Dubai now, i'll be glad send some yourway, or Hans'..! You send your cold breeeeze.. pleeeeez! :)
Well, we both know rye is great, really, don't we Khalid?
Actually, I made a variation on Hamelman's seeded sourdough using 2 leavens....a white stiff levain and a rye sourdough. That's the formula that uses a hot flaxseed soaker and roasted pumpkin and sunflower seeds. See above reply to Eric.
I don't know how you control your leavens and pre-ferments so effectively living in the desert; hats off to you! I guess you'll have temperatures in the 40s Centigrade, and have to rely heavily on air conditioning?
I'll have to detach my self from Hamelman's book for sometime, and bake one of your recipes.. I'll print this recipe for a starters.
Yes, we live in airconditioned houses, malls, cars.. even bus stops are airconditioned.. i'am serious :) If your dough isn't on transit in a car that has been sitting under the sun and turns into an oven, your dough is pampered enough in Dubai. Drawbacks are, we don't see much of seasons... it is 7 months of summer, and 5 months of spring. My dough starters aren't complaining though.. they sit nicely in my fridge most of the time.
Hi Martyn,
Thanks for adding your question to this thread; I see you live in Dewsbury! My family home town is Cleckheaton, just up the road!
You have asked a complicated question which I could spend an age answering by going into a lot of detail. However, I really do not want to put you off learning to work with sourdough, as it is such a fun way to bake, being both challenging and rewarding on any number of levels.
To answer your immediate questions:
You will need to make your own starter, and you will need to feed it. Here is the good news; there is lots of information available to help you to do this, much of it being right here on TFL. My immediate advice is to click on the "lessons" tab in the menu across the top of the TFL page. From there follow the prompts to get you to sourdough. Read through the posts sugested in Floyd's first entry in that thread. If you want to find more information about how to start a leaven from a book, then look at Dan Lepard's Handmade Loaf which gives pictorial step by step actions in a very clear way. Andrew Whitley also covers the sourdough topic in Breadmatters.
Basically, all you are doing is combining flour and water and allowing the natural yeasts present on the flour to get to work on the sugars and starches in the flour to engender fermentation. From there, feeding with more fresh flour allows further fermentation leading to a build up of wild yeast activity. Prolonged fermentation leads to more acidic conditions and the presence of lactic and acetic bacteria. The feeding regime you use is all about creating ideal conditions in which the bacterial and wild yeast fermentations work symbiotically in order to produce sufficient leavening activity to make dough lively enough to produce raised bread.
Once you have a leaven ready to use, save a small portion, and add the rest to your final dough. The retained portion is then fed more flour and water in order to produce the leaven for your next batch of dough. If you are not baking for some time, then the old leaven can be held in the fridge as a means to retard activity, before moving it to ambient and feeding it ready to use for the next bake.
I don't know what your current baking skills and experience are, but maintaining a leaven and baking with it is quite complex, and the process takes a lot longer than working with ordinary bakers yeast. However, don't let that put you off. You may want to concentrate on becoming more expert with regular yeast baking first; but if you feel confident enough, then start experimenting. Lots of reference points above to use; if you have further questions, just ask.
Best wishes
Andy
Tetszik az oldal!
Gyere hozzám! Blog:http://szanter.blogspot.com/
Üdvözlettel! Terike
http://youtu.be/3nY0SAJESZY