I have been meaning to start a blog here at TFL for quite some time. So...
I want to start this blog with a post influenced by why I began a bread-baking adventure in the first place. My quest began several years ago in an attempt to recreate a sourdough "pumpernickel" I and my extended family of Austrian descent relished when I was a kid growing up outside Denver. (Hi Pat.)
There was a local bakery near I-70 and Josephine whose name I can't recall and that has long since disappeared. However, the memory of their "pumpernickel" lingers among numerous family members that still talk about it at holiday gatherings. I decided I would bring those memories back to life.
As my knowledge of bread has grown, in no small part due to the TFL community, I realize this is not really a true pumpernickel, but basically a 50% Rye with Caraway.
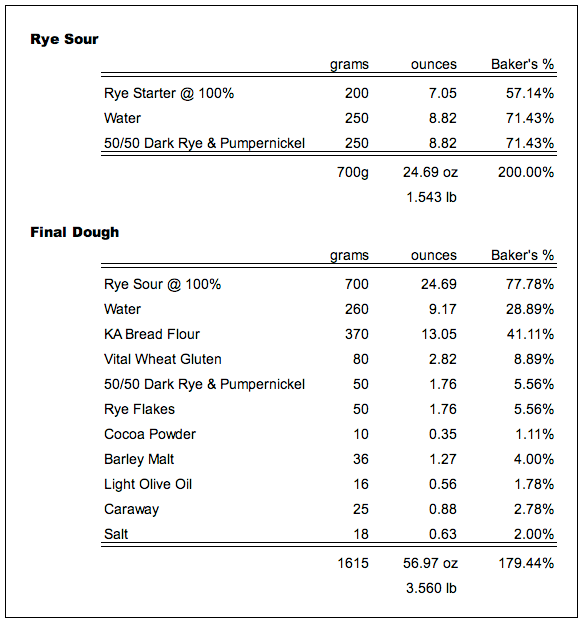
I adapted a recipe from Charles Van Over's "The Best Bread Ever" (my first bread book) by eliminating commercial yeast and converting to a full sourdough, increasing the percentage of rye, increasing final hydration, and pre-fermenting 39% of the flour overnight. Below is just the latest tweak of the formula and the resulting bake from a few weeks back. Being a bit of a purist, I dropped the cocoa for a little while, but discovered it does add essential flavor undertones in addition to being a coloring agent. (Hey...some people like chocolate in their bread.)
Despite ongoing refinements and continual variations, I have a base formula that finally satisfies cravings from a now distant era.

I used a 50-50 mix of Bob's Red Mill Pumpernickel and NYBakers Dark Rye, BRM Vital Wheat Gluten, Ghirardelli unsweetened coca, Eden Organic Barley Malt Syrup and KAF Bread Flour. And yes, I like poppy seeds.
Prefermented Flour = 38.89% Total Flour = 900g Total Water = 610g Final Hydration = 67.78%
General method:
- Late evening the night before baking, combine starter, water and rye flour to make rye sour. Cover and ferment overnight.
- In the morning, combine together all ingredients (except salt and caraway) just until hydrated. Let autolyse for 30 minutes.
- With mixer running, add salt and mix for 5 minutes (KitchenAid @ Speed 2). Add caraway and mix for 2 more minutes.
- Proof for 40 minutes in a warm place (76-80°F) then perform a stretch-&-fold.
- Proof for another 40 minutes and perform a 2nd stretch-&-fold.
- Proof for another 1.5-2 hours.
- Preheat oven, stone and cover to 475°F.
- Divide and shape dough into two boules or batards. Place either in covered brotforms or en couche. Proof for another 1 hour.
- Lightly brush with cornstarch glaze (or spray with water) and sprinkle poppy seeds on top. (simmer 1 TBL cornstartch with 1 cup water for 2 minutes and allow to cool to room temperature for glaze)
- Score and bake covered for 15 minutes at 450°F before lowering temperature to 420°F and baking uncovered for a further 15-20 minutes.
- Allow to cool completely on wire rack. Flavor builds when left uncut as long as you can wait. Goes well with european unsalted butter, cured meats and pungent cheese.


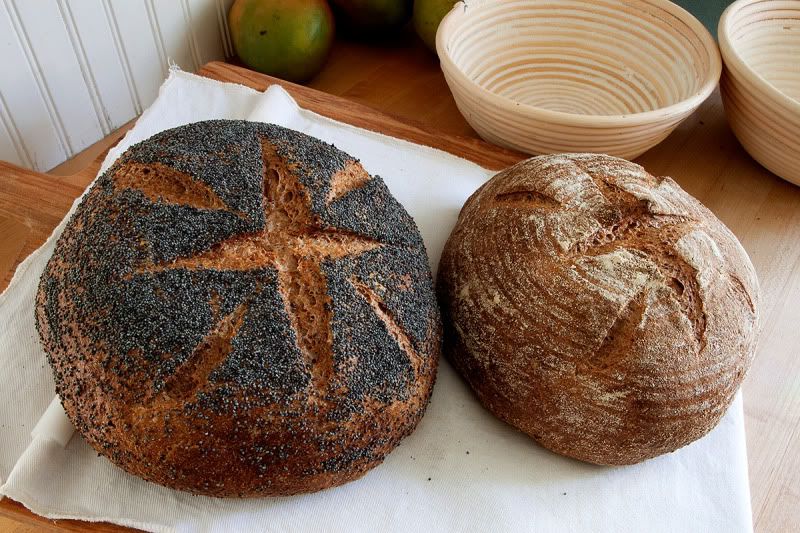
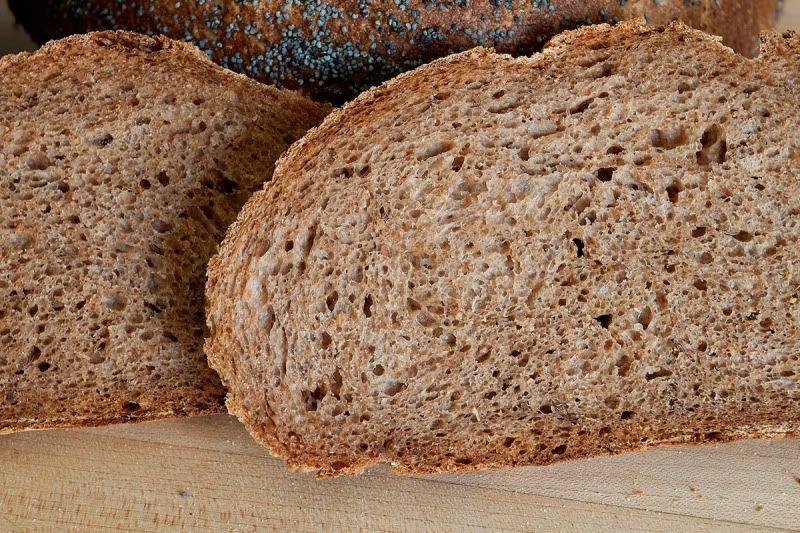
While the crumb make look dense, it is actually very even, light and moist. I normally have a more open crumb, but let this round overproof just a touch and was heavy-handed on the slashing. The flavor is clean and full with very little aftertaste..and meets the approval of all family members. The crust is thin and crunchy.
The non-poppy-top loaf was for those who get drug tested at work...
John
- ryeaskrye's Blog
- Log in or register to post comments
These are just gorgeous. It gives me something to aspire to.
weavershouse
That's a lot of vital wheat gluten!
Mini
Thanks vhaimo and weavershouse for the comments.
Mini, thanks for taking notice. Looking back at Van Over's original formula, I find the VWG was at 7.8% with the rye at 43%. Somewhere in my meandering trials I'm sure I tweaked beyond my knowledge. As a resident rye guide here at TFL, what amount do you think would be sufficient? Do I even need it if I am using a high-gluten flour for 50% of the total flour? I wouldn't mind simplifying my own version.
got a small pkg sitting in the cupboard. I don't free form, big difference. You could reduce it (why is it in there?) to a level tablespoon and see if you like the texture and hold better.
Mini
And it doesn't look at all too dense to me. It is a rye bread, after all!
In case you want to experiment with flavors, I find that fennel or dill play very nicely with the rye when substituted for the caraway. Even people who "don't like rye" (caraway, really) enjoy the bread with those seeds. Note that I haven't tried a mixture of them.
Good bread!
Paul
Paul,
Thanks for the comments.
I love fennel and put it in a lot of different dishes. So, I have used it in rye breads quite often.
I even use Mini's mixture and will light toast equal amounts of fennel, coriander and caraway (and sometimes anise) and then crush them in a mortar to add in bread. Really quite good. I particularly like dill havarti cheese on rye, so I will have to try adding dill directly at some point. Nice suggestion
I also agree with you that most people who say they don't like rye, really mean they don't like caraway. BTW, caraway is supposedly a carminative, something to help relieve gastrointestinal distress. Makes you wonder if the bakers of old added caraway just for flavor alone or if they knew of its fortuitous properties. Maybe that's why caraway is in sauerkraut as well...
Very nice ryeaskrye! I was wondering why you add the VWG myself. I think you would get a good rise without it considering the amount of BF. Maybe you would need a little more attention to development like a third S&F. Just a thought about the proof time. My experience is that with high percents of whole grains, especially rye, I get better spring and over all expansion with shorter proof times. This is such a beautiful loaf I'm going to try your mix tomorrow.
Eric
...if you do bake this up. And some pictures, of course.
An interesting point for me about the recipe is the dramatic transformation the dough undergoes, from annoying to touch, to being easy to manipulate after the 2 folds. The dough is quite sticky and wet when you first mix it up, but resist adding more flour. I'm sure you already know this from your recent rye bakes. I degas as little as possible when shaping and find I have better outcomes without a benching period. I shape and put in the brötform in one step. Maybe I need to revisit that.
I agree that a third fold might be in order. However, in my 3 years of toying with this formula, I dropped from doing 3 folds to 2 as I preferred to let the dough proof for ~2 hours without being disturbed and If I kept the 3rd fold, it lengthened the overall fermenting time and caused a few over proofed loaves.
Have fun Eric...I'll be anxious to see your outcome.
Well...my "Why?" would be that it was in the original formula from Van Over's book that I started out with. What Charles' "Why?" would be, I'm not sure.
So what is the purpose of Vital Wheat Gluten?
While I never really stopped to think about it, the formulas I have baked from Hamelman and Reinhart for ryes have not included VWG. Hmmm...I should have noticed that by now.
I will be baking my formula Saturday for our family's Easter gathering on Sunday. I think I'll experiment and leave it out. I have some Sir Lancelot HGF from Stan at NYBakers that I will substitute for the bread flour.
John
Could you explain how you achieved this scoring? What tool? Any tips on how to do it so nicely? Thanks!
Varda
Varda,
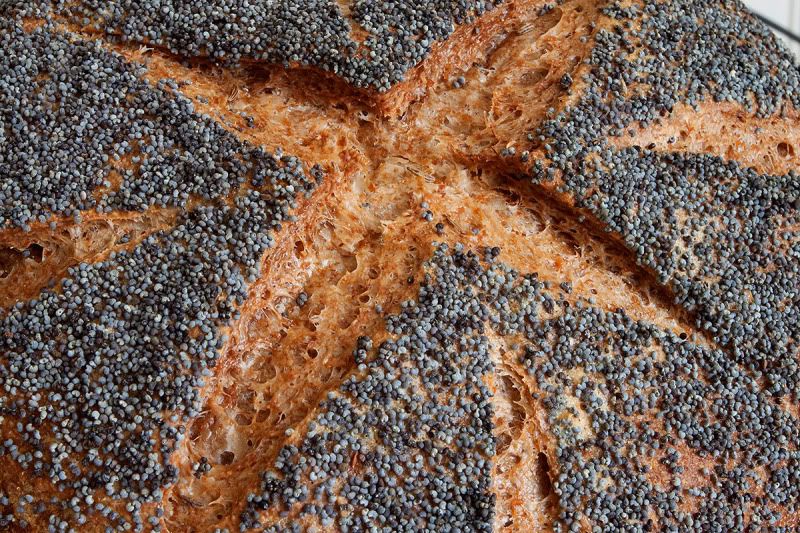
I simply scored an 'X' in the middle and then 4 smaller scores between the legs of the 'X' as shown below.
As for the tool, I used a double-edged razor blade mounted on a Starbucks stir-stick. I find dipping the blade in a cup of water between cuts helps when scoring ryes. There is an excellent scoring tutorial by dmsnyder if you do a search on TFL for it.
Criticizing my own loaves, I have to remember to score rye with a more shallow cut.
I have been using an exacto knife which is great for cutting balsa but not for dough apparently. I didn't even know that double edged razors were still sold, but I guess they must be. And I suppose you can criticize your loaves as much as you want, but I'm going to use them as a model for scoring, because they look so terrific. Thanks!
Check out David's post:
http://www.thefreshloaf.com/node/10121/bread-scoring-tutorial-updated-122009
Based on his post, I purchased several serrated-blade knives. I found the red Komachi tomato knife he has pictured at a discount store for $4, and it is one of the best scoring tools I have for "white" dough breads. I highly recommend it. The other bands did not work so well...
Being a old-school graphic designer, I can handle X-ACTO blades with some dexterity, but found they did not work so well for me. I even tried a scalpel.
For ryes and wet dough, I find the double-edge razor blade on a stir stick still works best. Two key points for me were to hold the blade at ~30° angle to the surface of the dough when scoring and to score quickly.
John
I will check out Dave's video. And put together a proper scorer. Thanks a lot.
Varda