The Fresh Loaf

A Community of Amateur Bakers and Artisan Bread Enthusiasts.

Blogs

Benito's picture
Benito

Still enjoying ourselves in Fort Lauderdale and starting to see friends gradually.  So tonight we are hosting a dinner party and the main course has some olives in it, a chicken saltimbocca so I decided I’d bake another Fougasse, my second time baking this bread for those who love crust.  It is quite fun to make, with very little effort or skill you can turn out a fancy looking delicious bread.  Even with my lack of artistic talent the bread baked up looking like a nice large monstera leaf.  If you like crust bread give this a go.

Levain Overnight

12 hours warm room temperature 74-76°F. 


In large bowl add the water and the levain then dissolve.  Then add salt and olive oil, then whole wheat flour and mix, finally add bread flour. After 10 mins of autolyse, slap and fold to develop the dough moderately.  Towards the end of mixing add the Kalamata olives and oregano through stretch and folds in the bowl.  Finally give the dough a bench letterfold and place into the bowl.


At 30 min intervals give the dough coil folds.  After the third set give the dough 1 hour 30 mins rest.

Allow the dough to rise to about 40-50% then shape.


To remove the dough from the bowl drizzle olive oil onto and around the edges of the dough.  Then gently spread the olive oil over the surface and around the sides.  In the bowl flip the dough to oil the bottom of the dough.

Transfer the dough to a parchment lined tray, smooth side up and gently stretch the dough out into a rough triangle.  Rest for 10 mins then cut the dough.  Make 2 or 3 short vertical cuts from the base of the triangle to the top, leaving space between the cuts. While cutting, use your other hand to gently spread the dough with your fingers to encourage it to open and prevent it from sticking back together. After cutting, spread the sides of the triangle outward to widen the cuts even further. Next, make diagonal cuts from the center cuts outward toward the sides of the triangle, while spreading the sides outward so the cuts open wide.  Place into a large plastic bag and close.  Allow to proof for 1 and a half to 2 hours.  30 mins prior to the end of proof pre-heat the oven to 450°F.  (Changes for the second time - cutting soon after stretching)


The dough should pass the finger poke test when ready to bake.  Prior to baking brush the dough with more olive oil.

(Changes for second time - brushing with olive oil prior to baking)


Bake at 450°F for 25-30 mins on the lowest rack rotating partway through.


After baking brush with olive oil and you can add herbs to your olive oil to add more flavour if you wish.


Cool on a rack.


Best eaten the day of bake. Reheat a minute or two under the broiler.


My index of bakes

Isand66's picture
Isand66


I have not made a bread in a long time using this technique which extracts as much flavor as possible from the flour.  I wanted to try it using almost 100% fresh milled flour.  Their is a tiny little bit in the seed starter but other than that it’s a combination of Barton Springs Mill Danko Rye, Yecora Gold Whole Wheat, Spelt and another companies Durum berries.

Except for the Spelt, the other grains were milled, sifted with a #30 drum sieve, re-milled with my Mockmill 200 with the stones starting to click and sifted again with a #40 drum sieve. The Spelt was milled, sifted with a #30 and then re-milled but not sifted again.

I used some real Parmigiana Reggiano and Vermont extra sharp cheddar cheese both chopped into pieces.  Since the cheese was added with the flour with the first mix, the flavor was very pronounced in the baked bread.  I might try adding it before the second bulk next time.

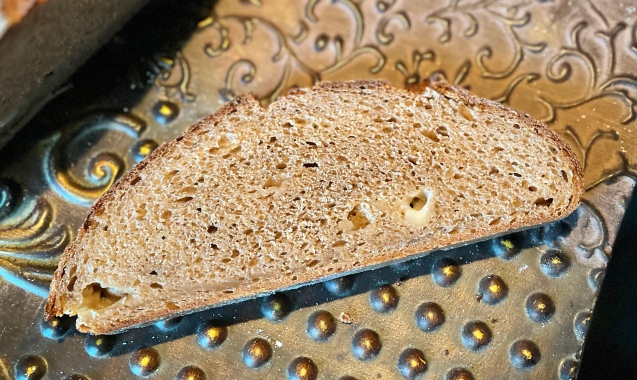
The final bread was very tasty with a nice crumb.  It was slightly over-proofed as I didn’t get much oven spring and it flattened out considerably after taking it out of it’s banneton.  I should not have let it sit out as long as I did after taking it out of the refrigerator after bulk retarding.
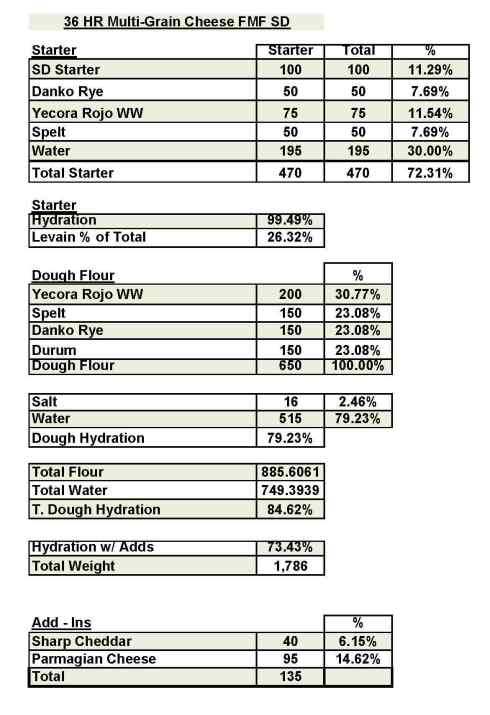
 

Directions

 Starter

Mix ingredients in a bowl until thoroughly combined.  Cover the bowl and let it sit at room temperature for around 8 hours.  The starter should almost double when ready to proceed.

 Main Dough

Mix the flours, 465 grams of the water together in your mixer or by hand until it just starts to come together, maybe about 1 minute.  Next add the cheese and mix for another minute.  Put the dough in a slightly covered oiled bowl and put in the refrigerator for 12 hours.

The next day add your starter, rest of the water (50 grams) and salt to the dough and mix by hand or in your mixer until it is thoroughly mixed and evenly distributed.  Due to the high water content in the 100% hydration starter this dough is very easy to mix by hand and is very silky and smooth.

Bulk rise at room temperature for 2 hours until it grows around 1/3 in volume doing stretch and folds every half hour until it has developed the correct amount of strength.

Put the dough back into the refrigerator for around 20-30 hours.

When you take the dough out of the refrigerator you want it to have almost doubled in volume but if it didn’t it should still be fine.  (Mine only rose about 1/3 in volume).  Let it rise at room temperature for around 2 hours or until the dough has doubled from the night before. (I used my proofer set at 82 degrees for 2 hours but I should have only let it go for about an hour).

Next, shape as desired.  Make sure you use enough rice flour with flour in your bowl/basket to prevent this moist dough from sticking.

Cover the dough with a moist towel and let sit at room temperature for 1.5 to 2 hours.

When the dough is ready to bake, score as desired and prepare your oven for baking with steam.

Set your oven for 540 degrees F. at least 45 minutes before ready to bake.  When ready to bake place the loaves into your on  your oven stone with steam and lower the temperature immediately to 450 degrees.   When the loaves are nice and brown and reached an internal temperature of 210 degrees F. you can remove it from the oven.

Let the loaves cool down for at least an 3 hours or so before eating as desired.
ADVERTISEMENT   
leslieruf's picture
leslieruf


After the problems of the first attempt, I reread the feedback I received and here is my reworked version. 

First up, the starter.  It was looking good on the first refresh so I decided to stay with an all bread flour starter.  This means that that percentage of white flour in the dough is higher and and there is less whole wheat.   Secondly I started early in the day while the starter was fresh and bubbly. 

Soaker:  I mixed the 20 g rolled oats with 30 g milk and left for the duration of the autolyse.  I soaked 25 g cranberries in some hot water.  

The main dough:  I decided to do a short autolyse, something I haven’t done much lately.  I mixed 93 g bread flour + 93 g whole wheat (milled 27 January and stored in the refrigerator) + 133 g Emmer, added 188 g water and left for just 20 minutes.  It was a little on the dry side but I held off adding extra at this point.  I then added  196 g of the nice and bubbly starter and mixed.  It was a little hard to combine so I added another 10 g water, the rolled oats , the drained cranberries and  6.5 g salt.  I kept the mixing time short, shaped the dough into a ball and left to rest. 

40 minutes later I laminated the dough very gently and sprinkled over 20 g chopped pecans. 

40 minutes later I did a gentle coil fold and repeated this one more time. 

3 ¼ hours after mixing it had increased in size and was a little puffy.  Scared that it would over ferment again, I opted to turn dough out and preshape at this point.  After 20 minutes I did final shape.  I watched the dough very carefully and 2 hours later turned loaf out of banneton, slashed and baked for 17 mins at 240 degrees C covered and 19 minutes uncovered at 235 degrees C.  


It smelt amazing during the bake.  Definitely a better bake, and whilst not a huge oven spring, I am very happy with the outcome.  


The crumb is much better this time. 


So there are minor changes to the soaker, but the possible issue of insufficient gluten seems to have been resolved with the higher % of bread flour.  Maybe the whole wheat flour worked better because it had aged a bit,  Not sure if that is the total answer but next time I may be able to allow bulk ferment to go a bit further. 

Leslie


Isand66's picture
Isand66


I’ve been wanting to make a bread with spent grains for a long time. My good friend Mike has become quite the home brewer and he graciously gave me some spent grains from his latest brew. He’s making a dark Stout type beer and the spent grains were a rich mahogany color full of flavor. They really ended up turning the dough a dark brown color reminicient of a pumpernickel style bread.

I milled the berries with my Mockmill 200 and the Big Country Whole Wheat from Barton Springs Mill was sifted and milled twice with a #30 sieve, and then sifted with a #40. The Spelt was also from the same mill and only sifted once with the #30 and milled twice.

I added some nice organic honey for a touch of sweetness.

The spent grains added a little extra hydration since they were very moist so overall this was a nice hydrated dough.

I really like the way this came out. You can really taste the maltiness added from the spent grains and the combo of fresh milled flours made this a keeper.

Formula

Levain Directions 


Mix all the levain ingredients together for about 1 minute and cover with plastic wrap.

Let it sit at room temperature for around 6-7 hours or until the starter has almost doubled. I used my proofer set at 76 degrees so it took around 5 hours for me. Either use in the main dough immediately or refrigerate for up to 1 day before using.

 Main Dough Procedure

Note: I use an Ankarsrum Mixer so my order of mixing is slightly different than if using a Kitchenaid or other mixer. Add all your liquid to your mixing bowl except 50-80 grams. Add the levain in pieces and mix for a few seconds to break it up. Next, add all your flour to the bowl and mix on low for a minute until it forms a shaggy mass. Cover the mixing bowl and let it rest for an hour.   Next add the salt, honey, spent grains and remaining water as needed and mix on medium low (about speed 3) for 24 minutes.  If you are using a more traditional mixer you would only mix around 7-10 minutes.

Remove the dough from your bowl and place it in a lightly oiled bowl or work surface and do several stretch and folds.  Let it rest covered for 10-15 minutes and then do another stretch and fold.  Let it rest another 10-15 minutes and do one additional stretch and fold.  After a total of 1.45 hours place your covered bowl in the refrigerator and let it rest for 12 to 24 hours. I use my proofer set at 79-80 degrees. If you are leaving it at room temperature 72 degrees I would let it sit out for 2 -2.5 hours before refrigerating. Depending on how developed the dough is after the initial mix you may not need to do as many S&F’s.

When you are ready to bake remove the bowl from the refrigerator and let it set out at room temperature still covered for 1.5 to 2 hours or if using a proofer set at 80 degrees for 1 hour.  Remove the dough and shape as desired and cover with a moist tea towel or plastic wrap Sprayed with cooking spray and let rise at room temperature for 1 1/2 – 2 hours.  (I use my proofer set at 80 F and it takes about 1 hour to 1.5 hours). You will need to judge for yourself if you have a nice fermented dough before baking in the oven. I also added the topping mix directly to the bottom of my bannetons and rolled the dough side to side to make sure I had good coverage. You can also spray a a tea towel and then sprinkle the topping on the towel and roll the dough onto the towel.

Around 45 minutes before ready to bake, pre-heat your oven to 540 degrees F. and prepare it for steam.  I have a heavy-duty baking pan on the bottom rack of my oven with 1 baking stone on above the pan and one on the top shelf.  I pour 1 cup of boiling water in the pan right after I place the dough in the oven.

After 1 minute lower the temperature to 450 degrees.  Bake for around 35 minutes or until the breads are nice and brown and have an internal temperature around 200-210 F. 

Take the bread(s) out of the oven when done and let them cool on a bakers rack for as long as you can resist. 

  
Benito's picture
Benito

One of my plans in bringing my homemade miso down to Fort Lauderdale was to use it in a couple of bakes.  We were out of bread and needing more bread for toast and dinners.  I’ve wanted to bake a bit more lean breads but baked in my Pullman pan since that is what I prefer for sandwiches and toast.  This is what I came up with.  I have to say that dough seems to ferment faster down here.  I’m not sure why, it is my starter from Toronto so the only differences would be the flour or the water.  I don’t think it is a temperature related thing since Toronto in the summer is bloody hot, hotter than it is here right now.  Also I have a proofing box in Toronto, while I don’t have one here.

My red miso paste is almost 1 g sodium per 20 g miso


For 1 loaf in a 9x4x4” Pullman pan.


Build stiff levain, ferment at 74°F for 10 hours overnight.

Starter 6 g, water 23 g bread flour 38 g


Bread flour 296 g, Whole Wheat Flour 83 g, Water 294 g, all levain, hold back water 13 g, salt 4 g and Red Miso 50 g


In the morning, add miso and salt to the water and dissolve.  Then add the levain and break down the levain as well as you can.  Add both the flours and mix well until no dry bits are left. After 10 mins of rest start gluten development with slap and folds then gradually add the hold back water in several aliquots using Rubaud to fully incorporate the water well.  Bench letterfold, remove aliquot, then at 30 mins intervals do coil folds until good structure is achieved.


Once the dough has risen 40% then shape the dough into a batard and place in prepared pan.


Final proof the dough until it has reached 1 cm of the rim of the pan.  pre-heat oven at 425°F .


Once oven reaches 425ºF score top of dough and then brush with water.  (I decided last minute to sprinkle with sesame seeds). Transfer to oven and bake (without steam) for 25 mins.  Rotate the pan and drop temperature to 350ºF.  Bake for another 25-30 mins rotating as needed until browned.  Remove from the pan and place directly on the rack baking for another 5-10 mins to firm up the crust.


My index of bakes.


Benito's picture
Benito

Down in Florida we are a bit more social than we are at home in Toronto.  We have friends we don’t see often so try to get together a few times each visit.  One of our close friends invited us over for dinner with his new partner so of course I offered to bring rolls to have with their Italian dinner.  Crusty rolls might have been better with Italian but I decided to use up some of my mashed sweet potato I have left over for some soft milk rolls.  

I forgot to get photos of the rolls when they were pulled apart, but I can say they turned out just as I wanted, soft, shreddable and yummy.

24 rolls in a 7.5 x 11.5” pan 


egg wash: 1 yolk and 1 tbsp milk, beaten…


Prepare the stiff sweet levain overnight or the day before and refrigerate when ready.


Prepare the butter paste by blending very soft butter with flour.


Cook Tangzhong mixing flour and milk constantly until it becomes a thick roux.  Let cool before adding to final dough.  Or add to cold milk and egg to cool it down.  Add the levain and break it up into small pieces with your spatula.  Add and dissolved IDY if using.


To mix by hand, add the flour to the wet ingredients (milk, tangzhong and egg) to dissolve.  Next add the flour and mix with a silicone spatula until no dry flour remains.  Rest 10-20 mins.  Next perform French folds until the dough is well developed.  Smear the butter onto the dough and then fold to incorporate and then perform further French folds until well developed.  Gradually add the mashed potato and knead to incorporate it well into the dough.  Form into a tight ball and place in a bowl covered with plastic or a damp cloth @ 82°F for 3-4 hours, some rise will be visible. Alternatively, you could mix the mashed potato and butter and then add the mixture to the developed dough until well incorporated.


Butter a large baking pan or line the pan with parchment.  Punch the dough down and then divide into 24 equal portions.  Form each into tight boules.  Place in the buttered baking pan seam side down.  Cover them and allow them to fully proof about 4-6 hours, they should pass the poke test.


About 30 mins before the end of proofing time, whisk your remaining egg and milk and then brush the small boules.


About 30 mins prior to end of final proof preheat the oven to 350°F. 

Immediately prior to baking brush the dough again with the egg and milk mixture.


Bake the rolls uncovered for 30-35 minutes or until the internal temperature is at least 190F. Cover if your rolls get brown early in the baking process.


Remove the bread from the oven but not the pans, brush the tops with the melted butter while hot, and then let cool for 10 minutes before pulling the bread from the pans. You may need to slide a butter knife down the sides of the pan to loosen the bread, but I have found parchment paper to be unnecessary.  Sprinkle with fleur de sel if you wish after brushing with butter. 

My index of bakes.

pmccool's picture
pmccool

Go Chiefs!

Ahem.  Well.  Yes, that needed to be said.

Tomorrow's Super Bowl festivities will feature pulled pork sandwiches because Kansas City.  A superlative sandwich requires a superlative bun.  For superlative buns, it's hard to improve on Portuguese Sweet Bread (this one compliments of Mark Sinclair.)  Although Ian, bless him, continues to experiment.

These are all suited up and ready to play:

And, since Mardi Gras is drawing near, some king cake, too:

Paul

alfanso's picture
alfanso

I made several process improvements. Last week's Vermont SD version was to dip my toe in the water giving the couronne a try.

Changes:

  • Replaced the Vermont SD with my standard Sesame Semolina dough
  • 8 balls @125g each rather than 6 balls at 167g (thanks to Will for referencing the 8 config in his writeup)
  • Moistened balls and rolled in bowl of sesame seeds, rather than sprinkled on as was last week's afterthought.
  • Placed directly on parchment inside a bottomless springform pan with a round container in the center to give it shape.  Both removed prior to placing the ring back in retard for another several hours.
  • Scored consistently at the same level all around

 Baked at the same 460 dF with steam.

Because the balls are constrained by being placed shoulder to shoulder, there isn't a lot of room for internal expansion of the crumb.  But they will still make tasty accompaniments at the dinner table.

The training wheels have been removed.   This was the test to decide whether a third bake will accompany us to a friend's house for dinner next week.  It will.

rscalia's picture
rscalia

Because of relocating to Europe (220V) I will sale my barely used Famag Spiral mixer.The unit is basically brand new (see picture). It comes with the offset bar, the sprocket to increase speed to 312 RPM (high adoration dough) and additional head levers (all of which was never installed and is brand new - I can provide additional pictures of the accessories to those who are interested). A overall package of $ 2,000+. I am asking $1,400 not including shipping. Local pick up is available and preferable given the weight of the unit. 


Pages

Subscribe to RSS - blogs