The Fresh Loaf

A Community of Amateur Bakers and Artisan Bread Enthusiasts.

Blogs

BenM's picture
BenM

can anyone offer advice on mixing a recipe written for hand mixing in a home spiral mixer?  An example would be the Basic Country Bread from the Tartine book. It’s a great bread and always comes out good. I would lIke to know how I could get similar results if the dough was mixed in a tabletop spiral mixer?

pmccool's picture
pmccool

A few months ago, I was given a one-pound package of einkorn grain.  While I've been interested in einkorn and other primitive wheats, the high cost (relative to modern wheats) has put me off.  I don't have any compelling health issues that would militate against using modern wheats, so my curiosity hasn't been enough to override the high price point.

Since I was at the point of needing to make bread again, and since the einkorn was sitting on the shelf, I decided it was high time to mill the grain and use it in a bread.  I spent quite a bit of time noodling through the archives here on TFL, looking at einkorn posts.  The bulk of those were levain-based breads.  Since I wanted to get a sense of the einkorn's flavor without other influences, and since there was so much commentary about einkorn's weak gluten, I went in search of a yeasted version.  What I eventually settled on was a recipe from Jovial Foods for an Easy Einkorn Whole Grain Bread.

The recipe produces a fairly straightforward no-knead bread.  The one tweak that I made was to bump the salt content up from 3g to 8g.  After combining the water, honey, and yeast, I milled the flour straight into the bowl, added the salt, and stirred everything until all of the flour was absorbed and a rough dough formed.  The dough was left in the bowl, covered, and allowed to ferment for 30 minutes. 

At the end of the short bulk ferment, the dough looked puffy and was perhaps 50% larger.  At that point, the dough was scraped from the bowl into a well-greased 8x4 loaf pan.  I smoothed the top of the loaf off with wet fingers.  The loaf was covered and allowed to ferment for another 30 minutes.  The oven was preheated while the loaf fermented.

At the end of the final ferment, I ran into a snag.  The loaf had expanded nicely and was domed about half an inch above the rim of the pan.  The dough lived up to einkorn's reputation for stickiness and did not want to release the plastic wrap that had been draped over the pan.  I used a bowl scraper to gently coax the dough loose from the plastic but still wound up with a scalped loaf.  Once again, I wet my fingers and smoothed it out as much as I could without causing further injury.

Fortunately, baking went off without a hitch.  At the end of 40 minutes, the internal temperature was between 195F and 200F, and the bread was a lovely shade of brown.  The dough was allowed to cool in the pan for 15 minutes and then turned out to cool on a rack. Once cooled, the loaf was placed in a plastic bread bag.

I used the bread the next day to make a ham sandwich for lunch.  The bread is delicious, without any hint of the bitterness that some people have noted in einkorn.  Does it taste significantly better than whole wheat bread made with modern wheats?  Not that I can perceive.  And certainly not enough to justify paying multiples of the price for modern wheat if flavor is the primary selection criteria. 

If you look closely at the crumb, you'll notice that the bread was just slipping across the border between well-fermented and over-fermented.  The crumb in the upper part of a slice is rather coarse and open while the crumb at the bottom is showing signs of compression.  Overall, if I were to use this recipe again, I'd reduce the yeast content from 7g to 4-5g.  I'd also dial the hydration back to about 70%, since the bread is extremely moist at the recipe's 77%.

Here are a couple of pics that show the loaf:
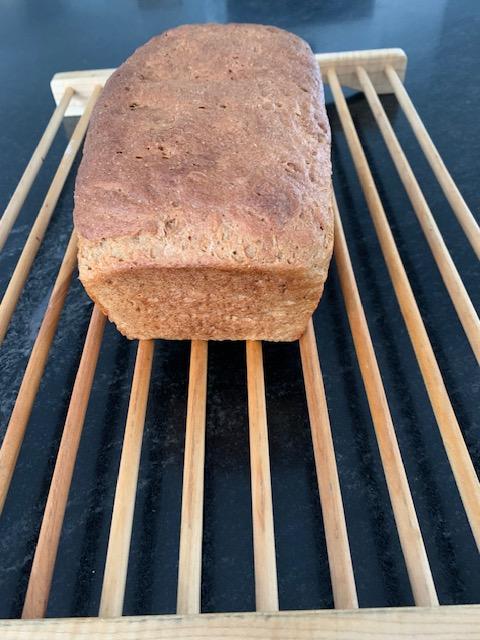
Barring the tussle with the plastic wrap, it would have been quite pretty.

Paul

dmsnyder's picture
dmsnyder

Sourdough Bread baked the same day as mixed versus baked after overnight cold retardation.

David Snyder

February, 2024

Last week I baked my Italian Sourdough bread for the first time without overnight retardation. It was delicious. This made me wonder about some of my other breads that I always have cold retarded on the theory that this developed better, more complex flavor. So, this week, I made my favorite multigrain sourdough and baked one loaf the same day as it was mixed and bulk retarded and baked another loaf from the same batch of dough after an overnight retardation.

 Both loaves were proofed for 50 minutes at room temperature. One was then baked after another 45 minutes of proofing. The other was refrigerated for about 18 hours, then warmed at room temperature for an hour before baking. Both loaves were baked in Lodge Combo Cooker cast iron Dutch ovens for 30 minutes covered at 475ºF. The loaf baked the without retardation was baked another 15 minutes uncovered at 460ºF. The retarded loaf which was a bit bigger was baked for 20 minutes more uncovered at 460ºF.

Loaf baked the same day as mixed

The crumb

Loaf cold retarded for 18 hours

The crumb

 The unretarded loaf had a slightly sweeter flavor and was a bit less sour. It had a significantly more open crumb. This is hard to explain. It was on the border of over-proofed before baking. Maybe that explains it. The retarded loaf was a bit more sour, and the whole wheat flavor seemed more forward. Both were delicious.

The bottom line for me is that either method could be followed according to my convenience. Both produced delicious breads that differed from each other in minor ways only.

I would love to hear about other bakers' experience with this.

David

 P.S. For those who like very open crumbs, here's a slice of the loaf baked without retardation:


David


Benito's picture
Benito

I enjoy making Key Lime pies when we’re down here in Florida.  I do love chocolate and decided to try an Oreo cookie crust with the lime coconut filling.  I’ve not made an Oreo cookie crust before, in the past when I’m home if I want to have a chocolate crust I have a recipe that I have developed for a Pate Sucrée pastry, but without my food processor I do not make it.

Ingredients:

  • 250 ml (1 cup) heavy cream
  • 4 tablespoons icing sugar (sub 2 tbsp sugar)
  • 5-ounces (2/3 cup) unsweetened coconut milk
  • 14-ounces (1 can) sweetened condensed milk
  • 1/4 cup freshly squeezed or bottled Key lime juice
  • Zest of 1 lime, finely grated

To garnish:

  • Whipped cream (optional)
  • Toasted coconut (optional)
  • lime slices (optional)


Bourbon whipped cream idea

  • 1 Cup Heavy Whipping Cream
  • 2 Tablespoons Sugar
  • 1/2 Teaspoon Vanilla
  • 1 teaspoon Bourbon


Instructions:

  • In a bowl, using an electric mixer beat heavy cream and sugar until creamy. Add the coconut milk, condensed milk, lime juice, and lime zest and whisk until fluffy and thick. Pour into crust and refrigerate for at least 30 minutes to set.
  • Before serving, top pie with whipped cream, sprinkle some toasted coconut and/lime slices or lime zest(if desired). Slice and serve.

Ingredients

22 regular Oreo cookies

5 Tablespoons (71g) unsalted butter, melted


Instructions


  • Make the crust: In a food processor or blender, pulse 22 Oreos (including the cream filling) into a fine crumb. You can also place them in a zip-top bag and crush them into fine crumbs with a little arm muscle and a rolling pin. You should have about 2 cups (packed) crumbs, or 250g. Pour crumbs into a large bowl.
  • Add the melted butter and stir to combine. The mixture will be thick and quite wet. Try to smash/break up any large chunks.
  • Pour the mixture into an ungreased 8-inch, 9-inch, or 10-inch pie dish, cake pan, springform pan, or square pan. With medium pressure using your hand, pat the crumbs down into the bottom and up the sides to make a compact, thick crust. If the mixture seems really wet and is not forming a nice crust, grind up 2 more Oreos and mix those crumbs in. Tip: You can use a small flat-bottomed measuring cup to help press down the bottom crust and smooth out the surface, but do not pack down too hard. If making a pie, run a spoon around the bottom “corner” where the edge and bottom meet to help make a rounded crust⁠—this helps prevent the crust from falling apart when you cut slices.
  • For a baked dessert, pre-bake this crust per your filling recipe directions. I usually pre-bake for 8–10 minutes at 350°F (177°C). For a no-bake filling such as cookies & cream pie, bake for 10–12 minutes at 350°F (177°C). Cool the crust completely before using, unless your no-bake filling recipe instructs otherwise.  Don’t forget to use pie weights to prevent the crust sides from sagging and the bottom from puffing up.


Although we enjoyed the pie, I found the Oreo cookie crust too sweet for me.  I think I’ll go back to making Ritz Cracker crusts when I’m without my food processor.

My index of bakes

Benito's picture
Benito

Time for another dinner party at our place.  So for last night’s main course I decided to make chicken sliders and made a batch of miso sweet potato sourdough milk rolls topped with sesame seeds.  I eliminated the salt and just used miso for the salt.  I looked at my salt content of my miso again and believe I had previously miscalculated the salt in it.  I made the mistake of not accounting for the water that the soybeans are hydrated with during the soak.  After assuming that the soybeans absorb their equal weight in water during the soaking is now use 14.8% as the amount of salt in the miso.

24 rolls or 12 buns in a 7.5 x 11.5” pan 


egg wash: 1 yolk and 1 tbsp milk, beaten…


Prepare the stiff sweet levain overnight or the day before and refrigerate when ready.


Prepare the butter paste by blending very soft butter with flour.


Cook Tangzhong mixing flour and milk constantly until it becomes a thick roux.  Let cool before adding to final dough.  Or add to cold milk and egg to cool it down.  Add the levain and break it up into small pieces with your spatula.  Add and dissolve miso paste.


To mix by hand, add the flour to the wet ingredients (milk, tangzhong and egg) to dissolve.  Next add the flour and mix with a silicone spatula until no dry flour remains.  Rest 10-20 mins.  Next perform French folds until the dough is well developed.  Smear the butter onto the dough and then fold to incorporate and then perform further French folds until well developed.  Gradually add the mashed potato and knead to incorporate it well into the dough.  Form into a tight ball and place in a bowl covered with plastic or a damp cloth @ 82°F for 3-4 hours, some rise will be visible. Alternatively, you could mix the mashed potato and butter and then add the mixture to the developed dough until well incorporated.


Butter a large baking pan or line the pan with parchment.  Punch the dough down and then divide into 24/12 equal portions.  Form each into tight boules.  Place in the buttered baking pan seam side down.  Cover them and allow them to fully proof about 4-6 hours, they should pass the poke test.


About 30 mins before the end of proofing time, whisk your remaining egg and milk and then brush the small boules.


About 30 mins prior to end of final proof preheat the oven to 350°F. 

Immediately prior to baking brush the dough again with the egg and milk mixture.  Top with sesame seeds.


Bake the rolls/buns uncovered for 30-35 minutes or until the internal temperature is at least 190F. Cover if your rolls get brown early in the baking process.


Remove the bread from the oven but not the pans, brush the tops with the melted butter while hot, and then let cool for 10 minutes before pulling the bread from the pans. You may need to slide a butter knife down the sides of the pan to loosen the bread, but I have found parchment paper to be unnecessary. 


Chicken Sliders

INGREDIENTS

  • 1 (12-ounce) package Hawaiian sweet rolls, such as King’s
  • 4 ounces sharp cheddar cheese (about 1 cup shredded)
  • 4 ounces low-moisture mozzarella cheese (about 1 cup shredded)
  • 1 clove garlic (1 tsp garlic powder)
  • 1 pound boneless, skinless cooked chicken
  • 4 medium scallions
  • 1/4 cup mayonnaise, preferably Kewpie
  • 1/4 cup sour cream
  • 1 tablespoon Dijon mustard
  • 1/2 teaspoon freshly ground black pepper
  • 1/4 teaspoon kosher salt
  • 3 tablespoons unsalted butter
  • 1 tablespoon white sesame seeds, preferably toasted


INSTRUCTIONS


  • Arrange a rack in the middle of the oven and heat the oven to 350°F. Without separating the rolls, cut 1 package Hawaiian sweet dinner rolls in half horizontally with a serrated knife. Place the bottom half of the rolls cut-side up on a cookie tray lined with parchment.
  • Grate 4 ounces cheddar cheese and mozzarella cheese (about 1 cup each). Place both cheeses in a medium bowl and toss to combine. 
  • Shred 1 pound cooked chicken into bite-size pieces (about 4 cups). Thinly slice 4 medium scallions (about 1 cup). Place the chicken, scallions, 1/4 cup mayonnaise, 1/4 cup sour cream, 1 tablespoon Dijon mustard, 1/2 teaspoon black pepper, and 1/4 teaspoon kosher salt in a large bowl and stir to combine.
  • Arrange half of the cheese mixture onto the bottom half of the rolls in an even layer. Transfer the chicken mixture over the cheese and spread into an even layer. Top with the remaining cheese mixture.
  • Place 3 tablespoons unsalted butter and the garlic in a small microwave-safe bowl and microwave until melted, about 30 seconds. (Alternatively, melt the butter on the stovetop.) Brush half of the garlic butter on the cut side of the top half of the rolls. Place the top half of the rolls over the sliders cut side down.
  • Cover the baking dish tightly with aluminum foil.
  • Bake until the cheese is melted, 20 to 25 minutes. Uncover and bake until the rolls are lightly browned and toasted, 5 to 7 minutes more. Cut with the serrated knife to separate the sliders into individual sandwiches before serving.

I served the sliders with a Greek yoghurt coleslaw with pineapples raisins.

My index of bakes.

Pizzafreak's picture
Pizzafreak

Hi! 
My ciabatta recipe is 80% hydration. 
I knead in stand mixer for 4 minutes the stretch and fold 3 sets. every 30 minutes

then spray Water and bake it with tray of steam. 
250 deg C for 3 minutes. 
then 200 deg for next twenty minutes by turning it. 
may problem is ciabatta has huge air pockets on top and smaller ones at the bottom. 
what could be the problem?

Floydm's picture
Floydm

Hey Loafers -

It has been an absurdly long time since I've changed the featured posts on the homepage. Like over a year, I believe. Please let me know if you see or make a post that it'd be fun to draw some attention to and I can update it.

My rule of thumb for the features is to try to highlight posts by community members that ideally include a nice image, a formula, and a bit of thoughts and discussion. Ideally the posts are for things that aren't too perfect or complex, as the goal here is to encourage newcomers to get excited about baking rather than intimidate them.

* * *

I haven't been baking or posting often, but I'm still here every day. The spam has been pretty relentless recently but I haven't yet given up the fight.

* * *

TFL turned 19 in January. Wild, isn't it?

* * *

The site is long overdue for a technological revamp but I'm a bit paralyzed deciding what to do about that. I think it is safe to say if one were starting from scratch today it'd be unlikely that you'd build a site like this one is right now what with all the changes in technology and user expectation, but there is still a great community here that I don't want to disrupt. So I haven't. But that means the tools have gotten a bit old and funky here. It just isn't a great place to post from your phone, modify images, anything like that. Alas.

I hope folks here are all well. :)

Benito's picture
Benito

We are still enjoying our extended visit here in Fort Lauderdale where we are seeing friends that we don’t otherwise.  Since many of them know that I like baking bread, I am getting requests to bring bread to their dinner parties in lieu of bringing the usual bottle of wine.  So for this dinner party I decided to bring milk rolls since they alway seem to go over well, but decided to try using my homemade red miso to amp up the flavour of the sweet potato and butter along with the cheddar cheese on top of the rolls.  As I may have written about in the past, the amount of miso needed to really be a prominent flavour in a bread would probably make it too salty.  However, miso is rich in glutamate, an amino acid that is released as the Aspergillus oryzae’s proteinases bread down the proteins in the soybeans as the miso is fermenting.  Glutamate is one of the substances that give food umami, that fifth taste sensation.  So it really brings out the other flavours in the food.

Our host for the evening only heated up half of the two dozen rolls saying that he was being selfish and keeping the other dozen for himself since they were so delicious.  So I guess they went over well.

I am without my trusty Ankarsrum Assistent down here so I am developing all my doughs by hand.  For these enriched doughs it is a lot of slap and folds, but I am getting a bit of exercise from it.

24 rolls in a 7.5 x 11.5” pan 


egg wash: 1 yolk and 1 tbsp milk, beaten…


Prepare the stiff sweet levain overnight or the day before and refrigerate when ready.


Prepare the butter paste by blending very soft butter with flour.  Doing this makes the butter faster to incorporate by hand than adding the butter directly in my experience.  I don’t do this if I am using my Ankarsrum Assistent.


Cook Tangzhong mixing flour and milk constantly until it becomes a thick roux.  Let cool before adding to final dough.  Or add to cold milk and egg to cool it down.  Add the levain and break it up into small pieces with your spatula.  Add and dissolved miso paste and salt.


To mix by hand, add the flour to the wet ingredients (milk, tangzhong and egg) to dissolve.  Next add the flour and mix with a silicone spatula until no dry flour remains.  Rest 10-20 mins.  Next perform French folds until the dough is well developed.  Smear the butter onto the dough and then fold to incorporate and then perform further French folds until well developed.  Gradually add the mashed potato and knead to incorporate it well into the dough.  Form into a tight ball and place in a bowl covered with plastic or a damp cloth @ 82°F for 3-4 hours, some rise will be visible. Alternatively, you could mix the mashed potato and butter and then add the mixture to the developed dough until well incorporated.


Butter a large baking pan or line the pan with parchment.  Punch the dough down and then divide into 24 equal portions.  Form each into tight boules.  Place in the buttered baking pan seam side down.  Cover them and allow them to fully proof about 4-6 hours, they should pass the poke test.


About 30 mins before the end of proofing time, whisk your remaining egg and milk and then brush the small boules.


About 30 mins prior to end of final proof preheat the oven to 350°F. 

Immediately prior to baking brush the dough again with the egg and milk mixture.  Top with the shredded cheddar cheese to your preference.


Bake the rolls uncovered for 30-35 minutes or until the internal temperature is at least 190F. Cover if your rolls get brown early in the baking process.


Remove the bread from the oven but not the pans, brush the tops with the melted butter while hot, and then let cool for 10 minutes before pulling the bread from the pans. You may need to slide a butter knife down the sides of the pan to loosen the bread, but I have found parchment paper to be unnecessary.  


My index of bakes

dmsnyder's picture
dmsnyder

About a dozen years ago, I developed a version of my San Joaquin Sourdough (SJSD) that was inspired by a type of Italian bread. While SJSD is a lean bread with mixed flours that is cold retarded before dividing, the Italian version was made with AP and Durum flour and was enriched with both sugar and olive oil. It was still cold retarded in bulk.

Recently, there has been a discussion in a BBGA (Bread Bakers Guild of America) group about the pros and cons of retarding bread doughs. That got me wondering about how some of my breads that I always cold retard would be baked the same day as they were mixed. And, since I had wanted to make some rolls for sandwiches, I decided to do my experiment with the Italian version of my SJSD.

In brief, it was a raging success - to my taste, even better than previous bakes which had been retarded in bulk overnight.  It was moderately sour, somewhat sweet and had more of the nutty durum flavor. Now, I want to try other breads I have always retarded without retardation.

Here is my formula and procedure:


Sourdough Italian Bread: A SJSD Variant - One Day Version


David M. Snyder

February, 2024


Total Dough


Ingredient

Amount (gms)

Bakers' %

AP flour

334

60.7

Fine Durum flour

200

36.4

WW flour

11

2

Whole Rye flour

5

1

Water

415

75

Salt

10

1.8

Sugar

14

2.5

EVOO

14

2.5

Total

1003

181.9


Liquid Levain


Ingredient

Amount (gms)

Bakers' %

Liquid starter

40

40

Water

100

100

AP flour

70

70

WW flour

20

20

Whole Rye flour

10

10

Total

240

240

  1. Disperse the liquid starter in the water.
  2. Add the flours and mix thoroughly.
  3. Ferment at room temperature until expanded and bubbly (8-12 hours). If necessary, refrigerate overnight and let warm up for an hour before using.


Final Dough


Ingredient

Amount (gms)

AP flour

300

Fine Durum flour

200

Water

365

Salt

10

Sugar

14

Active liquid levain

100

EVOO

14

Total

1003


Procedures

  1. In a large bowl, disperse the levain in the water.
  2. Add the flours and sugar to the liquid and mix to a shaggy mass.
  3. Cover the bowl and let it rest for 20-60 minutes.
  4. Add the salt and olive oil and mix thoroughly. (Note: I squish the dough with my hands until it comes back together, then do stretch and folds in the bowl until it forms a smooth ball and the oil appears completely incorporated.)
  5. Transfer the dough to a 2 quart lightly oiled bowl, and cover the bowl tightly.
  6. After 30 minutes, do stretch and folds in the bowl. 
  7. After another 50 minutes, do a stretch and fold on a lightly floured board. 
  8. Continue bulk fermentation for another  1-2 hours, until the dough is puffy. If fermented in a glass bowl, you should see lots of little bubbles throughout 3the dough. Volume of the dough may have increased by 50% or so. 
  9. Divide the dough into 2 to 4 equal pieces and pre-shape as rounds or logs. Cover with a clean towel, baker's linen or plasti-crap and let rest for 10-20 minutes.
  10. Shape as Bâtards, Demi-Baguettes or Ficelles. 
  11. Roll the loaves on damp paper towels, then in a tray of sesame seeds. Alternatively, you can brush the loaves with water and sprinkle with sesame seeds.
  12. Proof for about 45 minutes seam-side up on parchment paper or seam-side down on linen, pleated to separate the loaves and supported at both long sides by rolled-up dish towels. Cover with a damp towel, baker's linen or plasti-crap.
  13. One hour before baking, pre-heat the oven to 480ºF with a baking stone and steaming apparatus in place.
  14. When ready to bake, uncover the loaves and transfer the loaves to a peel, seam side down.
  15. Score them as baguettes or bâtards, according to their shape. Steam the oven and transfer the loaves to the baking stone. 
  16. After 12 minutes, remove the steaming apparatus.  Continue baking for another 8-15 minutes until the loaves are nicely browned and the internal temperature is at least 205ºF.
  17. Transfer the loaves to a cooling rack. Cool completely before eating.

Roast chicken sandwich.

Happy baking!

David


kimmy5500's picture
kimmy5500

I have starter for free , I did a church event and have 6 left to give away. If you in my area. I feed my with organic whole and rye..

Pages

Subscribe to RSS - blogs