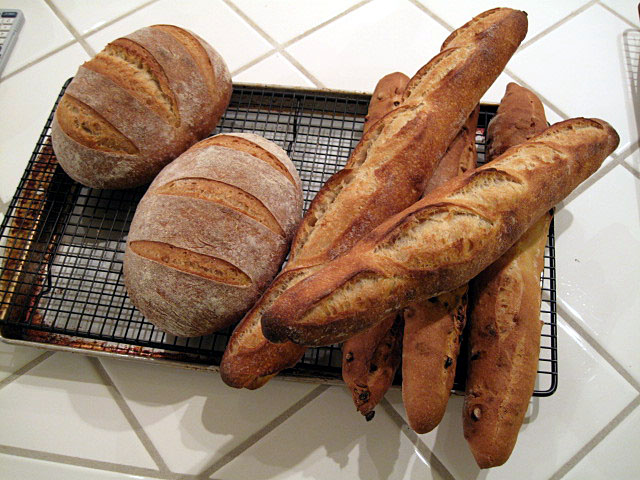
The Fresh Loaf

A Community of Amateur Bakers and Artisan Bread Enthusiasts.

Blogs

MaryinHammondsport's picture
MaryinHammondsport

I was looking for an excuse to use my sourdough starter this morning and settled on the Sourdough Blueberry Muffins from Mike Avery's website, Sourdough Home. For the recipe, go to

http://www.sourdoughhome.com/blueberrymuffins.html

These were just great! My starter is very thick and I had to add a little rice milk (I'm lactose intolerant) to enable me to stir everything in without over-mixing, but the crumb was very tender. I'll make these again.

Thanks, Mike.

Mary in Hammondsport

raisdbywolvz's picture
raisdbywolvz

Ok, I give in. Everywhere I turn, I encounter a discussion on how easy it is to make your own sourdough starter, especially using rye flour. I happen to have a new bag of stone ground rye flour. So, with a good rye and some tepid bottled water as the bait, I'm going to cleverly lure the elusive wild South Texas yeasties into my magic bowl and create my very own sourdough starter.

Seeing as how I've successfully reactivated a dried starter sent to me through the mail, made several loaves of bread with it, and am familiar with how it should behave, I'm confident that, as long as I can lure the yeasties in, I can create my own starter.

So here's how the starter is starting:

3/8/2009, 9:30 pm -Mixed 1/2 c rye flour & 1/2 c water in container, stirred it up real good, then put it on top of the fridge. The plan is, every 24 hours dump 1/2 and feed another 1/2 c flour and 1/2 c water until it's frothy. The alarm on my phone has been set.

Here's to frothy wild yeast!


rainbowbrown's picture
rainbowbrown

Sourdough Bagels

bagelsbagels

bagelsbagels

I made some sourdough bagels this morning. I used Bwraith's post, which was based on Susanfnp's post, as a guide: Sourdough Bagels Revisited. These were based on Silverton's recipe from _Breads from the La Brea Bakery_. After going back and forth reading Silverton's recipe and the modified ones, I decided to go with Bwraith's post exactly, well as exactly as I could. I made some slip-ups, which really affected my bagels. They taste great, but they are pretty open and bready and they puffed a little too much. I know precisely what my mistakes were and I thought I'd post them for others who might do some bagel making. All that I did wrong were small errors on my part, things like not taking notice of details in the write up and such. Anyhoo, here gos:

The write up called for 90% hydration starter. In my tendency to over look random details I refreshed my starter at 100%. I believe this is why they were bready. The idea of the dough having a slightly higher hydration was already blamed for breadiness in the discussions between Bwraith and Susanfnp and Bwraith discussed it throughout the comments, but it still went right out the other ear, since it was a difference in the starter.

I shaped some of them using the rope method used in the post and I shaped some of them using a method discussed in BBA where you make a roll and then poke a hole in it and twirl it around your finger. I think I like the rope method better, they were more consistently smooth. My mistake here though was I didn't make the center hole big enough and many of them closed up. Again, something discussed in the post, but I wasn't careful to take notice of it. They should have been about 2.5 inches and mine were only about 1.5 inches.

I believe I worked pretty quickly in getting them into the fridge after shaping and in going through the whole boiling baking process, but they still puffed too much. I think I'll blame this on the fact that my kitchen was 68 degrees and steamy. In fact my whole tiny apartment was steamy because of the big pot of boiling water. Next time I'll open the double doors next to my kitchen and let the chilly morning air in. I'm pretty sure the warm stuffiness of my kitchen gave them a good proofing environment for the four minutes that they sat out between the fridge and the oven.

I think that small slip-ups like these can be so easy to come across and I hope that discussing them will help them sink in more, making them easier to avoid in the future.

Now on to the good things:

I used 5% Giusto light rye flour, 15% Giusto whole wheat flour and 80% KA High Gluten flour, which all worked out great. They really taste quite awesome.

I used poppy seeds on some, ground flax seeds on some and kosher salt on some.

I refrigerated my parchment papered sheet pans before I did the shaping so that as I shaped I was putting the bagels on cold pans. I think this may have been a good idea, not quite sure though.

The only other time I have ever made bagels was about six years ago and was before I really began learning about baking. I just picked a recipe and followed it, not having any sort of understanding of what or why I was doing any of it. They turned out bad, real bad. So these bagels are pretty thrilling for me, and now that I know what I'm doing more in baking, I know what I need to do next time to fix it.

One more note is that I began kneading these in my Kitchen Aid and after three minutes the motor began to burn out, so I did the rest by hand. And this was with the hydration a bit too high.


Thank you Bwraith for your massively helpful write-up on your sourdough bagels. Reading it is actually what inspired me to try my hand at bagels again.

I also have a question about the KA high gluten flour. I don't have the Sir Lance A Lot, but the KA organic. The thing is it smelled a little odd to me. And I'm a little hesitant to admit that I know what it smelled like, but I do...it smelled like Jiffy boxed blueberry muffin mix. Anyone know why? The flour was malted and I don't know if I've ever used malted flour before, so I think it could have been that. I don't know...just curious.

And one more question.  As I was shaping, I found that most, but not all of the ropes were a little, I don't know, hollow-ish as I rolled them which made it a little difficult.  Anyone have any insight on this?  

Floydm's picture
Floydm

30% Whole Wheat. We ate them with a very bland pot of corn chowder I made this evening.

dolfs's picture
dolfs

In seeking a tasty and healthy bread for my 6 year old son's lunch box I've been looking to create a sandwich loaf that is in large part whole wheat flour and other grains, yet has a somewhat soft crust (you know children: they don't appreciate the best part of good bread), and fine and soft texture. It should hold up well for PB&J as well as cheese, turkey etc.

Multigrain Oatmeal Sandwich Bread
Multigrain Oatmeal Sandwich Bread 

Today was baking day for me and I made up a new recipe. It started with a variation on Peter Reinhart's Struan from his "Whole Grain Breads," but ended up with substantial modifications. What remains is the "epoxy" method which has always worked well for me since I learned about it. As you can see from the picture most (if not all) of my goals were reached. The whole loaf is airy, and the crust is mild in flavor and "crustiness." The color is lighter than you might expect because a substantial portion of the whole wheat flour used was white whole wheat flour. This is another one of those "fool the kids" tricks. If the bread doesn't look too brown it tastes better! (The white whole wheat does have a milder taste too).

The overall composition of the bread (not counting the oats on the outside) is 37% bread flour (I used Giusto's Ultimate Performer, organic unbleached), 35% white whole wheat flour (I used King Arthur), and 13% whole wheat flour (Giusto's), 14% rolled oats, 3.4% wheat germ (yes, that's a little over 100%, I rounded the amounts for this summary). Salt comes in at 1.85% overall, and hydration is at 75.6%. The bread flour comes in handy to provide enough gluten for a good rise (needed for good air and fluffy bread) and also helps create a milder (less WW) taste. I am not saying you need this much for the gluten reason, it is just what I ended up with and I am happy with bread that is only 1/3 refined flour. You can experiment with less if you want.

The end result was exactly what I was looking for. Within this goal, it was certainly my best ever. I know that some of you frown upon this kind of bread because it is not 100% whole wheat, it is too much like Wonderbread (not really, except texture may be somewhat), etc. I make plenty of "real" bread, but this outcome was the goal. Others have looked for this in the past (although mostly in a "white" bread), so I thought it worth sharing. 

Here is the recipe (from my Dough Calculator Spreadsheet):

Multigrain Oatmeal Sandwich Bread Formula
Multigrain Oatmeal Sandwich Bread Formula 

The recipe, as given here, makes 3% extra of the soaker and the biga to compensate for what might stick to your container and utensils and doesn't (easily) make it into the dough. I bake by weight (highly recommended), but approximate volumes are given for almost all ingredients. The wheat germ, if I remember correctly, was about 5 tablespoons. Not mentioned in the formula, but I also used about 1/16 of a teaspoon of ascorbic acid powder (vitamin C) as a dough enhancer. It promotes dough strength and allows for a "lighter" product. It gets destroyed during baking, so no health benefits!

Also note, for those of you that like to judge a formula by looking at the percentages, that soaker and biga are huge percentages in the final dough. This is normal for doughs made with the "epoxy" method as virtually all flour is part of biga, starter or soaker. In fact, if there was no flour whatsoever in the final step, you wouldn't be able to use percentages, because 0 flour would result in infinite percentages for the other components. The dough calculator has a convenient "Analysis" worksheet that collects all ingredients into an "Overall dough", which is how I got the percentages mentioned above.

Directions:

  • Soaker: Mix all ingredients until everything is mixed well and hydrated completely. Leave out at room temperature for 12 hours (overnight is what I do).
  • Biga: Mix all ingredients until everything is mixed well and hydrated completely, and then knead briefly. For a ball and place in refrigerator for 12 hours (overnight).
  • Final Dough: Cut up soaker and biga each into some 10 pieces and mix them in a bowl with all other ingredients. Mix well (dough whisk, stand mixer, whatever you like) on low speed until you have achieved a good blend. This will happen easier than for doughs not made with the "epoxy" method. Continue to knead until full gluten development has been achieved. With this dough you should be able to achieve a wonderful gluten window (window pane test). Your ideal dough temperature at this point should be 78F (if you don't know why or how, don't worry about it).
  • Bulk Ferment: Shape dough into a ball with tight skin and place, good side up in a greased bowl. Cover and let rise until approximately 2.5 times original size. (This happened for me in about 75 minutes in a 70F) kitchen. The dough will feel very airy! In my case no folds were necessary, but if you feel your dough s not as strong as you want (possible since the dough is fairly wet), give it a folder after 30 minutes and perhaps another after one hour.
  • Divide & Pre-Shape: The recipe makes two 1.5 pound loaves, so divide the dough into two equal pieces and quickly shape each piece into a tight ball. Deflate the dough some, but not completely while doing this. Let the pre-shaped balls rest (covered) for about 15 minutes. The dough might be just a tad sticky to your hands (it should have cleared the mixer bowl). If necessary use a tiny amount of flour, or wet your hands.
  • Shape & Proof: Pre-heat oven at 400F (I used a stone and cast iron pan for steam, but you can do without). Grease your loaf pans (I used spray with flour in it, you can use some butter, oil, or use parchment paper). Shape each ball into a roll/loaf, make sure seam is pinched shut, and roll the top side (seam will go down in loaf pan) in some oats that you have spread out. Place in loaf pan, seam down, oats up, and cover and let proof until a dome forms above the edge of the loaf pan (this took about 1 hour for me).
  • Slash & Bake: Optionally slash the loaves (I used a curved slash through the middle). If you don't slash and you get too much oven spring you may get tearing. I happen to think the slash looks good anyway. Place on the baking stone (i you use one, otherwise straight on rack in lower third of oven) and bake approximately 25 minutes until internal temperature is 205F (or use the "thump" test if you do not have a thermometer). Make sure you rotate pans sometime in the middle to get even heating and browning. I also remove the loaves from their pans when the internal temperature is about 190F so that the sides of the bread get some more browning. Careful with that, the loaves are very fragile at this point!
  • Cool & Eat: As always, let cool fully before slicing and eating. This bread freezes well. I slice the whole loaf and freeze two slices in a sandwich ziploc for easy "on demand" retrieval.


--dolf


See my My Bread Adventures in pictures
bakerb's picture
bakerb

Here's Floyd's Italian Bread again, it's a great recipe (for the recipe, just search Italian Bread)...I've used this dough for pizza, too, YUM:

Italian BreadItalian BreadItalian BreadItalian Bread

Thanks again, Floyd!   Beth

mse1152's picture
mse1152

We subscribe to a local CSA group (community supported agriculture), so we get a box of veggies, fruit, and herbs every two weeks. We got some dill last time, so I thought of dill bread...something with cream cheese or sour cream, or even cottage cheese in it. I wanted a break from making lean artisan(al) breads. Gotta go back to the roots every now and then. I modified James Beard's Sour Cream Bread from Beard on Bread, and it came out beautifully. This smelled so good, it was hard to keep from cutting it while it was hot.


Sour Cream Bread (with my mods and comments in italics)


1 pkg. active dry yeast

3 tablespoons sugar

1/4 cup warm water (100F-115F)

2 cups sour cream, at room temperature

~ 1/3 cup minced onion

~ 3 tablespoons minced fresh dill

1 tablespoon salt (too much. Try a scant 2 t.)

1/4 tsp. baking soda

4 1/2 to 5 cups all-purpose flour (I substituted whole wheat for one of the cups)


Combine yeast, water, and sugar. Let sit till foamy. Put sour cream, salt, and soda in a large bowl. Add yeast mixture, onion, and dill. Gradually mix in 4 cups of flour to make a wet, sticky dough. Dump the dough onto a moderately floured surface and continue mixing/kneading (use a dough scraper) for at least 10 minutes, adding flour as necessary, to make a workable, less sticky dough. (My hands ended up pretty coated with dough. I used about 2/3 cup above the initial 4 cups). Shape into a ball, and place in an oiled bowl. Cover and let rise in a warm spot till doubled. (I set it at room temperature for one hour, then used my proofing cycle at 85F for another hour).

Turn dough onto a lightly floured surface and divide into 2 loaves. (I rounded each piece and let them rest about 15 minutes before shaping). Shape into loaves and put into greased loaf pans. (The book calls for 9x5 pans; mine were 8.5x4.5, which may account the the tops exploding.) Cover and let rise again. (I used the proofing cycle for about one hour, at which time the dough crested over the edges of the pans).

Heat oven to 375F. Bake for 30-35 minutes. (I rotated the pans after 15 minutes, and baked for another 15. The internal temp. was at least 200F.) Remove from pans immediately to cool on racks.


Yum! The bread is soft and flavorful, but just a bit salty. I found that to be true of most of the recipes in this book, but I just forgot to adjust this time. I also think I'd replace more of the AP flour with whole wheat, just to firm up the loaf a bit.

This dough would make great rolls too.

Sue

bwraith's picture
bwraith

Home Milled and Sifted Wheat Montana Sourdough

Home Milled and Sifted  Wheat Montana Sourdough

My adventures in home milling and sifting continue. Most recently, I did fairly extensive additional test milling and sifting of Wheat Montana Bronze Chief hard red spring berries. In the past, I regularly used flour from two main sources: Heartland Mill, and Wheat Montana. Heartland Mill is a good source of hard red and hard white winter wheat flour and berries. Wheat Montana is a good source of hard red and hard white spring wheat flour and berries. After sending test flours from the milling and sifting session with Wheat Montana Bronze chief hard red spring wheat berries, I wanted to follow that with a "production run" and some test baking. I've already posted a fairly unusual "Reconstituted Mash Bread" made from Wheat Montana hard white and red spring wheat berries. The following is a more ordinary sourdough made from high extraction flour from the same milling session.

A spreadsheet in xls and html format is posted with the recipe and the sourdough timing. Additional photos are posted.

The formula is again much the same as previous test bakes. It consists of a levain contributing 15% fermented flour to total recipe flour made with equal quantities of sifted rye, sifted spelt, and freshly milled and sifted  "cream flour" from my milling session, combined with an overnight soaker of the remaining dough ingredients, which is the remaining "cream flour", 2% salt, about 76.5% water, and 1% malt syrup. The estimated ash content of my "cream flour" is about 1.1%, so it is similar once again to previous high extraction flours that I model after Heartland Mill Golden Buffalo flour.

The bread had some large and small holes, as the dough at 76.5% hydration was a little softer than I expected. As before, it takes some experience to learn the amount of water that my home milled and sifted flours will absorb. I slightly overestimated the amount of water in this case and ended up with a bread more reflective of a fairly soft and wet dough. The crumb was light and flavorful, which was expected, since I've had excellent results from Wheat Montana Prairie Gold and Bronze Chief flours in the past.

bwraith's picture
bwraith

Reconstituted Whole Grain Mash Bread

This is a recipe idea I've wanted to try since I started milling and sifting my own flour. My milling and sifting process results in a few grades of flour and bran, but in total they represent the entire contents of the whole grain. My idea was to process the different grades of flour in different ways, hopefully resulting in a better whole grain bread. In particular, I very much enjoyed the flavor and texture of the mash bread recipe from WGB by Peter Reinhart, which I blogged a while ago. This recipe is derived from the mash bread recipe and some other ideas in WGB, but it takes advantage of the fact that I have available various separate components of the whole grain flour. The resulting bread, made as described below, is very good, maybe my favorite whole grain bread so far.

I've posted a spreadsheet in xls and html format showing the recipe and sourdough timing. I'm not providing a whole recipe in the blog in this case. Since the ingredients will vary so much, and I used particular output from my milling and sifting process, it's more of an idea than a recipe. Anyone who tries it will have to carefully read WGB's mash bread recipe, look at my spreadsheet, and then make up a recipe to fit available ingredients and/or sifting equipment. I've also posted some additional photos.

To make this bread, I first simmered the bran and very dark coarse granular flour from my milling and sifting process for a few minutes. The idea is to soften the high fiber components of the whole grain flour. Then, when the simmer cooled to about 165F, I added "golden flour", which is higher ash content flour from the first and last siftings. I maintained the temperature at around 150-155 for a couple of hours to get a dark, sweet mash. The mash was refrigerated. Meanwhile, I fermented a levain of whole rye, whole spelt, and some of the whiter flour from my sifting process. In the morning I combined the mash, the levain, and all the remaining whiter flour from my sifting process along with some salt and malt syrup to make the final dough, which rose and was baked later in the day.

Admittedly, this is difficult to duplicate at home unless you have a couple of fine sieves and access to a coarse stoneground whole grain flour. However, a similar recipe should be possible by separating out the bran and larger particles with a fine sieve, simmering that, then adding some of the remaining flour to make the mash, then using all the remaining flour in the final dough.

Using store bought ingredients, another similar version could be to use store bought bran for simmering, a high extraction artisan flour (like Heartland Mill Golden Buffalo) for the mash, and white flour for the remainder. Yet another version might be to use store bought bran for the simmer, store bought wheat germ and white flour for the mash, and white flour for the remaining flour. Or, it would probably work to use store bought bran for the simmer, whole wheat flour for the mash, and white flour and store bought wheat germ for the remainder. All of the above are the same in spirit, which is to reconstitute the components of whole wheat flour in total, while simmering separately the coarser bran, mashing darker flour, and then adding lighter flour to the final dough.

Very roughly, the bran should constitute some 10-15% of the recipe, the dark flour added into the mash should be about 25% of the total flour, and the rest should be lighter flour. Wheat germ, if used, should total about 3% of the weight of flour. Evaporation and some mash left in the pan means you have to estimate the remaining water and flour in the mash, in order to then have the right amounts of flour and water in the remainder of the recipe. Another interesting flour to try in the mash, if you are going with a store bought duplication, is first clear flour. The character of the "darker" flour I added to my mash is somewhat like first clear flour.

Also, as in all the WGB recipes, you could easily make this a yeasted recipe by replacing my levain with a yeasted biga and adding some yogurt or other fermented milk product to bring up the levels of fermentation acids in the final dough.

The resulting bread has a soft, dense crumb, which is normal for mash bread. However, the unique flavor from the mash and the soft, spongey texture more than make up for the somewhat more dense crumb. The lighter color results from the fact I milled and sifted a 50/50 combination of Wheat Montana Prairie Gold and Wheat Montana Bronze Chief. The Prairie Gold berries are hard white spring wheat berries, which have a much lighter color of bran, resulting in a lighter color. I also prefer a mixture of white and red wheats, which results in a milder but not bland flavor that I prefer to either 100% red wheat or 100% white wheat. The more dense and soft crumb makes it an excellent bread for sandwiches or to use with tahini, peanut butter, honey, and so on. I had some this morning for breakfast, and it is one of my favorite whole grain breads, if not the all time favorite.

holds99's picture
holds99

I was thinking about one of the main objectives of TFL (encourage, support and assist new bakers) and with that in mind I decided to attempt a "tried and true" recipe that would perhaps be appealing to bakers just getting into artisan baking. I set out to make a bread that would be easy and as fail-safe as possible for entry-level bakers to produce. I chose the Rustic Country Bread recipe from King Arthur flour. The recipe is available on line at their website. I thought it would be a good recipe to introduce bakers who haven’t used or had experience with using a pre-ferment method (poolish) when making an “artisan” bread and because of its simplicity it’s a good one for new bakers to try. I used a Dutch oven for baking the bread, which pretty much eliminates the problems of moving the fermented loaf onto a stone and running the risk of having it sink or losing it completely. Anyway, here are the steps I followed. I made the dough per K.A. recipe using stretch and fold technique. Instead of dividing the dough into 2 boules, I kept it in 1 piece and made a large boule. After shaping the boule I placed it in large skillet, lined with parchment paper (make your parchment paper long enough so you will be able to have enough overhang on each side to enable you to pick up the boule and lift it up out of the skillet and place it into the Dutch oven without dropping it). I placed the skillet containing the boule in a plastic bag (you can alternatively cover it with film, stainless steel pot...whatever), closed the bag to let it rise until nearly doubled. An hour before baking I put the Dutch oven (empty) with the lid on into the oven and preheated the oven to 500 deg. F. After the boule had doubled in volume my wife helped me lift it out of the skillet (holding the ends of the parchment paper) and place it into the preheated Dutch oven. I scored/slashed the top of the boule with 3 long slashes, put the lid on the Dutch oven, placed it in the oven (be extremely careful here, you’re dealing with a 500 deg. cast iron pot) and closed the oven door.  I immediately turned the oven temp. down to 450 deg. F and let it bake for 30 minutes, then took the top off the Dutch oven for the final 10-15 minutes of baking. Don't forget to remove the lid, so your loaf will brown nicely.  Because this is a double size boule, you’ll have to bake this one about 10 minutes longer than the smaller boule. Using a thermometer inserted into the boule check for an internal temp. of 210 deg. F. If the top is getting too brown and it still hasn’t reach 210 deg. F. internal temp. put the lid back on and let it go for a while longer. Remove boule from Dutch oven, picking up the parchment paper edges, and place it on a wire rack to cool for a couple of hours.  DO NOT cut until completly cool.  So, here are the results.

 Rustic Country Boule baked in Dutch Oven

Rustic Country Bread - No 1: Rustic Country Boule baked in Dutch Oven

 Rustic Country Bread baked in Dutch oven.

Rustic Country Bread - No 2: Rustic Country Bread baked in Dutch oven.

 Rustic Country Bread - Interior/Crumb.

Rustic Country Bread - No 3: Rustic Country Bread - Baked in Dutch oven - Interior/Crumb.

Pages

Subscribe to RSS - blogs