I made this Italian dough as per recipe except, being I have crappy flour, cut way back on the water. It went like this: 3.5 cups of AP flour, sea salt, 1/2 cup of water with sugar and yeast. Mixed, adding more water, a tbsp at a time until I had a shaggy dough. If I had followed the recipe, I would have had, by this time, pancake batter. I kneaded, adding more water by dipping my fingers as I worked the dough, for 10 minutes and ended up with a respectable ball. I let it rest for three hours and baked in a pre-heated (15 minutes), oven with a bowl of water below the rack. Instructions called for 400 degrees for 20 to 25 minutes or until “golden brown.”
Based on past experience I went for 450 degrees.
The pix shows what I ended up with after 45 minutes. A cadaverous-white loaf. And you need a hack saw to get through that crust to a crumb that is anything but airy.
Okay. I’m ready to toss in my apron here. Any one have any suggestions? Much appreciated.
Katie
Hi Katie,
There is something fundamentally wrong going on. Could you post your recipe to give us an insight. Don't give up as I'm sure we can help. Baking is a learning experience.
Cheers,
Gavin
Thanks Gavin, and here’s the recipe with notes where I varied to suit my situation. And this is the biggie: while the recipe calls for AP flour, the only flour available where I live has 9.4% protein. From what I understand most AP flours are closer to 12.5% and that is why I have to cut back on the water.
Okay, the recipe:
Italian Bread : Quick Method
That’s it, Gavin. As I said, I depart from the recipe with the quantity of water. I start with 1/2 cup and add more by the tablespoon until I get that shaggy dough. Then I knead, wetting my fingers to add more moisture as needed. A little too much water and I end up with a sticky mess.
Thanks for taking a look... Katie
Something is way out of whack with the measurements. 3 1/2 cups of flour should be about 435g. 1/2 cup of water, 4 oz, is about 120g. This would make for a hydration of 120/435 = 27%, which is so low that it would not be a workable dough. But getting a "shaggy" dough shows that there was much more water than that.
No, most AP flours don't have 12.5% protein. 10 - 11.5% is more like it; even King Arthur's is labeled as 11.7%. What is the brand of flour, and is it bleached or not?
You didn't say if the dough seemed to have risen or not. That would be important to know. That amount of yeast should have risen that much dough in those 2 1/2 hours.
Something is also off with the baking temperature and time. For a loaf with that much flour, at 450 deg. F it would have been overbrown but possibly not cooked enough on the inside. Your loaf just looks way underbaked. The original instructions time of 20 - 25 minutes at 400 deg F would have underbaked too, but not as badly.
You didn't say what surface you baked on. A sheet pan, a baking stone, or what. 15 minutes is short for preheating an oven, especially if it had something with some thermal mass in it. Home ovens can be way off from the temperature setting, but this seems extreme even so.
You need to help us understand your measurements and baking setup. Something is very wrong about the amount of water for the flour, and the oven temperature, at the very least.
TomP
Only thing that comes to mind is the missing of 1 rise. It will make a difference. Enjoy!
Well I’m not sure as to the total amount of water added. From my previous posts you’ll know that I’ve had a problem with dough ending up like batter and no about of folding and slapping, stretching or resting would change that. Only adding more and more flour... a cup or more.
I blamed the Blanquita enriched wheat, pre-sifted flour. No mention on the pack about bleach.
With the loaf in the photo, I started with the 1/2 cup of water and, mixing in the bowl, added more water, table spoon at a time, until I had something I could knead. What I called a “shaggy dough.” It was still pretty dry but I added more water by simply dipping my fingers in a cupful and kept kneading, for about ten minutes. The dough did rise during proofing, maybe not quite doubling in size. The photo shows the top grill plate from the stove which I use as a pizza steel. It is about 1/4 of an inch thick. The stove is propane and I’ve read both pros and cons about using propane vs natural gas. Maybe I have a gas stove that was never converted for propane use. I don’t know. I live in a rental.
Anyway, adding water to the flour, slowly, seems to give me a workable dough but maybe I don’t have the feel for it yet. As far as the stove, I can try 550* next time and wait, watch, and see.
As always, much thanks, Katie
Your stove and flour complicate the situation, all right, as other people have posted. Don't go trying 550 deg F. Instead, try to find an oven thermometer so you can check the temperatures - plural because the oven probably won't have a single temperature. Check in several places. Cheap thermometers might be inaccurate too, but would be a starting point. You can also get a rough check on the oven without a thermometer. Here are some possibilities:
https://www.food.com/recipe/how-to-test-your-oven-temperature-without-a-thermometer-450973
https://food52.com/story/20189-how-to-find-your-oven-s-hot-spots?utm_source=chatgpt.com
There is the old-timers' method (my mother used to hold her hand in the oven like this) - it's going to be somewhat subjective but should give you the idea (sourced from a chatbot but in line with what I've read in the past):
Carefully hold your hand just inside the oven door (not touching racks or sides).
Make sure to try this when the oven heating unit is not on, otherwise the radiant heat from the unit (that is, the bare flame, if you can see one) might make you remove your hand too soon.
Preheat the oven longer, at least a half hour.
Some flours simply can't handle too much water. Beyond that they just become more and more watery and start to fall apart over time and handling. I've had flours like that. Your flour may be like that, especially since it seems to be a pastry flour and most pastry doughs use a low water level. If that's the case it may be impossible to make a loaf of bread from it without using a loaf pan. I don't know if you can get bread flour where you are, but if not maybe you can get some wheat gluten (also called "vital wheat gluten") and add it to your flour. That might be enough to make the flour usable - maybe.
You can also extract gluten from some of your own flour and add it to the dough for bread. Read up on how to do it on line. But if the flour has poor quality gluten that might not do the job.
If you have a probe type thermometer - one you can stick into a piece of meat - you can check the interior temperature of the loaf. It should be above 200 deg F at the end of baking and preferably up near 210 deg F, That's at sea level. If you are high enough above sea level to lower the boiling point of water, the desired temperature is a few degrees below boiling.
If you manage to get a reasonably acceptable loaf but it doesn't brown, add some sugar to the dough, or something else that contains sugar (honey, malt syrup, etc.). Sugar helps to create browning. It shouldn't take much, maybe only a few tablespoons.
TomP
Don't forget - a dough will get thinner as water is absorbed. Buy a cheap scraper (anything will do) and use that. Don't add more water. Enjoy!
On a fundamental level, the reason a crust browns is something called the Maillard reaction. Without getting too technical, the sugars in the dough, either added as in your recipe or from fermentation in sourdoughs, reacts with water to get that caramel color.
This is very difficult with any gas stove because these ovens have to be vented to reduce the risk of carbon monoxide escaping into the home. The water bowl you place in the oven turns to steam, but it goes right out through the vent and doesn’t have time to react with the dough.
You might want to try the Dutch oven baking method which will help to contain the steam long enough for the dough to react.
There may be issues with the recipe, too, I didn’t analyze it thoroughly. One really odd thing I noticed was the use of coffee creamer. That’s a totally new one on me.
-Brad
Thanks Brad but this is a third world stove: no vent ;-)
The only sugar in this is the teaspoon used to activate the yeast. So would a little more help?
I'd have to look into a Dutch Oven. It's not likely I could buy one here and would have to have one air freighted in.
I like the idea of creamer. It helps me control the amount of liquid, as opposed to using milk.
Katie
Katie,
It could be almost anything that would trap the steam. It doesn’t need to be a Dutch oven, although that has the additional advantage of uniform heat. People have used an inverted pot or roasting pan lid as long as it stays in place during the bake. I wouldn’t try using, say, aluminum foil.
I don’t think adding sugar would help much but you can try. I wouldn’t raise the temperature above 450*, in fact maybe drop it back to 400* and let it bake longer.
Could you post a photo of the crumb of your last loaf?
-Brad
I stopped seriously reading htat recipe when I saw coffee creamer. That stuff is not much more than dry chemistry. Iften I replace water with milk rather than using milk powder, when I don't have that on hand. Something to think about, pehaps.
According to their website https://harinablanquita.com/producto/harina-todo-uso-5-lbs/ this is a soft wheat and generally used for pastry. If you can find a flour that says “hard ” wheat it will make better bread because it has higher protein.
This flour may be better suited for soft rolls rather than loaves.
-Brad
Thanks for all the hard work everyone.
The Blanquita flour is all that’s available here. Except for oat flour. And answer me this... If you cover the bread, how do you know when it’s done? Just kidding. The only thing I have is the stainless steel mixing bowl and it’s very light metal. I’ll have to look in the stores to see if I can find something more suitable. Maybe a farm bucket...
I guess what I really need is an oven thermometer. I can’t trust what the stove is telling me. If I can just get it to a true 400, I’ll know by looking when the bread is done... Katie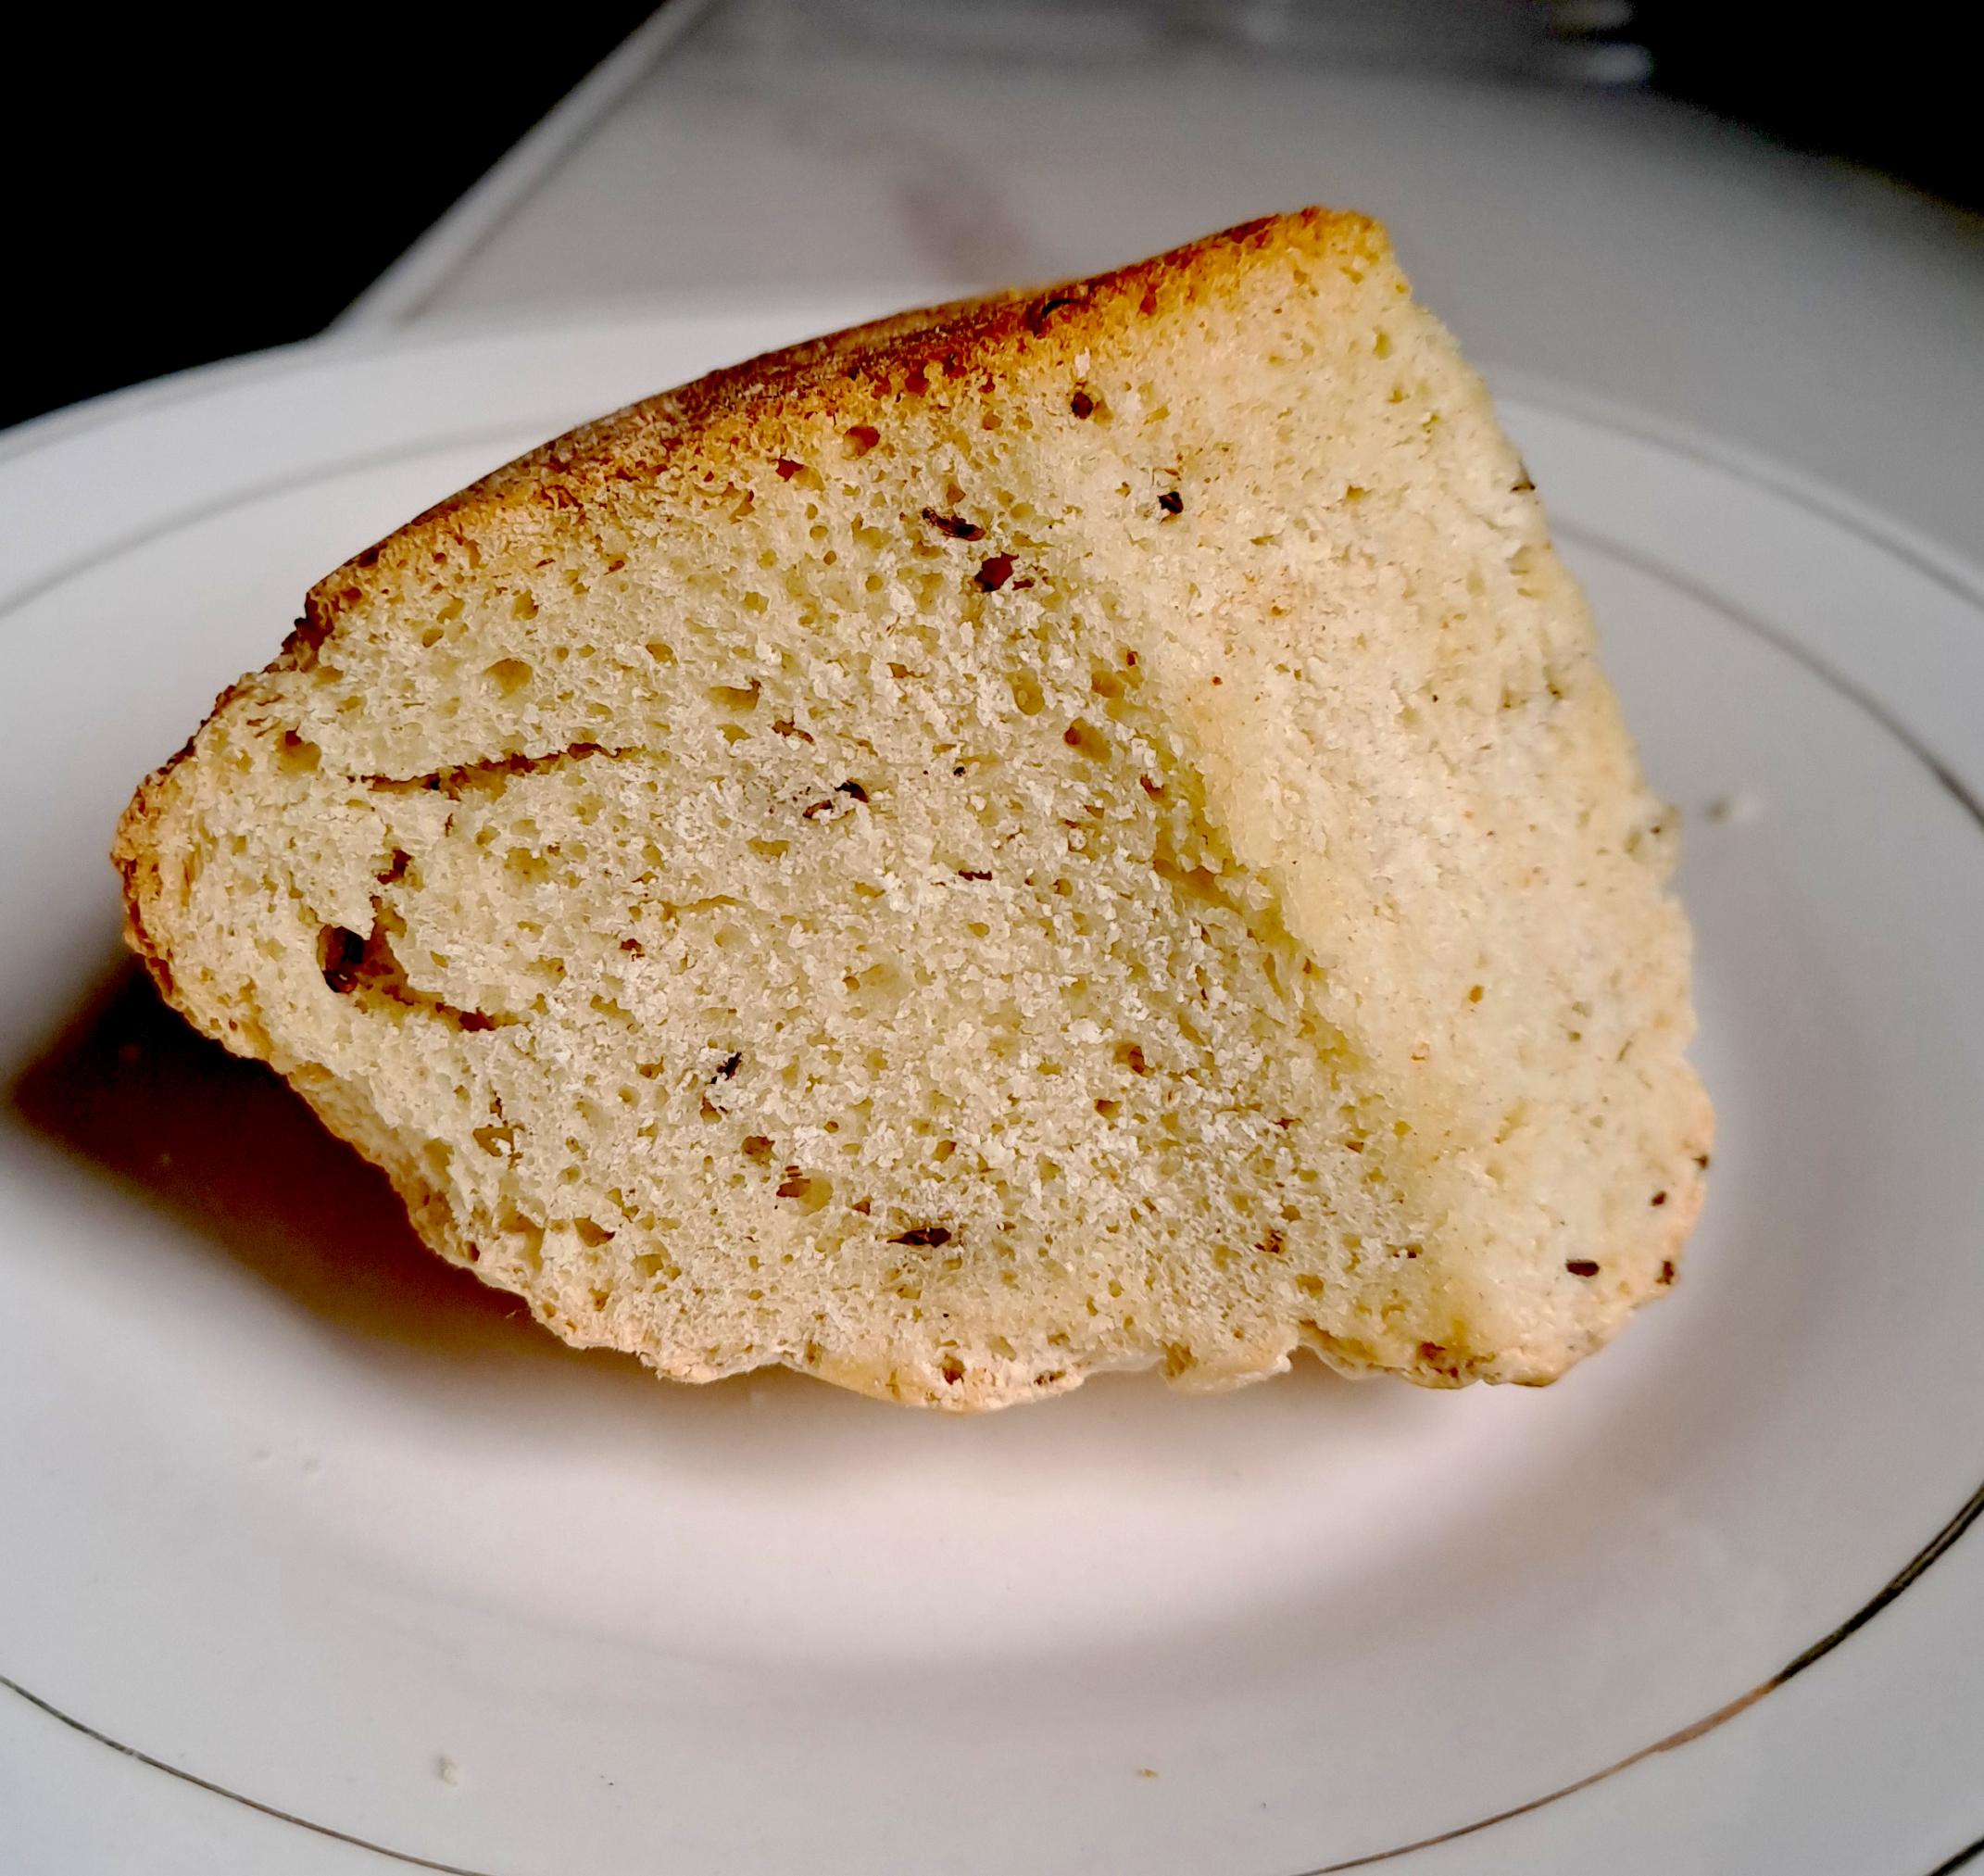
I should have said it remains covered for only the first 15 minutes or so. This allows the growing loaf to expand before the crust sets too hard, which prevents the expansion where you want it. Otherwise it could expand anywhere there is a weak spot, called a blowout.
The crumb doesn’t look as bad as your description implied. You might try a longer final proof and use the poke test to determine when it is ready to bake. You may need to shorten the first proof as well.
Good luck.
-Brad
The crumb looks all right. It's not especially open but it doesn't look underproofed or uncooked. And not everyone likes a very open crumb.
The right baking temperature gets the crust and the crumb properly cooked at the same time. There is always a tradeoff. Too high, and the crust will be cooked first. Too low and the crust will be undercooked by the time the interior is done. If the dough is very wet both interior and exterior might be done in the sense that the crumb temperature is about right but there can still be excess moisture inside. Baking longer at a lower temperature after that will drive out that moisture without overcooking the crust.
The larger the loaf, the longer it takes for heat to penetrate inside, so the crust tends to get done sooner than the inside. So the baking temperature needs to be lower than for a smaller loaf.
In this case, the crumb seems reasonably baked but the crust is pale, thick, and hard to bite through. This suggests that the baking temperature was too low to cook the crust in time, and then the loaf was baked for much too long a time. That last part of the bake would have dried out the crust and made it thicker. The lack of browning could have fooled you into thinking more baking was needed.
If I baked a loaf that seemed done inside as measured by a probe thermometer but the crust didn't seem to be ready, I would probably turn up the temperature, perhaps to 450 deg or more, for a short time (7 - 10 minutes) to see if the crust browned up and crisped more. The short duration at this higher temperature wouldn't overcook the interior. If the crust didn't shape up I would probably stop there, especially of the crust seemed hard and stiff.
If I baked a loaf where the crust got nice and brown relatively quickly but the inside temperature was low (below 200 deg F perhaps and below 190 deg F certainly), I would lower the temperature below 400 deg F, say 370, and continue the bake.
Of course, to make this work you need to have a probe thermometer and be able to rely on the oven temperature setting to some degree. Even without a good oven calibration, the you can make relative temperature changes in the right direction and the result should be better than nothing.
Your flour is for sure not the best for bread, but I'm pretty sure, you can reach better results than the loaf on the picture. It just requires a lot of trial and error, specially when the flour is not the only issue.
I see several potential issues:
Just my 2 cents
The flour does not contain malt or related enzymes. If present, those would break down some of the starch into sugars that would facilitate browning during baking.
One fix would be to add malt to the flour. Another would be to add some sugar. Either would help with browning the crust.
Paul
Gosh. Thanks everyone. The response is, frankly, a little overwhelming and has me looking forward to another loaf.
But here’s something that came to me and tell me if you think it’s relevant. It didn’t hit me right away but thinking about Brad and the stove vent, I checked and there is a convection feature on my stove and it is turned “on.” Doesn’t that mean there is some sort of fan running inside the oven? How is that affecting the moisture? I put a bowl of water in with the bread but maybe I’m not getting the benefit.
Okay, for the next try:
I’m stuck using the Blanquita flour, it’s all that’s available, and I’ve noticed that after kneading and resting, the dough seems to return to it’s “gooey” state, as if I’d done nothing at all. The gluten additive isn’t available and I’d have to have it air freighted in.
I’ll try for a little more hydration and try to keep better track of the amount of water used. Following the original recipe just makes a batter that can’t be handled. It just pools on the counter-top.
I’ll try for a cup of water (about 55% hydration?), but add a little at a time so I don’t over do it and have to add more flour. I’ll include the amount of water used to activate the yeast.
Knead for ten minutes, let rest for an hour, knead for ten minutes and let rest for two hours.
Use Tom’s “stick your hand in the oven” method to try to get a handle on the baking temperature and pre-heat for 1/2 hour. I don’t have a scale or thermometer so this is back to basics baking. I’m going to shoot for 400F and pull the loaf when it looks right. If I don’t see any color after 15 minutes, I’ll crank up the heat another fifty degrees.
If I can locate an oven thermometer later today, I’ll buy it but I’m not holding my breath :-)
Again, thanks everyone... and stay tuned.
Katie
That's a sign that the flour can't tolerate that much water. Some flours are touchy that way. Even a few percentage points less water can make all the difference. For example, I had a very good flour but at 62% hydration the dough would fall apart yet at 58% hydration it would make a very good loaf.
Cut back on the water, and if need be cut back until you can't make a dough because it's just too dry. Then add just the minimal amount of water to make a dough that holds together. If the dough still blobs out, then the flour is only fit for dry pastries. Even then you should be able to bake breads that are like Irish Soda breads.
Or, when the dough has reverted to a wet blob, you may be able to bake a decent loaf by using a loaf pan. Give it a try.
I'm not sure what you are thinking of when your write "knead", but this doesn't sound like the best approach. Your flour seems to be delicate and touchy, and "knead" sounds forceful. Here's what I would do: Rough mix, just enough to hydrate the flour; wait half an hour, exact time not critical; knead for a few minutes then stretch and fold the dough for a few more; wait 1/2 or 1 hour, then gently stretch and fold the dough several times. Repeat with a few more S&F sessions.
You may find that the dough starts to become more fragile or wet or gloppy as time goes on. Stretching the dough gently gives you a change to feel what is happening with the dough and it's more gentle than kneading would be. If this happens, more stretching is not going to rescue the dough. Most likely you will need to use a loaf pan if this happens.
Don't use convection - if possible. It will make a difference. Enjoy!
Yes, there is a fan, I can see it in the picture you provided. Are you 100% certain that your oven is gas and not electric?
Blanquita flour has approx. 9.3% - 9.5% protein. I have no doubt that you could make bread with it... But you need to do a lot of kneading / gluten development. Do you have a mixer?
Here is some bread made with yeast and 9.3% protein flour. I used a hand-held electric whisk with dough hook attachments. It was 78% hydration.![]()
On another thread I suggested making your own vital wheat gluten from the flour and then adding it back to your dough, Tom re-iterated this option here in this thread. Have you considered it? Do you need to know how to that?
Got back from shopping and no to a thermometer, likewise a scale, certainly no gluten, and still haven’t found the pie plate that I’ve been searching for.
Okay, more ideas and suggestions came through and for that I’m grateful but somewhat confused. Mwilson says more kneading, tpassin says don’t knead. If I don't knead, I can't use my "wet fingers" method for adding moisture to the dough.
I guess it is the “art’ of bread making, not the “science” of bread making.
Also the oven is propane (I see flames!) and I don’t have a mixer, just use a big spatula and a plastic scraper. Making my own gluten sounds interesting but from what I read I need high protein flour, a blender or food processor and some sort of grinder. If there is a simple method that doesn’t require all of the fancy gear, I’d appreciate knowing how.
Okay, thanks everyone. I’ll let you know...
Katie
Michael is thinking that the dough needs more development. I am reacting to your description of the dough deteriorating over time as you worked with it. I've had that experience and the solution was to use less water, not to work it more. We are both "right" but it depends on the flour characteristics in this regard, which we don't know - we are just have to guess.
But I'm asking you not to try to add more moisture. Try for the minimum amount that will make a workable dough. Your flour doesn't know or care what some recipe says. With ordinary good quality US All Purpose flour (or the European equivalent) this would not be a problem. Michael showed us how a good loaf can be made using low-ish protein flour. But there's more to flour than the protein level and it may be that if he tried to make the same recipe with your flour, it wouldn't work. Anyway, there's still something odd about the measurements you listed. That hasn't been explained yet.
You don't need high protein flour. I tried it once. Make up a dough, then submerge it in water and keep kneading and working it. Little by little starch will come out of the dough and start to cloud up the water. If the water gets too cloudy, dump it and use new. (You could save the starchy water and eventually the starch will settle out ready to be collected and used as a starch). With patience I ended up with a small rubbery mass in my hands. That's the gluten. At this point you need some way to grind it up - maybe a mortar and pestle will do it once the mass has been dried out, I didn't try. There is probably information on line about ways to grind it up.
As sparkfan said, try using a simpler recipe to make sure you can at least make a decent loaf. And as I said, be prepared to bake in a loaf pan if need be. If you get some success, move on from there in small steps. For example, if you made a successful loaf pan, next time try to make a small free-standing loaf with just flour, water, salt, and yeast. If that works but doesn't brown up, add some sugar next time. If you can make a free-standing loaf, then start modifying the recipe closer to the Italian loaf you wanted to make. Just keep the water amount low until you learn if you can use more.
Just a word - or 2. Use what ya got - just use it wisely - and that's up to you. Experiment. Change 1 thing at a time and see what happens. It's easy to go from there. It does take time. Regardless of what is written - there's nothing like doing. That's how you learn. Enjoy!
Good morning everyone... Katie’s cooking bread.
Photo 1 is the rough dough: 3.5 cups of flour with 1/2 cup of water/yeast. I mixed in more water, exactly 1/3 of a cup, a little at a time for the resulting dough
Photo 2 is the rise after 30 minutes
Photo 3 is the dough dumped from the bowl (had to be helped with a spatula), and stretched out
Photos 4 and 5, the dough folded and rolled before another 30 minute rest.
Will repeat the “stretch, fold, roll and rest” twice more for a total of 2 hours of resting before forming a dough ball for the oven.
Katie
So far - so good. Enjoy!
Good, that dough looks about as dry as it can be, so you have a good starting point. I'm not sure because I'm not there to handle the dough but I think it could have stood more kneading in the beginning and more stretching for the S&F sessions. Ideally the dough will let you stretch it out farther as more time goes by and it has received more stretches.
I think what we really want to learn is whether with this low amount of water, the dough holds up and doesn't turn weaker and wetter after some time has gone by. If it does stand up, you've got a win and can add a little more water next time.
Thanks Tom, and the dough is rising nicely. I’m on my forth “stretch, fold and roll” cycle, 30 minutes each. Is that enough? Do I need to knead it a bit before forming the dough ball? Do I need to let it rest again after forming the dough ball? Should I stick it in the fridge overnight? The pressure is getting to me :-)
Katie
No need to stress because there is no one RIGHT WAY. I wouldn't knead it once the dough has risen and gotten airy. It would be all right before then. In your picture the dough doesn't look all that risen to me, but again, I'm not there to see and feel it.
Because this dough is dry, it will probably be rather stiff. We'd like it still to be elastic (it will want to return after gentle pulling or squeezing) and extensible (you can pull it out some way and it will thin but not break). After a stretching session the dough will be more elastic, and after a rest some of that elasticity will relax away and you should notice the extensibility more.
If the dough doesn't get both elastic and extensible to some degree, it probably didn't get enough kneading or stretching - or the flour isn't suitable.
I don't know if you mean you formed a ball for more fermentation or just prior to shaping the loaf. You said the dough is rising. You can still do gentle stretching sessions after rising is under way, but mostly one doesn't need to by then. So cover the ball and let it continue to rise.
The main purposes for forming a nice ball before shaping a loaf are 1) to bake uniform dough pieces after adjusting their weight - you don't have to do that here; and 2) to make a nice uniform shape that can be turned into a finished loaf. After a preliminary shape the dough may become too elastic to easily form the final loaf. In this case just let it rest for 10 or 15 minutes (covered) and the final shaping will become much easier.
EDIT: TomP was faster
A picture is worth a thousand words. Now we get closer, thanks to the pictures ;)
The dough must be mixed and kneaded a lot more before you start with the stretch & folds, etc. Or at least mixed longer if you prefer the no-knead method. You still have dry spots and you it looks like you incorporate additional (dry) flour with every S&F.
At the end of mixing and kneading the dough should be homogeneous.
Imo some good insta reels from Trevor J Wilson on how to mix. It's not the only method or the only video about mixing, just one I personally like
https://www.instagram.com/p/DG8RiNDRVuE/
https://www.instagram.com/p/DG8yPP0RgH-/
https://www.instagram.com/p/DG-7r56xsNq/
Your dough might be a bit stiffer than his. If yours is much stiffer, then maybe you need another method. Trevor has a ton of free information on his Insta channel, also for stiffer dough.
https://harinablanquita.com/receta/masa-basica-de-pan/
https://harinablanquita.com/receta/panecillos-rapidos/
By forming the "ball" I meant shaping the loaf for the oven. I've gone ahead with a 5th stretching but the dough is resilient, coming back when I poke it. So in a few minutes I'll form it, let it rest for 15 minutes and then in it goes with a bowl of water beneath the rack. I turned the convection feature off as well so that might make a difference.
Katie
I suggest letting the dough prove longer than that. The dough shouldn't be resilient when poked.
I think turning off convection will be a good move. For better expansion of the loaf we want to delay stiffening of the crust and convection would hasten it.
Nope.
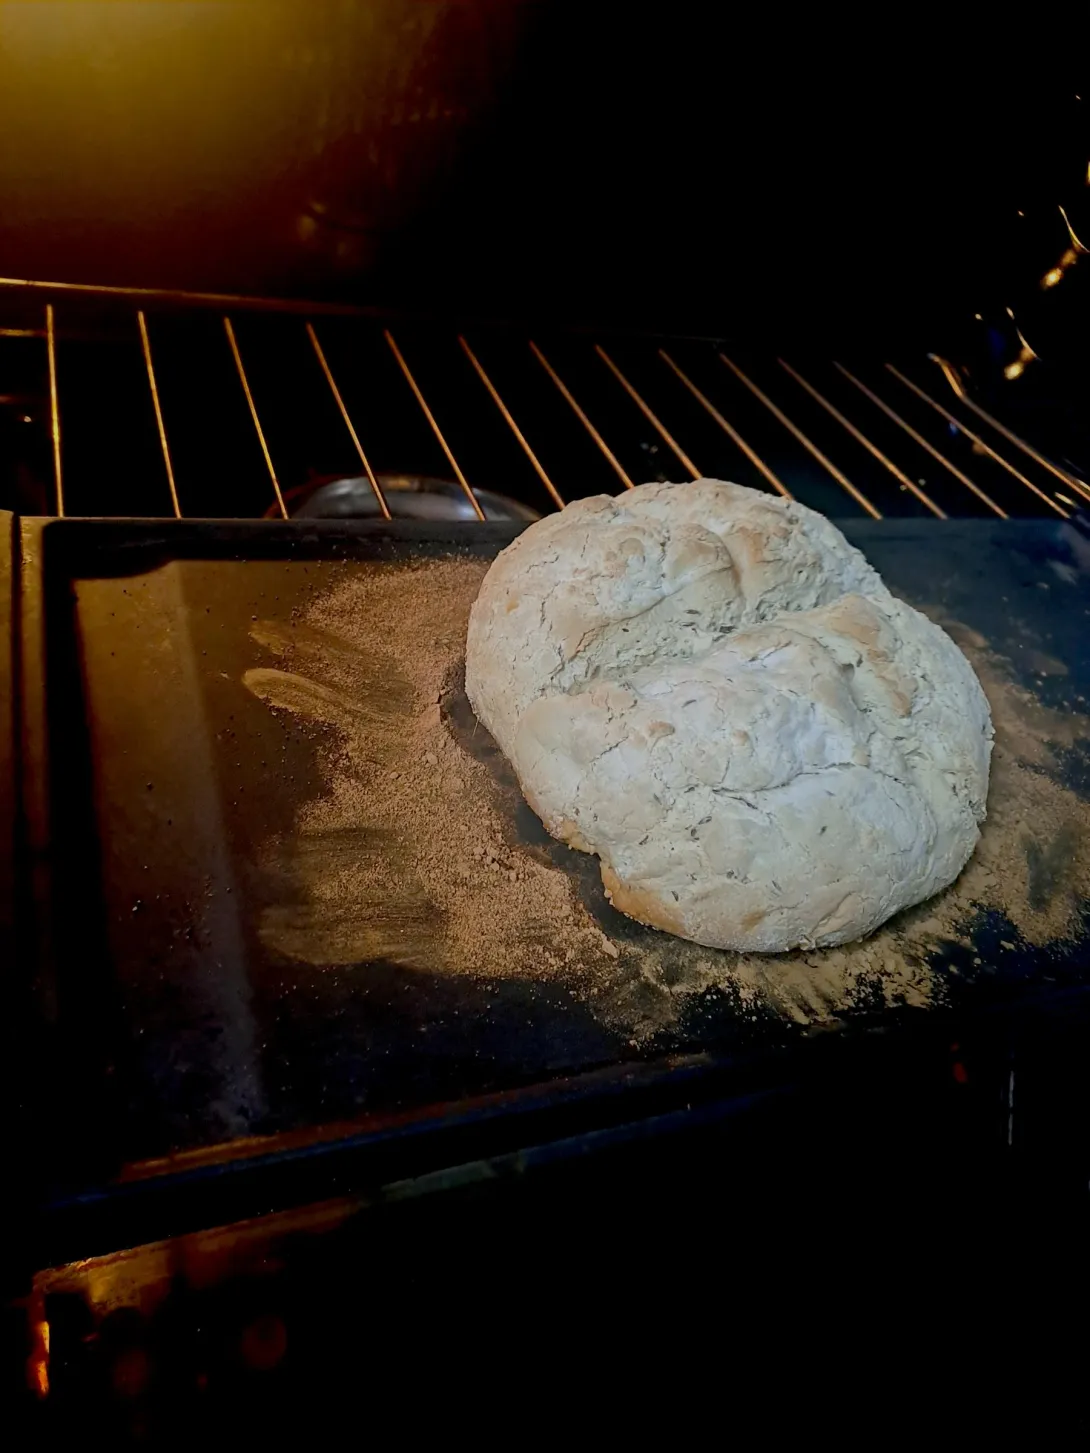
Formed the dough into a ball, let rest for 15 minutes and placed in a 400F pre-heated oven.
After 15 minutes there was no color at all. After another 15 minutes there was a light touch of brown on some of the edges. I gave it another 10 minutes but nothing seemed to change so I pulled it. The loaf seems small and is the color of a trout's underbelly. The crumb seems a bit gooey. Notice in the photo how the bottom crust tore away from the crumb while making the cut.
Very disappointing...
Katie
For the record;
Doubled means just that - well - give or take - a little - emphasis on little.
Enjoy!
OK, so it looks terrible but now we know useful things about the flour. Here is my reaction to the pictures, though I would have liked to have seen a good view of the sliced cross-section.
Overall, this is a good start. I've made loaves that looked much like that. Many of the points I mentioned are just a matter of practice and getting used to the dough. You can find out more about stretching, shaping, fermenting, and proofing on line, including here on The Fresh Loaf.
I suggest that your next loaf should include some sugar or honey, or try replacing half the water with milk. Use a little more liquid next time - only a little more, no more than an ounce more. You want to sneak up on the amount of water the dough can handle. Knead the dough more, and during a stretching session, stretch the dough more , unless it gets too elastic or fragile.
And remember, whatever you see on line about how to do this or that, don't worry if you don't do it exactly that way. There no one RIGHT WAY.
Thanks, but after this latest failure, it’s going to take some time to get my enthusiasm back. Anyway, thank you to all who offered your support, suggestions and encouragement. It was so much appreciated. I can’t tell you how great it felt to read your contributions to the thread.
Hang in there...
Katie
Perhaps you're just in need of a "reboot". When I get frustrated I go back to the basics, and in this situation it just might be a more straight-forward recipe that is actually written for the flour you are using. I posted links earlier from your flour's manufacturers site. Might be worth a try to get back into the spirit.
And just out of curiousity, are you sure that your yeast is good? If old, it might be worth replacing.