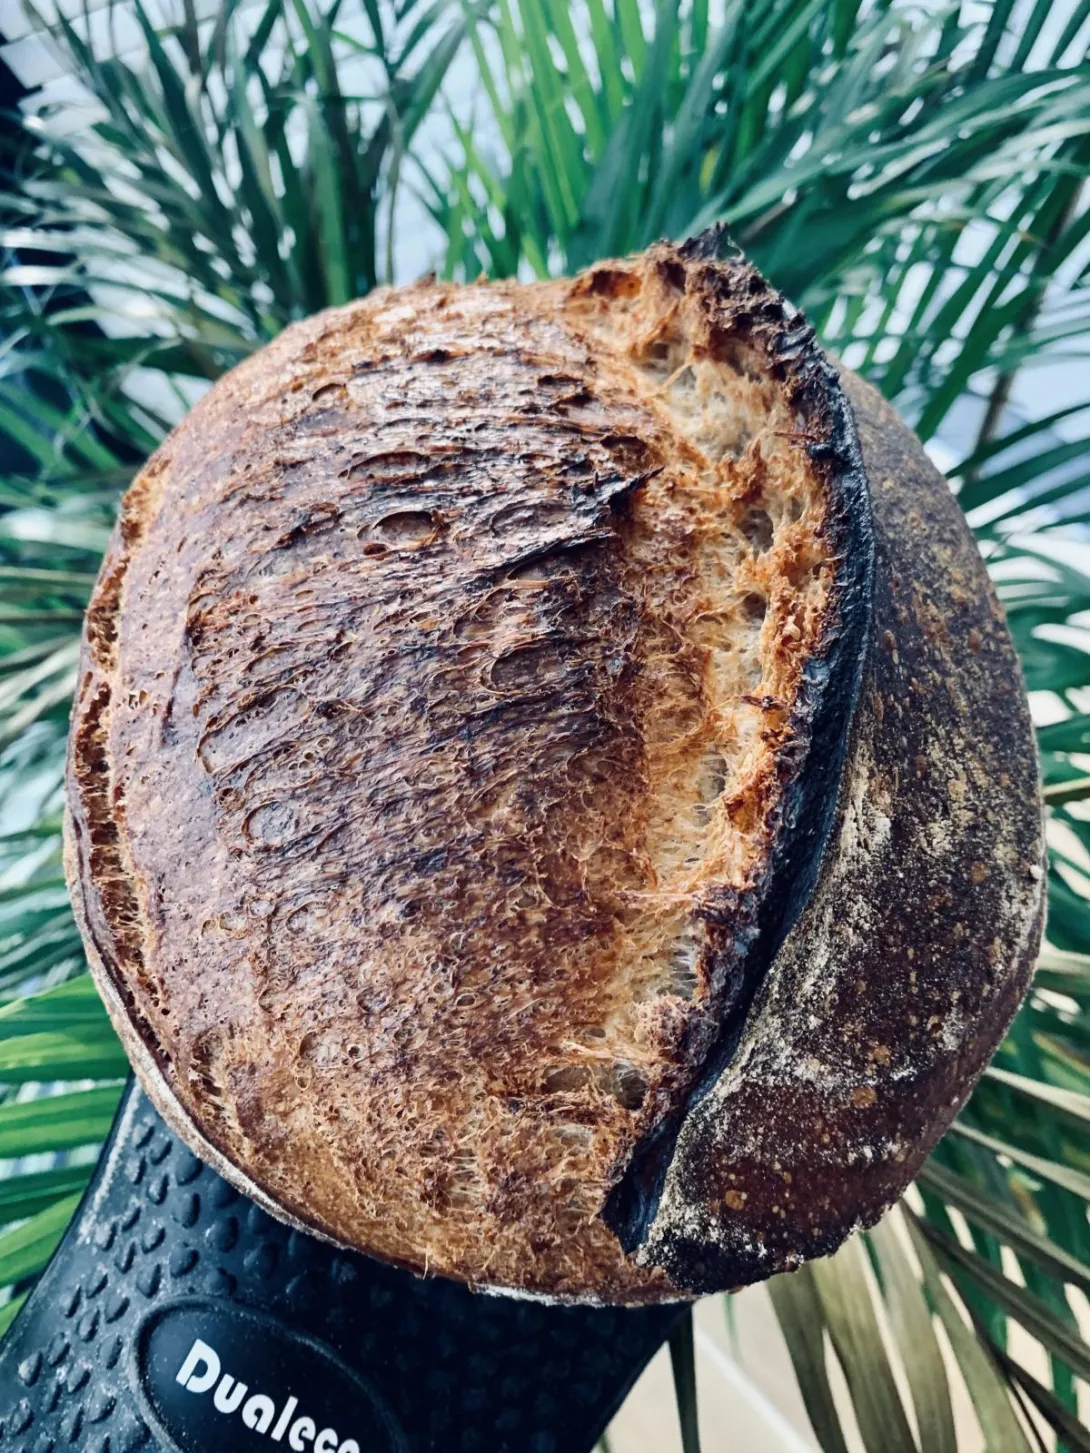
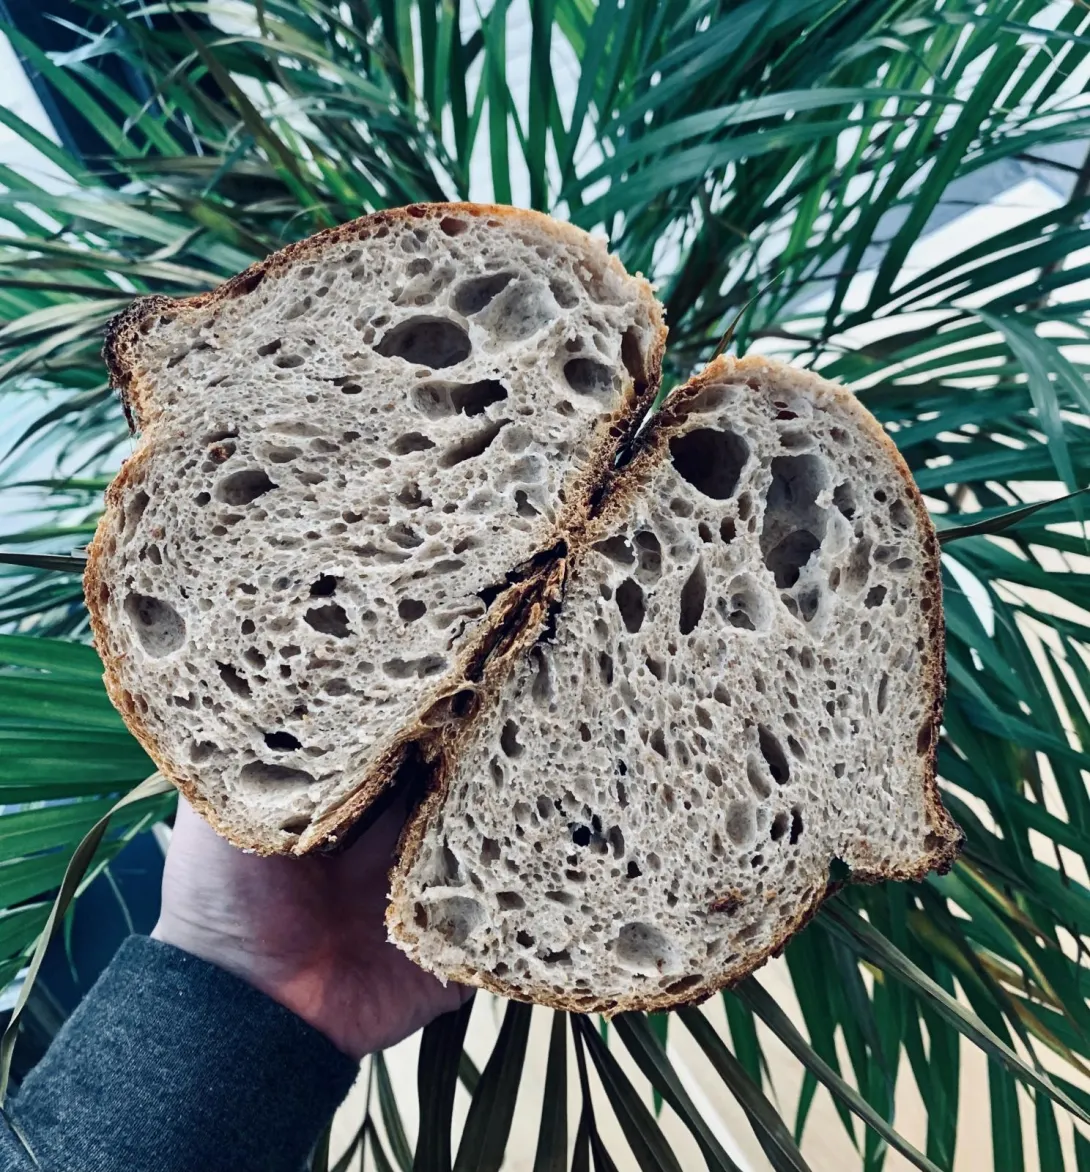
I've recently purchased a Mockmill Lino 100 to start milling a percentage of my own flour at home. I'm using Gilchesters wheat, rye and spelt grain berries. I've had great success using 70% strong Canadian white flour, 15% Spelt, 10% strong wholewheat and 5% rye, but all using either Matthews Cotswold Flour or Shipton Mill, not fresh-milled, at 78-80% hydration. See the first two photos for examples of good bakes, which are very consistent.
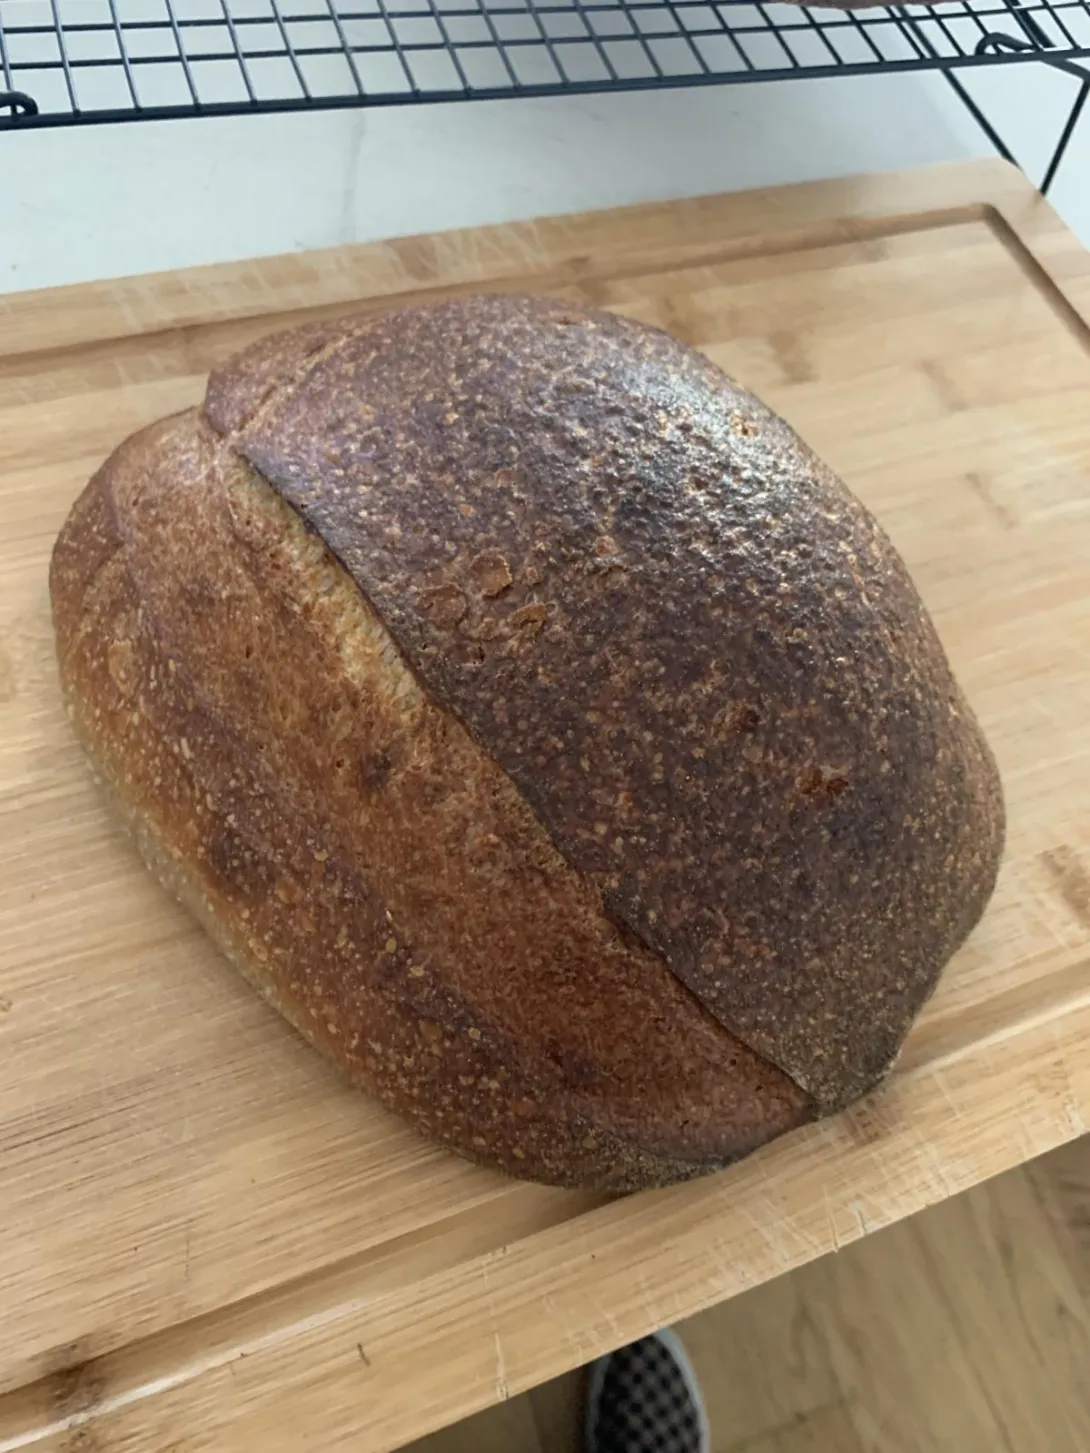
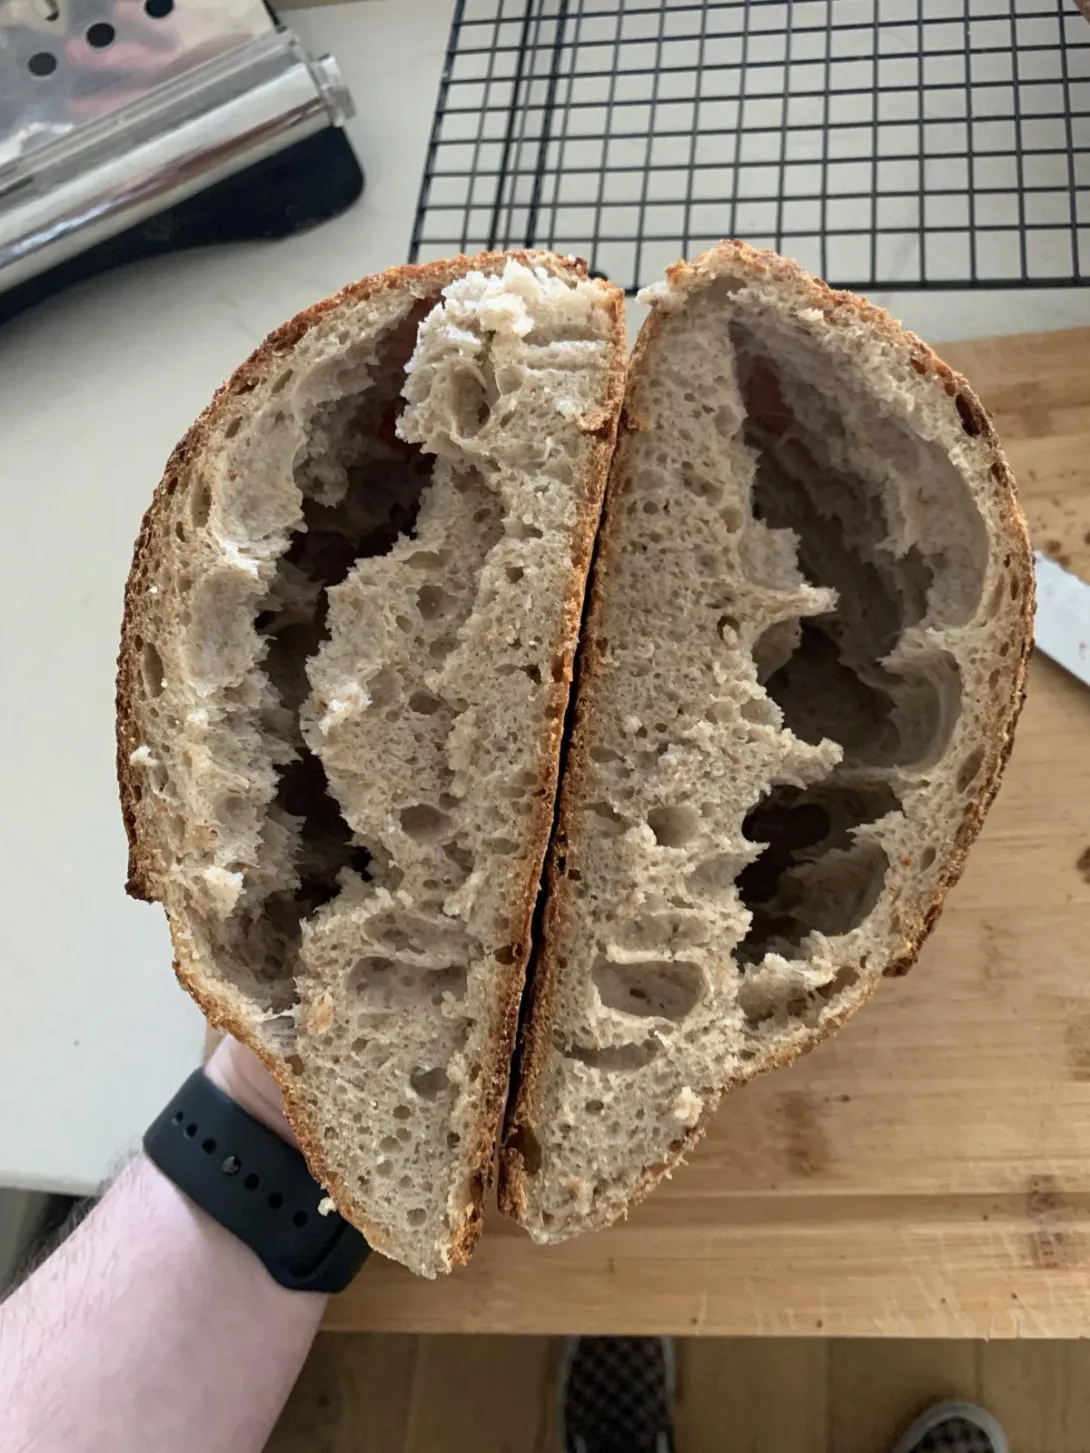
To get used to fresh milled flour, I've been using the same formula but with fresh-milled wholewheat, spelt and rye at 78% hydration. I've also been using the same process, and have been experimenting with different bulk fermentation times, as I know that fresh-milled flour ferments much quicker than conventional flour. However, my results are far from promising. The last two pictures are of a loaf I baked today, with the following process:
Build levain at ratio of 1:2:2, leave for 4-5 hours at 80F.
1-2 hours before levain is ready, I mill the fresh flour and mix all the flour with most of the water (leaving 2% out to mix in levain and salt later).
When levain has reached peak and passes the float test, mix in with the dough. Rest for 30 minutes. Add in salt and mix. All mixing done in a KitchenAid mixer with dough hook. I also hand mix larger batches for my micro bakery with fantastic results.
Start bulk fermentation, with 4 coil folds at 30 minute intervals. Total bulk is usually around 3-4 hours at 80F.
Divide, pre-shape, rest for 30 minutes, final shape using stitching. Cold retard overnight at around 2-3C.
Bake in a small deck oven, 20-25 minutes with steam.
--- ---
My thoughts on the problem are the following: it could be that I'm not allowing the fresh flour enough time to rest and to lose some of the heat from milling, as I mix it with the white flour and water right after I mill. Could this be a problem? I've also adapted to the increased fermentation rate by decreasing bulk fermentation. But still, no luck.
Anyone have any thoughts on what I'm doing wrong? All help is appreciated!
Matt, Hobz Bakery, Edinburgh.


My experience with fresh milled (also using mockmill) is that the grind is often a little courser than I think it is. What has worked for me is a pass through the grinder, followed by a sift to get as much large bran out as possible, followed by another pass through the grinder. I then, like you, add all of the water (with no levain or yeast) to the milled flour and let it soak for *at least* 6 hours (+ occasional folding/stiring), to soften any ragged particles that could cut the gluten and encourage starch breakdown via enzymes. (Some people here would probably freak out about that long of a soak with no salt, but honestly for home milled it is needed in most cases -- home mills, like mockmill, produce very little starch damage compared to commercial mills)
It looks like your gluten is getting cut, and is not congealing with the starches/fats properly from the last two images. The result of this is that during the final proof, all the gas sort of leaks out into that large pocket that was probably introduced during the final shaping? I would suggest giving the double grind, sift and long soak method a try.
I unfortunately don't have experience with fresh milled rye, so I'm not sure if that impairs its gluten development ultimately. I made a rye bread at SFBI recently and we were actually instructed to skip the stretch and fold + preshape because it is a temperamental flour with a gummy quality that can actually bog down the crumb if it gets worked too much after hydration. I would expect that fresh milled, unsifted, rye would be an even worse performer
Next - I'm a home baker with limited experience, and none of it may be what you need, but just in case something useful sifts out..... ?
I'm not familiar with your specific flours or grains. My experience with my Mockmill 200 has not produced that effect in any of my loaves, yeast or SD.
My process, just as a point of reference and for possible trouble shooting: I set the mill to where the stones are barely touching (setting #3 for me), pour the grain into the hopper on top, and change the setting to the finest (#1) until the grain is nearly all milled. Then I put it back to #3 for the last few bits to finish, and #4 before shutting it off. The flour does come out a bit more coarse than some commercial flours, but even that depends on what I mill. Hard white spring does better than hard red winter wheat, spelt and rye both come out pretty fine. And for the 200 at least, Mockmill advises against remilling flour. I don't remember if there could be warranty issues if you do that? Might be worth exploring if that's true for your model?
I have made a variety of breads mixing fresh milled wheat with varying percentage of either King Arthur AP or Bread flour (20%-80% home milled wheat), and I have nearly always combined them right away. I do find home milled flour is a bit more "thirsty", and often need to add an extra 10-15 gm more liquid. That may relate to the moisture content of my grain, and the fact that I live in an arid climate (Arizona).
I'm wondering if fermentation is more something you can tinker with? Others will likely be able to help you there. My home milled grains definitely rise much faster! Ditto that for starter feeds, especially when the kitchen is even a few degrees warmer. That applies to commercial yeast as well as SD bread made with some percent of fresh milled flour. (Add even a little fresh milled rye and Wowzer, off my starter goes!)
Hopefully you can figure out what works for you. Good luck!
Edit: I have also had better results when I do a prolonged autolyse, as much as overnight for a couple of loaves. Even an extra 30 min over what I had been doing has improved the texture of the dough.
It is perfectly safe to double mill flour. There is no mention of this being an issue in the user manual/warranty card and people (including Chris Stafferton) have been recommending it for years!
Your new loaf in the lower two photos are quite overproofed. The fermentation activity from your freshly milled flour has sped up bulk fermentation to the point where you are now overproofing your dough. Those caverns up top show evidence of the gluten breakdown from proteolysis that is happening because the pH is falling and proteolytic enzymes have become more active. The weakened gluten is showing that it can no longer hold back the pressure of the gases as they expand in the oven leading to the caverns up top.
Use even less levain and drop your bulk temperature if you can.
Benny
Thanks so much everyone for your detailed and helpful answers! I knew going into this that freshly-milled flour would ferment at a faster rate, but I guess I didn't realise just to what extent.
I'm not very keen on using high extraction wholegrain flour (sifting out the bran), just because I'd rather have the nutrition benefits of the whole wheat. I know Chad in Tartine No. 3 advocates for high extraction. I was never convinced but maybe I should try that.
I've just started a new batch, and have extended the autolyse. I'll definitely bulk at a lower temperature and keep it short.
If you wish to keep the bran, I would still recommend sifting it out to start with, and then soaking them separately (perhaps with a little active malt powder), or feeding them to your levain the night before. It is *really* difficult to home-mill bran fine enough -- it just gets flattened out with sharp edges that will act like little razors that cut all of your gluten and greatly reduce its extensibility in proofing/oven spring. Because bran is such a complex starch, it takes forever to soften without a little help from enzymes or our yeast friends.
I also wanted to keep it in, and I asked the experts at SFBI about it and they said this is probably the best way to do it if you don't have access to an industrial mill -- think of the bran as an add-in rather than the infrastructure. Soak it like you would seeds (through it is arguably worse than seeds because it permeates the entire dough on a more microscopic level, weakening the development of an elastic gluten network in a robust way). It's certainly a labor of love to do it this way -- being lazy, most days I just save it to make bran cereal at the end of the week instead ;)
Gotcha! I've tried a seeded white/kamut load with 10% fresh wholewheat (high extraction, bran removed), which I'll bake tomorrow. But it looks super already!
Hello Matt,
I have a Mockmill 200. I run the wheat berries twice through the mill The first run is at about 14 and second is 1 I read somewhere that it prevents over heating the Flour I use Scotland the Bread grain You should try some The flavour is really good. I blend it with Mungoswells white flour I live in Dumfries !
The top loaf looks lovely.
How do you calculate your water temp to add to your flour mix I find the flour is warmer when mill your flour GILCHESTERS flour is very lively too. I know with Scotland the bread flour they suggest gentle mixing and bulk no higher than 25c
I can imagine its so disappointing when you know you have been making lovely bread
Happy Baking Liz
Have you tried a float test at the end of bulk fermentation snip gently a wee piece of dough and float in room temp water
I've been meaning to try Scotland the Bread grain for a while, as well as Mungoswells. Really want to support local Scottish farmers and mills, just haven't that much time to get used to new flour - I've just set up a micro bakery and I'm terrified of not having consistent results so I'm sticking to flour I know for now. But I'm definitely eager to get my hands in Scottish flour!
I let the milled flour cool down - it was around 90F around 200g in.
deleted
That's definitely a good approach to take! I'll try 10% fresh milled on my next test bake!
I have had some concerns about this as well. FWIW, I recently found this discussion regarding temperature in the MockMill FAQ:
https://mockmill.com/eu/faq
One has to mill fairly aggressively to exceed 140F, although it is certainly possible. I would prefer to see a direct report and find out how the temperature was measured, but it has made me less concerned than the much more conservative 110F number I came across in Flour Lab. They don't discuss nutrition directly, but these temperatures are at least well below baking temperature.
This post contains an interesting discussion about the impact of bran in a gluten network (viewed through a microscope):
https://www.thefreshloaf.com/node/61538/understanding-grain-wheat
This post contains a link to a publication that studies the impact of bran on the gluten network (article: The effect of particle size of wheat bran fractions on bread quality – Evidence for fibre–protein interactions)
[edited to provide the second link I intended (originally shared by TFL user @barryvabeach)]
https://www.thefreshloaf.com/node/56958/fine-vs-coarse-ground-flour
As with most things, this could possibly change if you plan to make a bran levain.
Matt, I don't think I can help you troubleshoot your fresh-milled issue, unfortunately. But I'd love to hear more about how you got such a fantastic looking loaf (in the first two photos) at home. That looks exactly like the bread that comes out of my favorite SD bakery in Brooklyn! What is this "small deck oven" you speak of? How do you manage to achieve that incredible spread on the ear (as in, when you're looking at the uncut loaf, the total angle of the cut -- the part of the loaf that emerged during oven spring, and has that volcanic look to it -- appears to be close to 90 degrees)? I've never gotten coloration anywhere near that dark at home using a dutch oven.
Thanks so much! The small deck oven is a Chandley Pico Oven, released at the end of last year. It's basically a one-deck Rofco with a stone, and water injection (I would have bought a Rofco but can't hardwire it in my one-bed apartment). To be honest I've equally good oven spring and colour (if not better) from my Challenger bread pan in a domestic convention oven, so it is possible!
Looking at the uncut loaf, I score just to the right of the centre. The angle is very close to 90 degrees, I'm almost horizontal to the bench. And I pass the blade further underneath the cut one or two times more (doesn't work well with a very wet dough that's over proofed - my dough is usually 78-80% hydration). Not sure if that makes any sense. But to be fair, this was one of the best bakes I've had, and I don't always achieve this level of loaf. Also, to be clear, the crumb in the second picture of the 'good' loaf isn't the same bread as in the first photo (the first went to a customer, the second - crumb shot - loaf was the worst looking extra loaf I keep for myself.
Wow, you get that same look/angle from a DO?! Amazing. I'd love to see your scoring technique some time, if you'd be up for posting some more pictures...? The coloration is really great, I wonder if that comes down to properties of the flower, maybe? Because I'm really not coming close at home. I should probably let the DO preheat for way too long (say, 30+ mins at 500F), just to be sure that's not a possible explanation...
When you say you score to the right of center, do you mean the center as in, the top or 'crown' of the loaf? Right before it gets covered and goes into the pan? I do the same (think), but I've only ever gotten an 'opening' angle about as good as the below... I wonder why.
Attached are some pictures of a seeded loaf I just loaded into the oven. That's the angle I usually score at, though to be honest I think I scored slightly too deep. Your loaves look beautiful! Though I think you're scoring right down the middle? Maybe go slightly to the side, as in my pictures.
I believe colour has lots to do with flour, fermentation and the amount of sugars in the dough (though I'm way out of my depth here). Would love if someone here has some input on this, or any links to previous discussion. I know the colour I get from my mini-deck oven is nowhere near the beautiful deep golden colour I'd get from using my challenger bread pan. The oven spring using that was just out of this world. Oh I'd definitely preheat for longer, usually an hour at 250C in a conventional oven, with the top of the dutch oven off the bottom, to make sure the bottom part (on which the dough will sit) absorbs as much heat as possible.
Wow, those are great photos! Thanks-- very helpful. You'll have to post some 'after' photos when those come out of the oven. Now I wonder if maybe I'm overproofing all the time, or not building up enough dough strength... I think if I scored as deeply as your 2nd photo shows, my loaves would fall apart completely ;)
That first photo is playing tricks on my eyes... what is going on in the lower right corner?! It's actually a wonderful photo (bread aside) because of that corner... it really suggests several interesting possible stories. Plus the juxtaposition between shattered marble and beautiful unbaked bread is quite poetic. Nicely done!
I am also reminded of a lesson I thought I had learned by now: every little thing contributes to the result when it comes to SD baking. For example, I don't know why it didn't occur to me until just now that a boule will behave differently in the oven (with regards to oven spring and response to scoring) than a batard. Obviously it will! Hmm. Maybe it's time to get some oval bannetons and see how that turns out.
Researching more about coloration is on my baking to-do list; I can't seem to get a darker shade of brown on the crust than what I posted earlier. I can sometimes get some blackened bits, but never the deep mahogany that I see in fresh loaf posts fairly often, or that comes out of my favorite SD bakeries...
Here are some photos of the baked result - I double scored the one in this picture; I've seen some photos of Tartine and Hart Bageri loaves scored like this and I love the look! I absolutely love sesame loaves. Hoping to start selling these from my micro bakery soon.
To be fair, I don't usually get such a rigid dough. But the sesame inside the dough really helps with that. So my regular country loaf dough does collapse slightly when I score it, at 80% hydration (which is also what the seeded one was at, but the seeds must soak up lots of water).
Ah that is a cool photo! But I'm afraid it's just a bit of burned flour from my loader!
I converted to batard a while back and have never turned back! Though I'd like to make porridge loaves in a boule shape (I'd just need to spend more money on bannetons)!
That’s a beautiful loaf Matt, well done.
Benny
Sheesh, that's a gorgeous loaf. Can you share your process and formula?
Sure!
70% Strong Canadian White
20% Kamut
10% Freshly-milled whole wheat, high extraction
80% Water
2.5% Salt
15% Levain
15% Toasted Sesame Seeds
Levain at 1:2:2 (white and rye); left for 4-5 hours at 80F; Autolyse water and flour 1-2 hours before mixing; mix in levain; sit for 30 mins; mix in salt with some reserved water; Start Bulk in proofer set at 80F. 3 sets of coil folds every 30 minutes, stop after 1 hour 30 mins. Add in inclusions at the first fold (John from Proof Bread has a really good video on inclusions). Let rest for remainder of bulk (usually bulk for me takes a total of 3.5-4 hours). Divide and pre-shape. Rest for 30 minutes. Shape using stitching technique. Cold proof overnight. Bake the next morning.
Thanks for this-- I've been searching for a more interesting loaf... not sure I'd go for sesame seeds on the first try, but the kamut is an interesting idea. I guess the fresh-milled high extraction WW is why you originally posted this thread? And does that imply that you're not milling the kamut yourself?
Do I have it right that your best results have been with commercially milled WW flour, and that you're trying to calibrate your approach for the fresh-milled?
What's the protein content on the strong Canadian white and the kamut?
I recently shifted to a 100% high extraction rye starter, and I'd actually been considering moving away from my usual 'fermentalyse' approach-- the 100% rye levain is so strong that the dough hasn't really needed the head start. Maybe I'll try something along the lines of what you're doing: either cutting the rye with white to build the levain, or doing a regular autolyse before adding the levain, or both.
Any particular video you like for seeing stitching on the shape? I've experimented with that, but I haven't noticed much benefit vs. a tight rolling-on-the-table shaping.
Thanks for sharing all this info!
I can't recommend Kamut flour enough! I find it's also quite easy to work with, given the high protein. Yeah I don't mill the kamut myself, though I could in the future!
Definitely, my best results have always come from commercial flour. I'm very new to fresh milling.
I use Shipton Mill flour, and unfortunately they don't advertise the protein content on the sacks or their website - which thinking about it is incredibly strange! I should get in touch and figure out what the strength is.
I've always used a half white, half rye starter, don't really know why I started like that but it's given me consistent results. I do occasionally try a white levain, but I always go back to rye.
I've found the IGTV videos on Tartine's Instagram very useful. Jennifer Latham, Tartine's head of bread, gives a very detailed overview.
Where do you get your kamut? What little googling I've done shows it to be quite expensive!
Thanks for the video suggestion; I guess my research into Tartine's methods hasn't been nearly as thorough as I had hoped... excited to watch these.
I get mine from Shipton Mill in the UK. It is expensive, I only use a small percentage of it in each bake.
Matt, here's my treatise on fresh-milled home-milled flour, along with pointers to other TFL-ers who home mill: www.thefreshloaf.com/node/64863/7-things-about-freshmilled-flour
Of the home-millers, SeasideJess and Albacore are in the UK.
My post has links to SeasideJess's, and Agres's post on home-milled tips.