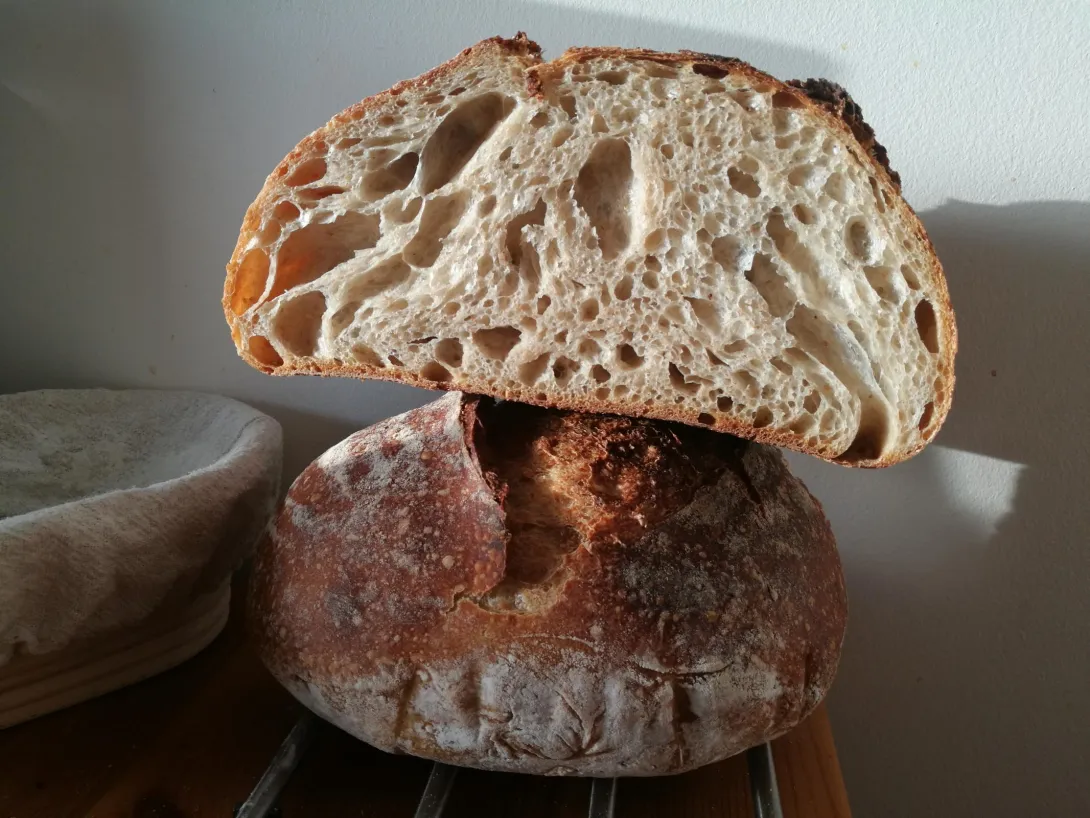
Hi all, this is my first post here at TFL. I've just started making sourdough 2 months ago, still learning the art and science! I made my 13th loaf yesterday and I'm pleased that I'm getting the ariness that I'm aiming for. However I'd like to achieve more evenly distributed air bubbles next time, it seems that with this one there are large longish air bubbles particularly concentrated on the left side of the loaf, and one on the other side too? Is this a sign of lack of gluten development or overproofing?
I still don't know how to judge when a dough is ready for shaping and when proofing is at its optimum stage for baking. My recipe/ process was:
90% strong white, 10% strong wholemeal (UK supermarket flours)
20% starter (young and quite active)
70.5% hydration
Autolyse flour and water about 1 hour, then mix in starter and salt, leave to rest 30min, bulk fermentation was at room temperature (around 27 degC). Did 3 stretch and folds for first 30 min intervals, then another 2 stretch and folds in longer intervals. Pre-shape on bench and rest 20 mins, then did final shape, transferred to banneton and cold proof in fridge for 18.5 hours. Took dough out of fridge and left in room temperature for an hour while preheating cast iron pot. Baked with some water sprayed on lid of the pot, 20 min with lid and around 25 min without lid.
So what can I do the next time so I can get a more evenly distributed open crumb? Look forward to learning from fellow sourdough bakers :)
Many people would give their eye teeth to have irregular crumb like that. with large and small holes. looks pretty perfect to me.
Nice work
Thank you! This is my best one so far, but thought those longish bubbles might indicate a `problem' with something that I'm doing, still so much to learn... :)
Looking at the slightly rounded bottom of the loaf, and the distribution of holes in the crumb, I'd guess that you might be slightly under-proofed on the final rise. But seriously, that's pretty good looking bread. Many weeks I wish mine looked that good.
Thank you must have been a good day for my loaf! Have made others that don't look like this at all. How would a slightly rounded bottom indicate under proofing? Keen to understand the science behind it...
is really nice too.
Leslie
Thank you for your kind words Leslie!
FOR SOME REASON (PROBABLY MY KEYBOARD), I AM GETTING DOUBLE POSTS HALF WAY THROUGH THE WRITING. I WILL TRY AND EDIT IT AWAY.
That is one lovely loaf! That is a crumb that many people try to achieve.
Tricky (not trick) question: How many bubbles are in a loaf of bread like this?
Take a look at THIS video. It is about 15 minutes but I learned a LOT from it. "Modernist Bread" is a book series that came out last year and is all bread research. It costs serious money (?$600) so it is WAY above my budget but there are interesting tidbits I have found. This bubble question is from there and just knowing the concept has helped me tremendously. Some of the info I already had arrived at but it was great to have it validated in such a way.
Back to tradeoffs. The way I look at your crumb pic is that is looks in the perfectly proofed to just a tad overproofed range and let me explain why. As the dough proofs and ages, some bubbles expand and get quite large, if they are left undisturbed. As the dough ages, the gluten structure (the ropes holding the bubble edges) can weaken and fray and break. Now you have multiple bubble walls collapsing so you have a large bubble instead of a bunch of smaller bubbles.
That may be why the "finger-poke" test works the way I understand it to work (I have seen opposite explanations ). Underproofed-When you poke your finger into the bubbly dough, if it is underproofed, the dough bubble walls are strong and springy. It springs back and the dent disappears.
Overproofed- If it is overproofed, the bubble walls have frayed and weakend. The bubbles pop, the strands stay stretched and can't spring back-it does not fill in.
Now the Goldilocks moment-the perfectly proofed loaf. The gluten strands are becoming a little weaker but there are still enough strands that can bounce back. When you give it a healthy poke, some of the bubble walls pop and the stronger dough walls spring back. It fills in but a bit slowly. Time to bake! Knowing this-I still have a great deal of trouble judging proof. Takes LOTS of experience and different ingredients affect the dough's behavior.
Oops-never talked trade-offs. The only way to re-distribute the bubbles after a long,cold rise is to warm up and handle the dough. When you handle the dough those fragile-walled bubble walls will totally collapse and you will de-gas the dough. The only alternative I see is a shorter cold retard,warm up, gently re-shape the loaf with folds, proof til done and bake. I'm not sure you will achieve the beautiful, custardy crumb you have already but you may want to try.
Delicious baking!
Thank you for the video and for explaining how the large bubbles may have been formed!! Will keep on baking so that I can get enough experience to know how 'perfectly proofed' dough needs to feel like!