The Fresh Loaf

A Community of Amateur Bakers and Artisan Bread Enthusiasts.

sourdough bread

dmsnyder's picture
dmsnyder

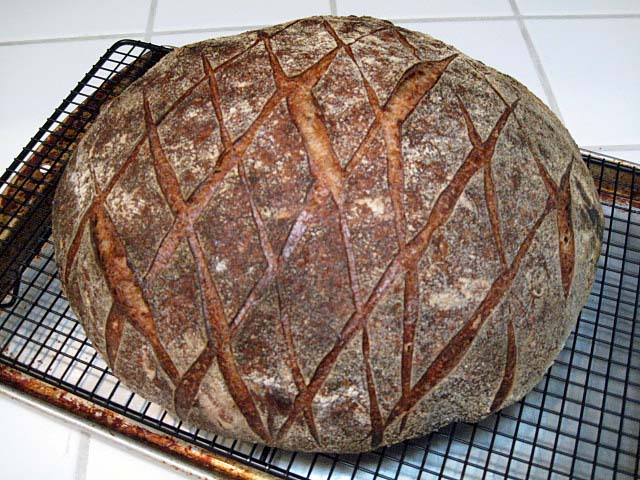
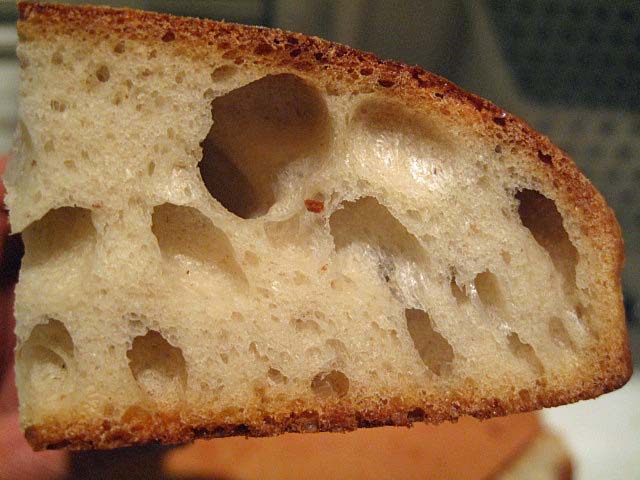
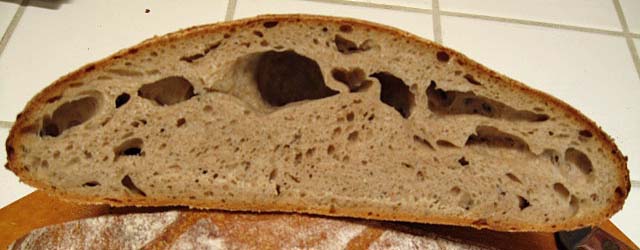
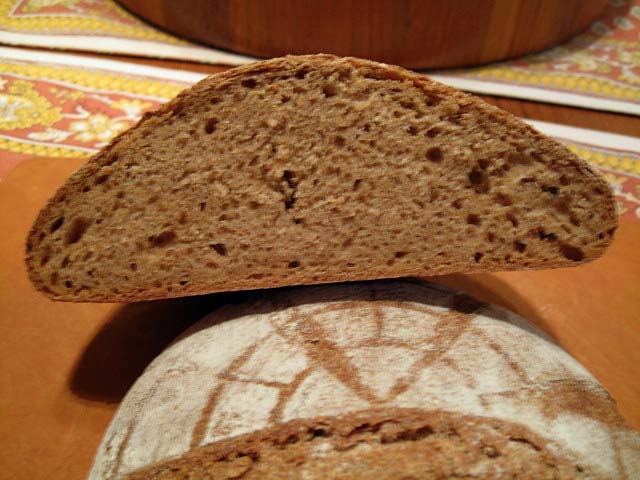
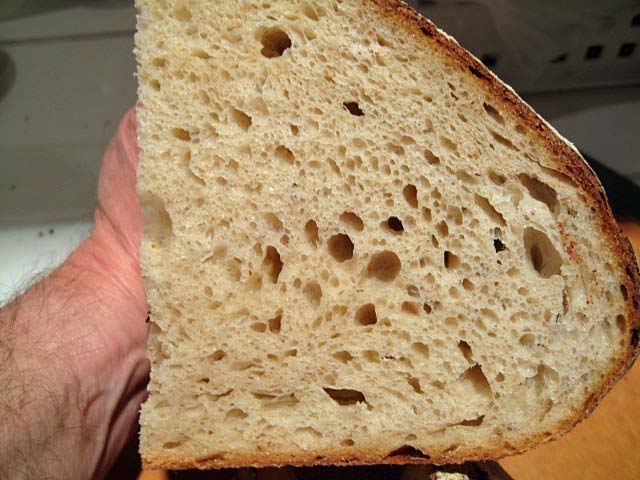
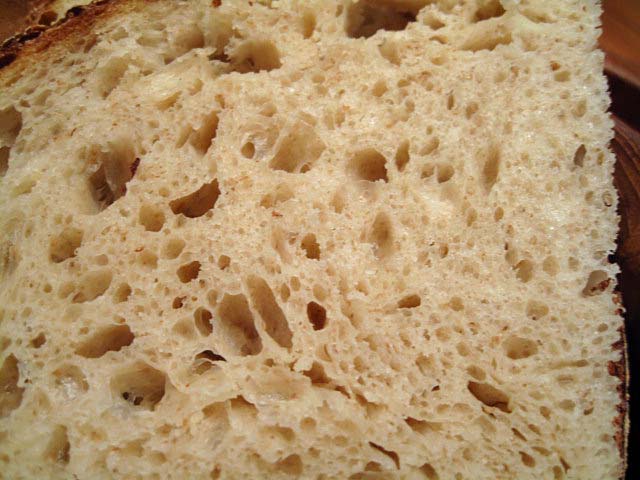
While I enjoy a variety of breads, the San Joaquin Sourdough remains my “go to” bread. It's easy to fit into a busy schedule. It uses few ingredients. It always tastes delicious. It's wonderful freshly baked but also makes great toast, French toast, garlic bread and croutons for salads or onion soup. It is almost as good after being frozen as fresh. What's not to like?


I first developed this formula about 3 years ago. Since then, I've tweaked the formula and methods in many ways. I know many TFL members have made this bread and enjoyed it. So, I thought an update on my current recipe might be of interest.

To summarize the changes I've made in the past 6 months:

  1. I substituted 25 g of whole wheat flour for an equal amount of the rye flour in the original formula. The difference in flavor is subtle, but I like it better.

  2. I adopted the oven steaming method for home ovens we were taught in the SFBI Artisan I and II workshops. 

    SFBI Steaming method

  3. I switched from using a parchment paper couche to a baker's linen couche. (Highly recommended! Here is my source for linen: San Francisco Baking Institute)

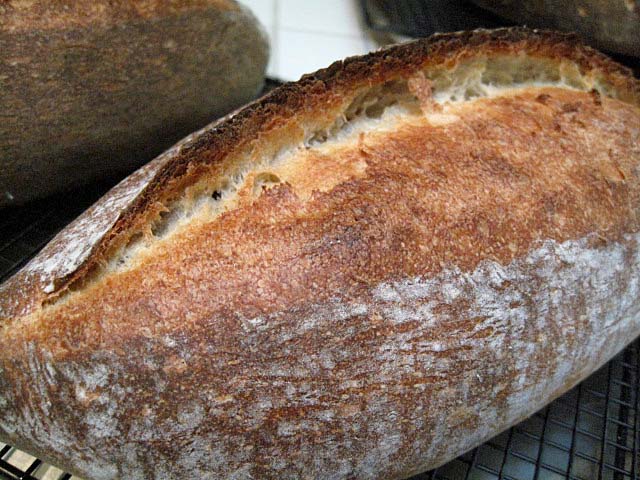
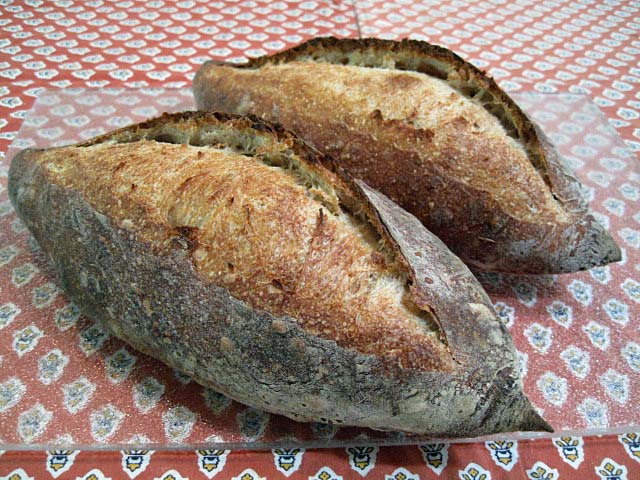
  4. Most recently, after trying several different methods, I've settled on the method of pre-shaping and shaping bâtards taught in the King Arthur Flour instructional video. (See: Hamelman technique videos  The relevant instructions are in the fourth video, starting at about 7:00 minutes.) The SJSD dough is very extensible. This method forms a tighter loaf which is shorter and thicker than that produced with the method I had been using.

Ingredients


Active starter (100% hydration)

150 g

All Purpose flour (11.7% protein)

450 g

BRM Dark Rye flour

25 g

Whole Wheat flour

25 g

Water

360 g

Sea Salt

10 g

Procedures

Mixing

In a large bowl, mix the active starter with the water to dissolve it. Add the flours and stir to form a shaggy mass. Cover tightly and let rest (autolyse) for 20-60 minutes.

Sprinkle the salt over the dough. Using a plastic scraper or silicon spatula, stretch and fold the dough 30 times, rotating the bowl 1/5 turn between each stroke. Cover tightly. Repeat this stretch and fold procedure 3 times more at 30 minute intervals.

Fermentation

After the last series of stretches and folds, scape the dough into a lightly oiled 2 quart/2 liter container and cover tightly. (I use a 2 quart glass measuring pitcher with a tightly fitting plastic lid manufactured by Anchor Glass.) Ferment at room temperature for 90 minutes with a stretch and fold after 45 and 90 minutes, then return the dough to the container and place it in the refrigerator and leave it there for 21 hours. 

Dividing and Shaping

Take the dough out of the refrigerator and scrape it gently onto a lightly floured work surface. Gently pat it into a rectangle. Divide the dough into two equal pieces.

To pre-shape for a bâtard, I now form a ball rather than a log. Place each piece of dough smooth side down. Pat into a rough circle, degassing the dough gently in the process. Bring the far edge to the middle and seal the seam. Then go around the dough, bringing about 1/5 of the dough to the middle and sealing it. Repeat until you have brought the entire circumference of the piece to the middle. Turn the piece over, and shape as a boule. Turn each ball seam side up onto a lightly floured part of your board.

Cover the dough with plastic wrap and/or a kitchen towel and let it rest for about 60 minutes. (The time will depend on ambient temperature and how active your starter is. The dough should have risen slightly, but not much.)

To shape a bâtard, I now favor the method portrayed in the King Arthur Flour instructional video. I encourage you to watch the video, but here is a verbal description of the method:

  1. For each piece of dough, place it in front of you on an un-floured board.

  2. Hold down the near side and stretch the far side of the piece into a rough rectangle about 8 inches front to back.

  3. Now, fold the far end two thirds of the way to the near end and seal the seam with the heel of your hand.

  4. Take each of the far corners of the piece and fold them to the middle of the near side of your first fold. Seal the seams.

  5. Now, the far end of the dough piece should be roughly triangular with the apex pointing away from you. Grasp the apex of the triangle and bring it all the way to the near edge of the dough piece. Seal the resulting seam along the entire width of the loaf.

  6. Turn the loaf seam side up and pinch the seam closed, if there are any gaps.

  7. Turn the loaf seam side down. Then, with the palms of both hands resting softly on the loaf, roll it back and forth to shape a bâtard. Start with both hands in the middle of the loaf and move them outward as you roll the loaf, slightly increasing the pressure as you move outward, so the bâtard ends up with the middle highest and the ends pointed .

Preheating the oven

One hour before baking, place a baking stone on the middle rack and put your steaming apparatus of choice in place. (I currently use a 7 inch cast iron skillet filled with lava rocks.) Heat the oven to 500F.

Proofing

After shaping the loaves, transfer them to a linen couche, seam side up. Cover the loaves with a fold of the linen. Proof until the loaves have expanded to about 1-1/2 times their original size. (30-45 minutes) Test readiness for baking using “the poke test.” Do not over-proof, if you want good oven-spring and bloom!

Baking

Pre-steam the oven, if desired.

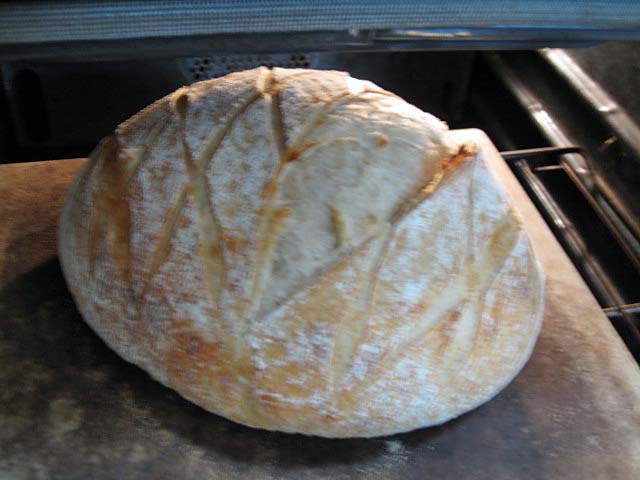
Transfer the loaves to a peel. (Remember you proofed them seam side up. If using a transfer peel, turn the loaves over on the couch before rolling them onto the transfer peel. That way, the loaves will be seam side down on the peel.) Score the loaves. (For a bâtard, hold the blade at about a 30 degree angle to the surface of the loaf. Make one swift end-to-end cut, about 1/2 inch deep.)

Transfer the loaves to the baking stone. Steam the oven. (I place a perforated pie tin with about 12 ice cubes in it on top of the pre-heated lava rocks.) Turn the oven down to 460F.

After 12-15 minutes, remove your steaming apparatus from the oven. Rotate the loaf 180 degrees, if it is browning unevenly. Close the oven door. (If you have a convection oven, switch to convection bake, and turn the temperature down to 435ºF.)

Bake for another 12-15 minutes, then remove the loaf and place on a cooling rack. Check for doneness. (Nice crust color. Internal temperature of at least 205F. Hollow sound when you thump the bottom of the loaf.) If necessary, return to loaf to the oven to bake longer.

When the loaves are done, turn off the oven but leave the loaves on the baking stone with the oven door ajar for another 7 minutes to dry the crust.

Cooling

Cool on a rack for two hours before slicing.

Enjoy!

David

Submitted to YeastSpotting

dmsnyder's picture
dmsnyder

We've been traveling a lot the past few months, and I haven't had many weekends at home to bake. Now, we'll be home for a few weeks, and I can bake more regularly. This weekend, I baked two of my current favorites – the SFBI Miche and Hamelman's Pain au Levain. (See: Miche from SFBI Artisan II - 2 kg. The formula for the Pain au Levain is found in Hamelman's "Bread.")

After a long, cool Spring, we're starting to get some Summer weather. It's been in the low 90's. Temperatures of 105ºF are predicted for the middle of the coming week. Frankly, I could do without the 105º days, but my starter and doughs are enjoying the warmer kitchen temperature. My old dictum - “Watch the dough, not the clock” - was applied. For example, the pain au levain, which Hamelman says to proof for 2 1/2 hours was ready to bake in 90 minutes after shaping. I feared the bâtards were a bit over-proofed, but the oven spring and bloom I got suggest proofing was pretty much on target.

SFBI Miche

Miche crust

Miche crumb

Pain au Levain

Pain au Levain, up close

One thing I learned and applied for this bake of the pain au levain: The last few bakes of this bread have had many excessively large holes. I suspected this was due to insufficient de-gassing before pre-shaping. So, this time, I de-gassed a bit more vigorously. I like the results.


Pain au Levain crumb

Happy Baking! And Happy Father's Day to all you fathers!

David


dmsnyder's picture
dmsnyder


Pan de Horiadaki

Maggie Glezer describes this Greek Country Bread as the “daily bread” of the Jewish community of Thessaloniki, almost all of whom were deported to Auschwitz by the Nazis during WW II. Glezer got the recipe from Riva Shabetai, who was a Holocaust survivor. Thessaloniki is currently the second largest city in Greece. It was settled by Jews expelled from Spain in 1492 and thrived for almost 500 years. Its culture had many Spanish influences in language, cuisine and customs.

The dough is 67% hydration and is enriched with sugar and olive oil. It is formed into boules, then, after bulk fermentation, it is proofed and baked in oiled cake pans, a technique I have not seen used except with Greek breads. Glezer provides both a yeasted and a sourdough version of Pan de Horiadaki. I made the sourdough version. The method is remarkable in that the bulk fermentation is short relative to the proofing time.

Levain

Wt.

Bakers %

Firm starter

30 g

22

WFM Organic AP Flour

135 g

100

Warm water

80 g

59

Total

245 g

181

  1. Disperse the starter in the water, then add the flour and mix until fully incorporated.

  2. Ferment at room temperature for 8-12 hours 

Final dough

Wt.

Bakers %

WFM Organic AP Flour

875 g

100

Warm water

595 g

68

Salt

20 g

2

Olive oil

30 g

3

Granulated sugar

30 g

3

Levain

170 g

19

Total

1720 g

195


Method

  1. The night before baking, mix and ferment the levain.

  2. Mix the flour and water and autolyse for 20-60 minutes.

  3. Add the starter in pieces and mix at Speed 2 until the dough is smooth for 10-15 minutes. The dough should clear most of the sides of the bowl after about 5 minutes. If needed, at 1-2 T of flour.

  4. Add the salt, sugar and oil and continue mixing until fully incorporated. The dough should be sticky but smooth and should yield a nice window pane.

  5. Transfer the dough to a lightly oiled bowl and ferment, covered, for 2 hours. (I did a stretch and fold in the bowl after 1 hour.)

  6. Oil two 8-inch cake pans generously with olive oil. (I did not have two 8 inch pans, so I used 9 inch pans. As a result, I'm sure my loaves were flatter than if proofed in the smaller pans.)

  7. Divide the dough into two equal pieces and form each into a tight boule.

  8. Roll each boule in the oiled pans and leave them, seam side down, in the pans.

  9. Cover the pans with plasti-crap or place in food safe plastic bags.

  10. Proof for 5 hours or until tripled in volume and risen above the pan sides. Glezer says to proof until the dough stays indented when poked with a finger. This was at 3 hours for me.

  11. An hour before baking, pre-heat the oven to 500ºF.

  12. Bake at 400ºF for 50-55 minutes until deeply browned. Rotate the pans, if needed for even browning, after 35 minutes.

  13. Remove the loaves to a cooling rack, and cool completely before slicing.


Pan de Horiadaki crumb

Note the dull (not shiny) crust. This is from baking without steam, as Glezer specifies. I personally prefer a somewhat shinier crust, so I may bake this bread with steam next time.

The crust is relatively thick from the long bake and very crunchy. The crumb is chewy. The flavor is exceptional, enhanced I'm sure by the sugar and olive oil. There is no detectible sourdough tang, just a sweet, wheaty flavor. I expect this bread to make outstanding toast and sandwiches, but it is delicious just as is.

Note to brother Glenn: If you liked the other Greek bread I made, you will love this one. I don't suppose it would be a crime to coat it with sesame seeds either, but the flavor is so nice as it is, it would be almost a shame to mask it with other strong flavors.

David

Submitted to YeastSpotting

dmsnyder's picture
dmsnyder

I don't know how many different formula's for baguettes I've tried, but the one with the best flavor was that for the Pain à l'Anciènne of Phillip Gosselin. (See: http://www.thefreshloaf.com/node/8524/philippe-gosselin039s-pain-à-l039ancienne-according-peter-reinhart-interpretted-dmsnyder-m).

During our recent visit to Paris, one of the breads we had was Gosselin's Baguette Tradition, and it was very similar to the Pain à l'Anciènne I had made. The differences were that the crumb was more open, chewier and had a mild sourdough tang. I don't know whether Gosselin makes his Baguette Tradition using the same long cold retardation as employed in his Pain à l'Anciènne, but I suspect he does.

Gosselin's Baguette Tradition from the bakery on Rue Caumartin

Gosselin's Baguette Tradition crumb

Today, I made baguettes using the Gosselin technique, but I substituted a liquid levain for the yeast … well, I did also spike the dough with a little instant yeast to better control the fermentation time.

Ingredients

Wt.

Baker's %

WFM Organic AP Flour

400 g

100

Ice Water

275 g

69

Salt

8.75 g

2

Liquid Levain

200 g

50

Instant yeast

¼ tsp


Total

883.75 g

221

Note: Accounting for the flour and water in the levain, the total flour is 500 g and the total water is 375 g, making the actual dough hydration 75%. The actual salt percentage is 1.75%.

Method

  1. The night before baking, mix the flour and levain with 225 g of ice water and immediately refrigerate.

  2. The next morning, add the salt, yeast and 50 g of ice water to the dough and mix thoroughly. (I did this by hand by squishing the dough between my fingers until the water was fully incorporated.)

  3. Place the dough in a lightly greased bowl with a tight cover.

  4. Ferment at room temperature until the dough has about doubled in volume. (3 hours for me) Do stretch and folds in the bowl every 30 minutes for the first two hours.

  5. An hour before baking, pre-heat the oven to 500ºF, with baking stone and steaming apparatus in place.

  6. Divide the dough into 4 more or less equal pieces and stretch each into a 12-14 inch long “baguette.”

  7. Score and bake immediately at 460ºF, with steam for 10 minutes, and for about 20 minutes total.

  8. Cool on a rack before eating.

Baguettes Tradition

Baguette Tradition crumb

The crust was crunchy and the crumb was nicely open and chewy. It was moderately sour but with nice sweet flavors as well. All in all, it was quite similar to the baguette tradition we had from Gosselin's bakery. The loaves are smaller with proportionately more crust than crumb. The crust was a bit thinner, and the crumb a bit chewier. My totally unbiased, super taster spouse declared it “much better” than what we had in Paris. I don't know about that, but it is quite good – close to my notion of a perfect sourdough baguette - and I expect to make it again and again.

David

Submitted to YeastSpotting

dmsnyder's picture
dmsnyder

This weekend, I baked another miche using the formula from the SFBI Artisan II workshop I attended last December. The SFBI formula and method can be found in my previous blog entry: This miche is a hit!

I amended the formula and methods as follows: For this bake, I used my usual sourdough feeding mix of 70% AP, 20% WW and 10% dark rye for the levain. The Final Dough was mixed with about 1/3 Central Milling "Organic Type-85 malted" flour and 2/3 WFM Organic AP, which is also a Central Milling flour. The SFBI method does not include an autolyse, but I did one. (Mixed the water, liquid levain, toasted wheat germ and flour and autolysed for an hour. Then mixed in the salt and proceeded.)

The bread flavor was the best yet, to my taste. I tasted it about 18 hours after baking. I had left it on the counter, wrapped in baker's linen overnight before slicing. This is the sourest miche I've baked. I like the sour tang and the flavor of the flour mix I used a lot.

SFBI Miche crumb

I also baked a couple loaves of one of the sourdoughs we made at the SFBI workshop. This one uses a firm levain fed at 12 hour intervals at 40% (by levain weight) of the final dough flour weight. After last week's trial of different methods of forming bâtards, I wanted to try the method portrayed in the KAF videos ( See Shaping) I think this method will become my method of choice.

The other loaf, which had an essentially identical appearance, was gifted to a neighbor before I took the photos.

SFBI "Sourdough with 2 feedings and 40% levain" crumb

This bread is meant to be a French-style pain au levain with little sour flavor. My wife's assessment sums it up pretty well: "It's just good bread."

Happy baking!

David

dmsnyder's picture
dmsnyder


This bake was inspired by the very large bâtards Chad Robertson bakes, but the formula is that of the miche we baked in the Artisan II Workshop at the SFBI last December.

I've now baked this bread using the original formula and using all high-extraction flour rather than the mix of “bread flour” and whole wheat. I've made 1.25 kg miches and 2.0 kg miches. I have been curious how the SFBI miche would be as a bâtard, and I wanted to keep the size large, to be better able to compare crumb structure and flavor to the miche/boule shapes I've made with the same dough.

An additional point: This was my first bake using a large, linen-lined oval brotform for proofing.


Total formula


Ingredients

Wt (g)

Baker's %

AP Flour

679

96.67

Whole wheat flour

23

3.3

Water

515

73.33

Wheat germ (toasted)

18

2.5

Salt

15

2.08

Total

1250

177.88

Levain


Ingredients

Wt (g)

Baker's %

AP flour

70

75

Whole wheat flour

23

25

Water

94

100

Liquid starter

47

50

Total

234

250

  1. Dissolve the starter in the water and mix in the flour. Desired Dough Temperature: 78ºF.

  2. Ferment for 8-12 hours.


Final Dough


Ingredients

Wt (g)

Baker's %

AP flour

586

100

Whole wheat flour

0

0

Water

398

68

Wheat germ (toasted)

18

3

Salt

15

2.5

Levain

234

40

Total

1251

213.5


Procedure

  1. In a very large bowl, dissolve the levain in the water. Add the other ingredients, except the salt, and mix thoroughly by hand.

  2. Cover tightly and autolyse for 30-60 minutes.

  3. Sprinkle the salt over the dough and mix thoroughly to incorporate.

  4. Transfer the dough to a clean, lightly oiled bowl.

  5. Ferment for 3-4 hours with 4 folds at 50 minute intervals. (I did this by the “stretch and fold in the bowl” technique.)

  6. Transfer the dough to a lightly floured board. Pre-shape as a log.

  7. Cover and let rest for 20-30 minutes to relax the gluten.

  8. Shape as a bâtard and place, seam side up, in a floured banneton.

  9. Cover with plastic and retard overnight in refrigerator.

  10. Remove the loaf from the refrigerator and allow to warm and complete proofing for 1-3 hours. (Watch the dough, not the clock!)

  11. 45-60 minutes before baking, pre-heat the over to 500ºF with baking stone and steaming apparatus in place.

  12. When the loaf is proofed, transfer the loaf to a peel. Slash the bâtard as desired, and transfer it to the baking stone. Steam the oven and reduce the temperature to 450ºF.

  13. Bake for 15 minutes, then remove any water remaining in your steaming apparatus.

  14. Continue baking for another 30 minutes or until the loaf is darkly colored, the bottom sounds hollow when thumped and the internal temperature is at least 205ºF. (If you have a convection oven, switch to “Convection Bake” and reduce the oven temperature to 425ºF at this point.)

  15. Remove the bâtard to a cooling rack, and cool thoroughly before slicing.

Bloom and Ear

Crackly Crust

I rested the loaf overnight, wrapped in baker's linen, before slicing and tasting.

Sliced loaf profile

Crumb close-up

The crumb was moderately open. She crust was crunchy, and the crumb was chewy. The flavor was moderately sour with a lovely wheaty flavor but without any harsh grassiness from the whole wheat. This flavor is as close to my notion of a "perfect" sourdough bread flavor as I can imagine. Those who prefer a less assertively tangy bread, might enjoy it more without the cold retardation.

David

Submitted to YeastSpotting


dmsnyder's picture
dmsnyder

Basic Country Bread from Tartine Bread

Basic Country Bread from Tartine Bread crumb

I made this following the recipe in the book. The whole wheat flour was freshly milled. The bread was delicious.

I always end up with a couple hundred grams of extra levain when I make the Basic Country Bread. I hate throwing it away, so, this week, I made a batch of baguettes with it. The 70% hydration dough was hand mixed and fermented for 2 hours with stretch and folds in the bowl every 30 minutes, then fermented for another 90 minutes with stretch and folds on the board at 45 and 90 minutes. I retarded the dough in bulk overnight. This afternoon, I divided the dough, pre-shaped it and let it rest for an hour. Then, the baguettes were shaped, rolled on wet paper towels then in mixed seeds and proofed en couche for 45 minutes before baking at 450ºF for 20 minutes.

Seeded baguettes

Seeded baguette crumb

The flavor was very much like the Tartine Basic Country Bread except more sour. Very nice.

David

dmsnyder's picture
dmsnyder

The “Miche, Pointe-à-Callière” from Jeffrey Hamelman's Bread has been one of my favorite breads and was my favorite miche for a long time. It's been quite a while since I last baked it. Since then, I've been doing more hand mixing of doughs I formerly machine mixed. I've found a new and wonderful high-extraction flour, Central Milling's “Organic Type 85.” And last, but my no means least, I've baked miches according to the formula we used in the SFBI Artisan II workshop last December. Many TFL members have baked this marvelous miche since I posted the formula, and they know what a wonderful bread this can be.

After these months of enjoying the SFBI miche, as well as Chad Robertson's somewhat similar “Basic Country Bread” from Tartine Bread, it seemed time to revisit the “Miche, Pointe-à-Callière.” I made it using Central Milling's “Organic Type 85” flour. I followed Hamelman's formula. I altered his procedures only by mixing the dough entirely by hand.


Overall Formula

Wt.

Baker's %

High-extraction whole-wheat flour

2 lbs

100.00%

Water

1 lb, 10.2 oz

82.00%

Salt

0.6 oz

1.80%

Total

3 lb, 10.8 oz

183.80%


Levain Build

Wt.

Baker's %

High-extraction whole-wheat flour

6.4 oz

100.00%

Water

3.8 oz

60.00%

Mature culture (stiff)

1.3 oz (3 T)

20.00%

Total

11.5 oz


Final Dough

Wt.


High-extraction whole-wheat flour

1 lb, 9.6 oz


Water

1 lb, 6.4 oz


Salt

0.6 oz


Levain

10.2 oz (all less 3 T)

Total

3 lb, 10.8 oz

Procedure

  1. Make the levain about 12 hours before you want to mix the dough. Dissolve the mature culture in the water, then mix in the flour.

  2. On the day of the bake, mix the Final Dough flour and water to a shaggy mass and autolyse in a large covered bowl for 20-60 minutes.

  3. Sprinkle the salt over the dough and add the Levain in several chunks. Mix thoroughly.

  4. Transfer the dough to a clean, lightly oiled bowl and cover tightly.

  5. Ferment the dough for 150 minutes, with stretch and folds on a floured board at 50 and 100 minutes.

  6. Form the dough into a tight boule and transfer it, seam side up, to a floured banneton. Place the banneton in a large plastic bag or cover with a towel or plasti-crap. (Note: Hamelman recommends the usual pre-shaping and resting before the final shaping. I did not do this, since the dough was rather slack, and the gluten did not require “relaxing,” in my judgement.)

  7. Proof for 2-2 ½ hours.

  8. One hour before baking, pre-heat the oven to 500ºF with a baking stone and steaming apparatus in place.

  9. Transfer the miche to a peel. Score it with a single square, “tic-tac-toe” pattern or diamond pattern. Load the miche onto the baking stone.

  10. Steam the oven and turn it down to 440ºF. After 15 minutes, turn the oven down to 420ºF, and bake for about another 45 minutes.

  11. When the miche is fully baked (internal temperature is 205ºF), turn off the oven. Leave the miche on the baking stone with the oven door ajar for another 10-20 minutes to dry the crust.

  12. Transfer the miche to a cooling rack and cool thoroughly. Then wrap it in baker's linen and let it rest for at least 12 hours before slicing.

Note: All times are approximate. Watch the dough, not the clock.

Miche, Pointe-à-Callière: Profile

Miche, Pointe-à-Callière: crumb

I rested the loaf for about 18 hours before slicing. The crumb structure was similar to that pictured in “Bread,” but I think I slightly under-fermented the dough and over-proofed the loaf.The crust was chewy. The crumb was rather dense and chewy. The flavor was not really sour but was very wheaty – more intense than I recall from other bakes with this flour.

Next time I make this miche, if I hand mix it, I'll add some S&F's in the bowl during the first part of the bulk fermentation and lengthen the fermentation, hoping to increase flavor complexity.

David


dmsnyder's picture
dmsnyder

This weekend, I baked a couple of breads I have enjoyed, but both were made with variations.

I have made the 100% whole wheat bread from Peter Reinhart's Whole Grain Baking a couple of times before with fresh-milled flour (100% Whole Wheat Bread from WGB, made with fresh-milled flour). I think it makes a delicious bread. This weekend, I wanted to make it with finer-milled flour and with a whole wheat starter, rather than a yeasted "biga."

The flour was milled from hard red winter wheat using the KitchenAid grain mill attachment. I milled the berries once on a medium setting and then twice on the finest setting. The result was a fairly fine flour, but still not as fine as KAF Organic Whole Wheat flour, for example. The levain had a somewhat gritty consistency. It ripened quite a bit faster than the yeasted biga does for this bread. The dough was quite soft and very manageable, but while quite extensible, had little elasticity. It was difficult to judge the proofing because the dough never was really springy. The modest oven spring I got suggests I may have over-proofed somewhat. The crumb was quite a bit more open than I got with previous bakes of this bread. I attribute this partly to the finer-milled flour and partly to the levain.

100% Whole Wheat Sourdough Bread from WGB, made with fresh-milled flour

Loaf profile

Crumb close-up

My wife liked the flavor of this bread. It has a rather pronounced sourdough tang over a sweet, wheaty flavor. It confirmed my aversion to this combination of flavors, sadly. I will make this bread again, but I will stick to the yeasted version.

Franko's gorgeous 80% rye with rye flour soaker ( See 80% Sourdough Rye Bread- adapted from Jeffrey Hamelman's 'Bread') reminded me how much I loved this bread from Hamelman's Bread (See Sweet, Sour and Earthy: My new favorite rye bread). I had expected to make it again sooner, but got distracted by other baking projects. Franko's bake in a Pullman pan was so lovely, I thought I'd use mine, but, at the last minute, decided to bake it as one large, almost 2 kg boule.

For this bake, I omitted the instant yeast. The dough was raised by the rye sour only. Also, for this bake, I used fresh-milled rye, milled as described above.

80% Rye with Rye Flour Soaker from Hamelman's Bread, made with fresh-milled rye flour

After cooling, I wrapped the loaf in baker's linen to rest for 24 hours before slicing.

80% Rye crumb (Note: The uneven color is an artifact of the lighting.)

After unwrapping the loaf, the crust felt very hard, but it was delightfully crunchy. The crumb was soft and moist. The flavor had a nice caramelized tone from the crust. The crumb flavor was mildly sour, sweet and very earthy - just a good whole rye flavor. Delicious. I had some with dinner, without any topping. I have some cream cheese and smoked salmon to eat with this for breakfast. 

This remains my favorite high-percentage rye bread. I just love the flavor and the texture of the crumb.

David

dmsnyder's picture
dmsnyder


One of the breads we baked at the SFBI Artisan II Workshop last month was a miche. Everyone thought it was one of the best breads we baked. I made it at home for the first time two weeks ago, but used “Organic Type 85” high-extraction flour from Central Milling rather than the mix of white and whole wheat with the addition of toasted wheat germ we had used at SFBI. (See This miche is a hit!)

This bread was delicious, but I did want to make it at least once using the formula we had used at the SFBI, just to see how it turned out at home compared to baked in a commercial steam injected deck oven. Certainly the several TFL members who have baked this miche in their home ovens since I posted the formula have found it to be good. Also, at the SFBI, we had found that miches scaled at 2.5 to 3 kg somehow had an even better flavor than those scaled at 1.25 kg. So, today I baked a 2 kg miche using the original SFBI Artisan II formula.

For those who would like to make this larger version, here is the formula for a 2 kg miche:


Total Dough

Bakers %

Weight (g)

AP Flour

96.67

1087

WW Flour

3.33

38

Water

73.33

824

Salt

2

23

Wheat germ toasted

2.5

28

Total

177.83

2000


Pre-ferment

Bakers %

Weight (g)

AP Flour

75

112

WW Flour

25

38

Water

100

150

Salt

0

0

Liquid starter

50

75

Total

250

375


Final Dough

Bakers %

Weight (g)

AP Flour

100

975

Water

69

675

Salt

2

23

Wheat germ toasted

2.5

28

Levain

31

299

Total

204.5

2000

The procedure used was the same as in my previous blog entry about this bread with one exception – shooting for a slightly lighter crust, I baked with steam for 20 minutes at 450ºF, then turned the oven to convection bake at 425ºF for another 40 minutes. I did not leave the miche in the turned off oven to dry out before removing it to the cooling rack. I did leave it in the oven while I heated the oven back up to 460ºF conventional bake for the next loaves (about 5 minutes).

I was concerned about over-proofing this loaf, and it was lined up ahead of a couple San Joaquin Sourdough breads waiting to bake.

Miche after baking 20 minutes with steam at 450ºF

The blowout I got suggests the loaf was a bit under-proofed. I also shaped the boule really tight, which may well have been a second factor.

The miche sang loud and long while cooling. The crust had some crackles, but not like the last miche.

Crust crackles

Loaf profile, cut through the middle

Crumb

Crumb close-up

2 kg miche beside 514 g San Joaquin Sourdough bâtards

The crust was crunchy-chewy - much thinner than the last bake. It was much less caramelized, and this was apparent in the less wonderful crunch and flavor. The crumb was nice. It was quite noticeably denser in the center of the loaf. I think this is expectable with a miche of this size. I thought the crumb structure was pretty consistent from the center of a slice to the crust.

6 hours after baking: The aroma of the crumb had a pronounced whole wheat grassiness. The crumb was moderately chewy. From past experience, I expect it to be softer tomorrow. The flavor was good - mildly sour with a nice wheaty flavor - but I didn't enjoy it quite as much as the miche made with Central Milling's "Type 85" flour. I think the flavor would have been better had I used fresh-milled whole wheat. That's what I will do the next time I bake this miche.

24 hours after baking: The aroma and flavor have mellowed and melded. The grassy aroma is gone. It just smells like a good sourdough country bread. The flavor is now delightful - very complex - nuttier and sweeter. A very thin smear of unsalted butter makes this bread ambrosial.

I froze half the miche. The other half will be croutons for onion soup gratiné tonight, breakfast toast with almond butter and crostini with ribollita for dinner tomorrow. (The ribollitta was my wife's all-morning project.) That should leave another quarter loaf for sandwiches, panini, French toast ... 

David

Submitted to YeastSpotting


Pages

Subscribe to RSS - sourdough bread