The Fresh Loaf

A Community of Amateur Bakers and Artisan Bread Enthusiasts.

jeffrey hamelman

dmsnyder's picture
dmsnyder

Hansjoakim recently showed us a Flax Seed Rye Bread he baked from a formula Jeffrey Hamelman published in Modern Baking in March, 2009.

I have baked a number of Hamelman's rye breads before and a number of his breads with seeds. I have enjoyed them all. This Flax Seed Rye is a new formula that is not in Hamelman's “Bread,” however. Yet its components are all familiar to anyone who has baked the ryes and multi-grain breads from that book. The combination of a 40% Sourdough Rye and a seed and “old bread” (altus) soaker sounded like a bread I'd really enjoy.

Hamelman's published formula for this bread is scaled for commercial bakery quantities. I scaled the formula to make a single 1 kg loaf.


Overall Formula


Ingredients

Wt (gms)

Baker's percentage

Flour (11.7% protein)

300

60

Whole rye flour

200

40

Water

402

80.3

Salt

10

2

Instant yeast

6.5

1.3

Flax seeds

50

10

Old bread

40

8

Total (approx.)

1 Kg

201.5


Sourdough (rye sour)


Ingredients

Wt (gms)

Baker's percentage

Whole rye flour

200

100

Water (cool)

166

83

Rye sour

24

12

Total (approx.)

390

195


Method: About 16 hours before the final mix, disperse the mature sourdough culture into the cool water. Add the whole or medium rye flour, and mix until it is incorporated. Sprinkle a layer of rye on top, and cover the bowl with plastic to prevent dehydration. Ripen the sourdough at about 70°F.

Soaker


Ingredients

Wt (gms)

Baker's percentage

Flax sees

50

100

Old bread

40

80

Water (cool)

150

300

Total

240

480

Method: Make the soaker at the same time you make the sourdough. Cut the old bread into cubes, and put it into a bowl along with the flax seed. Add the water and cover overnight.

Final dough


Ingredients

Wt (gms)

Flour (11.7% protein)

300

Water

85.5

Salt

10

Instant yeast

6.5

Sourdough

366

Soaker

240

Total (approx.)

1 kg


Method

  1. Remove a portion of the sourdough to perpetuate the culture.

  2. Dissolve the sourdough in the water, mix in the soaker, then add the rest of the ingredients and mix thoroughly. The dough will be rather loose. You can adjust by adding small amounts of water or flour, but avoid adding too much flour.

  3. Mix at Speed 2 (KitchenAid) to a moderate degree of gluten development. Desired dough temperature is 78F. (This dough, which Hamelman says is “tacky” was extremely sticky for me. I suspect the dough was over-hydrated. I would be inclined to reduce the water, use a more absorbent flour or both next time. I mixed for 25 minutes. There was better than “moderate” gluten development. It was just a very wet dough.)

  4. Bulk ferment in an oiled bowl for 45-60 minutes.

  5. Transfer the dough to the board and pre-shape into a round. Let it rest while you flour your banneton and pre-heat the oven to 480F with a baking stone and your steaming method of choice in place. (Note: Hamelman suggests baking 1.5 lb loaves. I chose to make one larger loaf. Also, you could shape this bread as one or more bâtards, if you choose.)

  6. Shape the dough into a tight boule. Optionally, press the dampened smooth side of the dough into a mix of seeds (Flax seeds 45%, sesame seeds 45%, caraway seeds 10% suggested by Hamelman. I brushed the smooth side of the loaf with water and sprinkled on some caraway seeds only.)

  7. Transfer the boule to a floured banneton. If you used the optional seeds, place it with the seeded side up. If you didn't seed it, place it with the seamed side up. Cover the banneton with a kitchen towel or plasti-crap, or place it in a food-safe plastic bag.

  8. Proof the boule for 45-60 minutes. (Hamelman specifies an ambient temperature of 80F.)

  9. Pre-steam the oven. Load the loaf on your baking stone, and steam the oven again.

  10. Bake at 440F for about 40 minutes with steam for the first third of the bake. (Note: Hamelman specifies about 38 minutes for a 1.5 lb loaf. For larger round loaves, a longer bake is needed, but be prepared to lower the oven temperature as the bake progresses if the crust appears to be getting too dark. Also note that, if you shape the bread as an oval loaf, the baking time may be less than for a round loaf.) The bread is done when the internal temperature reaches 205F and the loaf gives a “hollow” sound when thumped on the bottom.

  11. Cool completely before slicing.

The "supporting cast" is a couple loaves of Susan from San Diego's "Original" favorite sourdough. My timing was a bit off. The sourdough boules needed just enough more time in the oven to result in the rye over-proofing.

The rye had only modest oven spring and has a lower profile than hansjoakim's bake. In any event, it smells delicious!

The crust was quite hard when the loaf came out of the oven. By time it had cooled, the crust was soft. I left it on the counter, wrapped in a cotton cloth for about 20 hours. By the time I sliced it, the crust had firmed up again and was chewy. The texture of the crumb is drier than I expected, given the hydration level of the dough. I wonder how much impact my long mixing had on the dough structure and mouth feel.

The flavor of the bread is like that of other 40% sourdough rye breads, which is to say very nice. There is a subtle overtone  from the flax seeds which is not as pronounced as that in some of the other 5-grain breads in "Bread." 

I am thinking of ways I might modify the formula for future bakes. For example, I might use First Clear flour rather than AP. I would make the dough drier - more like what I think Hamelman describes. I might make Hamelman's "5-grain sourdough rye" with some old bread added to the soaker. 

Thanks again, hansjoakim, for bringing this bread to our attention!

David

Submitted to Yeast Spotting

dmsnyder's picture
dmsnyder

This bread is a rye with 66 percent rye flour and the remainder high-gluten flour. A rye sour is elaborated using whole rye. The sour is 80% hydration, which ends up being a very thick paste, due to how much water the whole rye absorbs. This is fermented for 14-16 hours and is then mixed with Medium rye flour, high-gluten flour, more water, salt and instant yeast.

The resulting dough is very loose. Hamelman says to mix it (in a professional spiral mixer) for only 3 minutes at first speed and 2 minutes on second speed. He says you should have "a bit of gluten strength, but ... not much." I aimed for "a bit" of gluten development but had to mix for 16 minutes in my KitchenAid. The dough was extremely sticky and still rough and pasty. It had enough elasticity after fermenting to form into loaves, using more flour dusting on the bench and my hands than is necessary with lower-percentage rye doughs.

Fermentation was only 45 minutes and proofing was 50 minutes. Proofing is tricky with this type of rye. Under-proofing contributes to excessive oven spring and blow-outs. Over-proofing leads to the loaf collapsing when it is scored or when it is loaded into the oven. I think I hit it about right. <whew!>

I wasn't sure about scoring a bread like this. I considered not scoring at all or making rounds and docking them. In the end, I decided to make oval loaves and score one in the "sausage" cut and the other in the "chevron" cut.

Hamelman prescribes a 24 hour rest after baking before slicing. I wrapped the loaves in linen and left them on the counter overnight.

When sliced, this rye has a fairly thick, chewy (but not hard) crust. The crumb is fairly dense and quite moist. It is tender to chew. The aroma is assertively rye, as is the flavor with a mild sourdough tang.

The taste is good when eaten plain. It is strong enough to come through when eaten with a slice of aged gruyère cheese. Just as a light rye seems to call for corned beef, this rye calls for stronger cheeses and fatty fish such as herring or salmon. I wish I could get some smoked sable. 

David

dmsnyder's picture
dmsnyder


The “Miche, Pointe-à-Callière” from Jeffrey Hamelman's “Bread” is one of my favorite breads. I've made it a great many times. But I have a confession to make: I've never made it with the proper hydration level.

It started out by my finding one of the very rare errors in this marvelous book. Hamelman's ingredient list in the “Home” version of the Final Dough calls for “1 lb., 6.4 oz (2 ¼ cups)” of water. Now, 2 ¼ cups of water weighs less than this. I initially assumed the volume measurement was correct, and I used 1 lb., 2 oz. of water. You know, this made an outstanding bread. It did have more oven spring and a higher profile than expected, but the crumb was nice and open with large holes, and it tasted great, so I kept using my “corrected” formula.

Now, “Bread” has been such a reliable book, I always doubted my solution. Finally, I compared the ingredient quantities in the 3 listings Hamelman gives with the baker's percentages he gives. It turns out that the error was really in the volume measurement, not the weight. The home recipe should call for 2 ¾ cups of water, which is 1 lb., 6.4 oz.

So, today, for the first time, I made the Miche at the 82% hydration called for in Hamelman's formula.

At the higher hydration level, this dough is not just slack. It is truly gloppy. Hamelman says to mix it 2 to 2 ½ minutes (in a professional spiral mixer) to get “moderate gluten development.” I mixed it in a Bosch Universal Plus for 17 minutes to get something less than “moderate” gluten development. Hamelman then calls for 2 or 3 folds during a 2 ½ hour bulk fermentation. I implemented the “stretch and fold in the bowl” approach and did 30 folds at 30 minute intervals over 2 hours, then I let the dough proof for another 45 minutes. (This is much like the method McGuire uses in his “Pain de Tradition,” as Shiao-Ping has shared with us. Since the Miche, Pointe-à-Callière is also a McGuire bread, according to Hamelman, using this method seemed entirely reasonable.)

I “shaped” the miche by dumping the dough onto a heavily floured board and folding the edges to the center. I made 6-8 folds. The loaf was then transferred to a linen-lined, floured banneton and proofed for 2 hours and baked with steam.
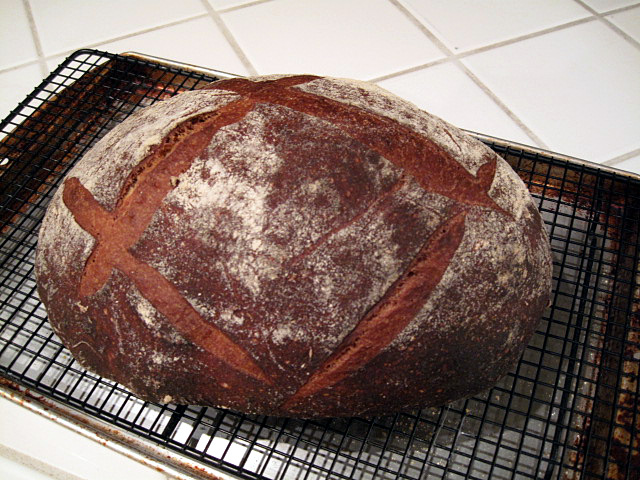
 

I am cooling the miche overnight before slicing. 

Miche profile

This miche still has a higher profile than those pictured in Hamelman.
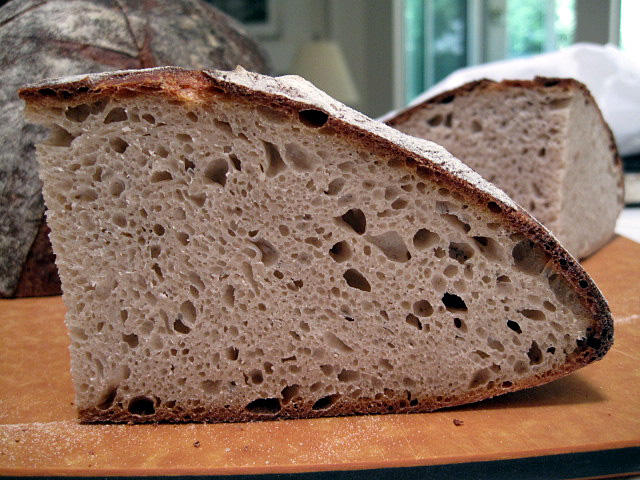
Miche crumb

The crumb is about right, but, interestingly, I've gotten more open crumbs on previous bakes using somewhat lower hydration. My hunch is that the difference is related to how I did the bulk fermentation.

David


wally's picture

My Excellent Adventure at King Arthur Flour

July 27, 2009 - 3:00pm -- wally

In response to a prior post where I mentioned my recent experience at King Arthur Flour, David (dmsynder) kindly suggested a fuller account of the class, and was even kind enough (at my urging) to provide a list of topics I should include. I've attempted in what follows to touch on all of them, if in revised (and perhaps stream-of-consciousness) order.

dmsnyder's picture
dmsnyder


Even before the recent crop of beautiful breads made with James McGuire's “Pain de Tradition” formula, I had been planning to bake the “Miche, Point-à-Callière” from Hamelman's “Bread” this weekend. Hamelman attributes this bread to McGuire, whose intention was to replicate the type of bread baked by the first French settlers of what ultimately became Montreal. The name of the bread, “Pointe-à-Callière,” was the name of their first settlement.

Miche, Pointe-à-Callière

The other, more well-known, bread meant to approximate French bread of that era is Pain Poilâne. Hamelman's formula is for a 82% hydration Miche (very large boule) made with high-extraction flour. It is a pain au levain with no added yeast. The principal difference between McGuire's and Poilâne's miches is the higher hydration of McGuire's. Actually, I make this bread with 2 oz less water than Hamelman calls for, which makes it a 76% hydration dough.

I have made this bread with first clear flour, Golden Buffalo Flour (a high-extraction flour from Heartland Mills) and with a mix of bread flour and whole wheat. Personally, I prefer the results with first clear flour over the others.


Overall Formula


High-extraction whole-wheat flour

2 lbs

100.00%

Water

1 lb, 8.2 oz

76.00%

Salt

0.6 oz

1.80%

Total

3 lb, 8.8 oz

177.80%


Levain Build


High-extraction whole-wheat flour

6.4 oz

100.00%

Water

3.8 oz

60.00%

Mature culture (stiff)

1.3 oz (3 T)

20.00%

Total

11.5 oz


Final Dough


High-extraction whole-wheat flour

1 lb, 9.6 oz


Water

1 lb, 4.4 oz


Salt

0.6 oz


Levain

10.2 oz (all less 3 T)

Total

3 lb, 8.8 oz


Procedure

  1. Make the levain about 12 hours before you want to mix the dough. Dissolve the mature culture in the water, then mix in the flour. Cover tightly and ferment at room temperature. (I let the levain ripen at room temperature for about 10 hours overnight. I then refrigerated it for another 6 hours. This was a matter of my convenience. It probably did increase the sourness of the final dough, which happens to be fine with me.)

  2. To make the dough, mix the flour and water in a large bowl or the bowl of a stand mixer, if you have one that can handle this much dough. Cover and let stand for an autolyse of 20-60 minutes. At the end of the autolyse, sprinkle the salt over the dough, add the levain in chunks and mix thoroughly. Hamelman says to mix the dough at second speed for 2 to 2 ½ minutes to get a loose dough with only moderate gluten development. This time would be for a professional spiral mixer, of course. DDT is 76F. (I mixed the dough in a Bosch Universal Plus. It took about 4 ½ minutes to get what I regarded as “moderate gluten development.” I think one could easily use the “stretch and fold in the bowl” technique with this bread and achieve equally good results, if not better.)

  3. Transfer the dough to a lightly oiled, large bowl, cover tightly and allow to ferment for 2 ½ hours. Fold the dough twice at 50 minute intervals. If the gluten development was less than “moderate” after mixing, a third fold may be needed. If so, do the three folds at 40 minute intervals.

  4. After fermentation, transfer the dough to a floured board and lightly pre-shape into a round. Allow the dough to rest for a few minutes, then gently round up the dough and transfer it to a well-floured banneton. Cover with a slightly damp towel or with plasti-crap. (The miche could be proofed on a well-floured linen couche, in principle. I have never attempted to transfer a slack dough loaf of this size from a couche to a peel. I imagine the results would be … amusing.)

  5. While the bread is proofing, pre-heat the oven to 500F and set up your steaming method of choice. (Hamelman calls for heating the oven to 440F.)

  6. After steaming the oven and loading the bread, turn the oven down to 440F. After 15 minutes, remove the steam source and turn down the oven to 420F. Hamelman says the total bake time is “about 60 minutes.” You can leave the miche in the turned off oven with the door ajar for 10 minutes after the bread is done. This will dry out the crust somewhat, but this is a very wet bread, and the crust will soften.

  7. Cool thoroughly on a rack. Hamelman prescribes covering the cooled miche with baker's linen and delaying slicing for at least 12 hours. (I think I actually did forgo slicing it for 12 hours once. It is an excellent idea, but I am weak.)

Miche Crumb

Miche crumb close-up

The flavor of this bread, like Poilâne's Miche, definitely improves over 1 to 3 days. I personally like the flavor best the day after it was baked. Of course, the next day is also pretty terrific, and the next … Hamelman says that the bread gets more sour and the “wheat flavor intensifies” over several days. My experience has been that the sourness does increase. I would describe the change in flavor as “mellowing” rather than intensifying. I think that is the same as what Hamelman describes as “the flavors melding.”

This bread has excellent keeping quality. Kept in a bread bag or bread box, it is very enjoyable for a week. It also freezes well. I usually cut it in quarters to freeze, wrap each quarter in 2 layers of freezer wrap and place them in food-safe plastic freezer bags.

Enjoy!

David

Submitted to YeastSpotting


dmsnyder's picture
dmsnyder

Hamelman's 5-grain Soudough made with rye sour is currently one of my favorite bread. The formula calls for high-gluten flour, but I have not had any for a while. I now have some KAF Sir Lancelot flour, and this is the first bread in which I used it. 

I followed the formula for ingredients exactly, as I had before. Using Sir Lancelot flour, the gluten developed a little more slowly. I think I could have given the dough another couple minutes mixing in the Bosch. I did a stretch and fold before bulk fermenting, but it could have used either more initial mixing or another stretch and fold.

The crumb was quite chewy. I'll be interested in seeing if this bread seems too "tough" when toasted.

BTW, you might notice in the first photo that the boule on the right has a duller (less reflective) crust. This was the first loaf loaded onto my baking stone, and I steamed the oven after the third loaf was loaded - maybe 45 - 60 seconds later. Even a few seconds baking without steam at the start has a pretty dramatic effect.

David

dmsnyder's picture
dmsnyder

SusanFNP's "Norwich Sourdough" is her adaptation of Hamelman's Vermont Sourdough from his book, "Bread." The recipe can be found on Wildyeastblog.com, Susan's wonderful baking blog, under "My New Favorite Sourdough."

I followed Susan's recipe with the following differences: 1) I used Guisto's Baker's Choice and Guisto's whole rye flours, 2) I baked three 500 gms loaves and froze the remaining dough in two pieces for future pizzas, 3) I cold retarded the loaves overnight, and 4) I baked the boule at 440F, 20 degrees cooler than the bâtards, to see how I liked this bread with a lighter-colored crust.

We had a few slices of the just-cooled bread with a salad for lunch. It was delicious - moderately sour with a crunchy crust and chewy crumb.

Something for blister lovers: The crust of the boule


And for the crumb-obsessed:


David

dmsnyder's picture
dmsnyder

Hamelman's 5-grain Levain and Seeded sourdough from "Bread" have been among my favorites for some time, but his 5-grain Sourdough Rye somehow had escaped my attention, in spite of several posts by others, until LindyD recently made it. At first, I was not clear that this was a different bread from the 5-grain Levain, but I eventually caught on. When I looked at the formula, I knew I would love it, and I do.

Thanks, Lindy! This is a wonderful bread.

David

ein's picture

Hamelman's Natural Leaven Class Report

April 28, 2009 - 7:55am -- ein

I just returned from the King Arthur Flour Co’s Baking Education Center and wanted to share my experience taking the 10hr, day and a half class:  “Naturally Leavened Breads” with Jeffrey Hamelman. Being greeted by sunny 70 degree weather in beautiful Vermont was a great way to start the day and the Education Center is a light and airy building with lots of well managed work space. 

gavinc's picture
gavinc

I usually only have time to make our favourite sourdough each weekend, but this weekend we have had rain and cold winds which cancelled some plans.  So I decided to make a recipe I hadn't tried before -Golden Raisin Bread - from Jeffrey Hamelman's "Bread".  This took me out of my comfort zone somewhat but I enjoyed the challenge and will try to take on a new recipe regularly.  I think I've grown in confidence thanks to this site.

I was very pleased with the result.  I experimented with the scoring pattern between the two loaves and also made them in a pan rather than free form batards.  The taste was very nice and sweeter than I expected.  The crumb is denser than my usual Vermont Sourdough, but I guess it's the type of loaf.  Couldn't wait until it was completely cool before I tucked in....

Edit - I forgot to add that this was made using my new two week old starter (Debra Wink version).

Pages

Subscribe to RSS - jeffrey hamelman