The Fresh Loaf

A Community of Amateur Bakers and Artisan Bread Enthusiasts.

Blogs

StevenSensei's picture
StevenSensei

In all honesty this bread wasn't planned until the day before I started my bake. I was planning on something else and then I stumbled across this thread from our very own Benny! 

Red Miso Furikake (Sesame seeds and Nori) sourdough

Since I've been experimenting with adding things into my bakes I immediately knew that this was going to be bumped to the front of the list. I made a few small changes like adding fresh shiso leaf instead of furikake and using a special kind of very dark red miso.

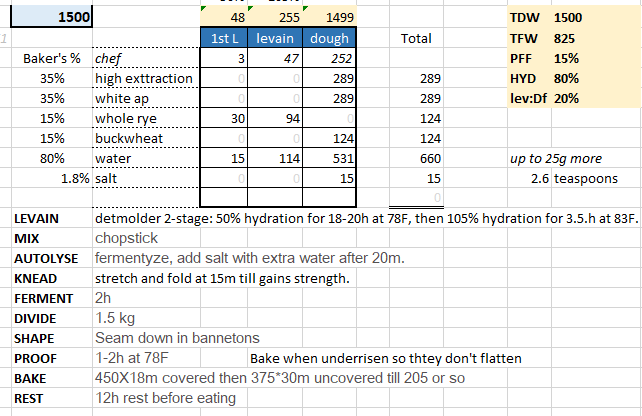
BREAD CALCULATIONS AND RECIPE HERE


First let's talk miso. These are the 3 I have in my house currently. In the upper right is a special white miso. It is sweet and creamy. In fact if I make soup using just that it almost tastes like a milk or cream based soup. Th largest container is a mixed miso which is delicious and has the rich umami flavor you think of when you think of what miso tastes like. The dark black miso in the upper left is called Hachou Miso. It is a pure red miso that is fermented for more than 3 years. It is from the Nagoya area of Japan and the oldest producer of this type of miso has been making it since 1337!  It is thick, and sticky, and pungent...and was my choice for this bread. When mixed with water you can see the dark color it produces. This is a flavor bomb for sure. I also decided to add fresh Shiso Leaf into the mix. Shiso is a great flavor that pairs well with miso and should add a slight freshness to the loaf. 


The dough itself was on the higher end of hydration and was quite sticky to work with. Gluten development wasn't a problem at all and the smell of miso and shiso were strong. Also the color of this dough. This is 10% rye and 90% bread flour. This is not a whole wheat bread!

Sensei's Report Card

Tasting Notes: And the result is gorgeous! The crumb is soft and creamy. The bread does carry the flavor of the miso. I've eaten it plain and as toast with some butter and it's tasty...but I walk away confused about how I would used it. It could be really really good as croutons for a salad. Sadly, the shiso was overpowered by the miso and I can not detect it at all. I think that Benny's inclusion of furikaki with sesame and nori would be better. The sesame would stand up to the strength of the miso. Even a sesame crust would be tasty. 

 Time/Effort: Three day process starting with a levain build on the morning and evening of day one, mixing and bulk on day 2, and finally baking on day 3. This is my normal sourdough schedule so It's not out of the ordinary for me. Dough is high hydration and can be sticky and difficult to work with if you haven't worked with breads over 80%

Would I make it again: Maybe. The bread is not bad and is very unique. However I have so many others that I would return to before this. So while it won't become a staple, it was a delicious experiment that if I do return to at some point will include sesame for sure.  


suminandi's picture
suminandi

With the kids out of the house and unable to bring baked goods to the office, I mostly stopped baking croissants. Husband has been wanting to eat some recently, and we never seem to catch the short hours of our favorite local bakery. So I made some yesterday and baked a few this morning (putting most of the batch in the freezer after shaping). 

I used Hanseata's recipe : https://www.thefreshloaf.com/node/33346/croissants-buttery-heaven, which I've scaled down to match 2 ingots of butter (~220 grams). I substitute oil for butter in the detrempe (as I usually do). This makes 12 nice sized croissants, about 90 grams finished weight.

Process:

After mixing the dough to medium development (stretchy but not thin windowpane), let rest until puffed about an hour. Pat out to one inch thick rectangle and refrigerate a few hours. (errands run during that time. Make butter block using Trader Joe's store brand unsalted butter. I usually use Kerrygold, and while this batch was delicious, next time I'm going back to using Kerrygold - i prefer the flavor. Locked in the butter block and did a letter fold. Cover and refridgerate for 30 min. Second letter fold, fridge for 30 min, 3 letter fold. Roll out a bit (to ~15 in X 6 in) cover and refrigerate overnight. In morning, roll out to 20 in x 10 in and cut into 12 wedges. Stretch wedges slightly and shape into rolls. 4 were allowed to proof about 2 hrs before washing with cream and baking for 30 min at 375 F. The rest were placed in the freezer in pie tins until frozen and then piled into a freezer bag. Plan thaw them overnight in fridge before proofing and baking. 

Results and improvement notes:

1) The cream wash did not produce as nice and shiny a result as egg yolk wash - go back to that. 

2) I did not remove the dusting flour off well enough when rolling them up. There are bubbles where the layers separated (see below)

3) Could have baked for 5 more minutes. 

Overall, very successful for a startup after a long break

Martadella's picture
Martadella

First days of really warm weather and after working in the garden all day yesterday we thought we really deserved pizza.

Fast recipe, inspired by one on the back of the bag of flour: 

1kg Anna Napoletana 00 flour 

680 g lukewarm tap water

12-15g salt

7 g dry yeast 

Mix everything into a rough dough.  Do 2-3 stretch and folds.  Let the dough double,  then divide into balls ( I did 6)

While the balls proof,  preheat 2 terracotta saucers in your outdoor bbq grill, about 30-45 minutes at least.  You may, but don't have to,  use round grill pans and parchment paper circles. And, unfortunately, you will have to experiment with times and temperatures,  because grills have their own quirks and caprices. You may of course use a regular pizza stone as well. 

For my hubby and son I made cheese and pepperoni pizza and for

all of us tomato and vegan nduja

The Roadside Pie King's picture
The Roadside Pi...

Inspired by, the pizza bible. However, this bake morphed into something completely different. Thick Brooklyn style. Specifically Armondo's, Canarsie-Brooklyn, Rockaway Parkway. (L train station) Thick Sicilian pizza.

The sfincione Palermitano is born. AKA, It's hip to be square


18X12 half sheet pan. 1,100 grams of dough. Three-day dough: Day one starter refresh/build. On day two, mix the final dough. 28 hr. cold ferment/Two hr. room temperature final proof. I realized I was out of barley malt. I substituted 2% Brown sugar. The rest is as written

This performance is coming to you live, from Greenwich Village- Manhattan N.Y.C. ETA to bake & update

"T" minus 30hrs. 

Martadella's picture
Martadella

Recipe in Russian (run it through the google translation) https://brotgost.blogspot.com/2018/12/blog-post.html?fbclid=IwAR2XYpM14tgTXPgoKt1db3XS9petMTSEBnKbZpbSktLuj4YMkiQ_rIiUXxY&m=1

I baked this bread several times with great success,  but this time I made several mistakes and the crumb surely shows it.

First thought looking at this crumb: weak starter

My liquid starter (made by fermenting white rye malt and raisins with small addition of vinegar)  was less bubbly and fizzy than I wanted. I can think of two reasons: 

-temperature of incubation was too high 

 -addition of vinegar was too big (and a piece of vinegar mother got into my jar, too)

Opara made with this ferment worked really slow. And I also made it too dense. 

Final dough was overhydrated.

So the final result is an extremely tasty and flavorful loaf with really ugly looking crumb. It's rather acidic (which isn't a feature of this bread, if made properly) but really nice to eat. The dense crumb has a pleasant,  soft, cakey mouthfeel.

And down below, a picture from my archive,  showing how this magnificent bread should look like:


Benito's picture
Benito

In my earlier blog post I described how I made my first ever amazake from scratch.  It is delicious, rich and sweet despite there being no added sugar.  Today I am doing a test bake of an Amazake Sourdough Vegan Hokkaido Milk Bread.  The amazake was used to make the tangzhong.  Because it is so sweet I didn’t add any sugar to the dough as I usually would.  I’m hoping that I have enough dough to fill the 10x10x10cm pullman pan I have and that it’ll bake up into a nice cube.

Instructions

Levain

Mix the levain ingredients in a jar or pyrex container with space for at least 300% growth. 

Press down with your knuckles or silicone spatula to create a uniform surface and to push out air.

At a temperature of 78ºF, it typically takes up to 10-12 hours for this sweet stiff levain to be at peak.  For my starter I typically see 3-3.5 times increase in size at peak.  The levain will smell sweet with only a mild tang.

Tangzhong 

Put about 1” of water in a sauce pan set on medium high heat. In the bowl of the stand mixer stir the amazake and flour until blended. Then place the bowl on the sauce pan to cook the tangzhong (Bain Marie) for several minutes until well thickened, stirring regularly with a spoon or heat-resistant spatula. Theoretically it should reach 65ºC (149ºF) but I don’t find I need to measure the temperature as the tangzhong gelatinizes at this temperature.  Let cool in the bowl and then refrigerate until the next morning.


Flax seed gel

Grind 1 tbsp of flax seeds and combine with 2-3 tbsp of water and stir to form a thick gel.


Dough

Into the bowl of a stand mixer with the tangzhong, add the soy milk (consider holding back 10 g of soy milk and adding later if this is the first time you’re making this), ground flax seed gel, salt, and levain.  Mix and then break up the levain into many smaller pieces.  Next add the flour.  I like to use my spatula to mix until there aren’t many dry areas.  Allow the flour to hydrate (fermentolyse) for 20-30 minutes.  Mix on low speed and then medium speed until moderate gluten development this may take 5-10 mins.  You may want to scrape the sides of the bowl during the first 5 minutes of mixing.  Next drizzle in the toasted walnut oil a little at a time.  Slow the mixer down to avoid splashing the oil at you. The dough may come apart, be patient, continue to mix until it comes together before drizzling in more oil.  Once all the oil has been added and incorporated increase the speed gradually to medium.  Mix at medium speed until the gluten is well developed, approximately 10 mins.  You will want to check gluten development by windowpane during this time and stop mixing when you get a good windowpane.  You should be able to pull a good windowpane, not quite as good as a white flour because the bran will interrupt the windowpane somewhat. 


On the counter, shape the dough into a tight ball, cover in the bowl and ferment for 4-4.5 hours at 82ºF.  There should be some rise visible at this stage.


You can next place the dough into the fridge to chill the dough for about 1.5 hours, this makes rolling the dough easier to shape.  Remember, if you do so the final proof will take longer.  Alternatively, you can do a cold retard in the fridge overnight, however, you may find that this increases the tang in your bread.


Prepare your pans by greasing them or line with parchment paper.  I used a muffin pan oiled with walnut oil.


Lightly flour the top of the dough. Scrape the dough out onto a clean counter top and divide it into six. I like to weigh them to have equal sized bun. Shape each tightly into a boule, allow to rest 5 mins. Flatten each boule, divide it into three pieces shaping each into a small boule.  Place each set of three small boules into the muffin tin to bake into a three lobed bun.


Cover and let proof for 3-5 hours at a warm temperature.  I proof at 82°F.  You will need longer than 3-5 hours if you chilled your dough for shaping. I proof until the top of the dough comes to within 1 cm of the top edge of the pan.


Preheat the oven to 350°F.  


Bake 20 mins lid on then remove lid and bake further 10-15 mins.


pH of the dough after mixing completed was 5.52.  

pH of the dough at the time of baking was 5.02 with a 100% rise.

I’m guessing that I’ll need to make an additional 50-75 g of dough to properly fill this pullman cube pan when baked with the lid on.  Not bad for a first time baking with the new cube pan though.  I’ll post the crumb and flavour later when the bread cools.

Benito's picture
Benito

I recently dropped into our local sake maker and picked up another package of koji rice.  My plan was to make my third batch of homemade miso since our first one is disappearing quickly and the second one is just over a month into its fermentation which will take a fully year or so.  However, I borrowed the book Koji Alchemy and have been reading through it and I’m finding it so fascinating and it is giving me some other ideas for my koji rice.

The first thing I decided to try making is amazake.  I’d never drank this before but it is popular in Japan.  Despite the fact that it is just koji rice, cooked rice and water 1:1:2 it is super sweet and umami.  Aspergillus oryzae is the mold that lives in koji rice, and much of it usefulness stems from the massive amounts of both amylases and proteases that it produces.  Foods that are fermented by koji rice will be sweeter and more umami rich because of the action of these enzymes.  Glutamate is well known as the amino acid that is the primary factor that gives food that umami deliciousness.  It is because of the proteases that glutamate is released from foods in large amounts, it is what gives miso and soy sauce that awesome delicious flavour. 

Amazake is not fermented so in making it unlike the miso, we are not trying to grow the aspergillus oryzae but instead we are relying on the enzymes already present from the aspergillus in the koji to break down the starch and protein in the rice to make the amazake sweet and yummy.  I used my Instant Pot set to Keep Warm, Less placing a couple of inches of water in the pot and then placing the jam jar with the koji rice, cooked rice and water in the water bath.  This setting at most stays on for 10 hours, so I had to run it twice, once at 4 hours and once at 10 hours to get the full effect.

This morning I took the jar of amazake out of the Instant Pot and stirred it well to break down the rice and tasted it.  It was shocking how sweet it is without any added sugar.  Wow such delicious interesting thing this amazake.  So the main reason I wanted to make it was to play with the koji rice I had but then I also had a plan for bread of course.  I am using this amazake to prepare a Tangzhong for my vegan version of the sourdough Hokkaido milk bread.  Because it is so sweet I didn’t need to add any sugar to the dough.  So we shall see if the resulting bread it too sweet for my liking.  Having tasted it, I wonder how it would work to make a stiff sweet levain!!

I’ll posted about my first test bake with my amazake in another blog post.


Martadella's picture
Martadella

I love this bread and the whole process is so nice

https://youtu.be/p_zZggD827c

In a pint jar I added some rye malt and raisins,  topped it with lukewarm tap water and then splashed in some homemade apple scrap vinegar. After just 10 hours at 38°C it's already showing the signs of fermentation. It's still not ready yet for making a starter, but maybe tomorrow? 

StevenSensei's picture
StevenSensei

Reading through the Tartine book my curiosity was peaked by some of the various flavor combinations. The idea of sourdough with roasted walnuts, green olives, some herbs...and lemon made me curious in the best of ways. Thankfully it is just a standard sourdough but with inclusions. A LOT of inclusions. 62% of inclusions. So many inclusions that I was a bit concerned when it was being mixed, proofed, and shaped that it might be more inclusion than bread!

FULL RECIPE AND BREAD CALCULATIONS HERE


Ready for the second stretch and fold and the inclusions. As expected the dough smells great and I am really looking forward to this one. 

Overnight in the fridge and this bread was haunting me. I may have had a dream about baking this bread. I may have woke up early and laid in bed thinking about how the bake would go. The bake went well and then there was the torture of having to wait to cut into it. Thankfully it had about 6-8 hours to cool before I caved and carved into it to go with dinner. 

Spoiler: it was worth the wait!


Sensei's Report Card

Tasting Notes: The sourdough itself has a nice chew and crisp crust just like I like it. The lemon smell is there and the taste is subtle. It brings a nice freshness or brightness to the bread. It's not a strong lemon flavor but a nice accent that I was pleasantly surprised by. I've now had 3 slices of this bread, as is and toasted with some butter. It's super solid and great with cheese. I think the olives could have been stronger (the ones I had were not as salty/briny as I would expect). I would like to do this again with some black olives, a different brand of green olives, or even some kalamata olives. The toasted walnuts are wonderful. I really want to use more walnuts in bread in general after this experience. Maybe a walnut / cranberry bread soon. 

Time/Effort: Three day process starting with a levain build on the morning and evening of day one, mixing and bulk on day 2, and finally baking on day 3. This is my normal sourdough schedule so It's not out of the ordinary for me. The mixing of inclusions was a bit of a challenge but if you handle the dough gently it isn't that much of a challenge. 

Would I make it again: Yes! I want to do some different olives but this combination is great. Olives great. Walnuts great. Lemon Great. What's not to love?

Pages

Subscribe to RSS - blogs