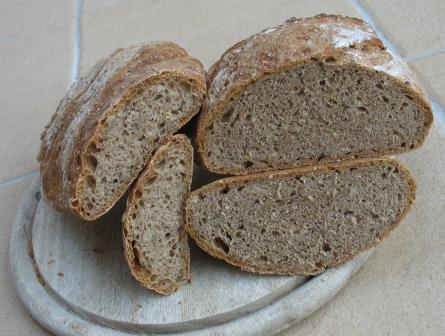
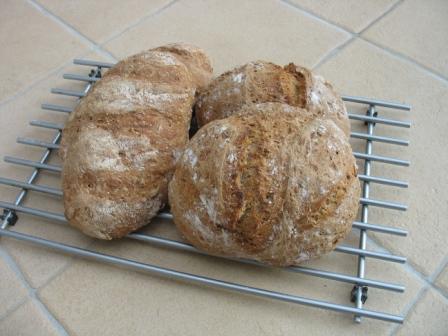
The Fresh Loaf

A Community of Amateur Bakers and Artisan Bread Enthusiasts.

Blogs

lolo's picture
lolo

Focaccia


This was really fun to make. I decided to try something with a poolish today, and I'm so glad I picked focaccia!  But wow does this recipe make a lot.  Even though it took a while, the results are really worth it.  I've never made focaccia of any kind before, but this was way better than any store-bought stuff I've had in the past.  Here's the crumb:


Focaccia Crumb


I left my poolish out overnight because I was... well.. lazy. BBA says to ferment it for four hours and then refrigerate it overnight, but I was tired and I wanted to go to bed, so I left it outside as a compromise. It wasn't as warm as my house, and it wasn't as cool as the refrigerator. It had the added bonus of not requiring a warm-up period when I felt like baking in the morning.  I figured it wouldn't make a huge difference if I cheated this way, and I was right! It still tasted great in the end. The poolish was a really fun consistency.


Poolish Poolish, consistency


This dough was a lot easier for me to work with than the pain a l'ancienne dough, even though they're both really wet and slack. Folding was a lot easier than the ancienne shaping for some reason. I've never done the stretch and fold before, and I really like the technique. Really easy but produces a nice result. I was surprised at how the dough changed just from three folds, 30 minutes apart.


Dusting Focaccia Dough Folding Focaccia Dough Oiling Focaccia Dough


The shaping was also a lot of fun. Maybe I just like playing with my food?  I did an herb oil with as much fresh basil as I could remove from my plant without killing it, and supplement with some dried italian herbs.  I was out of flaked kosher salt, which was sad, but I had sea salt in a table-salt sized grind.  I'll definitely get the larger salt for the next batch.


Herb Oil on Focaccia Dough Final Shaping, Focaccia Dough


If anything I think I should have degassed it a little more. It puffed WAY up, especially on one side that was particularly bubbly.  I gave half of it away to my best friend, and I'm thinking about making it again for a party this weekend. Seems like an ideal food for a lot of people who want to nibble and drink some wine! 


Anyone know the best way to store it?  Covered?  Plastic wrap?  Uncovered?   


Focaccia

lolo's picture
lolo

Pain de Campagne


This is my second bread from BBA.  I decided to stick with boules even though Reinhart says this is the perfect dough for all kinds of fancy shapes.  Everything went really well until the slashing.  I bought a lame from a local kitchen store and it just was not slashing the dough.  At all!  I tried wetting it, oiling it, using the other side of the blade... nada.  Finally I touched it with the tip of my finger and realized that it's fairly dull.  Sad!

I grabbed a semi-sharp serrated tomato knife to do the slashing instead.  While that actually cut into the dough, it did so with a fair amount of drag, so I didn't get the cleanest slashes.  Ah well.  Time to go to the hardware store to buy a package of razor blades, I guess. 

Pain de Campagne, boule


The recipe said it made three loaves.  They turned out to be rather small loaves, so next time I think I'll split it into two if I'm going to do the same shape.  But there is something nice about these little boules, though.

Pain de Campagne


The crumb on this is decent.  The taste is good, but I think I like the taste of the pain de l'ancienne better.  My husband liked the taste of this, but halfway through a big slice said there was an "aftertaste."  I don't know if he's tasting the whole wheat component (hard red winter wheat berries I ground in my vitamix) or what.  I don't think I let the bread overproof, and he said it wasn't an alcohol flavor, so I'm not sure what he's tasting.

Overall a fairly successful bake.  It was my first time using a pate fermente.  I even considered making two loaves and keeping the other third of the dough for a loaf tomorrow, but I haven't baked with a poolish yet so that might be my next project. 

shakleford's picture
shakleford

This weekend I finally made a loaf of vollkornbrot, which I'd been planning to do for some time.  It was a lot of fun, and let me try several things that I had not done before:

  • I used the formula from Peter Reinhart's Whole Grain Breads, which includes preparing a mash on the first day.  A mash is a thin paste of flour or whole grains and water, kept at 150 for several hours.  The goal of this is to produce what I think can best be described as enzyme craziness.
  • I've been on a rye kick lately (rye sourdoughs are currently my favorite type of bread), but had not tried anything more than around 2/3 rye.  While a 2/3 rye dough is a lot different than a wheat dough, the vollkornbrot dough was much different than either of them.
  • I bought a grain mill around a month ago, and while I've been very happy with it, I've been using it almost exclusively to produce finely-ground wheat flour.  I'd been holding off using it for rye, as I still have a fair amount of store-bought rye flour to use up.  However, the vollkornbrot recipe calls for coarsely-ground rye, so I figured it would be a good opportunity to break out the rye berries I bought.  For the mash, I actually produced what I would classify as cracked rye (the recipe calls for rye chops), sifting out the smaller pieces to use as part of the flour for the starter.
Day 1 consisted of preparing the mash mentioned above, along with a starter.  Having never made a mash before, I can't really say if mine turned out correctly, but it was gelatinous and quite pleasant-tasting.  I've been maintaining both a rye and a whole wheat starter for a couple of months now, and have had good success with both, but I used the rye starter in this recipe just to make the end result 100% rye.  Since the expanded starter was made of coarsely-ground rye it did not rise much, but smelled terrific.  The mash and starter are pictured below: 

On Day 2, I combined the above ingredients along with a good deal more rye flour and a few other items (including, somewhat surprisingly to me, sunflower seeds).  On a whim, I used a medium-coarse grind on this additional flour as well.  Reinhart lists molasses and cocoa powder as additional optional ingredients, but I decided to leave them out in this batch.  After mixing the final dough, I let it proof - the rise was pretty limited, as one might expect, but it was noticeable.  Reinhart's instructions have this bread being cooked in an open pan, but based on my reading, I wanted to try it with a lid.  However, I do not have a Pullman pan and have sworn off buying any additional kitchen accessories for at least two months.  Instead, I used the oft-recommended trick of covering the pan with a baking sheet (weighed down with a cast iron skillet) to roughly approximately a lidded pan.

After around two hours of baking (including rotating the loaf after the first hour so that it cooked more evenly), I pulled the below item out of the oven.  I was a little bit disappointed with its appearance, as the flour that I can carefully sprinkled inside the pan and on the top of the loaf had mostly disappeared and there were not as many cracks as I was expecting.

The hardest part of the process was still to come:  waiting until Day 3 to sample the loaf.  Fortunately, that was today.  I'd wrapped the loaf in a towel after it cooled yesterday, and when I took it out this evening, it smelled terrific.  Cutting through that crust was a bit of a challenge (as expected), but once I made it through, the crumb was quite soft with a very unique texture.  Reinhart says that using a mash gives the crumb a creamy texture, and while I didn't really know what that meant before trying this bread, I have to say that "creamy" is probably the word for it.  The taste was very complex - it didn't have much of a rye flavor, but I could detect the sourness from the starter, the sweetness from the mash, a hint of the taste of the sunflower seeds, and many other factors that I can't quite place.  For the first time I can remember, I wish that a loaf I made had more crumb and less crust.  I will also be interested to see how the flavors continue to develop over the next several days.  I've included a photo of the crumb below.

Overall, this was a very satisfying bake for me.  I love trying new ingredients and techniques, and when they actually produce something this tasty, it's even better!  I will definitely be baking more vollkornbrot in the future, although I think I may first try a few of the lighter recipes I've been neglecting.  I also plan to save some of this loaf to provide altus, perhaps for Reinhart's Bavarian Pumpernickel recipe.  In addition, I'm now more interested than ever in trying my mill out on different grains and coarser grinds.  So many breads, so little time...

lolo's picture
lolo

Pain a l'Ancienne

I've decided it's time to jump into breads, and what better way than BBA?  After reading most of the book I decided that this would be a great first bread to try.  I was SO happy with the flavor and the crumb; I've never ever made bread that tasted so good or had such a nice texture.  It really was "creamy and cool" just as it should be.  The crust even crackled as it was cooling!  How fun!!  Not bad for my first shot at "real" bread.

Pain a l'Ancienne - Crumb


I think I could stand to make a slightly less hydrated dough next time (I think I added too much water, then was adding flour like mad to compensate) and gain some height without giving up the overall quality of the bread.  The bread spread out while shaping, causing me to curl it under a little, which created veins of uncooked flour on the undersides of some of the loaves.  A stiff brush removed most of it, but still, who wants a mouthful of flour?  If I can figure out how to use less flour without the dough sticking like crazy, I'd be set.  The excess flour burned up in the oven and I nearly smoked myself out of my kitchen.  I also need a much larger baking stone, as I could only fit two loaves at a time, which really lengthened the whole process.


"Shaping" the "loaves" "Shaping" the "loaves"

I made the dough around 11 pm and took it out of the fridge at 9 am.  I put it in the oven a little after 12 (even though I wasn't sure it had actually doubled yet... I didn't want to overproof it and end up with even flatter dough...)  I tried to score the first two loaves with a lame, but that was hopeless.  I moved on to sharp scissors like the book suggests, and while that worked better, you could hardly see the cuts on the final loaves.  I skipped that step altogether on the last two loaves and it seemed to work out fine.  Maybe if I make the dough a little drier next time the slashing will work out as well.

Overall I'm really, really happy with these, especially since it was my first try.  It was absolutely the best tasting bread I've ever made.  I can't wait for my whole wheat starter to be ready so I can get going on some of the recipes in his Whole Grains book as well!

Pain a l'Ancienne
Janedo's picture
Janedo

baguette farciebaguette farcie

A big thanks to Eric (ehanner) for this great idea. These baguettes (baguette Monge recipe - quick to make) are filled with mountain ham, like serrano, ewe cheese and grainy mustard. The kids loved them! I made a sun-dried tomato, herb, olive oil, goat cheese, serrano one for me. Perfect picnic fair. I formed six small rectangles, lay the ham, cheese, etc in the middle and folded the sides up and rolled lightly to form a baguette. Just have to be carfeul not to roll the dough too thin. The seam on the bottom, then slashed before baking. 

pain épice T110pain épice T110

The breads were made using a firm starter that I fed to become stirrable in the evening, left out all night, then the dough made in the morn, baked in the afternoon (an initial 4-5 hr rise, then a 2-3). Half T65 and half T110. The T110 is a new brand I found. It's organic and stone-ground like the other but the bran is really small and you can't really see it, but the flour is sort of grey-beige. Really strange but it makes the best bread ever with a spicey, pain d'épice smell to it.  

pain romarin
pain romarin

I made Mike Avery's sourdough ciabatta that was a huge hit here. I have actually never tasted it but my italian friend said it was great! This bread I'm showing is based on the same technique, but I changed a couple things.

Rosemary-honey bread 

the biga (I made an orange size ball and left it out all night) didn't weigh it 

400 ml water

625-50g T65 (bread flour over there and maybe a bit more)

3 tbsp olive oil

1 tbsp honey

2  tsp salt

2 tbsp fresh rosemary chopped

I don't know why but the bread was lighter in texture, almost like a yeast bread. Maybe because there was no milk and the honey helped? I have no idea but it was really GOOD! 

baguettes rustiquesbaguettes rustiques

These are the rustic baguettes from Glezer's Artisan baking. They were really good, but  it dawned on me that I'll never get those huge holes if I always use my organic T65 which isn't real white flour. I bought some T55 non organic to try one of these days but that breaks my heart a bit. It's just a challenge thing. I don't like baguettes that much really anyway! But any amateur baker wants to try and master them ... don't we?

I read an article about french flours and yeast. Did you know that most bakeries in France have a flour sponsor? They only use the flours from that supplier and they get great, light, holey baguettes because the flour has emulsifiers, and other additives. That's pretty icky in my books... and also my initial motivation for baking my own bread. But it's very much like the States, you have wonderful artisanal bakeries and so do we. They just have to be hunted down! I read an article yesterday about France's N°1 baker who makes the best baguette in France. His name is Anis Bouabsa and is from a family of Tunisian immigrants. He talks about using a very, very small amount of yeast and a long long rise (20 -30 hrs) but didn't say anything about builds. 

Have a nice Sunday!

Jane 


foolishpoolish's picture
foolishpoolish

[DELETED BY AUTHOR]

dmsnyder's picture
dmsnyder

Nury's Light Rye

Nury's Light Rye

Nury's Light Rye Crumb

Nury's Light Rye Crumb

Mmmmmm .....

David

MaryinHammondsport's picture
MaryinHammondsport

With the loaf shown below I have managed to solve a couple of recent problems.

I mentioned earlier that I was having a spreading problem with my sourdough and other artisanal breads -- actually, anything not baked in a loaf pan. I speculated that this was because our water was softened. We had the water tested, and it came out as 1 grain (the equiv. of 17 ppm.) while Hamelman recommends between 100 and 150 ppm as ideal. We purchased some spring water just to test it; this was rated at 8 grains, or 134 ppm. It worked. Same recipe I have had trouble with, now no longer spreading all over.

A second problem with this particular recipe was a pale pale crust. Paler than Wonder Bread. I added 6 grams of diastic malt this time. Wow! Boule trial with harder water and maltBoule trial with harder water and malt

Because we have a very well-vented gas oven, I baked it under a stainless steel bowl. This was my second trial with the bowl and I am convinced. Real oven spring this time.

The crumb is the next area that needs work. I had some scheduling problems, and the dough was manipulated a little more than I had planned. The crumb is acceptable, but could be better. The taste is fine, though perhaps not quite sour enough, but I can work on both of those.

Thanks to Susan for the bowl idea and the Mike Avery for introducing the idea that overly soft water sould cause problems. Who would have guessed!

Mary


ejm's picture
ejm

I did it!!! I did it!!!

wild bread

After weeks of angst with babying my jar of wild yeast, feeling I would never be able to bake a loaf of bread that WASN'T sour (not to mention the several times I was going to throw in the towel altogether), I have achieved my goal.

Not only was it not too sour; it wasn't sour at all! And it was light!! Light as a feather!!

And here's how I did it: I virtually started over with feeding. Some time in March or so, I brought the sludge out of the fridge and returning to McKenna Grant's (Piano Piano Pieno) original formula, and started a twice a day regimen:

  • 2 Tbsp wild sludge
  • 3 Tbsp unbleached all-purpose flour
  • 2 Tbsp water

And kept at it for days until finally finally, it began to look like a real starter again.

Now the question is whether I'll be able to repeat the success...

I like to balance cookie cutter(s) on top of the just shaped bread to etch a design in top of the loaf. For this loaf, I used 3 heart shaped cutters. Instead of removing them just before baking, I left them there for the first half of the baking and removed them when turning them around to account for uneven heat in the oven.

wild bread

The bread really was outstanding. Wonderfully crisp and chewy on the outside and light and open-holed inside.

dmsnyder's picture
dmsnyder

So, for my last baking experiment of the weekend, I chose another bread I've baked many times - the Sour Rye Bread from George Greenstein's "Secrets of a Jewish Baker."

 I made two loaves and baked them together, covered for the first 15 minutes with the base of a large oval enameled metal roaster. This was a mistake. I was aware that the loaves were a bit crowded, in order that they both fit under the covering pan. When I attempted to remove the pan from them, I found that the loaves had stuck to the sides of the pan, one badly. I had to remove the pan from the oven with one loaf still stuck to it, scrape the loaf loose and replace it in the oven to finish baking. Both loaves suffered localized loss of crust. 

Compared to my previous bakings of this bread, with the oven humidified with hot water poured into a cast iron skillet, I had increased oven spring. And the loaves were, if anything, a bit over-proofed. For those of you who love burst loaves, this is for you! The crust was a tad crisper than usual, but still not thin and crackly. The crumb was denser than usual, but still quite in the proper range for this bread. The taste, as usual, was delicious - moderately tangy/sour. 


Sour rye, baked covered

Sour rye, baked covered 

Sour rye, baked covered

Sour rye, baked covered 


I will try baking this bread covered again some time, but I won't be crowding two loaves under one cover again.

 At this point, my overall feeling about baking bread covered is that it doesn't make a huge difference in the product - maybe a bit more oven spring, but is easier than fussing with the skillet/hot water method, in some ways. Other kinds of breads, like baguettes, may benefit more than the ones I've tried this weekend. I'll post my results when I try them.

It's been fun!


David 

Pages

Subscribe to RSS - blogs