The Fresh Loaf

A Community of Amateur Bakers and Artisan Bread Enthusiasts.

StevenSensei's blog

StevenSensei's picture
StevenSensei

This is a modification of the recipe originally published in Reinhart's Whole Grain Breads - (Bread Calculator / Recipe)


This week it was time to try another whole grain bread. The spiced Swedish Limpa bread looked like a winner. I was a bit hesitant given the use of fennel and anise seeds along with cardamom and cumin. More on this later.


I decided to modify the recipe to a more traditional 3 day bread and dropped the use of commercial yeast. Opting instead for a 100% rye starter for any leavening. With this change the bread is actually 50% rye and 50% whole wheat. This is a heavy and dense bread without a lot of gluten development. In fact, bringing this bread together reminded me a lot of doing a 100% whole grain rye. The lack of gluten means working the dough a bit and just trying to get it to come together. I added a little bit more water when the dough first came together because it felt quite dry. That addition made the dough a bit too sticky…but it’s fine…like a 100% rye we are not going to get a nice smooth dough and taught skin.


I measured and lightly ground the spices in a motor and pestle. Wow! What an amazing smell. I was super pleased with the anise and fennel combination. I was afraid it would be too much like licorice but it was fine. They really complement one another and stand up as a subtle flavor against the strength of the rye.


The bulk went fine and I did see a 50% growth as I wanted in a reasonable amount of time which also let me know that the refresh of my starter a few weeks back has worked just fine. After a very rough shaping of the dough and a healthy amount of rice flower on the banneton liner it was into the fridge for the night. The next morning the bake went fine and as expected there was not much rise to the bread. This one is quite flat, which is exactly what I expected given the rye content. The outer loaf isn’t super pretty because of how I brushed off the rice flour…but the inside…oh my! This is the kind of moist dark complex rye that I love. I need to try to slice it super thin and toast it till it snaps like a cracker. 


Sensei's Report Card

Tasting Notes: This has a strong sourdough tang from the high percentage of rye flour. The smell is amazing and complex with all of the spices. I love cumin in most things, and was careful to dial the amount in this bread back as warned in the text from the book. That said the bites that do have cumin in them the cumin is quite forward and gives a more savory note which does not go as well with all of the other flavors. If I do this bread again I would drop the cumin and increase the anise to 3g. Every bite of this bread is an adventure in the best way.


Time/Effort: Not a lot of effort for this other than dealing with a difficult to work with low gluten dough. If this isn’t your thing you could easily drop the whole wheat in favor of a strong bread flour and likely be just fine.  


Would I make it again: For sure! The flavors are great. In fact I could see using the seed mix in just a normal sourdough, or even using these in a whole rye instead of caraway (which is also a great flavor for rye bread). I’m pretty sure that there is a recipe for this style of bread in the Bread Bakers Appetence as well that might be worth looking at.


StevenSensei's picture
StevenSensei

I recently read and enjoyed Tartine Bread by Chad Robertson. I was pleasantly surprised as I was reading it that my method of baking sourdough is very similar to the process outlined in the book. With that in mind I figured it would be easy to pick up any of the recipes in the book and go to town with some very mild adjustments or experimentation. All of the variations of breads listed had my mouth watering and I was (and still am) keen to try some things beyond a standard sourdough. 


I settled on going first to the Rosemary Polenta Pumpkin Seed Sourdough. The Recipe as Written (RAW) on this one is a HUGE failure. Let's step back a bit first and try to explain what happened and where it all went wrong.

I am no stranger to high hydration bread. In fact thanks to a transcription error to a notebook I keep in the kitchen I spent more than a year baking sourdough with a 91% hydration. That was a learning experience in how to build dough strength and be able to shape a boule or batard successfully. The day I realized that I had made that transcription error and went back to making 75% hydration bread I was startled at how easy it was to manipulate, shape, and produce bread with a reasonable hydration level. 

This recipe however it a whole other beast. To start, Chad recommends that you begin with a recipe for the "Basic Country Bread"

White Flour                              90%

Whole Wheat Flour                 10%

Salt                                          02%

Leaven / Starter                      20%

Water                                      75%


Not accounting for the water or flour in the starter this is just a standard 75% hydration bread. Nothing of concern. Straight forward. This should be easy.


To a full recipe using 1000g of flour we then add the following after the first stretch and fold with no other adjustments:


1 cup roasted pumpkin seeds

1 cup polenta

2 cups boiling water (used to hydrate and soak the polenta)

3 Tbsp corn oil

1 Tbsp chopped fresh rosemary


Not using my acute sharpened mind and superior reasoning skills I blindly followed the recipe and this is the result. 

The basic dough felt great after mixing. The soaker preparation went as planned and the polenta gladly soaked up all of the water. Look at how lovely it appears when ready to be mixed into the dough. 

Once incorporated the dough smells AMAZING but is very very wet and sticky. That's ok though, we still have lots of stretch and folds to do to build up the dough strength. In fact, over the series of stretching and folding some dough strength was build up and came close to a window pane. Good enough to move onto the final bulk before shaping.   


90 min later the dough has grown 50% and is ready for shaping. However, this is where my fears come roaring into view. The dough is still super super wet, and in fact not able to be shaped. As I round off the dough the edges are not flat and are able to keep a rounded edge on the board, but it is still far to wet and sticky to actually do any real shaping or producing the correct tension in the dough. The chance of actually forming a full boule is slim to none. 
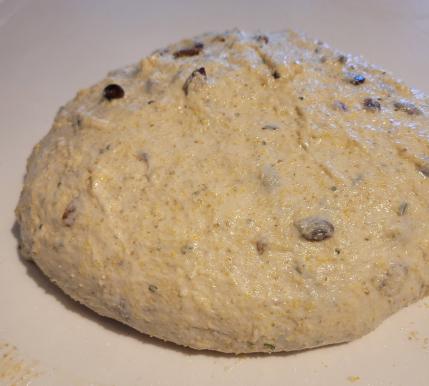


Refusing to be completely defeated and also refusing to not have bread for the week it was time for PLAN B!

Or rather PAN B - When all else fails, don't waste dough, pan it up and see what happens.
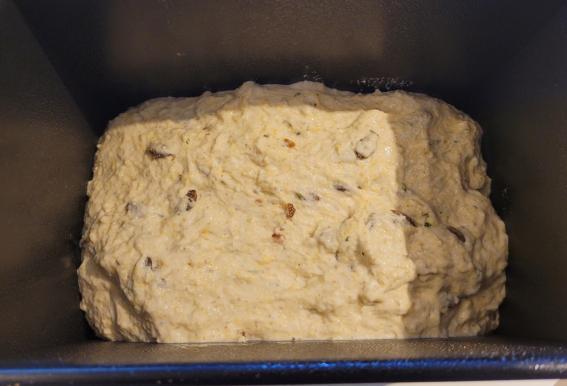
 

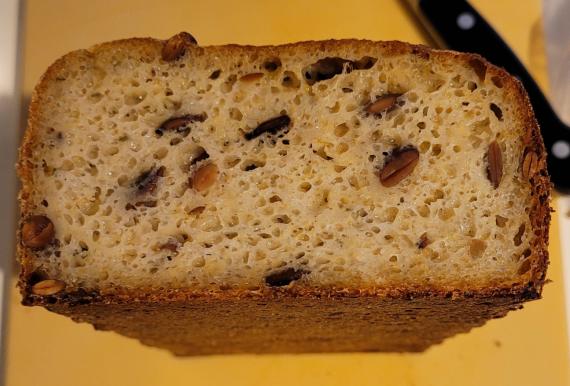
After an overnight in the fridge and a normal bake routine (About 5 min longer) we end up with this. I made sure to take a temp measurement to make sure the dough was fully cooked. 


The crumb is very moist and springy. It is not gummy. If anything it reminds me of a mass produced crumpet. The smell is still divine. I had a slice as is and found the texture to be strange, which honestly is not a shock. I wouldn't use this for a sandwich. It might make excellent croutons.
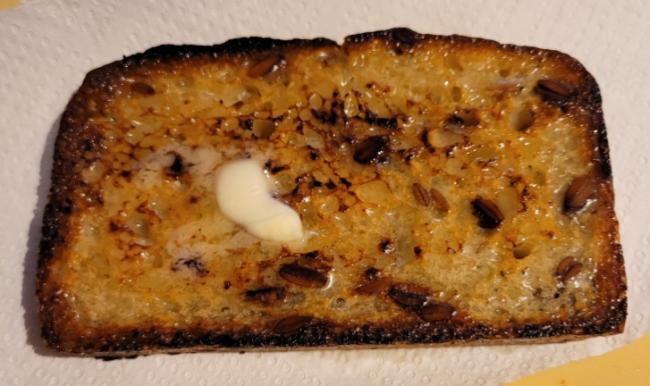
As toast it works well. The crumb developed a nice crunchy crust and the interior crumb is quite soft and creamy. I can only imagine how good this would be if it had the proper hydration, shaping, and bake. But for now that must remain in my imagination. 

So what went wrong? Obviously the hydration here is WAY WAY OFF! Normally a soaker just hydrates grain and doesn't add an appreciable amount of liquid to the overall recipe. Or at least most recipes that use a soaker have accounted for this additional liquid.  In this case it did just the opposite. What were we actually working with? 

If we add the water from the soaker into the overall dough recipe it means we are dealing with 122.5% Hydration!

If we treat the corn oil as a liquid addition instead of a fat we are up to 126.4%

Finally, if we treat the polenta as "Flour" in the recipe we are still at 108.2%


Yikes!


To the internet! After a bit of searching it appears that this is an issue that I am not the first, nor will I be the last to experience issues with this recipe. In fact this blog post describes exactly what I encountered. 


It appears that this recipe would benefit from quite a few alterations including but not limited to:

Reducing Base Hydration and keep the soaker the same

Cooking the polenta instead of just soaking

Count the polenta as flour and adjust total hydration


Sensei's Report Card

Tasting Notes: The rosemary is not too strong and if anything is more of an aromatic. The roasted pumpkin seeds are a nice textural addition and add a slight nutty flavor. I don't taste the polenta but I assume it is part of the creaminess I get when the bread is toasted.  The bread, even in this "failure" state is still pleasant. I'm really curious what it is intended to taste like. 

Time/Effort: Time seems completely on point for my usual routine. The effort at 120+% hydration is not acceptable. 

Would I make it again: NO! FAILURE. F, full stop. Not Acceptable. Report to my office! That said, you will get another chance but will require some major revision to achieve a passing score. 


UPDATE: Revisited this and came up with a tweaked formula. Crispy Crust, Great flavor, Crumb is acceptable but not as open as I want so a minor needs improvement. See the new post HERE. 

StevenSensei's picture
StevenSensei

I have been craving a good solid whole wheat bread recently and thought I should also do some sprouted grains as well. I picked up a copy of Reinhart's Whole Grain Breads and got to reading. Of course the book starts with background and food science and stories. I enjoyed the detail he goes into with the development of this book, the recipes, and the methods specific to whole grain bread baking. 

Surprisingly the methods here are quite different than a normal sourdough or yeast based bread and in fact many of the breads in this book use a combination of pre-fermentation in the form of a starter or biga as well as using commercial yeast on the 2nd or 3rd day of baking. 

My baking schedule was different than my normal routine but also not too difficult to deal with.

Thursday Night - Soak Wheat Kernels

Friday - Begin sprouting

Saturday - Prepare starter / Preferment - Continue Sprouting

Sunday - Mix Starter, Sprouted Wheat, and other ingredients including the commercial yeast and bake. I did this around 7am and the bread was out of the oven before noon. 

Bakers Percentages found here

Sprouted Wheat and then Ground in preparation for making the final dough (283g).

A very active whole wheat starter. This came from a seed of 100% rye starter that was fed once to make 64g at 100% and then a second time to make a full 397g at 75% hydration. This is only one half of the total dough. The method used by Reinhart is to create a portion that is pre-fermented (a starter or a biga) that is then mixed with other ingredients and commercial yeast in an "epoxy" method on the day of the bake. 

Shaped and baked as a loaf in a pullman pan. Also baked at a lower temperature than I normally bake at but the instant read thermometer didn't lie. The bread was done. 

The crumb was tight as expected. Also, and perhaps most importantly the bread is not gummy at all, which can be an issue with 100% whole grain. I wanted to cut into it right away but waited for breakfast on Monday. A bit of butter and a light toast and it's good. Looking forward to a sandwich later today with mozzarella, fresh tomato, and some avocado. 


Sensei's Report Card: 

Tasting Notes: The crumb is moist and has an almost buttery quality on the finish. The crust is presently firm with a nice chew. Not overly sour. Honey is not a strong flavor and does not appear present in the bread flavor profile. 

Time / Effort: A little bit of pre-planning needed due to the time to sprout the grain. However, if this was a weekly bake it would fall into a routine very quickly. It is a multi day process bread, but as with all sourdough breads the extra time to grow the starter and develop flavors with extended or delayed fermentation is worth it to me. 

Would I Make it again: Yes. Maybe a small increase in the salt and pull half of the sprouted grain before grinding to have some larger grains for texture.  

StevenSensei's picture
StevenSensei

I've been using a LeCreuset Dutch Oven for most of my baking, but I really wanted to make some sandwich bread. I have a few glass pans but figured with the popularity of shokupan (Japanese white bread baked in Pullman style pans) that it was time to invest in a pan and give it a try. 

I settled on this pan made by Majimaya Baking Supply in Tokyo. They do a lot of metal production for baking. I hope to visit the retail shop one day. Ordering online was not a problem and soon enough I had a 1.5斤 pan, which of course let me down a rabbit hole of actually how to use such a thing.

くろがね塗テフロン加工1.5斤勾配有食パン型フタ付き

1.5斤 is a Japanese measurement of volume that is then applied to mean this tin is good for a 1.5 sized loaf of bread. Which is appropriate for 2-4 people. 

The pan has a volume of 2774ml and the manufacturer recommends using 374g of flour. In this case they do not mean total dough weight but the amount of flour in the recipe for a yeasted loaf of white bread. This works out to approximately a 964g total dough weight loaf of bread. 

To scale recipes to different pans we get to do some bakers math. 

  • 1.5斤 has a capacity of 2774ml and recommends 373g of flour
  • OR
  • 134.46g of flour in a recipe per litre

This is a handy starting point to then scale other recipes using tools like the Foodgeek Bread Calculator

StevenSensei's picture
StevenSensei

As a home baker in Japan there are quite a few constraints that can make baking more challenging than baking in a full western kitchen. With a bit of effort and improvisation good bread is still quite achievable. 

Let's start with fermentation. For the first few years I've used a digital temperature controller connected to a kotatsu (traditional heated table) to maintain a somewhat consistent temperature for doing bulk fermentation or growing sourdough starter. And it worked...surprisingly well. 

I spent some time searching for a better alternative and finally came to the conclusion that I needed (ok really really wanted) a Brod & Taylor folding proofer. After extensive searching I came to a sad conclusion. This device is not available in Japan. If I wanted to make this upgrade I would have to find a way to import one or to go to America and carry one back on a plane with me. Neither were ideal, but here we are. Then very recently I found a Japanese company that makes their own version of a tabletop proofer. The Japanese Kneader Company mostly produces products for commercial bakeries but have released a mini version for home use. I snapped one up and am THRILLED with it. I contacted their support division for a minor issue and they were extremely responsive. Through that experience I also learned that their partner business in the USA and Europe is in fact Brod & Taylor. So near as I can tell, this is the actual manufacturer and that agreement also explains why I couldn't find the B&T in Japan!

Now the elephant in the kitchen so to speak is the oven. Western style and sized ovens are really NOT a thing here. In such small living areas any kind of functional kitchen is a rarity. Many apartments, especially in city locations may only have room for a very small refrigerator and a SINGLE BURNER for warming food. As someone who loves to cook the adjustment has been difficult. I consider myself lucky in that I have a gas stove with 2...yes TWO burners. Counter space is also non-existent. I ended up purchasing two different kitchen storage cabinets / bar counters to create counter space. Once that was sorted it was time to tackle the oven issue. 

This wonderful little device fits the bill. It is a combination oven, broiler/grill, and microwave that will go up to 300c. Even more importantly, it is just large enough for me to put a 24cm LeCreuset dutch oven inside. While I will never be making full size french baguettes, with an interior that is  H30cm x W41cm x D29cm it is enough to do pretty much everything else. The ability to have 2 baking sheets in at the same time is also quite nice for things like bagels. 

Have you made brioche yet? I have a few times now. The first 2 times I did it by hand. That was an experience and one that I don't care to repeat. A mixer became a priority. Thankfully I had some family who was going to come to visit and were willing to fly one to me. Unfortunately that trip didn't happen, but I eventually had them ship the mixer to me. Yes, importing kitchen goods from overseas. The crazy thing is, after the cost of the mixer, and the ridiculous shipping costs. It was still a few hundred dollars cheaper than buying the same exact mixer locally. Worth It! KitchenAid Professional Series 6 Quart Bowl Lift Stand Mixer with Flex Edge. This has also enabled me to make marshmallows in my kitchen and after doing that I will never buy them in a bag again. 

 View Larger Image 1

Of course beyond these big things there is the standard assortment of bowls, spoons, dough whisks, lames, bread pans, cooling racks, and other things that are necessary but not worth actually listing and talking about. 

The take away from all of this. If you have an oven, a way to mix ingredients, and a way to provide consistent temperatures (not required but very nice)....you should be able to bake bread. The rest is up to practice, skill, experience, and time. 


StevenSensei's picture
StevenSensei

This blog post is used as an index to the bakes I've done and posted here for quick reference in the future

Equipment, Books, and other General PostsBread Recipes Completed (Commercial Yeast)Bread Recipes Completed (Sourdough)Quick Breads (Chemically Leavened with Baking Soda / Baking Powder) Bread Adjacent Items 

Pages

Subscribe to RSS - StevenSensei's blog