The Fresh Loaf

A Community of Amateur Bakers and Artisan Bread Enthusiasts.

mountaindog's blog

mountaindog's picture
mountaindog

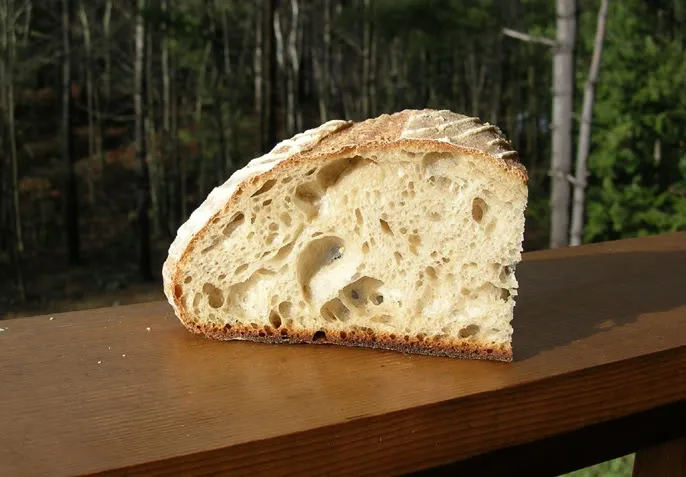
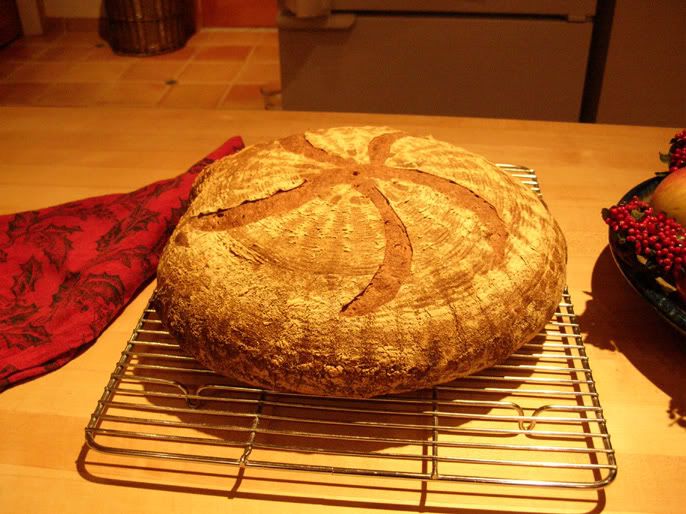
This weekend I made the Thom Leonard boule again (actually 2 smaller boules), but this time made a darker loaf where 30% of the total flour was whole wheat and a little rye. I imagine this combo of flour is more in line with what a Poilane loaf is like. My husband called me from Paris the other day to report on the Poilane loaf he tasted while there, saying it was not really a dark whole wheat bread, rather the crumb was a medium to light color, with even, small to medium holes, not huge holes. He of course diplomatically told me that he likes my bread better, and does not see what the Poilane fuss is about :-)

This week's batch of 30% whole wheat Leonard boules came out very flavorful and the crumb was very light with a nice amount of more even-sized holes, the crust was nice and crispy and chewy. I used my white 100% hydration starter rather than the rye I usually use. The best experiment with this batch is that I used white rice flour to dust my bannetons with, as Merrybaker suggested a while back - what a difference! The proofed loaves slid right out using very little flour, so my crusts were nice and brown - thanks Merrybaker for the tip!

I also made the Pane Siciliano from BBA but using my white 100% hydration sourdough starter rather than yeast, which demegrad inspired me to do. I was worried it would not rise well because I actually used very little starter to make the pate fermente, only about 30 g or so - that was all I had on hand after making the levain for the Leonard loaves. I was suprised to see the pate fermente rise very quickly, so I guess it liked all the extra food. For the final dough, I made it very wet and slack, and I used demegrad's shaping instructions which worked well. They came out very good - great crispy crust, nice semolina flavor, and not at all sour but you can taste something there from the starter. This one will definitley go on my rotation of favorite bread recipes.

The flavors of these two breads are a nice contrast to each other. The two Leonard boules are on the left/back - note the lack of excess flour this time on the crust thanks to the rice flour. In front are two of the Pane Siciliano. My Siciliano crust, although nicely blistered and crisp, is not as shiny as others who made this. I think because my dough was so wet, I had flour on the counter to shape it, and some remained on the crust, dulling it a little despite spraying lightly with olive oil before proofing. No matter, it tastes great and still looks nice - makes a great gift.


Here is a shot of the crumb for Pane Siciliano.


Also, I had mentioned awhile back about my neat bluestone oven setup that I really like, here is a shot (yes, my oven really is that frightfully dirty, guess it's time to clean it). These stones cost me $6 each at my local stoneyard that sells native Catskill bluestone, and they live in the oven, since they work well in evening out the heat for anything I may be cooking in there. I notice my breads are all browning much more evenly all around than before I had these in place, but this may not be worth the effort or make much difference for other bakers, depending on what their ovens are like.

All in all a good weekend of baking...practice makes each batch come out better.

mountaindog's picture
mountaindog

 Hole-y-ness:

I've been asked how I get the big holes, and how I fold. Whether you are working with a bread dough that uses commercial yeast, or with sourdough, the same principles seem to apply from what I've experienced. Obviously, there are others here more experienced in sourdough who may have different techniques. It depends on what works for you.

What gives me the big holes is to use a very wet, soft dough, fold it 2-3 times for the first 60-90 minutes of fermenting to strengthen the gluten, and when you're ready to shape, VERY GENTLY pour it out onto your counter, VERY GENTLY fold the sides into the center to gather it up into a boule without degassing it in the least, flip upside down in your hand and tighten it into a boule by pinching the seam underneath closed. Then place it smooth-side down (seam-side up) into a floured banneton or proofing basket. Do not skimp on the rising time - if it needs 5 or 6 hours rather than the 3 stated in the recipe, let it rise all the way, and make sure your starter is very active.

I really like this bread, I just made it again this past weekend and it came out equally well as it did in the photo at top. It had more of a sour bite to it this time from the wet rye starter.

Thom Leonard’s Country French Bread (from "Artisan Baking" by Maggie Glezer)

Makes one 4 lb. (1.8 kilo) loaf

Time: about 18 hrs. with 30 minutes of active work


The evening before baking make the Levain as follows:

45 g ( 1 oz) fermented rye sourdough starter refreshed 8-12 hrs before (I use a batter-like starter made with equal weights water to rye flour, not a firm starter. If you only have a white flour starter, use that and just substitute 30 g of the white flour in the final dough with rye flour)

120 g (3.3 oz) lukewarm water

140 g (5.3 oz) unbleached all-purpose or bread flour (see my note below on flour)

Dissolve starter in the water in a small bowl, then add flour and beat this batter-like dough until very smooth. Place in covered container and ferment at room temp (@70F) until doubled, 8-12 hrs.

NOTE: I use only King Arthur All-Purpose flour rather than bread flour as it has a high enough protein content and a high ash content compared to other all-purpose flour. The high amount of protein found in most “bread flours” makes the crumb too tough for my taste.

Next day make the final dough as follows:

100 g (3.5 oz) Whole Wheat Flour (if you like your bread a little darker add up to 350 g whole wheat here and use 250 g less white flour below)

1030 g (36 oz) unbleached all-purpose flour (King Arthur has best protein and ash content. If using a white flour starter in the levain rather than rye, substitute 30 g of the white flour here with 30 g rye flour)

660 g (24 oz) warm water

all the fermented levain you made the night before (305 g or 10.6 oz)

23 g (0.8 oz) sea salt (preferably grey Celtic sea salt if you can find it, often sold in health food stores)

Mix By hand: combine all flours in large bowl. Add the warm water to the fermented levain to loosen it from container. Pour the watered levain into the flours and mix with spoon, dough whisk, or hands until just combined. Cover with plastic wrap and let rest (autolyse) for 20-30 minutes. Turn dough out onto work surface, knead for 10 minutes, then add salt, and knead for another 5 minutes until salt has dissolved and dough is very smooth and shiny.

Mix By stand mixer: same as by hand except leave in mixer bowl after autolyse, then mix with dough hook on lowest speed for 5 minutes. Add salt and knead in mixer at low speed for another 4-5 minutes until very smooth and almost cleans the bottom of the mixing bowl.

The dough should feel soft, sticky, and extensible at end of kneading. If it is too stiff and dry, add a few more drops of water until dough just barely clears bottom of mixing bowl at end of kneading if using a stand mixer, or until dough feels soft and stretchy, and slightly sticky, if hand kneading. Softer, wetter doughs give you larger air holes in the baked loaf, which also gives the bread more flavor.

Fermenting: Place dough in lightly-oiled bowl at least 3 times its size and cover with plastic wrap. Let ferment for 3 hours at room temp (@70F) until well-expanded but not yet doubled in bulk. Turn dough 3 times at 30 minute intervals by gently folding like a business letter and flipping upside-down, (that is, turn once at 30, 60, and 90 minutes into fermenting time), then leave the dough undisturbed for remainder of time. OR: for even more flavor, ferment at room temperature for one hour (turning 2 times, once at after 30 and once after 60 minutes), then retard overnight in fridge, warming up again next day at room temp. for 2-3 hours before shaping.


Rounding and resting: Turn dough out onto floured work surface, and very gently round it into a tight boule. Cover with plastic and let rest for 10-15 min. to relax the gluten. While resting, prepare your basket or banneton by dusting with flour. If you’d rather make 2 smaller boules than one large one, divide the dough in half with a dough cutter, and gently form each piece into a tight boule.

Shaping and proofing: Shape the dough into an even and tight round loaf (or leaves if making 2 smaller boules) without deflating it. Place dough topside down into the floured basket or banneton. Lightly sprinkle the top of the dough with flour, cover with plastic wrap and proof for 4 to 4.5 hours at room temperature (@70F) until at least doubled in volume and a slight dent remains when pressed with finger.

Preheating oven: At least 45 minutes before dough is fully-proofed, preheat oven with baking stone on middle rack to 500F.

Bake: Gently flip the dough upside down to release it from the banneton/basket onto semolina-dusted parchment on an over-turned baking sheet or wooden peel, or directly onto a semolina-dusted peel if not using parchment. Slash the boule with a razor in a pound sign (#) design, or in a spiral, cross, or any other desired pattern, as long as the slashes go completely across the top to allow for even expansion during baking. Slide parchment onto hot baking stone in oven, or onto semolina dusted baking stone if not using parchment, and quickly mist side walls of oven with water in a mister (do not spray near the oven light!) and quickly shut the oven door to prevent heat and steam from escaping. The steam helps the dough rise very quickly in the hot oven (called “oven spring”) and also makes the crust more brown and crisp. Turn oven down from 500F to 400F and set oven timer for 30 minutes (20 minutes if making 2 smaller boules). Continue misting every 30 seconds just 3 or 4 times for first 2 or 3 minutes of baking, then leave to bake. When first 30 minutes are up, open oven and rotate loaves around to even out browning. Set timer for another 30 minutes (20 minutes for 2 smaller boules) and check the loaf when that time is up. If it is still a light color brown, leave in for another 5-10 minutes until it is a deeper brown but not burnt, then probe center of loaf with instant-read thermometer, loaves are done when thermometer reads at least 205F in center. If they are getting burnt but center is not done, your oven is too hot, turn it down another 25 degrees or so next time. Let cool thoroughly on rack before cutting as the centers are still cooking, at least 2 hours.

mountaindog's picture
mountaindog

Stayed home today to nurse my lame dog, so I have time to make some notes for myself for future reference:

For this past weekend's baking, I decided to make the Thom Leonard Country French bread (Glezer) again, but using my rye starter, and compare it to the Essential Columbia (also Glezer) my current favorite recipe. For the Columbias, however, I made two different batches for further taste comparison: one with a wet rye starter (saving the step of making a firm starter if you don't keep one) and the other with the firm white starter called for in the original recipe in Glezer's book.

Here is how the Thom Leonard bread came out:

The crumb was beautiful as was the oven spring and crust. I also used King Arthur AP flour only, rather than a mix of AP and Bread, because the protein level of KA AP is as high as other bread flours (11.7%). The last time I made this bread using KA bread flour, the crumb was way too tough and chewy, even for me who likes chewy bread. Seems like the only reason to use a very high protein bread flour like KA (12.7%) would be to strenghten mostly whole grain breads. The Thom Leonard above tasted very nice for a mostly white French bread, however, I have developed a taste for a bit more whole wheat in my bread which is why I prefer the Columbia at the moment. Of course, the original Thom Leonard recipe calls for high extraction flour, not white AP flour. If I can ever get my hands on some, I will try it again with that.

Next, I made the Columbia using a wet rye starter, and omitted the small amount of rye called for in the recipe, replacing it with additional whole wheat and white AP. To first make the levain for this recipe using the wetter rye starter rather than the stiff white starter called for, I used a bit more starter, a bit less water, and a bit more flour, until the correct consistency was achieved and the total weight of the levain as an overall ingredient in the recipe was preserved. This was a pretty slack dough, as I like to work with wetter doughs for improved crumb, so when I tried to slash it for the batard, the darn razor dragged again despite oiling and I went over the same slash too many times and compressed the dough too much in those spots, you can see the results in the crumb shot below:

Despite the spread out loaf, I still got some nice holes and the crust was gorgeous! The taste was as great as before, with a slight flavor from the rye starter that made it taste mildly like a rye bread.

The next batch of Columbias were made with the stiff white starter called for in the recipe, my stiff starter uses 75% white bread flour to 25% whole wheat flour. I fed it 3 times at 12 hr intervals before making the levain with it for this recipe. Rather than making 4 smaller loaves, I made 2 large ones using bannetons. I had trouble with slack dough sticking to bannetons before so I got over-eager with the flour on these, and I had to brush a lot of it off after baking. I also think it inhibited the crust forming nicely as in the free-form loaves above which have the nice crisp crackly bubbles. The other thing I did differently was to degas them by pressing the flat of my hand all over the dough before rounding into boules, thinking I would try to even out the crumb more, but I overdid it, and I did not get as nice holes this time - there are some big ones, but not as many as I like to have and not as even. Below are photos of the large boules made with the stiff starter, and for comparison I stacked the previous batch's smaller rye starter batard on top of the sliced boule - the pic on the right is without a flash and shows the holes in shadow a little better, while the left shows the actual color of the crumb nicely:

I also found that I prefer making the smaller batards free-form for this recipe rather than using a banneton to make larger boules. Not only does this avoid getting excess flour on the crust, but it provides a greater surface area and ratio of crust to crumb, since the crust is so good on this bread. As far as taste difference in crumb between the wet rye starter method vs. the stiff white starter, it is very hard to tell the difference, but I like the stiff starter version's flavor slightly better - it has a bit more tang and wheaty flavor and slightly less rye flavor - the rye flavor in the rye starter batch may outcompete the wheat germ and malt flavors. I would probably get the same result using my wet white starter, so I will try that next.

Lessons learned:

1) levain: using a wet starter seems to work just as well in this recipe as using a stiff one - the type of flour used will make a bigger difference in flavor than the hydration does.

2) first fermentation: do not de-gas the dough completely, just fold it 2 or 3 times for strength during fermentation 30 min. apart. I also retarded the dough overnight in the fridge after a 2 hour room temp. first fermentation.

3) shaping and proofing: handle as little as possible without de-gassing as noted above, but do gently form smaller batards rather then large boules to get more crust ratio. Without pressing out the gas, do tighten the batard into a very tight cylinder as much as possible to create enough surface tension to avoid it spreading out too much or flattening when scoring.

4) when slashing a slack dough like this, don't score over it again or it will flatten it out too much.

5) avoid over-flouring bannetons as it ruins the crust and didn't really help with the sticking anyhow, maybe a spray oil is better - I'd like to know how people avoid banneton stickiness and resulting collapse with the coiled willow baskets.

That's it for this week...


mountaindog's picture
mountaindog

After making a decent BBA Pain Polaine the other day, I next made two breads from Maggie Glezer's "Artisan Baking" book that use a very firm starter. I've made Thom Leonard's Country French bread before (p. 133) and that came out very good, but I was really blown away by how good the Essential's Columbia bread (p. 82) came out! After tasting this Columbia bread, it was disappointing going back to taste the Poilane, I liked the Columbia much better, although granted they are somewhat different styles of bread:

columbia.jpg

This Columbia is by far the best bread I've ever made, no contest, in fact my French husband and I agree this is the best bread we've tasted outside of France. The taste and texture are wonderful: crispy, chewy, with a very complex sourdough flavor, really not much sour but a lot of flavor! I wonder if it is all the combination of different flours in the recipe, plus the wheat germ and malt syrup...all I can say is this will be my new standard bread to make weekly, as well as to give away as gifts. Next time I make it I may try using oblong bannetons to give the loaves more of a football shape rather than the batards I made here. By the way, that crust is not burnt, the malt syrup makes it carmelize very darkly. I followed the recipe in the book exactly except I retarded the final dough overnight in my cold mudroom for the first ferment. Check out Columbia's excellent crumb and crust:

columbia_crumb.jpg
mountaindog's picture
mountaindog

I made this last night from BBA. My slashing is improving but I don't seem to get them deep enough to get "ears". Here it is right out of the oven:

poilane1b.jpg

Anyhow, this poilane miche from BBA tastes very good, crust is very chewy and flavorful, crumb is even and slightly chewy - not dense, and softer than I thought it would be but since this bread is meant to last a week it needs to be to keep from getting too hard too fast. Since this uses a lot of whole wheat flour, I suppose the holes are big enough, I am pretty happy with the rise since this is only my second sourdough attempt at all. Here is the crust and crumb shot:

poilane2b.jpg

mountaindog's picture
mountaindog

After getting some good advice from this site following a failed first attempt at wild yeast sourdough, I continued to feed my starters every morning and moved them out of my 60F kitchen and into a 70F location. I finally saw what an active sourdough starter should REALLY look like (notice the rise above original fill lines in marker):

active_starters2.jpg

I have two active starters going now, the bottom is rye and the top is 75% white/25% whole-wheat.

So now I was able to make my first successful sourdough pain au levain. It came out pretty ugly as I need to practice my slashing on these wetter doughs more, but the crust came out really crispy and chewy. I could have gotten larger holes and a better rise in the crumb, but I had let it go too long proofing and it almost overflowed the basket, so I had to fold the dough a third time and let it proof again, but I was running out of time so baked it when it was not as risen as it could have been. Still, the taste was absolutely wonderful and texture nice and chewy without being dense! Really nice flavor, some slight sour bite but not at all overpowering, other flavors hard to describe.

painaulevain_sd_1st_success2.jpg

I was on a roll, so I also whipped up some BBA Pain A L'Ancienne again, very easy recipe, chewy, crusty, very tasty:

2nd_pain_a_lancienne2.jpg

And finally, I was able to make some saffron buns for Christmas breakfast from the recipe on this site, but with no dairy, by substituting soy creamer for the milk and a vegan soy spread for the butter. I am allergic to dairy. They came out great, my dairy-loving family and friends loved them! This particular soy spread is meant to be used for cooking as well as a spread, and in my opinion, tastes much like unsalted butter. The buns tended to spread out more than rise very high, and I am not sure if that is due to my dough being very hydrated, or if using real milk and butter would give a slightly better rise. I intend to try the BBA cinnamon rolls next with the same substitutions. I'll be doing more sourdough baking this week as I am on vacation and have guests coming for a big New Year's Eve dinner. Happy Holidays to all!

1st_saffronbuns1.jpg

Pages

Subscribe to RSS - mountaindog's blog