The Fresh Loaf

A Community of Amateur Bakers and Artisan Bread Enthusiasts.

hellen's blog

hellen's picture
hellen

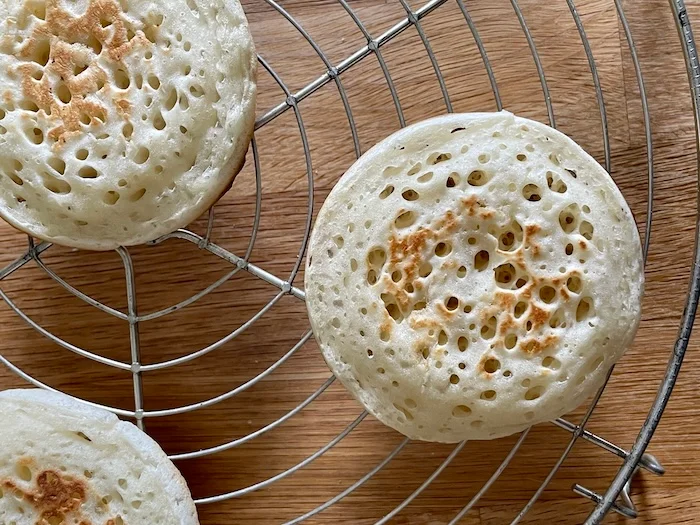
Sharing this recipe for no yeast crumpets I developed and am quite proud of.

I don’t know why this doesn’t exist already (or maybe it does but is just obscure). The no-yeast crumpet recipes I have found previously don’t really have holes on top and looked more like pancakes than crumpets imo. All the recipes for holey crumpets I found on the internet were either made from sourdough discard or some combination of yeast and baking powder/baking soda.

I’ve tried a sourdough discard + baking soda crumpet recipe (the KA one I believe) and also two different crumpet recipes which use instant yeast and baking powder. None worked for me, they all turned out cakey, mushy, and/or gross.  I decided to develop my own crumpet recipe. My first attempt using sourdough to leaven the batter was not ideal.

After several failures, I went and bought crumpets from the supermarket out of sheer frustration and noticed that there was no yeast listed in the ingredients. I consider this brand of crumpets (Oakrun bakery) to have the ideal texture as it has a very defined honeycomb with a bouncy texture when toasted. (Aside from no yeast, they also had more sugar than the crumpet recipes I found online.) So I decided to use this as a guideline to develop my no-yeast crumpet recipe. I don’t have access to some of the leaveners they use, so I only use baking soda. After some tinkering with hydration, I think I’ve hit a pretty good ratio. 

Recipe is here. Hope you give this recipe a try and get consistent holey crumpets as well. 

The most important thing about cooking crumpets is having a flat and heavy griddle or pan that retains heat well.  Also, you should modify the vinegar amount if your white vinegar is not 5% acetic acid.

Process video here: (not sure why video embed not working?) 

https://www.instagram.com/p/C9U7379yGd1/

or watch on my instagram or tiktok.


I am fairly certain that the addition of potassium bicarbonate will give a better honeycomb texture. Although I have not tried this yet, you can get “lye water” at Chinese grocery stores which is essentially a solution of sodium bicarbonate and potassium carbonate. I think this will work fairly well to give crumpets a good honeycomb texture. Chinese lye water is traditionally used in bai tang gao/bok tong go, a honeycomb textured rice cake that is fermented with yeast (leading to sourness) which then reacts with this sodium bicarbonate and potassium carbonate mixture when steamed to give high, defined honeycombs. Personally, I think the texture of a good bok tong go is very similar to that of a good crumpet.

Would be curious to know if anyone has experience baking with potassium bicarbonate or this potassium carbonate and sodium bicarbonate solution.

hellen's picture
hellen

My best attempt yet in my quest to make the fluffiest, shreddiest healthy-ish whole grain imbued shokupan: this 20% Rye Shokupan.

Recipe is adapted from Benito's Mochi SD Hokkaido Milk Bread recipe, a great recipe - all props to benito.

Because I am lazy I cut some steps to simplify the process a bit - namely, I poured boiling water directly from my kettle instead of heating up milk (I know - it changes the composition somewhat) and I baked the bread all in one step instead of taking it out of the tin for further baking. I also had more sourdough starter to use up so I modified the stiff sweet starter amounts.

Aside from that, the main difference is the use of whole grain rye flour for the tangzhong/yudane. This bread I am quite pleased with but later attempts to raise the rye flour content were unsuccessful - gah! I really hope to develop a high-percentage super shreddy rye bread...one day...

The hardest part of making this bread is getting the proofing right. Almost all of my shokupan failures come from overproofing. I find shokupan dough to be much less forgiving than other lean doughs, which I can chuck in the fridge if I need to go out. Further thoughts and written recipe/recipe card here on my blog, or you can follow benito's recipe above and just change the mochiko to rye.

hellen's picture
hellen

Nigella seeds add so much savoury depth to bread and works really well with sourdough. For anyone in Toronto, Blackbird Baking has a seeded loaf which uses a mixture that includes nigella seeds. Their seeded loaf was a staple for me many years ago. The defining feature of the loaf, I think, is definitely the addition of nigella seeds! Recipe here.

I did not think to bake with nigella seeds until very recently. I have made these seeded buns 2 or 3 times prior but this is my first time adding nigella seeds. I was super pleased with the flavor it brought. If you've never tried nigella seeds, they taste savoury, vaguely allium, slightly oregano-ish. Hard to describe!

For this bake, I was a bit lazy with the stretch and folds. I usually do at least 3 and sometimes up to 5 stretch and folds for this type of dough, but this time I only did 2. As a result the buns were not as open crumbed as they could have been I think. 

I also typically bake the following morning after cold bulk fermentation in the fridge. For this bake however, I did not form and bake the buns until more than 41 hours later. The buns were flavorful but I think the crumb could have been better - in previous iterations of the same recipe, I have had a much airier open crumb structure. I think it was slightly over-fermented, but some additional strech and folds could probably have fixed this.

I have heard that pizza dough is optimally cold fermented for 3-5 days. I am wondering if this also holds true for doughs like ciabatta or if that amount is way too long. In both pizza dough and ciabatta the goal is similar - crispy crust, open crumb, big air bubbles. They are both also relatively high hydration doughs. Does anyone have experience cold-fermenting high hydration doughs for 3-5 days? I would be curious to know the results. 

If you would like to try these seeded buns, the recipe is here. I highly recommend trying nigella seeds!

Below is a previous bake using the same recipe, but without the addition of nigella seeds and only 14 hours in the fridge.


Subscribe to RSS - hellen's blog