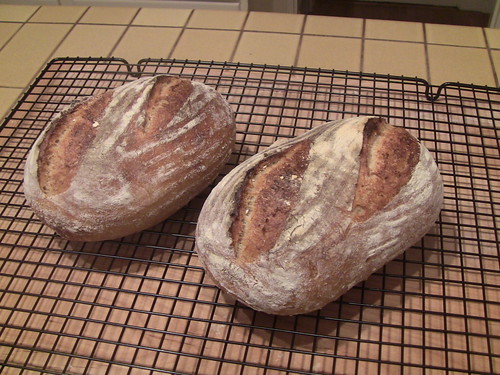
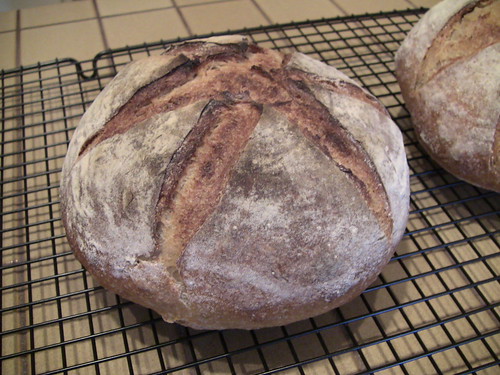
The Fresh Loaf

A Community of Amateur Bakers and Artisan Bread Enthusiasts.

GSnyde's blog

GSnyde's picture
GSnyde

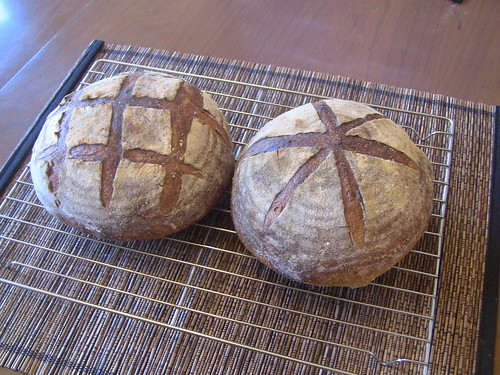
I baked David’s “San Francisco Style Sourdough”.   I used the formula and procedure from his latest blog entry on the on-going experiment (http://www.thefreshloaf.com/node/27982/san-franciscostyle-sourdough-bread-two-ways-3252012), except I did not retard the proofed loaves overnight.

The loaves are light in weight; crispy-crusted; with an almost perfect moist, airy crumb; the flavor is moderately sour and very nice.

These aren’t the best-looking loaves I’ve baked, on the outside.   But the crumb is real purdy.

Made a nice accompaniment to Chicken Salad.

Next time, I’ll retard the proofed loaves and see what it adds.

Thanks for all the effort on this, David.  Good bread.

I also baked a quick bread from Beth Henspergers Quick Breads book today—it’s a Pumpkin Gingerbread, with a spiced streusel topping.  Very moist and quite spicy (I added white pepper and candied ginger to her recipe).  Real good with Brandy butter, my new favorite dessert condiment. And since there's some whole wheat flour in it....it's healthy!

Glenn

GSnyde's picture
GSnyde

I didn’t think I’d want to be tied to the kitchen for bread-baking this weekend.  I did want to use up part of a large supply of pecans.  So I started looking for Pecan Scone recipes and found what looked like a great one in The Cheese Board Collective Works, the source of the wonderful Curry-Onion-Cheese Bread I’ve blogged about before (http://www.thefreshloaf.com/node/22549/some-spice-breads-–-one-sweet-and-one-savory).  And indeed the scones were about the best I’ve made (and some of the best I’ve eaten).

These are free-formed scones with a maple glaze.  They come out very crunchy on the outside and moist and tender on the inside.  The Pecan and Maple combination is outstanding.  I think the secret to success—besides the great recipe—was keeping everything very cold and minimizing handling of the dough.

Here’s the recipe for 12-15 scones:

1. Preheat oven to 375 F. Prepare two sheet pans with parchment or silicon mats.

2.  In a large mixing bowl, sift together:

  • 3 ½ cups AP flour
  • 1 Tbsp Baking Powder
  • ½ tsp Baking Soda

3.  Mix in:

  • ½ tsp Sea Salt
  • ¾ cup Granulated sugar

4.  Cut ½ pound of cold sweet butter  into ¾ inch cubes and cut it into the dry ingredients with a pastry cutter or two knives until butter bits are about pea sized.

5.  Then stir in 1 ¼ cups rough chopped toasted pecans.

6.  Make a well and pour in ¾ cup of heavy cream and ¾ cup of buttermilk.  Mix until just blended.  Form gently into 2 inch balls (don’t worry if they’re not very spherical; minimize handling).  Place the balls 2” apart on sheet pans.

7.  Bake for about 30-35 minutes, until golden brown.

8.  About 5 minutes before the scones are done baking, pour  ½ cup of real maple syrup into a medium sized bowl and gradually whisk in 1 cup of sifted powdered sugar until the consistency is a thick glaze.

9.  When  the scones are done, transfer them to a wire cooling rack on top of newspaper or something like it to protect your counter.  After about 10 minutes of cooling (so the glaze doesn’t just melt off the scones), spoon the glaze over the scones (I used about ¾ of a tablespoon for each).

10.  Let cool until the glaze sets (about 10 impatient minutes).  Enjoy with a hot beverage.

One more photo from today.  A Flicker defeating the cage around our bird feeder.  They have very long tongues.

Glenn

GSnyde's picture
GSnyde

Cat and I spent the week of 3/3 through 3/10 on an expedition on the waters and islands around Southern Baja California.  It was a glorious trip, with great up-close encounters with marine mammals and other local fauna.

My camera was busy trying to capture some sense of the wonderful natural world we experienced.

[That's a Grey Whale calf our friend Julie is about to pet]

On our return to civilization, once I got my work life under control, I found time to bake this weekend.  I’m very glad my camera has had some stop-action exercise.  My bread photos are much improved by a faster shutter (it looks like the loaves are lying absolutely still).

I tried a bit of an experiment in sourness.   I took my tried-and-true San Francisco Country Sourdough formula and made it “country-er”.  A bit more rustic and a bit sourer.  I added more whole wheat and more rye (15% of each), used pumpernickel rye in the main dough, increased the hydration to 70% to compensate for the thirstier flour, and lengthened the fermentation time for the levain.

I made three loaves of about 525 grams each, two batards and one boule.  The boule proofed in the basement (about 55 F) so I could bake it in a second batch in my small oven. 

The result was a noticeably sourer, but still only medium-sour, bread, with a bit less open crumb (due to the coarser flour).    This bread, like ones made with the basic SFCSD recipe, has a wonderful light, moist crumb and a moderately chewy crust.  Very delicious.

I will definitely make this bread again.  Maybe even take it up to 25% pumpernickel.

Here’s the new formula and procedure:

San Francisco Country-er Sourdough (Sourdough Pain de Campagne with more rye and whole wheat) version 3-17-12

Yield: 1570 grams: Two 785g Loaves; or Three 523 gram loaves; or…   

Ingredients

LIQUID-LEVAIN BUILD

88 grams   AP flour

24 grams  Whole Wheat flour

24 grams  light rye flour

170 grams   Water, cold (45 F or so)

28     Mature culture (60% hydration)

FINAL DOUGH (70% hydration, including levain)

540 grams   All-Purpose flour (70%)*

115 grams  Whole wheat flour (15%)**

115 grams   Whole rye flour (15%)***

470 grams   Warm water (80 F or so) (61%)

17 grams   Salt (2%)

312 grams   Liquid levain  (40.5%)   

 3-17 used CM Artisan Baker’s Craft (malted)

** 3-17 used CM Organic Hi-protein fine whole wheat

*** 3-17 used CM Pumpernickel rye


Directions

1. LIQUID LEVAIN:  Make the final build 15 or so hours before the final mix, and let stand in a covered container at about 70°F

2. MIXING: Add all the ingredients to the mixing bowl, including the levain, but not the salt. Mix just until the ingredients are incorporated into a shaggy mass. Correct the hydration as necessary.  Cover the bowl and let stand for an autolyse phase of 60 minutes. At the end of the autolyse, sprinkle the salt over the surface of the dough, plus a few drops of water to moisten the surface, and finish mixing 5 minutes. The dough should have a medium consistency. 

3. BULK FERMENTATION WITH S&F:  3 hours. Stretch and fold the dough in the bowl twice 20-strokes at 60-minute intervals.  If the dough has not increased in size by 75% or so, let it go a bit longer.

4. RETARDED BULK FERMENTATION (optional):  After second S&F on board, form dough into ball and then place again in lightly oiled bowl.  Refrigerate 8-20 hours, depending on sourness desired and scheduling convenience.

5. DIVIDING AND SHAPING: [Note: if bulk retarded, let dough come to room temperature for 30-90 minutes before pre-shaping.]  Divide the dough into pieces and pre-shape.  Let sit on board for 30 minutes, and then shape into boules or batards or baguettes.

6. PROOFING: Approximately 1.5 to 2.5 hours at 72° F. Ready when poke test dictates.  Pre-heat oven to 500 with steam apparatus in place.

7. BAKING: Slash loaves.  Bake with steam, on stone.  Turn oven to 450 °F after it hits 500F after loading loaves.  Remove steaming apparatus after 12 minutes (10 for baguettes). Bake for 35 to 40 minutes total (for 750g loaves; 27 minutes for 500 gram loaves; less for smaller loaves).   Rotate loaves for evenness as necessary.  When done (205 F internal temp), leave loaves on stone with oven door ajar 10 minutes.

Glenn

GSnyde's picture
GSnyde

I made the Ciabatta from Professor Reinhart’s formula in Bread Baker’s Apprentice today.   Easy to make, though I can see where a novice might want to add more flour to the gloppy dough instead of trusting to the magic of gluten.   I added a heaping teaspoon of milk powder to soften the crumb.   I shaped a pound of dough into four large rolls.

It’s a simple bread.  Nice texture and good flavor, but nothing to write home about.  I think it would be good for a sandwich roll.

p

Glenn

GSnyde's picture
GSnyde

No big experiments or breakthroughs this week.  I had a promise to fulfill: my mother-in-law wanted a loaf of sourdough.  I made a batch of San Francisco Country Sourdough (http://www.thefreshloaf.com/node/25402/sf-country-sourdough-–-my-best-ever…not-sure-why) into three half-kilo batards.  One served nicely last night as a platform for roast turkey sandwiches and tonight for a side dish with white bean soup.  One for M-I-L.  And one for the freezer.

I’m pretty pleased with the shaping: I essentially used a baguette-shaping method but without the extension of the length.  Proofed on a couche.

Good moderately sour tang with whole wheatiness, moist airy crumb and crispy crust.

Glenn

GSnyde's picture
GSnyde

Over the past couple weeks, I’ve been on a roll….Well, actually, sandwich fillings have been on a roll literally.  I’ve been making rolls, but that’s not a figure of speech of which I am aware.  I suppose I could say I’ve been roll-playing.  Anyway…enough tropes.

Last week I made an old favorite: the highly enriched sandwich buns SylviaH introduced us to back in 2010 (http://www.thefreshloaf.com/node/17329/buns-sandwiches).  This is like a Challah in crust and crumb, with egg, honey, milk and butter in the mix.  I’ve made these four or five times, and Sylvia’s formula is easy and the outcome is always wonderful.  I’ve enjoyed it for burgers, sandwich meats, tuna salad or—most recently— oval shaped for Chicken Teriyaki sandwiches.

This weekend I finally got around to trying the “Po-Boy Rolls” that ehanner posted about way back in 2007 (http://www.thefreshloaf.com/node/4329/po-boy-victory).  This formula comes from Bernard Clayton, who calls it “Blue Ribbon French Bread”.  I was looking for the perfect rolls for French Dip sandwiches, something with a thin crackly crust and a light, tender, regular crumb. This formula was perfect, just slightly enriched with a bit of milk and butter, very fully developed dough.  Made into six rolls (instead of the two long batards Eric made), they absorbed the jus nicely, but held together.  A bit of horseradish sauce, some thin sliced Tri-tip roast, and an herb- and garlic-infused jus—pretty perfect sandwich!  And fresh out of the oven, with butter and jam, they were a nice accompaniment for an omelet, too.

Two very different kinds of rolls, but both certain to be regulars in my baking rotation.

Glenn

GSnyde's picture
GSnyde

In celebration of the first three-day weekend of the new year, I made a batch of laminated dough, using Txfarmer’s deservedly celebrated poolish croissant formula and procedures (http://www.thefreshloaf.com/node/22677/poolish-croissant-pursuit-perfection).  As with my first attempt at this challenging but rewarding treat (http://www.thefreshloaf.com/node/24692/pâtisserie-lamentation), I split the batch in two and made some croissants and some morning buns.

Again I found Txfarmer’s detailed notes to be very useful, especially the notes about being patient with the dough and letting it rest when it doesn’t want to be stretched to the required dimensions, and letting the shaped pastries proof fully (over 3.5 hours for me).

Coupla notes about my procedures: I used Plugra butter, but about 30 grams less fold-in butter than Txfarmer specifies.  I trimmed the dough sheets liberally before each fold to get nice square, layered edges (more on the trimmings below).  I let the dough rest overnight in the fridge after the final fold.  I haven’t been baking for that long, and each experience with a rolling pin is an education.  I’m getting better at keeping the dough sheets regular in shape and even in thickness.

The results were very satisfactory—not significantly better than my first try, but at least as good (repeatability is an encouraging thing).  Thanks, again, Txfarmer!

The morning buns pretty much followed the Tartine formula (linked in my earlier blog post), except I left out the orange zest and used a bit more butter in the muffin cups, so the bottoms of the buns are more caramelly. 

Since I had about 40 or 50 grams of dough scraps, I decided to try something different.  I mooshed the scraps into a ball, rolled it out to about 3/16” thick, covered the sheet with grated Jarslberg cheese, rolled it up like a jelly roll, sliced 1” rounds, proofed for about 90 minutes, and baked them at 350 for about 40 minutes.  These are delectable little cheese wheels, crispy and flaky outside and tender inside…very cheesy.  Next time, I’ll add a touch of cayenne.

In the midst of the patisserie adventure, I had to fulfill a spousal demand for my usual variation on Reinhart’s Cinnamon-Raisin-Walnut Bread.  Mine includes a mix of walnuts and pecans and a mix of golden raisins and dried cranberries.  This time I tried one little new twist—I soaked the raisins and cranberries in a rum soaker (1/4 cup dark rum, 1 ¼ cup hot water and 1 tbsp of sugar).

There’re almost too many treats in the house now.  So I haven’t cut into the Cinnamon-Rum Raisin-Cranberry-Walnut-Pecan Bread yet.  I’ll post a crumb shot later.

Added Note:  Here's the crumb shot.  There is a mild and enjoyable rum flavor in the raisins, an improvement on a really good bread.  Kinda like Whisky for Breakfast.


Glenn

GSnyde's picture
GSnyde

My wife likes her sourdough sour.  And a happy wife is better than the alternative.  Not that I dislike sour sourdough.  Indeed, for some purposes (along side a salad, or as toast, or as an appetizer with cheese, or….), I like my sourdough sour, too.

I hadn’t changed anything up in my usual sourdough bread (which I call San Francisco Country Sourdough) for a while.  I’d been meaning to try it with some toasted wheat germ added, a variation taken from the SFBI Miche formula many of us have played with.  Also, the talk recently about the Larraburu Brothers bread, and means of achieving sournness, had me thinking I should go for the sour.

So I followed my usual formula, but I added 2% toasted wheat germ (18 grams) and an additional 20 grams of water.  To encourage sourness, I let my liquid levain ripen longer than usual (14 hours), retarded the loaf for 16 hours after a three-hour primary ferment, and baked the loaves four and a half hours after the dough came out of the fridge (90 minute warm up, 60 minutes between pre-shaping and shaping, and a two hour proof).

The bread is nicely sour.  The crust is crispy as usual.  The crumb is moist and toothsome but not tough.  The crumb is more regular (less full of irregular holes) than usual; this might be attributable to the wheat germ cutting gluten fibers.  All in all, a good variation.

My sour-loving wife liked it, and noticed the extra wheaty flavor.

Here’s the formula:

San Francisco Country Sourdough—With Wheat Germ (version 12-8-12)

Yield: Two 770g Loaves; or Three Mini-Baguettes (245g each) and one 800g Loaf; or One 1000g loaf and two 270g baguettes; 0r Three 513 gram loaves; or…   

Ingredients

LIQUID-LEVAIN BUILD

100 grams   AP flour

24 grams  Whole Wheat flour

12 grams  Whole rye flour

170 grams   Water, cool (60 F or so)

28     Mature culture (75% hydration)

FINAL DOUGH (67% hydration, including levain)

640 grams   All-Purpose flour (83%)*

85 grams  Whole wheat flour (11%)**

45 grams   Whole rye flour (6%)

18 grams toasted Wheat Germ (2%)

455 grams   Warm water (80 F or so) (58%)

17 grams   Salt (2%)

306     Liquid levain  (48%)   

Directions

1. LIQUID LEVAIN:  Make the final build 12 to 15 hours before the final mix, and let stand in a covered container at about 70°F

2. MIXING: Add all the ingredients to the mixing bowl, including the levain, but not the salt. Mix just until the ingredients are incorporated into a shaggy mass. Correct the hydration as necessary.  Cover the bowl and let stand for an autolyse phase of 30 to 60 minutes. At the end of the autolyse, sprinkle the salt over the surface of the dough, and finish mixing 5 minutes. The dough should have a medium consistency. 

3. BULK FERMENTATION WITH S&F:  3 hours. Stretch and fold the dough in the bowl twice 20-strokes at 45-minute intervals.  Place dough ball in lightly oiled bowl, and stretch and fold on lightly floured board at 45 minutes.  If the dough has not increased in size by 75% or so, let it go a bit longer.

4. RETARDED BULK FERMENTATION (optional):  After second S&F on board, form dough into ball and then place again in lightly oiled bowl.  Refrigerate 8-20 hours, depending on sourness desired and scheduling convenience.

5. DIVIDING AND SHAPING: [Note: if bulk retarded, let dough come to room temperature for 30-90 minutes before pre-shaping.]  Divide the dough into pieces and pre-shape.  Let sit on board for 30-45 minutes, and then shape into boules or batards or baguettes.

6. PROOFING: Approximately 1.5 to 2.5 hours at 72° F. Ready when poke test dictates.  Pre-heat oven to 500 with steam apparatus in place.

7. BAKING: Slash loaves.  Bake with steam, on stone.  Turn oven to 450 °F after it hits 500F after loading loaves.  Remove steaming apparatus after 12 minutes (10 for baguettes). Bake for 35 to 40 minutes total (for 750g loaves; less for smaller loaves).   Rotate loaves for evenness as necessary.  When done (205 F internal temp), leave loaves on stone with oven door ajar 10 minutes.

Glenn

GSnyde's picture
GSnyde

After all the heavy food, sweets and rich baked goods at holiday time, I decided to bake some nice healthy loaves of bread and make some soup with local North Coast seafood.  OK, the chowder has a good dose of cream in it, but I used a recipe without bacon, so it’s dietetic compared to my usual.

The bread is Hamelman’s Whole Wheat Multi-Grain, a 50% whole wheat sourdough with just a touch of instant yeast and some honey.  In the soaker, I used only rolled oats as that’s what I have on hand.  I added toasted pumpkin seeds and sunflower seeds.  The seeds plus oatmeal equaled the weight of the mixed grains in Hamelman’s formula.   I used the total amount of water the formula calls for.  The dough was dense but extensible, very easy to handle.  I made three loaves, semi-retarding one on our 50 degree porch while the first two baked.  All came out nicely.  The crust is dark but not crispy, and the crumb is moist and wonderfully wheaty with the nice feel, smell and taste of seeds.

The Salmon and Crab Chowder was adapted from a Food Network recipe (http://www.foodnetwork.com/recipes/bobby-flay/salmon-chowder-with-crab-whole-grain-croutons-and-pinot-glaze-recipe/index.html), but I added several pounds of salmon trimmings to the stock and added garlic to both the stock and the chowder; I also added a couple sliced leeks to the chowder.  I skipped the croutons and the drizzle.  It is quite a production with lots of steps, but the result was very well-received.  Rich, hardy chowder with lots of well-melded flavors.  It makes me grateful for the bounty of our local fishery.  Sorry, no photos of the lovely chowder. 

Now, my holiday story of The Hannukah Miracle of Christmas Dinner.

In case you don’t know the story symbolized by the Hannukah Menorah, it is told that when the Jews recaptured their temple from Greek occupation, there was only enough oil left to light the holy lamp for one night.  But miraculously, the oil lasted eight nights.  Thus Hannukah is celebrated as the eight night “Festival of Lights”.

Cat and I have a mixed marriage (we joke that we’re a born-again Druid and a lapsed agnostic, but we don’t remember which of us is which).  Cat’s family celebrates Traditional American Christmas with food, drink, a tree and presents, and drink.  My family celebrates Traditional American Hannukah with food and presents, and food.

For the last several years, I have spent “The Holidays” with Cat’s Family here on the North Coast.  Her brother is a good cook, and he cooks Christmas Eve dinner and I cook Christmas dinner, or vice versa.  This year, for Christmas dinner I made a Rib Roast rotiserried on charcoal, with many side dishes, including caramelized onions, sautéed mushrooms, and a potato gratin with shallots, Gruyere and cream.   Several days later, after roast beef sandwiches, barbecue beef sandwiches, and several omelets of leftover potatoes gratin and caramelized onions, we  realized that our Christmas dinner made EIGHT MEALS!!  It’s a multi-religious miracle!  It’s a miracle that we’re still standing.

I might also mention that my Hannukah stocking this year included two wonderful baking books—Ortiz’s The Village Baker and Hensperger’s Bread Bible.  I’m looking forward to new experiments.

Happy New Year to all TFLers.

Glenn

GSnyde's picture
GSnyde

It’s been a few weeks since I posted about my baking adventures—there hasn’t been much new and I’ve been busy getting my work life in order for vacation and then vacationing.

A couple weeks ago I started my experiments with the pizza dough recipe from Pizzetta 211 (http://www.thefreshloaf.com/node/26335/furtherance-my-pizza-education).   So far so good, but nowhere near as good as the restaurant’s.  The 30 minute machine kneading gives this dough a good balance of elasticity and extensibility.  I think what I need to work on is the shaping.  To get the piece to 11 inches without overhandling takes a gentle touch and patience.  This one is topped with homemade sausage, caramelized onions with balsamico and radicchio.

With a house full of holiday visitors the last week, I sorta put my semi-sensible diet on hold.  The leftover Christmas rib roast cried out to be sliced thin, barbecue-sauced and slapped on some Dutch Crunch rolls.  And I haven’t the heart to ignore a crying rib roast.  These were from Reinhart’s BBA formula for Vienna Bread (with thanks to Brother David for emailing me the formula since I left that book at home).

Then, another try at my favorite Bear Claws, using the Cream Cheese Short Dough and the Bear Claw filling recipe and procedures from Inside the Jewish Bakery.

Then the last couple days I’ve baked bagels, using the Krakowski formula from Stan, but ordinary bagel shaping.  Monday night, I made one-and-a-half the volume of dough in the formula and made 20 bagels on two sheet pans.   Them I boiled and baked 10 yesterday morning and 10 this morning.  I can now tell you that leaving the uncooked bagels in the fridge for 36 hours does no major harm.  Today’s batch was delicious.  The only difference is there are some bigger holes in the crumb, so the thing was not quite as chewy.

Before the year is out, I plan to find a Hamelman hearth bread formula I haven’t made before; need some crusty bread to accompany Salmon Chowder made from local fish.

Happy Holidays to all.

Glenn

Pages

Subscribe to RSS - GSnyde's blog