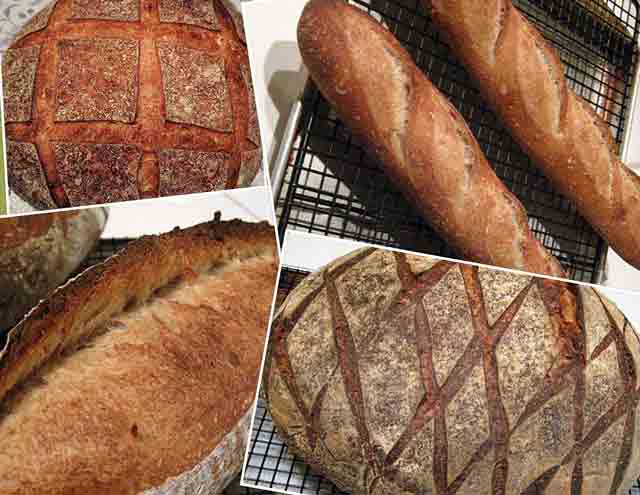
“Scoring” is the word used to describe the cuts made in a loaf of bread before it is baked. Some breads are not scored. For example many loaves baked in pans are not. However, almost all free-formed “hearth breads” are scored.
When is scoring done?
Scoring is generally performed just prior to loading the loaves in the oven. French rye breads (pains de siegle) are sometimes scored right after shaping, before proofing.
Why are breads scored?
Intentionally creating a weak spot on the surface of the loaf prevents the loaf from bursting at weak spots created during shaping.
The type of scoring performed controls the direction in which the bread will expand during “oven spring.”
The pattern of cuts made, the angle at which they are made and the depth of the cuts influences the rate of expansion and the formation of an “ear” - a raised flap of crust at the edge of a cut.
The pattern of cuts can create a pleasing visual pattern on the surface of the loaf. While there are some very traditional patterns, for example for baguettes, the baker can use the scoring pattern to identify the type of bread or to create an unique pattern that identifies the loaf as coming from his or her oven.
The effects of scoring on loaf shape are discussed in more detail below.
What do you use to score bread?
The blade used to score bread is often referred to as a lame (pronounced “lahm.”) This is simply a French word with means “blade.” Breads may be scored with straight or curved razor blades, either held in the hand or mounted on a handle. Scoring may be performed with other sharp, straight blades, even with a straight razor. Some bakers prefer serrated blades.
For some types of scoring, a straight blade is preferred. Straight bladed knives are preferred for cuts made with the blade held perpendicular to the loaf's surface. This sort of cut is generally used for round loaves (“boules”). For other types of scoring, a curved blade works better. Curved lames are generally used for long breads like baguettes which are scored with cuts parallel to the long axis of the loaf.
Video on Choosing a Blade: http://youtu.be/vF7eFluzHXc
How are the cuts made?
The scoring stroke should be firm, rapid, smooth and decisive. For the beginner, it may help to take “practice swings” or to visualize the movements and totally focus one's attention before making the cuts. Understanding the functions of scoring and the effects of the variables described can help, but there is no substitute for experience. In this respect, scoring bread is no different from an athletic skill or any other art or craft. (Tourist: “Please, sir, can you tell me how to get to Carnegie Hall?” New Yorker: “Practice, practice, practice.”)
The cuts should generally be 1/4 to 1/2 inch deep. A wet, sticky dough requires a more shallow cut than one would make in a dryer dough.
Scoring a boule (round loaf)
The angle the blade of the knife makes with the surface of the loaf is important in determining how the cut will open up. If you want the cuts to spread equally from the cut and to open quickly, as is traditional with round loaves (boules), the knife should be held vertically – at 90 degrees to the surface of the loaf.
Video on Scoring a Boule: http://youtu.be/gnL7mvR9wFg
Besides the “tic-tac-toe” pattern, boules can be scored with diamond patterns, simple crosses or much more elaborate and creative patterns.
Miche scored with a diamond pattern
Scoring a long loaf (bâtard)
If you want the cuts to spread more slowly and create an “ear,” as is generally desired with long loaves (baguettes and bâtards), the knife blade should be held at a shallow angle with the surface of the loaf, at about 20-30 degrees or so. Many find using a curved blade helps make this type of cut. The blade is held with the concave surface facing up (away from the loaf). A flap of dough is created that will lift up to create an “ear” as the loaf expands and, by lifting gradually, slows the expansion of the loaf. This prolongs the time during which new areas of dough are exposed to the direct heat of the oven and results in greater overall expansion – a larger “bloom.”
Video on Scoring a Bâtard: http://youtu.be/UC5HLCWAyMo
Bâtards
Baguettes
The effect of scoring on loaf shape
Michael Suas, in his book "Advanced Bread & Pastry," provides some information about how scoring patterns influence loaf shape. Scoring is not just to make a visually pretty design on the top of a loaf. It is also how the baker controls the direction in which the loaf expands. This impacts the shape of the loaf cross section (rounder or more oval), the height of the loaf and, for a boule, whether it stays round or ends up more oblong.
According to Suas, long loaves like bâtards and baguettes are traditionally scored parallel to their long axis. This may be a single long cut or multiple cuts that are almost parallel and overlap somewhat (for ¼ to 1/3 of their length, generally). This pattern promotes sideways expansion of the loaf, resulting in an oval cross section when the loaf is sliced.
Baguette showing overlapping cuts, almost parallel to the long axis of the loaf
For breads with high-rye content which have lower gluten and less oven spring, the traditional objective is to encourage a higher rise in the oven spring resulting in a rounder cross section. This is achieved by "sausage" or "chevron" cuts.
"Sausage cut" on the left. "Chevron cut" on the right.
Boules are scored in a variety of patterns with differing effects on how the loaf expands. The common "tic-tac-toe" pattern and a simple cross will direct the expansion upward. More complex patterns like diamonds result in a relatively flatter loaf.
One of most interesting effects is that scoring a boule with multiple parallel cuts encourages expansion at a right angle to the cuts. This results in an oblong loaf shape.
Two boules scored differently. Note the effects of the scoring pattern on the final shape of the baked loaves.
What's the point of an ear? Controlled bloom!
This topic is not about the auricular anatomy of elves (or Vulcans). It's about scoring breads.
Scoring loaves creates a visually pleasing pattern, and it helps control the expansion of the loaf as it bakes.
What Suas called "the classic cut" is parallel to the long axis of a baguette or a bâtard. The cut is made with the blade at a shallow angle to the surface of the loaf. The cut should be shallow - about 1/4 inch deep. Paradoxically, this shallow cut results in the flap lifting better than a deeper cut would, thus forming a nice "ear." Hamelman (pg. 80) points out that "a deep cut will simply collapse from its own weight."
The angle of the blade is important. "If the angle is not achieved and the cut is done with the blade vertical to the loaf, the two sides of the dough will spread very quickly during oven spring and expose an enormous surface area to the heat. The crust will begin to form too soon - sometimes before the end of oven spring - penalizing the development of the bread. If the cut is properly horizontal, the sides of the loaf will spread slower. The layer of dough created by the incision will partially and temporarily protect the surface from the heat and encourage a better oven spring and development." (Suas, pg. 116.)
These photos illustrate nice "ears," but they also show that the bloom occurred slowly, as it should. Notice that the color of the crust in the opening has 3 distinct degrees of browning, decreasing from right to left. The darker part on the right obviously opened first and was exposed to the direct heat of the oven for longer. If the bloom occurred too rapidly, it would have a more even coloration.
In summary, in order to achieve an optimal bloom in baguettes and bâtards, one must attend to 3 variables when scoring them:
The cuts should be almost parallel to the long axis of the loaf.
The blade should be held at about a 30 degree angle to the surface of the loaf.
The depth of the cut should be shallow - about 1/4 inch.
Variable shading of the bloomed crust confirms that the desired slow but prolonged opening of the cut during oven spring occurred.
A final word
This tutorial focused on the mechanics of scoring, but the other steps in bread making impact the behavior of the cuts you make and the final appearance of your loaves. In fact, every single step, from your choice of ingredients and their proportions – your formula – to how you steam your oven plays a role in how your cuts will open. Your best looking loaves will result from a series of choices that are mutually dependent, where how you score a loaf takes into account the other choices you have made about the formula, mixing, fermentation, shaping, proofing and baking.
I've been working on the requested update of the Scoring Tutorial. I was expressely asked to use "real" bread, instead of the dishtowels I used to demonstrate the use of a transfer peel. I made a batch of my San Frandisco-style Sourdough for this purpose. So, after finishing the third video for the new tutorial (one more to go), I had to dispose of my instructional materials.
No expressions of sympathy are called for I assure you.
A nice crab salad and Anderson Valley Chardonney complemented the bread quite nicely.
A question arose recently about the use of a couche for proofing bread. Here is a demonstration of how to use a linen couche.
Step 1: Mis en place
Equipment needed: Proofing board and a length of baker's line.
In the bakery, loaves that are not proofed in baskets are proofed on wooden boards covered with baker's linen. After the loaves are placed on the linen between folds, they are covered with heavy plastic sheeting. The boards are then shelved in rolling racks which are usually themselves covered with plastic.
Baker's linen is an ideal material on which to proof loaves. It is relatively inexpensive. It is flexible. It is inherently non-stick. Even when proofing loaves made with high-hydration, somewhat sticky dough, flouring of the linen is generally not needed. The linen absorbs some moisture from the surface of the loaves which makes them easier to score cleanly.
Baker's linen can be purchased from King Arthur Flour or from TMB Baking (affiliated with the San Francisco Baking Institute). The latter's prices are lower. (I have no financial association with either.)
At home, we are usually only proofing 2 to 4 loaves at once, so a simpler procedure can be followed.
Step 2: Preparing the couche.
Cover the board with the linen. Fold back one end, and roll it up to form a supporting structure for the first loaf place on one end of the couche.
Step 3: Placing the loaves on the couche.
The loaves are placed on the couche. Note the roll of linen supporting the right hand side of the loaf on the right and the fold of linen between the two loaves.
Step 4: The left hand end of the couche is brought up and over to cover the proofing loaves.
Any excess linen can be folded back over to cover the loaves with another layer of linen.
Step 5: The covered loaves are left to proof until ready to bake.
I generally prefer proofing loaves seam side up. The exception is loaves topped with seeds. When transferring loaves proofed seam up with a transfer peel, the loaves must be flipped over on the couche before being transferred to the transfer peel, then to a peel for loading onto a baking stone.
Step 6: Uncover loaves. (Seen with transfer peel)
Step 7: Pull linen from left end to flatten out the folds
Step 8: If loaves were proofed seam side up, flip them over so the seam is down.
Step 9: Transfer loaves to a peel.
Step 8: Score the loaves.
Scored loaves, ready to load.
Loaded onto the baking stone.
Twelve minutes into the bake. Good oven spring. The cuts have opened nicely with good ears. The loaves have just started to color. Time to vent the steam.
After another 13 minutes baking and 7 minutes resting in the turned off oven with the door ajar ...
I can't help it. I'm so proud of my son's first bread. A month ago, I visited them for Thanksgiving and left him with some of my sourdough starter. I baked once while there, with Joel watching. Yesterday, he made his first on his own San Joaquin Sourdough.
I aske Joel how it tasted. He said, "Kind of like yours. Great."
Not too shabby, eh?
It's not quite like having another grandchild, but sort of like.
A neighbor and I have a 15 year old tradition of exchanging baked goods at this time of year. His wife always bakes a delicious rum and nutmeg-flavored cake, and I give them a loaf of bread. This year, my gift was a 1.5 kg loaf of Hamelman's pain au levain.
They say "fences make good neighbors," but I think exchange of fresh-baked goodies does too.
The latest Baker's Catalogue from King Arthur Flour has a recipe for “Swedish Tea Ring.” I usually just scan these recipes and go on looking for new toys, but this one caught my eye. The sub-caption described it as a “decadent cinnamon roll in the shape of a ring,” but the formula seemed the least “decadent” of any pastry I could recall – 3 1/2 cups of flour, 1/4 cup sugar, 1 egg, no shortening! Of course the filling had butter, but still … I thought maybe this was an editing error. I did a quick internet search for other Swedish Tea Ring recipes. They all had butter or oil or lard. I checked the KAF web site and found the recipe there to be just like in the Baker's Catalogue. The dough is a very simple enriched yeast dough, without any of the commonly added flavorings (citrus extract, vanilla, cardamom, etc.). That was another point in its favor, since my wife doesn't like cardamom much at all.
Well, the boys and girls at KAF generally know what they are doing, at least in the bakery. So, I figured I had to know if this was any good. If it was, I would have a (relatively) low-calorie sweet dough in my repertoire and less reluctance to bake breakfast sweet rolls, which both my wife and I do enjoy having.
The recipe for “Swedish Tea Ring” can be found here with versions for volume, English and metric ingredient measurements: Swedish Tea Ring
There were some luke warm reviews of the recipe on the KAF site, noting that the amount of filling was not sufficient and that the pastry was dry. Other reviews were more positive. I experienced a spousal veto of doubling the filling, but decided to watch the pastry carefully while it was baking and shorten the bake time, if the ring looked like it was done sooner than the recipe specified. In short, I followed the KAF recipe, except I omitted the optional glazing and ended up baking for just 22 rather than 25 minutes.
We tasted the tea ring for desert after dinner, and it is very good. The dough is sweet but not too sweet and is tender. We did not find it dry, but note that I did reduce the baking time. The filling did seem sparse when I spread it. I will increase it by 50% when I make this again. But the overall flavor balance of dough and filling was very nice. Susan had seconds.
As an added bonus, this dough is the closest I have found yet to the taste and texture of the cheese pockets from Karsh's Bakery I grew up loving and have always wanted to be able to duplicate.
I'm looking forward to making this tea ring again and to using the dough recipe for other pastries. I recommend it … even if you are already skinny.
I had thought that, when I retired, I would tackle more complex breads and pastries. So far, my inclinations have been otherwise. I have been working on simpler recipes that can produce good breads with lesser time demands. Go figure.
This bread is an example. A baguette sur poolish is a classic bread. It can be produced in 5-6 hours (not counting the overnight fermentation of the poolish) and is at its peak of quality as soon as it has cooled. Yesterday I baked a sourdough adaptation of this classic bread, starting in the late morning to have fresh-baked baguettes with our dinner.
Liquid levain
Baker's %
Wt. (g)
Flour mix
100
100
Water
100
100
Firm starter (50% hydration)
40
40
Total
240
240
Notes:
The “Flour mix” is 70% AP, 20% WW and 10% whole rye flour.
I used my stock starter to feed the levain. It is kept at 50% hydration. Adjusting for this, the actual levain hydration is 89%.
Mix the levain ingredients and ferment for 8-12 hours. (My levain quadrupled in 6 hours and was refrigerated overnight.)
Final Dough
Wt (g)
AP flour
294
Water (80-90º F, if cold levain)
164
Salt
9
Liquid levain
240
Total
707
Note: The final dough hydration is 66%, accounting for the water and flour in the levain.
Procedures
Dissolve the liquid levain in the water.
Add the flour, and mix to a shaggy mass.
Autolyse for 20-60 minutes.
Add the salt, and mix thoroughly. Transfer to a clean, lightly oiled bowl and cover tightly.
Bulk ferment at 75º F for 3 hours with stretch and folds at 30, 60, 90 and 135 minutes.
Divide into 3 equal pieces and pre-shape as logs.
Rest for 15-30 minutes, covered.
Shape as baguettes and proof on a couche for 75-90 minutes.
Transfer baguettes to a peel and score.
Bake at 450º F with steam for 22-25 minutes. (I baked for 12 minutes with steam at 450º F then for 10 minutes at 425º F convection bake.)
Cool for at least 30 minutes before serving.
The crust was thin and crisp – as close to a classic baguette crust as I have produced with sourdough. The crumb was moderately open and chewy. The flavor was moderately sour – more sour than I expected. It was very nice with our dinner of soup (krupnick) and salad (lettuce with pecans, dried cranberries and Point Reyes blue cheese with a mustard vinaigrette).
We are visiting our son in Las Vegas for Thanksgiving, and I'm introducing him to sourdough baking. This has entailed three challenges. The first is the demands of baking with a houseful of family. This is wonderful, but the scheduling complexity is greater by several orders of magnitude. The second is that Joel does not have a mixer. This is a very minor issue, but it does require adapting some recipes I am accustomed to making with machine mixing. The third challenge is baking in a gas oven. This is a new experience for me and, from my reading of TFL topics over the years, a challenge to many.
Yesterday, Joel and I made a large loaf of my San Francisco-style Sourdough. I followed my usual formula (see My San Francisco Sourdough Quest, Take 4) with the following changes:
1. Mix the flours and water in a bowl with a spatula and autolyse for 30 minutes.
2. Add the salt and levain and mix well using stretch and fold in the bowl.
3. Stretch and fold in the bowl x 2 at 30 minute intervals.
4. Stretch and fold on the bench x 2 at 30 minute intervals.
5. Ferment without molestation for another hour.
6. Pre-shape and shape one 1 kg batard.
7. Proof for 2 hours en couche.
8. Bake at 450 dF for 35 minutes steaming for the first 15 minutes using Sylvia's method (towels in loaf pans, saturated with boiling water.)
Here are some results (I couldn't get a photo before Joel had cut the loaf after cooling.):
Even using two towels in loaf pans, the crust was rather dull, suggesting sub-optimal oven steaming. However, oven spring was satisfactory. The crumb structure was more open than usual and a bit less chewy. I judge it better than acceptable. Note that I did not retard the loaves, so the flavor was minimally sour but very nice - more like a good French pain au levain than a San Francisco Sourdough.
The results were good enough to warrent baking more hand-mixed SFSD's after I get home to my own oven.
I hope everyone had as nice a Thanksgiving as I did.
As those of you who have made San Joaquin Sourdough know, my procedure calls for a 21 hour cold retardation during bulk fermentation. The length of the cold retardation was taken from Anis Bouabsa via Jane Benoit (janedo on TFL). While I have often increased or decreased the 21 hours by 3 hours or so, I have been wary of a much longer time, because I feared proteolysis would result in unacceptable gluten degradation.
This week, I did (finally) retard my dough for about 36 hours, partly for scheduling convenience but also out of curiosity. To my surprise, the resulting bread was hardly different than those I had retarded for 15 hours less. There was no discernable difference in flavor, although I had expected a more pronounced sourdough tang. The crumb structure was actually better, in my opinion. The crust coloration was unchanged.
So, here are some photos of the breads made with a 36 hour cold retardation:
I would be interested in hearing about other bakers' experience with prolonged cold retardation of sourdough dough.
Our accompaniment to this bread was Chicken Paprikash.