The Fresh Loaf

A Community of Amateur Bakers and Artisan Bread Enthusiasts.

Benito's blog

Benito's picture
Benito

It was really strange that I had stopped adding nuts or seeds to my bread for quite a long time.  Now that I have started to add inclusions again, it reminds me how much I love them.  Running low on bread, this is what I decided to do for this all wholewheat loaf.  The lobes didn’t come out that evenly when baked, this does happen sometimes when they are shaped a bit too fat, it doesn’t affect the flavor but does make the mountains of Hokkaido look a bit wonky LOL.

I’ve been extremely pleased that increasing the percentage of tangzhong used can offset the need for VWG.  I no longer add VWG to these bakes and yet they bake up nice and tall.  Reducing the flour to milk ratio of the tangzhong from 1:5 to 1:2 has allowed this increased percentage.  At the higher ratio there wouldn’t have been any liquid left for the dough to mix if the percentage flour was 20%.  This change has also made the crumb softer and fluffier.  Gelatinizing the starch in the tangzhong really has some nice effects.

For one 9x4x4” Pullman pan loaf.


Instructions

Levain

Mix the levain ingredients in a jar or pyrex container with space for at least 300% growth. 

Press down with your knuckles or silicone spatula to create a uniform surface and to push out air.

At a temperature of 76-78ºF, it typically takes up to 10-12 hours for this sweet stiff levain to be at peak.  For my starter I typically see 3-3.5 times increase in size at peak.  The levain will smell sweet with only a mild tang.


Tangzhong 

In a sauce pan set on medium heat, stir the milk and whole wheat flour until blended. Then cook for several minutes until well thickened, stirring regularly with a spoon or heat-resistant spatula. Let cool in the pan or, for faster results, in a new bowl.  Theoretically it should reach 65ºC (149ºF) but I don’t find I need to measure the temperature as the tangzhong gelatinizes at this temperature.  You can prepare this the night before and refrigerate it, ensure that it is covered to prevent it from drying out.


If you plan on using a stand mixer to mix this dough, set up a Bain Marie and use your stand mixer’s bowl to prepare the tangzhong.


Dough

In the bowl of a stand mixer, add the milk (consider holding back 10 g of milk and adding later if this is the first time you’re making this), egg, tangzhong, salt, sugar and levain.  Mix and then break up the levain into many smaller pieces.  Next add the flours.  I like to use my spatula to mix until there aren’t many dry areas.  Allow the flour to hydrate (fermentolyse) for 20-30 minutes.  Mix on low speed and then medium speed until moderate gluten development this may take 5-10 mins.  You may want to scrape the sides of the bowl during the first 5 minutes of mixing.  Next add room temperature butter one pat at a time.  The dough may come apart, be patient, continue to mix until it comes together before adding in more butter.  Again, knead until well incorporated.  You will want to check gluten development by windowpane during this time and stop mixing when you get a good windowpane.  You should be able to pull a good windowpane, not quite as good as a white flour because the bran will interrupt the windowpane somewhat.   Add the walnuts and seeds, then mix until well distributed.


On the counter, shape the dough into a tight ball, cover in the bowl and ferment for 2 - 4 hours at 82ºF.  There should be some rise visible at this stage.


You can next place the dough into the fridge to chill the dough for about 1.5 hours, this makes rolling the dough easier to shape.  Remember, if you do so the final proof will take longer.  Alternatively, you can do a cold retard in the fridge overnight, however, you may find that this increases the tang in your bread.


Prepare your pans by greasing them with butter or line with parchment paper.  


Lightly oil the top of the dough. Scrape the dough out onto a clean counter top and divide it into four. I like to weigh them to have equal sized lobes. Shape each tightly into a boule, allow to rest 5 mins. Using an oiled rolling pin roll each ball out and then letterfold. Turn 90* and using a rolling pin roll each out to at least 8”. Letterfold again from the sides so you have a long narrow dough. Then using a rolling pin, roll flatter but keeping the dough relatively narrow.  The reason to do this extra letterfold is that the shorter fatter rolls when placed in the pan will not touch the sides of the pan.  This allows the swirled ends to rise during final proof, this is only done for appearance sake and is not necessary.  Next roll each into a tight roll with some tension. Arrange the rolls of dough inside your lined pan alternating the direction of the swirls. This should allow a greater rise during proof and in the oven.


Cover and let proof for  4-6 hours at a warm temperature.  I proof at 82°F.  You will need longer than 4-6 hours if you chilled your dough for shaping. I proof until the top of the dough comes to within 1 cm of the top edge of the pan.


Preheat the oven to 350F and brush the dough with the egg-milk wash.  Just prior to baking brush with the egg-milk wash again.


Bake the loaves for 50 minutes or until the internal temperature is at least 190ºF, rotating as needed to get even browning. Shield your loaf if it gets brown early in the baking process. After 50 mins remove the bread from the pan and bake a further 10 mins by placing the loaf directly in the oven on the rack with the oven turned down to 325ºF.

My index of bakes.

Benito's picture
Benito

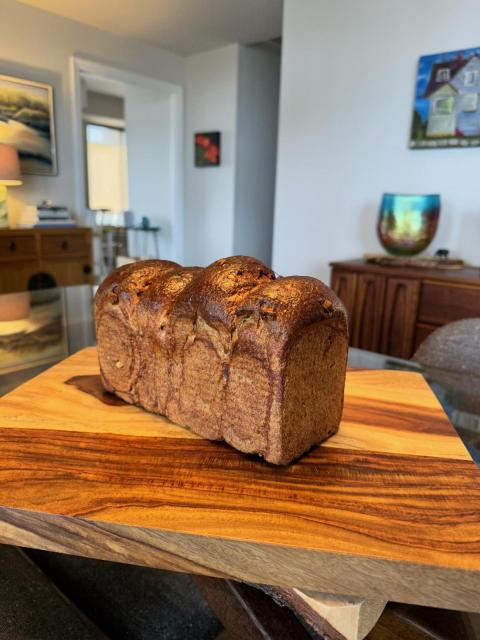
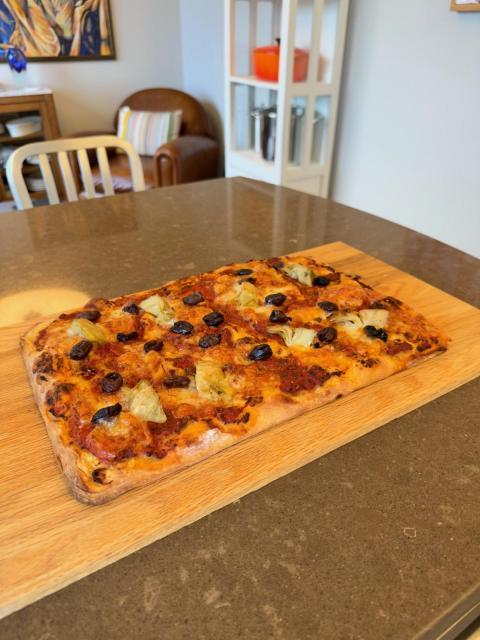
My partner requested another Roman Pizza so how could I say no?  I wanted to use up a bit more of the whole Kamut that I have left so changed the spelt to Kamut.  Also having made this once I wanted to improve it, the last time the crust didn’t brown as well as I would have expected for the baking time.  So I added a tiny amount of sugar and some diastatic malt.  This worked well to improve the browning of the crust so I am happy with that.

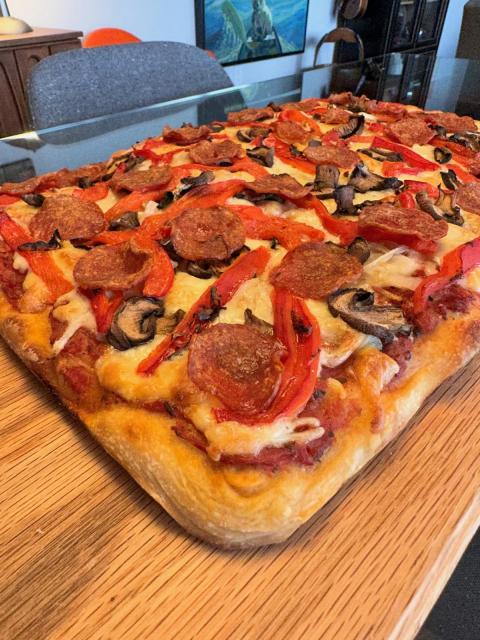
To avoid all the grease from pepperoni, I encased them in paper towels and microwaved them in 15 sec intervals soaking up the grease until they were partly cooked.  During the pre-heat of the oven, I placed the sliced mushrooms in one layer in the oven to cook them to draw the water out of them.  Unfortunately I was called away from the kitchen so they got much more baked than just pre-baked, but they certainly didn’t soak my pizza.

In changing the formula from spelt to kamut, I didn’t extend the fermentation quite enough to compensate for the fact that kamut has better quality and quantity of gluten forming proteins in it than spelt so the crumb is more closed than I wanted.  I’ll need to remember to extend the fermentation, aiming for perhaps 120% when using a stronger grain in the future.  
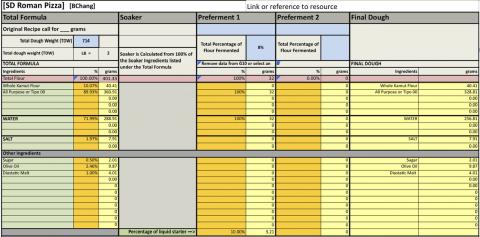
For 11” x 17” pan


12 hour overnight levain build at 75°F 


In the morning when levain is at peak about 3x rise.  Into the bowl of your mixer, add warm water, salt, sugar, diastatic malt and levain.  Mix briefly with a spatula to dissolve the dry ingredients.  Then add all the flours.  Mix with your stand mixer until there is no dry flour visible.  Rest 5 minutes.  Then increase to medium speed and mix until moderate gluten development.  With the mixer running, drizzle in the olive oil.  continue to mix until good gluten development and all the olive oil is well absorbed.


Transfer the dough to the countertop. Do a letterfold of the dough.  If using an aliquot jar to follow rise extract the dough now.  Transfer your dough back into your proofing container in your proofing box at 78°F.  


During bulk fermentation perform three sets of coil folds at 30 mins intervals then allow the dough to rest until the dough has achieved 50% rise.  Then cold retard, this is for convenience so that the pizza can be delayed and ready for dinner today or the next day.  This is optional depending on how quickly or slowly the dough ferments.  


Approximately 2.5 hours before baking time take the dough out of the fridge for final proofing, this continues in the bowl until right before baking when it will go into the pan and have a short proof shaped.  Aim for about 80-85% rise to shape and then 100-105% rise for baking.  Make sure you start the pre-heating of the oven 500°F about 1 hour prior to the dough reaching 100-105% rise.  Bake your pizza on a pizza steel or stone placed on the lowest oven rack.


Another option which I think I prefer and I did is to allow the dough to ferment until it rises 80-85%, then shape and place it into the well oiled pan.  Allow it to reach 100-105% rise (I would aim for 120% rise at time of baking the next time I baked this again with kamut), then place it in the fridge and start pre-heating the oven.  This way it is easy to stretch the dough since the gluten hasn’t tightened from the cold retard.  During the pre-heat the dough will chill and should have even better oven spring as the cold gases rapidly expand in the oven.


Prepare your toppings well before shaping.  

For pepperoni microwave for 30 secs between sheets of paper towels to reduce the oil when baking.  If using mushrooms slice and bake or cook to dry out.  Could bake while the oven is pre-heating!  Could also dry out roasted red peppers this way or just dry with paper towels.


Crushed Tomato Sauce

Makes enough for 1 Roman pizza

1 can San marzano tomatoes - squeeze tomato water out of the tomatoes then using a hand mash up the tomato meat.  Keep the canned juice and tomato water mix to drink.

¼ tsp freshly ground black pepper

1 tsp dried basil or 2 tbsp minced fresh basil

1 tsp dried oregano or 1 tbsp minced fresh oregano

1 teaspoon granulated garlic powder

2 tbsp red wine vinegar or freshly squeeze lemon juice or a combination

1 tsp salt to taste

Stir together, can store up to 1 wk.


When the dough reaches 80-85% rise shape the dough.  Using a brush, oil your pan well with olive oil.

Flour the top of the dough in the bowl,  release it from the sides of the bowl, then flip it onto a well floured countertop.  Then flour the exposed top of the dough well. Stretch out the dough into a rectangle.  Using your fingers gently press into the dough gradually stretching it out.  Then gently flip the dough over and repeat the gentle pressing of the fingers aiming for about 75% of the pan size.  Once done, I folded the dough in half and transferred the dough to the pan unfolding it and stretching it out to the edge of the pan.  The dough was then allowed to complete final proofing for 10 mins.  


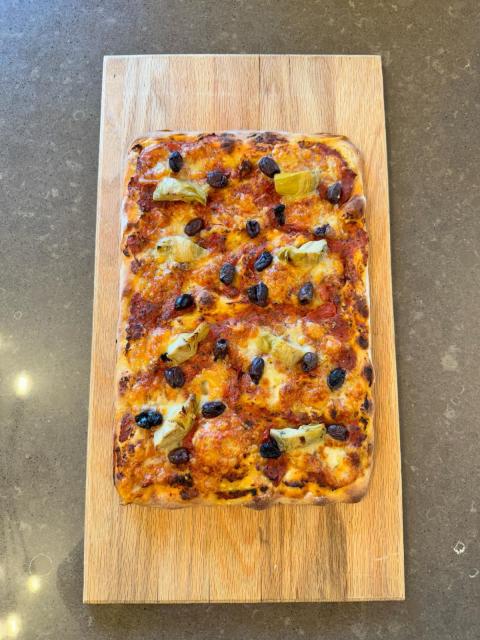
Drizzle olive oil on the dough.  Then using a large spoon, spread a thin layer of pizza sauce over the dough from edge to edge.  Slide the baking pan into the oven on top of the baking surface. Decrease the oven temperature to 425°F (220°C) and bake for 10 minutes. Transfer the pan to a wire rack and sprinkle on the grated cheese and any other toppings. Lightly drizzle some olive oil over the entire pizza. Slide the sheet pan back into the oven on the baking surface and bake for 15 to 20 minutes more. The cheese should be melted and the bottom crust well colored.  You can move the pizza up to a higher rack for the final 5 minutes if the toppings aren’t browning enough to your liking.

My index of bakes

Benito's picture
Benito

I needed more bread, so what’s new?  Wanting some whole grain bread though I decided to use some spelt with the whole wheat for some variety.  I also wanted some seeds in this bread because I love seeds so decided to add pepitas and sunflower seeds at 10% each.

As is my custom, I use the weaker flour in the tangzhong since preparing the tangzhong denatures the protein so the gluten that that portion of the grain doesn’t contribute to the gluten of the dough.  However, the gelatinization of the starches that occurs does help with dough strength.  If I use a lot of a weaker grain, more than the 20% needed for the tangzhong, then I will use that in the levain.

For one 9x4x4” Pullman pan loaf.


Instructions

Levain

Mix the levain ingredients in a jar or pyrex container with space for at least 300% growth. 

Press down with your knuckles or silicone spatula to create a uniform surface and to push out air.

At a temperature of 76-78ºF, it typically takes up to 10-12 hours for this sweet stiff levain to be at peak.  For my starter I typically see 3-3.5 times increase in size at peak.  The levain will smell sweet with only a mild tang.


Tangzhong 

In a sauce pan set on medium heat, stir the milk and whole wheat flour until blended. Then cook for several minutes until well thickened, stirring regularly with a spoon or heat-resistant spatula. Let cool in the pan or, for faster results, in a new bowl.  Theoretically it should reach 65ºC (149ºF) but I don’t find I need to measure the temperature as the tangzhong gelatinizes at this temperature.  You can prepare this the night before and refrigerate it, ensure that it is covered to prevent it from drying out.


If you plan on using a stand mixer to mix this dough, set up a Bain Marie and use your stand mixer’s bowl to prepare the tangzhong.


Dough

In the bowl of a stand mixer, add the milk (consider holding back 10 g of milk and adding later if this is the first time you’re making this), egg, tangzhong, salt, sugar and levain.  Mix and then break up the levain into many smaller pieces.  Next add the flours.  I like to use my spatula to mix until there aren’t many dry areas.  Allow the flour to hydrate (fermentolyse) for 20-30 minutes.  Mix on low speed and then medium speed until moderate gluten development this may take 5-10 mins.  You may want to scrape the sides of the bowl during the first 5 minutes of mixing.  Next add room temperature butter one pat at a time.  The dough may come apart, be patient, continue to mix until it comes together before adding in more butter.  Again, knead until well incorporated.  You will want to check gluten development by windowpane during this time and stop mixing when you get a good windowpane.  You should be able to pull a good windowpane, not quite as good as a white flour because the bran will interrupt the windowpane somewhat.   Add the seeds and mix until well distributed.


On the counter, shape the dough into a tight ball, cover in the bowl and ferment for 2 - 4 hours at 82ºF.  There should be some rise visible at this stage.


You can next place the dough into the fridge to chill the dough for about 1.5 hours, this makes rolling the dough easier to shape.  Remember, if you do so the final proof will take longer.  Alternatively, you can do a cold retard in the fridge overnight, however, you may find that this increases the tang in your bread.


Prepare your pans by greasing them with butter or line with parchment paper.  


Lightly oil the top of the dough. Scrape the dough out onto a clean counter top and divide it into four. I like to weigh them to have equal sized lobes. Shape each tightly into a boule, allow to rest 5 mins. Using an oiled rolling pin roll each ball out and then letterfold. Turn 90* and using a rolling pin roll each out to at least 8”. Letterfold again from the sides so you have a long narrow dough. Then using a rolling pin, roll flatter but keeping the dough relatively narrow.  The reason to do this extra letterfold is that the shorter fatter rolls when placed in the pan will not touch the sides of the pan.  This allows the swirled ends to rise during final proof, this is only done for appearance sake and is not necessary.  Next roll each into a tight roll with some tension. Arrange the rolls of dough inside your lined pan alternating the direction of the swirls. This should allow a greater rise during proof and in the oven.


Cover and let proof for  4-6 hours at a warm temperature.  I proof at 82°F.  You will need longer than 4-6 hours if you chilled your dough for shaping. I proof until the top of the dough comes to within 1 cm of the top edge of the pan.


Preheat the oven to 350F and brush the dough with the egg-milk wash.  Just prior to baking brush with the egg-milk wash again.


Bake the loaves for 50 minutes or until the internal temperature is at least 190ºF, rotating as needed to get even browning. Shield your loaf if it gets brown early in the baking process. After 50 mins remove the bread from the pan and bake a further 10 mins by placing the loaf directly in the oven on the rack with the oven turned down to 325ºF.

My index of bakes.

Benito's picture
Benito

This first time I tried making one of these I used Full Proof Baking’s Kristen’s formula. It was great, but I had some technical issues related with shaping and transferring the dough from the countertop into the pan.  This time I thought I’d try a different one, Maurizio’s The Perfect Loaf formula.  Some of the minor changes I made are in brackets.

This recipe is for 11”x17” that I have decreased to 80% of the original weights. 

VITALS

Total dough weight

720g

Pre-fermented flour

7.5%

Levain

17.0%

Hydration

72.0%

Yield

One 11 × 17-inch rectangular pizza (baked in a half-sheet pan)

TOTAL FORMULA

INGREDIENT

BAKER’S %

WEIGHT

Type 00 flour or white flour (~11.5% protein)

90.0%

366g

Whole spelt or whole wheat flour

10.0%

41g

Extra-virgin olive oil

2.3%

9.6g

Water

72.0%

293g

Fine sea salt

1.9%

8g

Ripe sourdough starter, 100% hydration

0.8%

3.2g

ADDITIONAL INGREDIENTS


Tomato sauce, low-moisture mozzarella (cut into ½-inch cubes), and toppings of your choice 


Levain

INGREDIENT

BAKER’S %

WEIGHT

Type 00 flour or white flour (~11.5% protein)

100.0%

30

Water

100.0%

30g

Ripe sourdough starter, 100% hydration

10.0%

3.2g

Using Ripe Sourdough Starter Instead of a Levain

If your sourdough starter is refreshed regularly and at 100% hydration, you can swap out the levain in this recipe for your starter. Give it a refreshment 12 hours before (i.e., the night before) you plan to mix this dough and omit the levain. If your starter is not made of a large portion of white flour, note that the final pizza will be a bit more sour than it would otherwise be.

  • Duration: 12 hours (overnight) at warm room temperature: 74°–76°F (23°–24°C)
    • MIX THE LEVAIN: Warm or cool the water to about 78°F (25°C). In a medium jar, mix the levain ingredients until well incorporated (this liquid levain will feel quite loose) and loosely cover. Store in a warm place for 12 hours.
  1. Mix

2 INGREDIENT

3 WEIGHT

4 Type 00 flour or white flour (~11.5% protein)

336g

6 Whole spelt or whole wheat flour

41g

8 Extra-virgin olive oil

9.6g

10 Water

262g

12 Fine sea salt

8g

14 Levain

64g

    • Desired dough temperature (DDT): 78°F (25°C)
    • CHECK THE LEVAIN: It should show signs of readiness: well aerated, soft, bubbly on top and at the sides, and with a sour aroma. If the levain is not showing these signs, let it ferment 1 hour more and check again.
    • MIX THE DOUGH: Warm or cool the water so the temperature of the mixed dough meets the DDT of this recipe. In the bowl of a stand mixer ◦ fitted with the dough hook, add the flours, water, salt, and ripe levain. (I added water, salt, mixed to dissolve then levain, mixed to dissolve, then added the flours).  Mix on low speed until just incorporated. Increase the speed to medium and mix until the dough begins to strengthen and cling to the dough hook, 3 to 4 minutes. Let the dough rest in the bowl for 5 minutes.
    • ADD THE OLIVE OIL: Mix on low speed until all the olive oil is incorporated, 1 to 2 minutes. Increase the mixer speed to medium and mix until the dough begins to smooth out and cling to the dough hook, 2 to 3 minutes. Transfer to a bulk fermentation container.
    • MEASURE THE TEMPERATURE OF THE DOUGH: Compare it to the DDT and record it as the final dough temperature. Cover the dough.
  1. Bulk fermentation
  • Duration: About 3 hours 30 minutes at warm room temperature: 74°–76°F (23°–24°C)
  • Folds: 3 sets of stretches and folds at 30-minute intervals
  • SET TIMER AND MAKE A NOTE: Write down the current time as the start of bulk fermentation, set a timer for 30 minutes, and let the dough rest in a warm place.
  • STRETCH AND FOLD: When your timer goes off, give the dough one set of stretches and folds. Using wet hands, grab one side of the dough and lift it up and over to the other side.
  • Rotate the bowl 180 degrees and repeat. Then rotate the bowl a quarter turn and stretch and fold that side. Rotate the bowl 180 degrees again and finish with a stretch and fold on the last side. The dough should be folded up neatly. Cover and repeat these folds every 30 minutes for a total of 3 sets of stretches and folds.
  • LET THE DOUGH REST: After the last set, cover the bowl and let the dough rest for the remainder of bulk fermentation, about 2 hours.
  • Proof
    • Same-day bake: Proof the dough in a warm place for 3 hours.
    • Next-day bake: Proof the dough in the refrigerator overnight. The next day, take the dough out and leave out on the counter for 2 hours to bring it back to room temperature before baking.
    • At this point, there's nothing to do: continue to let the dough proof in the bulk fermentation container for 2-3 hours at room temperature.
    • About an or two hour into proof, begin preheating your oven with a rack in the middle to 500°F (260°C) and with a baking surface—I like to use my Baking Steel—inside on the rack.
    • Duration: 3 hours at warm room temperature: 74°–76°F (23°–24°C), or overnight in a home refrigerator: 39°F (4°C)
    • LET THE DOUGH PROOF: You have two proofing options:
  • Bake
    • Duration: 30 minutes in the oven
    • PREPARE THE OVEN: Place a rack in the bottom third of the oven with a baking stone/steel on top. Preheat the oven to 500°F (260°C) for 1 hour.
    • PREPARE THE TOPPINGS: While your oven is preheating and your dough is chilling in the fridge, gather and prepare your pizza sauce, cheese, and other toppings.
    • SHAPE THE DOUGH: Have a 11 × 17-inch sheet pan at hand (brush the pan with oil). Gently scrape the dough onto a floured work surface. Flour the top of the dough and your hands, and using your fingertips, gently press the dough out to a rectangle. (After pressing the dough out on one side, flip the dough over and repeat stretching the dough further, again aiming for about 75% of the pan’s size). Once pressed out to about 75 percent of the pan’s length, transfer the dough to the pan. Gently stretch the dough as needed so it runs edge to edge. (Stretching the dough to 75 percent first makes it easier to transfer to the pan and then finish stretching.) (Once fully stretched allow the dough to rest in the pan for 10-15 mins)(To transfer to the pan, I simply folded the dough in half so it was much easier to lift onto the pan and unfold.  The dough should not stick to itself if you have fairly generously floured it on both sides).


    BAKE THE PIZZA: Using a large spoon, spread a thin layer of pizza sauce over the dough from edge to edge. (I drizzled olive oil on first then applied the tomato sauce.)  Slide the baking pan into the oven on top of the baking surface. Decrease the oven temperature to 425°F (220°C) and bake for 10 minutes. Transfer the pan to a wire rack and sprinkle on the grated cheese and any other toppings. Lightly drizzle some olive oil over the entire pizza. Slide the sheet pan back into the oven on the baking surface and bake for 15 to 20 minutes more. The cheese should be melted and the bottom crust well colored.

    Baking with Sauce Only
    Baking the pizza first with only the sauce does two things: It gives the dough a chance to get a head start in baking, since the dough usually takes longer to bake than most of the toppings. Second, having only the tomato sauce on top means there isn’t too much weight on the dough so that it can’t rise. The full complement of toppings would prevent rising, but not so little weight that it rises too high.


    FINISH AND COOL: Transfer the pan to a wire rack and let the pizza cool for 5 minutes before slicing.


    I topped the pizza with artichoke hearts and Kalamata olives that I squeezed and dried prior to using them.  I also had fresh mozarella cheese from Eataly that I tore and squeezed a bit to get rid of excess whey in it.  I meant to have fresh basil to use but forgot to pick that up at the grocery store.


    To make the sauce, I used a can of San Marzano tomatoes.  I only used the actual tomatoes from the can and squeezed the tomato water out of them and then mash the remaining tomato meat with my hand.  I added homemade red wine vinegar, salt, pepper, dried basil, dried oregano and garlic powder and then mixed it thoroughly.  I didn’t want this to be too wet to keep the crust from becoming soggy and it worked well.


    I was very happy with this pizza and this might become my go to pizza moving forward.  I’ll probably play with the dough recipe, but I think I prefer this to the New York/Naples styles I had been making up to now using my cast iron skillet.  There was always the risk of burning my hand when transferring the dough into the scorching hot skillet that I can now avoid by making this style of pizza instead.

    My index of bakes.

    Benito's picture
    Benito

    Having to practice more to get the rust out of my processes and shaping.  I was able to get my preferred organic all purpose flour similar to T55 for baguettes.  Also continuing to see how far I can push fermentation with every so slightly more gluten development with each bake.  In this bake along with the Rubaud kneading in the bowl when adding the levain and later when adding the bassinage water, I did a total of 300 slap and folds.  These recent bakes do support the fact that doing more gluten development does support longer fermentation without loss of grigne/ears.  I’ve also adjusted my scoring a bit as the broken straps were bothering me.  Although I still overlap the scores still to avoid sausage appearance, I am consciously trying to leave the straps slightly wider, this seems to reduce the number of straps that break during oven spring.  To do this, I do have to score a bit outside the middle third lane of the baguette.

    One thing that is now happening is that extensibility has increased substantially and my baguettes are too long for my baking steel and even for the cookie tray that the couche sits on.  So I over handled this set of baguettes.  After 20 mins in the couche, I decided to remove them to cut them a bit shorter, otherwise they would have drooped off the steel.  I know I degassed them somewhat during that process of over handling.  So I might reduce the dough weight a bit so they aren’t as long next time, or cold retard them en bulk at the end of bulk to tighten the gluten, not sure yet.

    Overnight Levain build ferment 75°F 10-12 hours

    78°F 9 hours to peak


    When levain at peak, mix 28 g water with all the levain mixing to loosen.


    In the morning, to your mixing bowl add 353 g water and diastatic malt 5.8 g to dissolve, then add 527 g AP flour to combine.  Allow to autolyse for 20 mins.  Next add the loosened levain and salt 12 g, pinch and stretch and fold to combine in the bowl.  Slap and fold x 100 then add hold back water 23 g gradually working in until fully absorbed by massaging and then Rubaud kneading the dough, then slap and fold x 200.


    Bulk Fermentation 82*F until aliquot jar shows 20% rise.

    Do folds every 20 mins doing 3 folds

    Could do cold retard at this point for  up to overnight. (Aliquot jar 20% rise)


    Divide and pre-shape rest for 15 mins

    Shape en couche with final proof until aliquot jar shows 55% rise then (optional) cold retard shaped baguettes en couche for at least 15 minutes for easier scoring.  I often do this for convenience as the oven is pre-heating.


    Pre-heat oven 500*F after 30 mins add Silvia towel in pan with boiling water.

    Transfer baguettes from couche to peel on parchment

    Score each baguette and transfer to oven, bake on steel.

    Bake with steam pouring 1 cup of boiling water to cast iron skillet dropping temperature to 480*F. 

    The baguettes are baked with steam for 13 mins.  The steam equipment is removed venting the oven of steam.  Transfer the baguettes from the baking steel to next rack completing baking directly on a rack to minimize the browning of the bottom crust.  The oven is dropped to 450ºF but convection is turned on and the baguettes bake for 10 mins rotating them halfway.  The baguettes are rotated again if needed and baked for another 3 mins to achieve a rich colour crust.

    Benito's picture
    Benito

    Being back in Toronto I have access to ingredients that I couldn’t find in Fort Lauderdale Florida.  Yesterday I went to Chinatown and picked up some purple sweet potatoes and some BBQ Pork.  I’ve been wanting to try making fully sourdough (not hybrid with IDY) Baozi for a while, the last attempt at it didn’t go well.  Given the expense of buying BBQ Pork these needed to be successful and they were.  

    The dough is quite stiff as is customary with these steamed buns so mixing my hand and kneading on the countertop are the way to go.  The dough comes together very quickly.  Because there is baking powder in these, the pH data is interesting.  Not surprisingly they start out with a high pH of 5.62 and at the time of steaming only dropped to 4.86.  Even the delta of only 0.76 is very low.  Some of that is definitely the baking powder but I also used a stiff sweet starter as well.  This kind of bread shouldn’t have a sour tang and these definitely did not.  In the future, I would increase the dough per baozi to 60-65 so I can get more filling into each.  As well, I would increase the final proof even more, these were steamed at 112% of rise for the second batch, I’d say I can go up incrementally to 120-125% next time as the dough performed well.

    I did not use the optional IDY in this bake.

    For 12 Baozi 

    Make the Filling 


    Filling Ingredients

    • 4 tablespoons chicken stock
    • 2 tablespoons hoisin sauce
    • 1 tablespoon oyster sauce
    • 1 tablespoon sugar
    • 1 tablespoon Shaoxing wine (or dry sherry)
    • 1 clove garlic , grated
    • 1/8 teaspoon five spice powder
    • 2 tablespoons cornstarch
    • 1 heaping cup (180 g / 6.5 oz) homemade char siu , diced (or store-bought char siu) 1.5 cups is better 
    • While the dough is resting, combine all the filling ingredients in a small pot except for the diced char siu. Mix until the cornstarch is dissolved fully.
    • Bring the mixture to a boil and cook until thickened, so you can draw a line on the bottom of the pot with a spatula, about 1 minute. Take the pot off the heat and let the mixture cool off. Once cooled, add the diced char siu and mix until it is evenly distributed.


    Overnight Levain

    In a large jar, combine all purpose flour, water, ripe sourdough starter, and sugar. Cover the jar loosely and let the levain ripen overnight at warm room temperature (I keep mine around 76°F to 78°F).


    Tangzhong

    In a sauce pan set on med heat with about 1.5 cm of water, place the bowl of your stand mixer creating a Bain Marie, whisk the milk and flour until blended. Then cook for several minutes until thickened, stirring regularly with a spoon or heat-resistant spatula. Let cool.


    In The Morning

    In a mixing bowl, add the Tangzhong, water, milk, sugar and salt, mix to dissolve.  Add the stiff sweet levain and using a silicone spatula, cut the levain into small pieces.  Add the baking powder, cornstarch, oil and flour.  Mix to form a shaggy dough.  Allow to rest for 10 mins.  On your countertop knead the dough until good gluten development, this is a very stiff dough so I prefer to knead it manually to spare my mixer.  Spread about half of the mashed sweet potato on top of the flatten dough, fold and then repeat with the remaining mashed potato.  Knead the dough on the countertop until the mashed potatoes are well distributed.  Remove some dough for aliquot jar to follow rise.  Shape into a boule and rest in a covered bowl at 82°F until the dough has increased by 40%.


    Prepare twelve 4” parchment squares.


    Remove the dough to the counter and divide into 12 equal portions shaping each into a tight boule.  Allow to rest for 10 mins.  Roll out the dough into a 5” circle thickest at the center rolling towards the center of the circle. Flour the back of the dough circle then place about 45 g of bbq pork filling in the center.  Form into a bun pleating the dough together at the top.   Place on a 4-inch square of parchment paper.


    Cover the filled bao with a damp cloth and place in a warm place and allow them to ferment until they pass the poke test.  Using an aliquot jar they should reach about 100% rise.


    Prepare your steamer setup and bring water to a boil.  Working in batches if necessary, arrange buns in the bamboo steamer spacing 2” apart.  Once the water is boiling turn the heat down to medium.  Steam over boiling water for 10 minutes.  Turn off the heat and leave the buns in the covered steamer for 5 more minutes to prevent collapsing.  (I left them in the steamer and on the same stove element turned off). Do not lift the lid of the steamer, doing so will cause a sudden drop in temperature that can cause the buns to collapse or wrinkle or dent.  Remove the buns from the steamer and allow them to cool for 5 minutes before serving.  


    Buns can be kept in an airtight container (a resealable bag works great) at room temperature for up to 4 days or in the freezer for up to 3 months. Room temperature buns can be reheated in the microwave for 15 to 20 seconds or steamed for about 2 minutes, until soft and warmed through. Reheat frozen buns by steaming until soft and warmed through, 10 to 15 minutes.


    For those interested, the aliquot jar shown in the photos is made by Billie Olive and it is well designed and easy to use.  I have always found using one helpful when adjusting my bakes when repeating a bread and wanting to increase or decrease the degree of fermentation.  


    I am doing a giveaway with Billie Olive for one of these aliquot jars on Instagram this weekend.  If you’re interested head over to Instagram and follow me bread_md and you’ll be able to enter the free giveaway for the aliquot jar.  I will be posting the giveaway tomorrow and it will only be open for a short while.

    Here’s the link to my Instagram giveaway.


    My index of bakes.

    Benito's picture
    Benito

    I was disappointed in my last set of baguettes so had to bake another set.  With this set, I was using this new AP flour again and based on the last set decided to go with 76% hydration and do hand mixing so I could better assess how the dough felt.  I also didn’t do any cold retard because the dough in the last set really resisted stretching as it was still a bit cold during shaping.

    I have only two baguettes to show this time, one of the shaped and fully proofed baguettes slipped off the transfer board and hit the edge of the countertop and stretched out of shape degassing.  I didn’t bother to bake it.  This dough didn’t resist stretching and in fact I barely had to so any stretching during shaping.  In fact, they ended up a bit too long for the cookie tray that I use to support the couche and the pointy ends ended up sticking to the cookie tray and I had to wrestle them off.  Despite this I am quite happy with this bake.

    Another thing I have been exploring is whether more gluten development can allow longer fermentation and still retain the grigne/ears of the baguettes.  I’ve increased the slap and folds up to 260 this time and I really pushed final proofing to a total rise of 50% far greater than what was my standard when I first became adept with baguettes.  Back then I tried to get the baguettes in the oven by 30% rise so 50% is a much more.  The ears were retained and the crumb looked decent.  I think I can push a bit more to 55% with this flour and this degree of gluten development.

    Benito's picture
    Benito

    I still have some rhubarb from a friend’s farm from last year frozen in my freezer.  We are hosting a dinner party for neighbours tonight so wanted to bake a pie with a pate brisée pastry crust using the rhubarb.  I couldn’t source any sour cherries so decided to try a spiced peach rhubarb filling for the first time.  I recently purchased a Fat Daddio’s pie dish.  I have always used glass pie dishes because I could see the crust and tell if it was fully baked.  The problem though is that the glass doesn’t heat as quickly as I’d like even with the pie baking on the baking steel on the lowest rack.  This metal pie plate should transfer the heat sooner to the crust so hopefully these juicy filling pies will have a crisp and non soggy bottom.  Another benefit of this pie plate is that it is a bit deeper so more fruit filling is a good thing in my book.

    You will need to have a double batch of your favorite pate brisée pastry recipe for this pie.  You can find the one I use in my index here.

    Peach Rhubarb Filling

    • 2 1/2 cups sliced rhubarb (about 1/4 in. thick)
    • 2 1/2 cups peaches (peeled and sliced)
    • 1/4 cup brown sugar
    • 1 cup granulated sugar
    • 1/4 cup cornstarch
    • 1 1/2 tsp cinnamon
    • 1/8 tsp allspice 
    • 1/4 tsp salt
    • 3/4 tsp vanilla


    Put frozen fruits in the dutch oven to defrost with ½ cup of granulated sugar to help macerate.


    Later add the other ½ cup of granulated sugar to the ¼ cup of cornstarch to loosen the cornstarch and remove the clumps.  Then add the ¼ cup brown sugar and all the spices and salt to the liquid from the fruit. 


    Will partially cook to thicken a little bit.  Brought up to 155°F so a bit thickened but not fully thick.  Tested the liquid by removing some and microwaving it and it does fully thicken well.


    Once the bottom pastry is rolled out and transferred to the pie plate cover and place in fridge for at least 30 mins and up to 3 hours allowing the butter to firm up and the gluten to relax before adding the filling and topping with the top pastry.


    When ready to bake pre-heat oven to 425°F baking at this temperature for 30 mins on the lowest rack on a baking stone or steel.  Watch the edge and protect it from over browning.  


    After 20 mins shielded the edge and continued to bake at 425°F for another 10 or so mins then shielded the whole pie with a cookie tray and decreased temperature to 350°F and baked until the bottom crust was nicely browned another 60 mins or so. 

    My index of bakes.

    Benito's picture
    Benito

    I am definitely out of practice shaping baguettes.  Looking at my index I see it has been almost exactly 6 months, much too long.  Based on the three baguettes I baked you can see the improvement with the shaping from the first to the third.  Another variable is that I couldn’t find my preferred flour that I have been using for baguettes so had to use a flour I haven’t used for baguettes before.

    This bake I wanted to further test the idea that with more gluten development I could final proof further.  In the past with little gluten development I found the sweet spot for proofing at time of bake was a 30% rise in total.  This allowed me to get an open crumb and decent ears.  This time I actually used my Ankarsrum Assistent for dough development and a couple of folds.  The dough went into cold retard when the aliquot jar showed a rise of only 20%.  The following morning the dough was pre-shaped, shaped and allowed to rise to 45%, so much much more than what I used to do.  Based on the third shaped baguette I’d say that my theory works.  I’ll need to try to get another bake this week of baguettes to get the rust out and confirm my findings.  The one baguette which looks like a snake that swallowed a small animal probably had a large trapped air bubble I’m guessing, anyhow suboptimal to say the least.

    Overnight Levain build ferment 75°F 10-12 hours.

    In the morning, to your mixing bowl add 353 g water and diastatic malt 5.8 g to dissolve, then add 527 g AP flour to combine.  Briefly mix in your stand mixer until there is no dry flour, then autolyze for 15-20 mins.  


    Add the bassinage water to the stiff levain, mix to loosen.  Sprinkle salt on the dough.  Then spread levain on the dough.  Mix until the dough has at least moderate gluten development.  This was very quick in the Ankarsrum Assistent.  Release the dough to the countertop and do a few folds to smooth out the dough.


    Bulk Fermentation 82*F until aliquot jar shows 20% rise.

    Do folds every 20 mins doing 2 or 3 folds stopping when the dough is showing good strength.  Place in 3°C fridge overnight.


    Divide and pre-shape rest for 15 mins.

    Shape en couche with final proof until aliquot jar shows 45% rise then (optional) cold retard shaped baguettes en couche for at least 15 minutes for easier scoring. 


    Pre-heat oven 500*F after 30 mins add Silvia towel in pan with boiling water.

    Transfer baguettes from couche to peel on parchment

    Score each baguette and transfer to oven, bake on steel.

    Bake with steam pouring 1 cup of boiling water to cast iron skillet dropping temperature to 480*F. 


    The baguettes are baked with steam for 13 mins.  The steam equipment is removed venting the oven of steam.  Transfer the baguettes from the baking steel to next rack completing baking directly on a rack to minimize the browning of the bottom crust.  The oven is dropped to 450ºF but convection is turned on and the baguettes bake for 10 mins rotating them halfway.  The baguettes are rotated again if needed and baked for another 3 mins to achieve a rich colour crust.

    My index of bakes.

    Benito's picture
    Benito

    We’re back home and as usual out of bread.  I found some Einkorn flour so decided to use it in this loaf.  No bread flour or VWG will be used for this loaf.  As I have recently started to use a stiffer tangzhong and have increased the percentage up to 20% I haven found that I don’t need to use any VWG at all and can still get a great rise for this style of bread.  So this loaf is 100% whole grain, 20% of that whole einkorn.  I also like the flavour that einkorn gives to bread, but it is definitely hard to come by around here.

    For one 9x4x4” Pullman pan loaf.


    Instructions

    Levain

    Mix the levain ingredients in a jar or pyrex container with space for at least 300% growth. 

    Press down with your knuckles or silicone spatula to create a uniform surface and to push out air.

    At a temperature of 76-78ºF, it typically takes up to 10-12 hours for this sweet stiff levain to be at peak.  For my starter I typically see 3-3.5 times increase in size at peak.  The levain will smell sweet with only a mild tang.


    Tangzhong 

    In a sauce pan set on medium heat, stir the milk and whole wheat flour until blended. Then cook for several minutes until well thickened, stirring regularly with a spoon or heat-resistant spatula. Let cool in the pan or, for faster results, in a new bowl.  Theoretically it should reach 65ºC (149ºF) but I don’t find I need to measure the temperature as the tangzhong gelatinizes at this temperature.  You can prepare this the night before and refrigerate it, ensure that it is covered to prevent it from drying out.


    If you plan on using a stand mixer to mix this dough, set up a Bain Marie and use your stand mixer’s bowl to prepare the tangzhong.


    Dough

    In the bowl of a stand mixer, add the milk (consider holding back 10 g of milk and adding later if this is the first time you’re making this), egg, tangzhong, salt, sugar and levain.  Mix and then break up the levain into many smaller pieces.  Next add the flours.  I like to use my spatula to mix until there aren’t many dry areas.  Allow the flour to hydrate (fermentolyse) for 20-30 minutes.  Mix on low speed and then medium speed until moderate gluten development this may take 5-10 mins.  You may want to scrape the sides of the bowl during the first 5 minutes of mixing.  Next add room temperature butter one pat at a time.  The dough may come apart, be patient, continue to mix until it comes together before adding in more butter.  Again, knead until well incorporated.  You will want to check gluten development by windowpane during this time and stop mixing when you get a good windowpane.  You should be able to pull a good windowpane, not quite as good as a white flour because the bran will interrupt the windowpane somewhat. 


    On the counter, shape the dough into a tight ball, cover in the bowl and ferment for 2 - 4 hours at 82ºF.  There should be some rise visible at this stage.


    You can next place the dough into the fridge to chill the dough for about 1.5 hours, this makes rolling the dough easier to shape.  Remember, if you do so the final proof will take longer.  Alternatively, you can do a cold retard in the fridge overnight, however, you may find that this increases the tang in your bread.


    Prepare your pans by greasing them with butter or line with parchment paper.  


    Lightly oil the top of the dough. Scrape the dough out onto a clean counter top and divide it into four. I like to weigh them to have equal sized lobes. Shape each tightly into a boule, allow to rest 5 mins. Using an oiled rolling pin roll each ball out and then letterfold. Turn 90* and using a rolling pin roll each out to at least 8”. Letterfold again from the sides so you have a long narrow dough. Then using a rolling pin, roll flatter but keeping the dough relatively narrow.  The reason to do this extra letterfold is that the shorter fatter rolls when placed in the pan will not touch the sides of the pan.  This allows the swirled ends to rise during final proof, this is only done for appearance sake and is not necessary.  Next roll each into a tight roll with some tension. Arrange the rolls of dough inside your lined pan alternating the direction of the swirls. This should allow a greater rise during proof and in the oven.


    Cover and let proof for  4-6 hours at a warm temperature.  I proof at 82°F.  You will need longer than 4-6 hours if you chilled your dough for shaping. I proof until the top of the dough comes to within 1 cm of the top edge of the pan.


    Preheat the oven to 350F and brush the dough with the egg-milk wash.  Just prior to baking brush with the egg-milk wash again.


    Bake the loaves for 50 minutes or until the internal temperature is at least 190ºF, rotating as needed to get even browning. Shield your loaf if it gets brown early in the baking process. After 50 mins remove the bread from the pan and bake a further 10 mins by placing the loaf directly in the oven on the rack with the oven turned down to 325ºF.


    My index of bakes.

    Pages

    Subscribe to RSS - Benito's blog