My Daily Bread

my daily bread

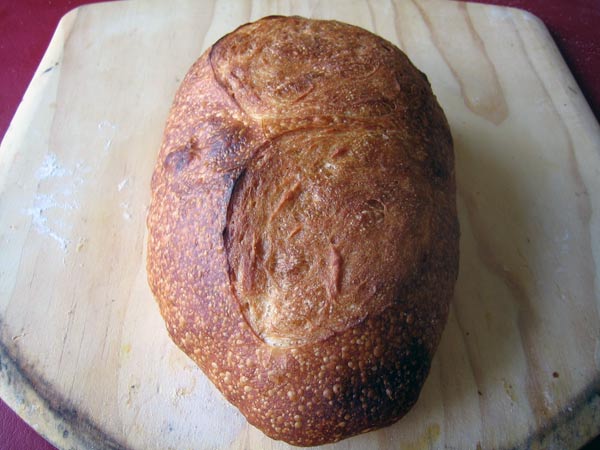
If you ever read my baker blog, you'll know that almost every week, regardless of what else I am baking, I bake a batch of pain sur poolish. I began baking a bread like this while reading The Village Baker. I've since adapted it to be even simpler.

This recipe really has become my control, my baseline for experimentation. Whether it be a new mixing technique, a new brand of flour, or a new baking schedule, when I apply a change to this recipe I have the easiest time perceiving how that change modified the outcome of my bread.

I'm offering up this recipe here because a few people have asked for it. But more than advocating this recipe in particular I'm advocating the method of finding something you like and using it as your baseline for experimentation.

My Pain Sur Poolish (Daily Bread)

Poolish
1 cup flour
1 cup water
1/4 teaspoon instant yeast

Final Dough
1 pound flour
10-12 ounces water
1 teaspoon instant yeast
2 teaspoons salt
all of the poolish

Combine the ingredients for the poolish in a small bowl the night before baking. Cover the bowl with plastic wrap and leave the poolish out at room temperature overnight.

The next day, prepare the final dough, either by using the autolyse method of flour and water first then the rest of the ingredients with minimal mixing or by combining them all and mixing until you have decent gluten development (8 to 10 minutes).

I typically fold the dough once an hour twice during primary fermentation, then shape the loaves and give them a longer final rise, typically around 90 minutes. Meanwhile, my oven and baking stone are preheating as hot as they can safely go.

Baking, with steam, takes me 20 minutes, 5 minutes or so at maximum oven temperature, the remainder at 450-475. I rotate the loaves once half way through the baking.

my daily bread

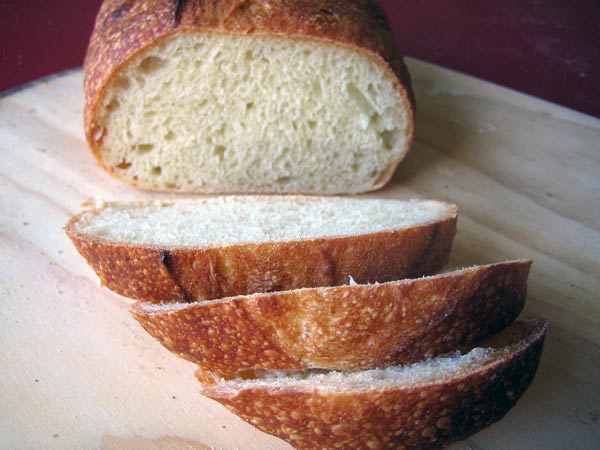
That is it. Simple, tasty, and a great recipe to practice with.

Relate Recipes: Italian Bread, Rustic Bread.

Do you have a bread recipe that is your standard? Please, share it!

Average rating
(7 votes)

Comment viewing options

Select your preferred way to display the comments and click "Save settings" to activate your changes.

My lazy loaf

The bread I bake most often is what I call my "Lazy Loaf." It is a variation of the recipe in lesson #1. I make a sponge with 1 c wheat flour, 1 c water and 1 tsp yeast. If I'm on the ball, I leave the sponge over night. But more often than not, I make a sponge while I make breakfast and let it hang out on my counter while I get the kids to school and do all the "Mom stuff" I've got to do for the day.

Then I add about 1 T butter, 1 tsp salt and the rest of my flour. Some times I add honey and sometimes I add cracked wheat, depending on my mood.

Keep in mind, I rarely measure for this loaf, (hence the name Lazy Loaf) so all measurements are approximate.


score: 1

Great Recipe!

Since trying this recipe out a couple of weeks ago I have fell in love with it. The 1st version was a bit wet so I added a touch more flour the subsequent times, starting with 1lb and then addidng till it felt just right (still keeping it pretty moist though). It is now one of the base recipes I use, making it every few days and adding other things to it, such as a small head of finely chopped roasted garlic or some asiago cheese. Just wanted to say thanks!


score: 0

Poolish right?

Floyd,

I was looking at your recipe, thinking of making baguettes this weekend with it, but when I calculated the hydration, I came up with 90-100% depending on whether one uses 10 or 12 oz of water in the dough.

Is the poolish right? I've always used a poolish with roughly even weights of water and flour, and if you use a cup of both, I think that comes out to 4.25 to 4.5 ounces flour and 8 ounces water. Did you mean to say 1 cup flour and 1/2 cup water?

If you're wrangling with bread at nearly 100% hydration and getting the beautiful loaves I see, you are truly ... The Man. :-)


score: 1

Wet dough

Agreed. I am trying this today. I used 12 oz water in the autolyze, which created a nice dough. But when I added the poolish it turned to soup. I added at least 1/2 cup more flour as I mixed, but I still have a dough that is more like that for an Italian flatbread. We shall see how it goes, but I don't think it is going to shape very well ;-(

Next time I think I will start with 10 oz water in the main dough.

sPh


score: 1

Wet dough for me too!!!

I'm glad I'm not the only one who found this dough extremely wet...I used only 8 oz water in the autolyze and still ended up with a soup-like consistency once I added the poolish! I have only been making bread for a few months, so I thought maybe I just didn't know how to properly deal with such a wet dough. I ended up adding 1 1/2 cups of extra flour and it was still very wet (I used a mixmaster to knead and it barely started to pull away from the edges of the bowl), but it was more manageable and more what I pictured the "correct" result to be like. I am in the final stages of the last rise right now, so we will see how it turns out... I think next time I will try only 4 oz of water in the dough????


score: 1
user icon

Quite wet

There is no question this is a super wet dough. It is not hand-kneadable, and only after folding a couple of times on a highly floured surface is it even shapeable (and even then, with difficulty). I've found I'm happiest with the results when I leave it that wet, but it'll still make a nice bread at a lower hydration.


score: 1

My first attempt at your Daily Bread

Terrific recipe. My dough was also quite wet. Took at least another half a cup of flour and the dough was still a little wet. Regardless, the bread has a great flavor. I made two baguettes, one plain and added some olives to the second one.

P.S. Compliments on the great website (I am new here).


score: 1

Aha! Why didn't I read this

Aha! Why didn't I read this whole thread before I tried this recipe? I thought I had screwed something up royally because I couldn't knead it in the smooth, masterful way I remember my grandmother did back when she made bread every day. Did I stop to think she was NOT making artisanal French bread? Nope. And so we learn from our mistakes.

Floyd, your tips, tricks, recipes and instructions are terrific. Thanks for all your hard work!


"I am not a cook. But I am sorta cooky."


score: 2

1st Attempt

Floyd:

   I tried the Daily Bread as well as I could since I'm not a baker and trusting the receipe.

After mixing the poolish with the autolyzed flower dry yeast and salt.  Do I disolve the yeast in extra water--I just added it in and stirred it with my hand and put it into a bowl that I sprayed with oil...Right or Wrong?  After 1 hour, I dumped it out on the heavily flowered counter top and just folded the back 1/3 to the middle and the front 1/3 to the middle and put it back into the washed and reoiled bowl.  Right or Wrong?  After letting it rise for another hour I formed it into three small round balls and let them rise for 3 hours but they were really flat and low.  How do you get them to be taller.  I did the baking thing of pre-heating the over to 500+ degrees without any stones but with the iron skillet in the bottom that I filled with water to create the steam.  I shut the door and watched them for about 5 minutes and resteamed them.  Let them bake for about another 15 minutes towhich they burned some.  Since I'm not any type of baker what am I doing wrong.  Harsh comments will not hurt my feeling at all.  If I stupid for doing things--Hey I'm retired and just learning.  Thanks as I'm going to try again Monday.  Anyone else who can tell me anything--please do.  Again Thanks


score: 1
user icon

poolish

I meant 1 cup to 1 cup on the poolish. I like the flavor I get out of a wet poolish better.

I'm guessing end up closer to 65 or 70% hydration by the time I bake it. The combination of a bit of extra flour I throw in when mixing plus the flour it picks up when I am folding it on a *highly* floured surface narrow the difference.


score: 0

That makes sense

Got it. If I can find time to make a loaf of this, I'll let you know how it goes.


score: 1

The crust

The crust on the loaf in your picture looks like a Panera sourdough crust, but of course this is not a sourdough. Is the crust as good as it looks? Is it chewy or flaky? What do you think creates the good crust - the very high baking temperature?

sPh


score: 0

flour and yield

Two questions: Do you usually use AP or bread flour? Does this recipe make 2 loaves?


score: 1
user icon

Answers to flour & yield

I usually use AP in the poolish and bread flour in the final dough. I don't have a good reason for doing it that way, that is just the habit I've gotten into.

Yes, typically I make it into two loaves.


score: 1

Does this crust come out

Does this crust come out softer? I made this today and it came out crisp but thin. I'm trying to figure out if it just comes out that way or if something else caused it.


score: 1
user icon

Crust

Um... It typically doesn't come as crispy as a straight up French Bread, but it is still rather crusty.


score: 0

A Few Noob Questions

Hello All..

I'm new here and somewhat new to bread making, (I've been very fortunate to have always gotten at least edible results though !).

I tried the recipe tonight using 10oz water.

I used "bulk" dry active yeast in both the poolish and the bread.

I mixed the flour with the salt, added the poolish, stirred a bit, and added the warm water with disolved yeast.
While kneading I added flour - likely 1c or so - until the dough just started to stick together - it was still plenty wet.
Working with really wet dough is just a bit over my head at this stage.

I let it rise in the oven with the light on, sealed in a plastic bag.

I only did two rises because I was pressed for time.
Each time the dough easily doubled within the 1 hour time period.
The second rise seemed to be bigger than the first !

After I formed to loaves I put them on the table, also covered in plastic, and they doubled within 40 min.

Question...Are my rises too fast ?

PS....My biggest problem at this stage seems to be shaping uniform and pretty loaves but I guess that will come with (lots of) practice.

I found this link with some photos;

http://jansdough.janktheproofer.com/shapebread.htm

Has anyone got another one ??

Floyd - how did you get the pattern on the top of the loaf pictured ?
I just slice with a razor but I like your effect better !

Thanks in advance for any advice....

John,
Ottawa, Canada


score: 1
user icon

Those are pretty fast rises.

Those are pretty fast rises. For getting really good, nutty flavor out of your flour and super cool, uneven crumb you need to slow things down more than that. But, hey: sometimes you are in a hurry, and if you end up with results you still enjoy, who is to quibble?

Shaping and scoring just take practice, so don't worry if they aren't coming out perfect. Jeffrey Hammelman's book has the best descriptions and pictures of shaping that I've seen (I've yet to do an article on it because I stink at it). Generally you want to get tight surface tension and degas the dough a bit while shaping, but you don't want to totally deflate the dough (though your loaf sounds like it had enough yeast that it could use some serious degassing).

My best info on scoring I've written over here. Generally speaking, cut almost straight up and down the loaf with your hand at about a 45 degree angle, perhaps even lower. Cut around a half an inch to as much as an inch deep. And just bake often and practice: you'll start to get the hang of it.

Good luck!


score: 2

Cooler temperatures

You can also use cooler temperatures. For this recipe I did one rise in the refrigerator, which seems to help both with controlling the amount of rise and the final flavour.

sPh


score: 1

My first bread in a pan

Ever since I started baking bread(thanks to this faboulous cite) my husband wanted me to bake bread in the loaf style, but i did not have a loaf pan. So last night when he returned from his tour he brought a loaf pan. AND so I had to bake a bread immediately. Well not exactly so. I used all purpose flour n made a poolish n also added some of the dough that I has saved from previous baking. It was bubbly within an hour n smelled yeasty. I did not knead it too much and using a little oil made a ball n placed it in a greased bowl.As soon as the dough was near double I used the folding technique and repeated this once again n then placed the dough in the Refrigerator for a slow rising. In the morning the dough had more than doubled. Then I degrassed the dough and again using the folding method shaped the dough n placed it in the pan. After slashing n glazing I poped the loaf in the ovan with the fan on. I like my crust to be little soft so I sprayed water in the ovan once immediately before placing the pan inside n once after five minutes.
The smell of bread was so good. It was baked in 25 minutes.The crumbs was even n the bread was oh so soft inside. The coulor of the bread was not white but slightly pale can some one tell me why was it so. I think the all purpose flour I used was unbleached so the pale(cream) colour but could there be any other reason too.
n hubby was so happy to have his loaf. out came the butter n knife Couldn't wait for even five minutes n slathered it with butter n half the bread was gone. I took some to office for my friends n they too loved it.
Thanks a ton for this site n for sharing experiences. I have learned so much fom all.
shi


score: 1

soft crust

Shi - I've always sprayed water in to the oven to obtain a HARDER crust! And a spray five minutes into baking makes it even more so!
For a soft crust, I lightly flour the surface of the loaf and don't spary .. it seems to work! So if you find spraying makes a soft crust - it implies we are all being hoodwinked and there's no difference whatever you do!!!

Andrew

PS did you allow the loaf to rise again after knocking back and folding and placing i the tin~?


score: 1

andrew actually I did not

andrew actually I did not spray much water just a few squirts on the walls of the ovan for ovan spring.i think for a real hard crust a lot of steam has to be created like by placing a pan of boiling water in the bottom or ice cubes etc. The crust was crunchy n thin not hard. I am really very very new to bread baking but this is how my bread came out.
I can say that the kneading i did was only for say 1 minutes(well the dough was quite wet)and then the twice folding, shaping and yes last rising in the pan. The Top was not perfect but after the slashing n ovan spring u couldnt see that. :))
Do u have any suggestion regarding the pale(cream colour) of my loaf(inside)could it be that the all purpose flour was unbleached(is that good). (sigh) in india we get only all purpose flour(we call it maida) no classification whether it is bleached or un bleached.
shi


score: 1

pale cream color of loaf

One reason typically suggested for a creamy color has to do with oxidation of the carotene while mixing or kneading the bread. Since there is much less kneading with this recipe, air is mixed less with the flour and the original carotene yellow color is preserved. This also means that there is more flavor!. So it sounds like you are doing very well, Shi. Keep up the good work.


score: 2

Ice cubes

There are convincing arguments that ice cubes are not the best for producing steam as they tend to cool the oven. I find a cup of boiling water does the trick with some regular oven-spraying for the first five minutes, then that's it. But perhaps ice cubes give a different character to the crust that might be attractive in another way? Any ideas? I haven't experimented with this yet....


score: 0

Convincing Arguments?

Opening the oven door multiple times to spray water will cool the oven down just as much as using ice once, in my opinion. I use ice as there is less splatter hence less chance of recieving a steam burn (very painful) also it reduces the risk of water damaging the electrical system. I'm going to buy an oven thermometer and test out the differences today.


score: 1

Test Done...

I baked bread rolls today, one batch I used ice for steam another I used water. Equal weight of water and ice was used. One minute after adding ice the temperature of the oven had dropped by 20°C, one minute after adding water the temperature dropped 15°C. Water resulted in a far better bloom. The problem with ice cubes was the initial burst of steam was insufficient compared to an equal weight of water...
Poppy seeds = water, Sesame seeds = ice.


score: 1

Whatever works

Wow -- thanks for doing the research. I can see ice cubes as a better way to steam if you had an oven that can get to a really high temperature but vented at a high rate.

But, in the end, do whatever works and makes you happy, right?


score: 0

Ok, so the message here...

Poppy seeds = water, Sesame seeds = ice.

Is that sesame seeds will retard oven spring. Got it!

:)

I actually heat my water in the microwave for a minute before throwing it in the steam pan. I pop the water in the micro while I get the breads ready to go in the oven. Open the door, slide the loaves onto the stone, dump the hot water in the pan. Instant steam.

-Joe
Edit: I see JMonkey already posted the same info. Great minds think alike :)


score: 0

Steaming

I've had better luck with 2 cups of boiling water into a pre-headed iron skillet at the bottom of the oven. My oven vents so quickly, that I need the extra water to keep a decent amount of steam inside. I also spray water on the walls at 30 second intervals for the first 2 minutes.

Works well for me.


score: 0

And, whatever you do ....

DON'T BLOCK THE OVEN VENTS.

I learned the hard way.


score: 1
user icon

Blocking the vent inside a gas oven.

What do you me "I learned the hard way"? What happened?


score: 0
user icon

Click the link to find out.

Click the link to find out.


score: 0
user icon

You got off easy!

There are reasons that gas ovens are vented.  Like... they need air in order to burn the gas.  Like they need a way to get rid of the combustino gasses.


All in all.... like you said, don't blick the flippin' vents on a gas range.  Electric is OK though.


Mike


score: 0

Crispy crust.

I normally give a good water misting on loaf or loaves as they enter the hot oven, or put into cloche. My husband is an electrician say's no way to mist the walls of the oven.. This was sourdough baked under a cloche. qahtan 


score: 0

Crispy crust

Beautify loaf, qahtan. Can you share more about the recipe and the temps at which you baked this?

In search of the perfect crust & crumb


score: 0

Translating old recipes for hearth stone temps

Have any of you taken old recipes, that often called for baking the bread an hour at 375 degrees F, and figured out how to bake the loaves in much hotter ovens on baking stones/tiles? I'd appreciate your advise.
Sylvia
In search of the perfect crust & crumb


score: 0

Oven temperatures,,,

About the only time I use the recipes suggested temperature for bread is when I bake some thing like this....qahtan

Photobucket - Video and Image Hosting


score: 1

Crispy crust...

You always get a good crispy crust when you use a cloche, before I bought
the one in KAF catalogue I used this one that my husband made for me,$7.99
at Home Depot, plus ring crew and washer, I ran the pot through the dishwasher first to remove any nasties that may have been on it :-))
But I always bake at a very high temperature,non convection, and I only mist as breads are entering the oven, never ever the oven walls. qahtan

Photobucket - Video and Image Hosting


score: 0

qahtan, a question..

Your loaf looked great and the idea of a cloche appeals.
Do you heat the cloche in the oven with your (appears to be) pizza stone? Then put the loaf on the stone and put hot cloche on top?
I can imagine this would simulate an old fashioned brick oven. If so - I shall get a terracotta pot like that and try it! But of course, that would only work with round loaves - my batons would have to be cooked in the oven without a cloche!

Andrew


score: 0

Qahtan , a question.

I let the dough, loaf final rise on the what was then a pizza stone, then sprayed the loaf with water put the cover/flower pot cover on, and into a very hot oven.

The tricky part is the amount of dough that will NOT touch the wall with it's oven spring.
So the bigger the pot and base stone the better.
Brown rice flour on the base. qahtan


score: 0

Oven temp and Peter Reinhart

I've just used Peter Reinhart's recipe for a cinnamon raison walnut loaf (apparantly based on the one in Brother Juniper) using the "in the News" link on the right (Great idea Floyd - they are always worth browsing).

Anyway all went well with kneading, rising and Peter is right - a fantastic flavoured loaf - BUT - the oven temp??? 375f degrees just as stated in recipe.

I was really disappointed in lack of oven spring - YES a well risen loaf went in and came out exact'y the same BUT no extra "lift" or lightness and the crust is indifferent :~

I usually tackle new recipes as stated unless really unhappy with method before tinkering but wish I'd gone with my gut instinct one this one and heated my convection/fan oven to 200c (my oven cooks hot so "normal loaves" go in at 210-220c but enriched/egg/sweet doughs a little lower to prevent the top catching.

Still it eats well - no photo this time but I will do my best next time as I reckon the recipe is a keeper.


score: 0

cloche temperature

So do I take it that the cloche and pizza stone are not heated first? In which case is there limited oven spring?

Thanks
Andrew


score: 0

Cloche Temp

I always preheat my oven to 500 degrees with the cloche inside before baking. In my opinion, this is pretty much the whole point of using a cloche - to quickly and easily approach the effect you would get by baking in a wood fired brick oven.

Eric


score: 0

cloche temperature, oven spring

As you can see by the loaf pictured above there was /is no shortage of oven spring.

Maybe you would like to take a look at this, or even Google "baking bread under a cloche"

This recipe is an adaptation of one that accompanied the La Cloche.
CRUSTY COUNTRY LOAF
1 1/2 teaspoons SAF yeast
1 teaspoon honey
1 1/2 cups warm water (100-110 degrees)
about 4-5 cups hard white whole wheat flour
1/2 teaspoon salt
Place the warm water in a large mixing bowl (I use a Bosch). Add SAF yeast and honey. Mix until yeast is dissolved.
Add salt and stir to mix. Add flour 1/2 cup at a time until a dough forms that holds together and cleans the sides of the bowl. Knead by hand for 10- 15 minutes, adding as little flour as possible to keep from sticking. Knead until dough is soft, but supple. If kneading by machine, knead 6-8 minutes.
Shape dough into a ball. Place the ball of dough in the
center of the La Cloche bottom. Cover with the dome lid and allow to rise in a warm place until doubled, about 30 minutes or more.
Preheat the oven to 450 degrees. With a sharp knife or blade, make criss cross slashes in the top of the risen round loaf. Place the La Cloche (lid on) in the preheated oven and bake for 15 minutes at 450 degrees.
Reduce the heat to 400 degrees and continue to bake another 30 minutes, or until bread is crusty and brown. During the last 10 minutes, the lid should be removed for a crustier crust.
Remove the loaf when done and place on a wire cooling rack.


score: 0

Pizza stone gas grill.

Hi, Im new here and glad to meet you.
Ive been trying to bake bread on and off over the years with some sorry results to some times okay.
I tried your poolish bread recipe and it turned out really good.
My problem was that I just got a new oven and didnt want to crank it up all the way.
So I used my gas grill.
I cranked it up on high with a pizza stone in the center and shut the lid and let it heat for the last twenty or so minutes of the loaves proofing.
I proofed them on a floured pizza peal.
When I put them on the stone, the grill was at 575 degrees.
I poured a cup of water on the hot plates under the grill and shut the lid.
About every minute I would lift the lid just far enough, and pour another cup of water.
This produced great clouds of steam for about five or six seconds and would drop the temperature about twenty degrees.
After five minutes, I turned off the center burner dropping the temp to 425 degrees, and let them bake for about fifteen more minutes.
The bread turned out crusty and yummy.


score: 0

Father's Day

I needed to bake up a good crusty loaf to be an accompaniment for Cajun Shrimp.
The shrimp is baked in a sauce that needs a good bread to sop up all the
yummies. This loaf looked so good, but I was hesitant to try it because of
everyone's description of working with slack dough. I used 8 oz of water and
even though the dough was slack it was easily managed. My only error was
that I made it into one loaf...one gigantic loaf! I didn't print off the recipe
and I guess I thought since there was a picture of one loaf that was supposed to be
the end result. Even though I don't have stone yet..the loaf looks pretty good.
I will post a pic later. Don't be intimidated by the talk of wet dough as I was,
just try cutting back on the water to begin with. Next time I will try it a bit
wetter and see the difference.
I also baked a German Chocolate cake for dessert..just a few calories tonight!
The gangs all here ..time for dinner..
Happy Father's Day to all our Dads!!


score: 0

Finally - a decent loaf of Artisan bread!

I've been baking bread for about 15 years. I haven't purchased "store bought" bread in about 10 years. I've tried numerous times to bake a nice, tasty artisan loaf with lots of good holes. (I'm not sure what this is really called, but I call it "holes":) Never had any success, until yesterday.

I followed the recipe for My Daily Bread and read the lessons. Thanks to this list I finally made a good loaf yesterday. I discovered that I had been making my dough too dry, over kneading it, and not baking it hot enough. Now all I have to do is make sure that I can do it again! Once could always be a mistake. :) After reading several posts, I decided that I should take photos of the good, the bad, and the ugly. Maybe it will help me to remember what I did to do it right or wrong.

Thank you for this great list!

MJ


score: 0

poolish in the breadmachine

[don't throw things at me!!] Just thought I'd put a note up here to say I used the poolish recipe in my breadmachine and got dramatically better results than with any other method I have tried. I put the cup flour, cup water and 1/4 tsp yeast in my breadmachine pan while making dinner, then dumped in 1/4 cup water, 2 1/2 cups flour and 3/4 tsp salt at bedtime and awoke to a shiny, crisp but chewy crust, fairly dense aromatic loaf that compares not with everyone else is no doubt getting out of their steamy ovens, but is finally better than anything I can buy at the grocery store. Just wish I could get the crust a bit darker. Damn them for not making the machines more programmable. Thanks!


score: 0

Cajun Shrimp

This is for Paddyscake. Can you give us the recipe for the shrimp? This sounds like something I would love.

Thanks


score: 0

Shrimps

This qualifies for the bread site cuz you have to have good crusty bread to eat
with this. What's cool is that you bake it all in one big dish. We like to take
this outside to eat, dish in the middle of the table, plenty of napkins and bread!!
Corn on the cob and you have a great meal. The best part is that it is so simple
and tastes like you had Emeril over to cook for you!

3 lbs uncooked large shrimp, unpeeled
3/4 c butter
1 1/2 c italian dressing
1/2 c lemon juice
1/2 c chopped fresh mint (don't skip, use 2 T dried if you have to)
4 crumbled bay leaves
2 T Worcestershire sauce
1 T tabasco
2 t pepper
1 t salt

Place shrimp in 13x9 glass baking dish. Melt butter over med heat. Whisk in
the remaining ingredients. Cool and then pour over shrimp. Marinate in refrigerator
2-3 hrs, stirring occasionally. Preheat to 450, then bake till shrimp are opaque
(for 13-15 count, 20-25 minutes, 15 minutes for smaller shrimp)
Hope you like it!
PS How goes your sourdough efforts?


score: 0

Sour Dough

I'm one of those lucky people who are not crazy about sour dough so I don't have to continually feed and fret over a starter. Thanks for the shrimp recipe.


score: 0

Weaned from the Breadmachine

I had to try it, and though I haven't tasted it, I'm pretty excited about how pretty this loaf is (in my newbie opinion).  This is my first loaf of bread!!  The dough was so wet I found it difficult to work with and so just made one big loaf. On one side where the loaf sat on the cookie sheet, there are rough edges that are blackened from where the wet dough was not tucked under tight, but I'll shave them off before serving.  Otherwise, this has well exceeded my expectations (especially when nervously trying to make a wet lump into a loaf last night!)

Thanks for this!


score: 0

Doubling a recipe

I got an answer, thanks.

If you wanted to make double the amount of bread in this recipe, would you just make two batches and bake them all at once, or would you double everything in the recipe?
Thanks.
Deryn


score: 0

my daily bread

This is my seccond attempt at my daily bread, the first one tasted good and all but the shape was very bad

the only problem wit this one was that i managed to mix up teaspoons to tablespoons in salt :P


score: 0

I made a new one today and

I made a new one today and it came out as well as the one yesterday except with less salt, delicious :)


score: 0

My first attempt at Daily Bread

 I finally made an attempt at this recipe a couple of days ago.  I keep forgetting to read all the comments below the original post so I was already into this loaf before discovering the wet dough parts.

My dough was very wet as well but I kept adding flour to make it work.  I created the poolish and then added the flour as instructed.  It was very sticky and I found it a challenge but finally got it to where I could work with it.  It just seems like I worked with it all day long however.

I've never had dough RISE as much as this did.  It was amazing to say the least and actually started overflowing my bowl at one point.

I should have made 3 loaves I think but made 2 instead per the instructions.  They were very large and after the final rise they too almost overflowed my baking sheet.

The bread had a good texture with some decent holes and even a couple of too large ones throughout.  Taste was good but I seem to keep creating a hard crispy crust that I'd rather not have.  I guess I'm cooking it at too high a temp.  I find that my bread is better the next day or even on the 3rd day as far as the crust is concerned.  I store it in a plastic bag and it softens up.

I will certainly try this again and hopefully one day can post some pictures of my own.  Thanks for the great recipe and instructions.  Be Blessed!!!

 "We're Making Footprints In The Sand"


score: 0

Tastes and smells amazing!

I just pulled this out of the oven and was unable to resist trying some hot. It smelled heavenly and tastes even better with a little salted butter. Just had to play with it a little, so I snuck a cup of whole wheat flour in with the rest of the bread flour and added two tablespoons of olive oil. Ended up WAY wet and sticky, and didn't rise much vertically, but man is it ever good.

Thanks, Floyd! This is only my fifth loaf of bread ever, and I'm having a blast.


score: 0

My first attempt

My first attempt at this recipe and any bread for the past 7 or so years... The crust is delicious, very crispy, and some of the crumb is nice but near the bottom it's kinda doughy. The temperature of the bread was up around 205 when I took it out, but I think either my thermometer is off or I stuck the thermometer so far in it was near the very top of the loaf. In any case, I'm enjoying it.


score: 2

My first daily bread loaf

I've never baked anything fancy that required something like a poolish. I did know about them though from a book that I gave to my mother-in-law, The Bread Bakers Apprentice. After seeing this recipe and finding other tips for the aspiring home baker of artisan/rustic breads I was inspired. Over the past weekend I made a loaf based on this recipe and it was fantastic.

Without a scale I had to guess the proper measurements of flour. Correct me if I'm wrong but would 1 lb. of flour come out to approximately 2-2/3 cups? Like other members who tried this recipe I too had to add more flour during the kneading process. Can someone offer a suggestion on how to properly add flour? I was adding 1/2 cup at a time and kneaded till the dough was tacky enough to peel away from the bowl without sticking to it. Anyway, below are a few pics on my results with the final being my set up in the oven.


In my oven I purchased six of these 6"x6" unglazed quarry tiles from Home Depot for about $3. I'm very happy with the results so I'll stick with them for now. As you can see I got a small cast iron skillet on the bottom of my oven for the steam part of my baking. Works like a charm.


score: 0

Great Job alaskabaker

Those are beautiful loaves! Very nicely-shaped batards, great crust!


score: 0

1st Attempts

Floyd:

   I tried the Daily Bread as well as I could since I'm not a baker and trusting the receipe.

After mixing the poolish with the autolyzed flower dry yeast and salt.  Do I disolve the yeast in extra water--I just added it in and stirred it with my hand and put it into a bowl that I sprayed with oil...Right or Wrong?  After 1 hour, I dumped it out on the heavily flowered counter top and just folded the back 1/3 to the middle and the front 1/3 to the middle and put it back into the washed and reoiled bowl.  Right or Wrong?  After letting it rise for another hour I formed it into three small round balls and let them rise for 3 hours but they were really flat and low.  How do you get them to be taller.  I did the baking thing of pre-heating the over to 500+ degrees without any stones but with the iron skillet in the bottom that I filled with water to create the steam.  I shut the door and watched them for about 5 minutes and resteamed them.  Let them bake for about another 15 minutes towhich they burned some.  Since I'm not any type of baker what am I doing wrong.  Harsh comments will not hurt my feeling at all.  If I stupid for doing things--Hey I'm retired and just learning.  Thanks as I'm going to try again Monday.  Anyone else who can tell me anything--please do.  Again Thanks


score: 0

What keeps the bread from

What keeps the bread from sticking to these tiles?  Thanks


score: 0

Loaves don't stick ...

... either to the tiles or to the pot (if you're using the closed-vessel /high-heat style), once they reach a certain point in the baking process. I'm sure one of the chemists on the site can explain what exactly happens that makes the solid bread separate  cleanly from the cooking surface, but there is no need for oil or grease when baking a lean (i.e., no fat or dairy) dough. 


I am not a cook. But I am sorta cooky."


score: 1

Home Depot

People who will bite the hand that feeds them will lick the boots that kick them!


Damn!  I've been looking for these tiles for YEARS!  I'm sure I called Home Depot & they didn't know what I was talking about!  So I'm using a pizza stone. 

I made this recipe for the first time the other day.  EVERYTHING went wrong!  I already had a poolish (Mother) in the fridge, so I used that.  I spent ALOT of time trying to convert the weight to Imperial (Cups), since I don't have a scale; I came up with 3 1/3 cups per pound.  It looked like the Mother was dormant so I screwed around with that for awhile.

 Finally, got it going.  It was at least 3 times bigger than his picture!  I wasn't sure I would get it out of the oven!  LOL

 But, boy, was it good!  My best bread, so far.

Has anyone tried to double the recipe?  I like to give a loaf to the lady next door.

 sob


score: 0
user icon

Ask to talk to a grown up....

sob8864 commented

I've been looking for these tiles for YEARS!  I'm sure I called Home Depot & they didn't know what I was talking about!  So I'm using a pizza stone.


If you talk to the usual high school kids at a home depot, lowes, sutherland or whatever, they'll give you the deer in the headlights look and not know what you're talking about.


So, if they say they've never heard of unglazed quarry tiles, ask to talk to the deparment manager.  Usually the manager WILL know what you are talking about, and where to find them.   And the high school kid will learn something.  Whether they retain it or not is another matter.


Mike


score: 0

Home Depot quarry tiles

I found several boxes this weekend at Home Depot. Ten bucks a box. Unglazed quarry tiles in red. Was looking for them all winter and they finally showed up.

However, there was a warning printed in large red letters on the box, stating that the silica sand contained in the tiles can cause cancer or other serious lung problems.

These were the smaller tiles and while I don't make it a point to sniff tiles, they do break. So I opted out and ordered a baking stone to replace my too small pizza stone.

Maybe I'm being overly cautious?


score: 0

manufacturer?

I suppose you don't happen to know the manufacturer, do you?


score: 0

Love the daily bread


 Floyd:

 Just wanted you to know that I've been working your daily bread recipe for the last couple of weekends and am just loving it.  I'm using a longer, cool ferment, and I'm shaping more like un-scored baguettes, but in all other ways I'm staying faithful to your recipe.

It's frankly given me the crumb I've always hoped for: lots of air and very elastic, with a great crust.

Will put up a pic later today, if I can get my butt in gear.   

Thanks a bunch!


Prandium longa. Vita brevis.


score: 0

People who will bite the

People who will bite the hand that feeds them will lick the boots that kick them!


Floyd,


I don't know if I'm posting this in the right place but I have a question.  I want to include a small loaf of My Daily Bread in my Christmas baskets this year.  I'm thinking to take the dough through the second rise & place in a loaf pan & freeze.  Then give the recipents instructions on how to thaw & bake so they can have that wonderful smell & taste of fresh bread.


Will this work???


Thanks

sob


score: 0
user icon

I have no idea, I've never

I have no idea, I've never tried that. You've got two weeks though: give it a shot!


score: 0

First rise?


Floyd:

Just to benchmark, what is the range of your average first rise time with this?

Thanks, in advance.  Grrr.

Prandium longa. Vita brevis.


score: 0

Hi Folks,I'm new here.

Hi Folks,

I'm new here. I tried to make this loaf using the original recipe but it was just too wet.

 I scrapped the original project and started over, this time only using about half of the water called for 

 I'm gonna try putting photos up. Not bad for a first effort I think. Or should I say second?

My first tryMy first try

Another shotAnother shot 

Hope everyone can see this.


score: 4

I made this the other day

I made this the other day and wow!  I've never used a poolish before, and actually this was my first try with all-purpose flour!  (I was pretty ambitious starting with only wheat)  The dough was wet, but the second rise on top of my little toaster oven was great, and the flavor-amazing!


(that's all that was left of the loaf by the time I got my camera out) 


score: 0

my attempts stale quickly

Hi, all.  I'm a long-time lurker (especially benefiting from the lessons and videos), but this is my first post.   I've made this recipe twice now, with similar results, and I have two questions.  I have two questions.

First, like many others, I found the dough exceptionally sticky.  I can barely shape a loaf, and when I do, they spread a lot.  How do people deal with this?  I've read of using wet hands, for example. 

Second, both times the bread was spectacular right out of the oven (at least by my standards, and my wife's).  But the next morning, it was a little heavy - perhaps a bit stale.  I know that bread without preservatives is going to go stale faster than bread with - but this was faster than other breads I've made.  Has anyone had a similar experience?  Or advice on what I may be doing wrong (or not enough, or too much) to make this happen?

Thanks, Floyd, for starting the site, and to everyone for all the useful information.

 Matt 


score: 0

Tried this today

Hi! I'm new here, and I just tried the Daily Bread this morning, exactly as written. (although I did add just a bit of wheat flour, while mixing, to help form the dough. I still left it pretty wet, though.)
I have to say, I found it a delightful dough and it yeilded 2 amazing loaves! Absolutely delicious AND beautiful! Thanks so much for this recipe!


Judy


score: 0

Can I make the poolish, put

Can I make the poolish, put it in the frige, and then use only a portion of it to any bread recipe.  Say 1/4 cup each time.  It will last for about 2 weeks I think I read somewhere.  So I would be able to get four or six loaves of bread out of t his one poolish?  Is this possible?


score: 0

Daily bread came out great!!!

I tried my first loaf of Pain sur poolish.


It came out great although I ended up having ot add about another 1.5 cups of flour.


I was wondering if adding a 1/4 cup of malt powder would give it more flavor.  Any Ideas?? 


score: 0

Something Wrong!

I've made this loaf many times now and it is scrumptious! However, the last two times I've baked, something has gone wrong.

I've noticed the poolish water hasn't gotten completely incorporated after it's been out over night. This is new; before there was no extra water sitting under the "glop." Also the last two times, the baked bread hasn't turned out. I get many bubbles on the top of the loaf and the loaf itself barely rises. When I cut into it, the top crust is very thin and the top inch of bread is so lacey with holes that there is only about 2 inches of bread below to eat. Why is this happening? It's very frustrating as I don't think I'm doing anything differently.


score: 0
user icon

Extra water under your poolish

Love this bread!

OK here's my 2 cents: 

I've noticed that when I don't get around to using my poolish in the usual interval of time it starts to separate and look watery at the bottom.  I'll bet your poolish wanted to be used before you got to it - probably it bubbled up and dropped down.  Has it been warmer in your kitchen than usual? That would certainly cause things to speed up in your poolish. A warmer environment may also be responsible for the over-risen top part of your bread. Perhaps you can cool things down a little (or speed them up to account for the summer temps).

 Keep us posted!


score: 0

Extra water

Floyd, that is exactly what happened! Would it make any difference if I drained the water off? (I thought I should use it.) Or does that whole episode render the poolish not usable? Is there any clue to when that separation begins? Thanks for the feedback.


score: 0
user icon

Pain sur poolish

Here's my weekend effort (minus 1 loaf I gave away). I used a perforated curved pan for the baguette and the batard. The batard oozed out over the edge of its pan and has a bit of a handle, but it still made that great crackling sound when it came out of the oven.

Pain sur poolishPain sur poolish


score: 0

Comment viewing options