Learning Pumpernickel--Now With Crumb
Last week, I posted about my Horst Bandel bread from Hamelman's Bread. At first glance the crumb images looked good and the flavor was very good. However after some reflection on the bread and the process I decided my initial declaration of victory may have been over stated. While my first attempt was acceptable for a first try, I suspect I have much to learn about this style of bread.
I have been having conversations with Mini and Andy (ananda) about the process and specifically the temperature profile to arrive at a well baked loaf. Along the way I have been talking with qahtan about puddings of various types. There was a most interesting thread on puddings which made me wonder if Pumpernickel isn't really just another steamed pudding without the fruits. After all you cook it in a closed pan at low extended heat and after wards stabilize the moisture by wrapping in towels. The word Pudding has me first thinking about chocolate or lime and a box of Jello but apparently the British and many other Europeans refer to steamed bread by the same term.
I looked at some videos on how to make a proper Christmas Pudding. The example was shown placing a quantity of wet looking dough in a glass pan, covering it with parchment and foil, then tying a string around the foil cover. The whole thing gets placed in a hot oven and slowly cooked in a lowering oven to arrive at a well caramelized crumb, deep in color and full of flavor with a soft crust. That's exactly what I want for my Pumpernickel.
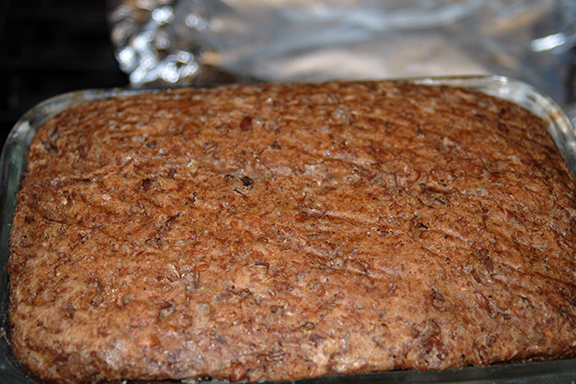
So, to sum up. I discovered that the bottom of my crust from my first try was quite a bit drier and harder than the sides. I decided to place the pan on a wire roasting rack instead of directly on the hot stone. Thinking is that I'll get a less direct and harsh heat. I took my best guess on how much dough to load in the pan and let it proof. When it was again within 1/4 inch of the top, I removed some of the dough from the top as you can see in the photo. That shot is taken after proof and after I removed an additional amount. Next I placed a piece of parchment over the bread and slid the cover on. It was then weighted down with a cast iron griddle to be sure it didn't pop off again and also to be sure it was sealed.
I made additional dough so I would have enough to try a glass pan at the same time. My thinking was that the thicker walls of the glass pan would temper the direct heat and not dry out the bottom crust. Also I had the chance to try out the paper/foil cover tied on with a string.
The breads were loaded into a preheated 350F oven and baked as above for 30 minutes. At this time the heat was lowered to 250F for 2 hours. The final reduction was to 220F for another 6 hours approximately. At this time (6AM) I turned the oven off and let the heat coast down for the next 4 hours. The internal temp was 204F when I checked after the 6 hours at 220F. Both loaves popped out of the pan easily and were well shaped. They are now wrapped in a towel awaiting the Pumpernickel Fairy to tap me on the head and say they are ready to eat. I will post the crumb images when available. Some of these are a little out of order, sorry but they should make sense. I thought anyone who might be thinking of making this bread might like to see the steps I used to get this far.
Eric
Added the Crumb Image by edit:
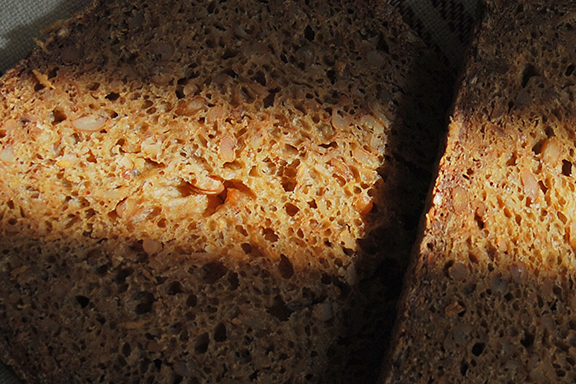
The Pumpernickel Fairy made a low pass on the flight deck this morning and gave me a frown. It has been 24 hours since I wrapped the bread in a towel and placed it on the wire rack (thanks Mini). I unwrapped it and sliced off a few slices to see the results. First, I will now confess I made a mistake with the mix, which was in following the directions as written. On page 223 Item 4.) Mixing, Hamelman says "Add all the ingredients to the bowl, including the sour-dough and both of the soakers, but do not add any of the final dough water reserved from squeezing the liquid from the old bread soaker". I take that to mean that I should add the amount of water in the final dough segment of ingredients (page 222 bottom). The water amount is 12.8 Oz (1-5/8 cups). The first time I made this I with held that water and found I didn't need it. This time I needed an additional 16+ Oz of bread flour to get to a reasonable dough. The amount must be a misprint as I can not see where the differences in rye flours would make that much of a difference. JH goes on to say "It is entirely possible that no additional dough water will be required".
So, bottom line is that this batch has way more white flour in it than was called for, percentage wise. It isn't nearly as flavorful as the last batch. The edges are hard now but they will soften up some after it has sat a day or so in a plastic bag. It has a nice flavor and my wife and are enjoying some with cream cheese. Turn the page and start over she said (Pumpernickel Fairy)

Pleated paper over glass pan

Proofed, removed some dough, ready to cover

Wrapped and tied.

In oven covered and weighted down

Pullman ready to cover

Covered with paper ready to bake

After bake, paper is wet from steaming.

Perfectly formed top.

After bake, foil removed, wet paper.

Clean slightly domed top.

Side view of glass pan shows solid loaf.

Turned over on board. Well shaped loaves

I think this is the way they should look?

Waiting for the Pumpernickel Fairy!


Comments
I've been watching this and planning to try it soon. Sure wish my hubby liked rye as much as I do.
Did you use any spices or altus?
Thanks Tracy,
No spices on this batch but I did use 2 slices of the previous batch. I toasted them dry and soaked them.
Eric
That looks like a GREAT Pumpernickel! Cumbersome steps, but when you enjoy making it, everything is a breeze. Thanks for the great pictures too.
Shiao-Ping
Thanks Shiao-Ping,
It does look good but we'll have to see tomorrow. It isn't too cumbersome once you figure out the steps that can be done at the same time and get a procedure in place.
There are so many unusual steps to this that I thought it would be helpful to document the baking process.
Eric
I notice you cool them on a board instead of a rack. Any particular reason?
Boy you don't miss a thing. The board was just to make it easier to wrap the loaves. They are resting quietly on a cooling rack. :>)
Eric
The formation of the loaves are exceptionally well done. No pullman here, darn.
This is a great pumpernickle to have, well done Eric! You will have much chewing to do for a week!
Mebake
Mebake,
I wouldn't worry about the pan much. Actually I think a glass pan or maybe even a cast iron bread pan would be fine. A heavier pan is probably better if you plan to use a heated stone to hold thermal energy for the slow cool down. I would go to a thrift or second hand store and look for a glass pan with an edge all around so you can get a good seal with a foil cover. I know the traditional shape is from a square Pullman pan but that's just something that evolved from when bread was baked on trains in a Pullman car.
Eric
Eric, that pumpernickel fairy is a tease, isn't she? I can't wait to see the crumb shot.
Edit: Aha, there it is! Beautiful crumb. I wish I were eating it right now.
Those pictures are great, Eric.
I have been wanting to do a pumpernickel loaf, but don't own a pullman pan. Does anybody have any thoughts on doing this in a normal loaf pan? Should I try covering it tightly with tin foil and possibly putting something heavy on top?
Callie
with a cast iron skillet or a brick on top of it should be a good substitute for a lid, I think.
Callie, see above post on using a glass pan.
Eric
Beautiful! You did it! What color! (Now turn on the lights!) And you thought rye would take you a year? Silly. Congratulations! You are cruising now!
Would you mind, May I use your crumb shot for my lap top photo? A "wall paper shot" for it just looks so good! Please, pretty please?
Mini
Eric, what a gorgeous loaf..I can just taste it. Lovely, crumb...thanks for sharing!
Sylvia