The Fresh Loaf

A Community of Amateur Bakers and Artisan Bread Enthusiasts.

Blogs

Martadella's picture
Martadella

This is the same as in previous post but I tortured myself with using devices, like scale and even the thermometer 😀 Oh, dear .... 

It can be done without any commercial yeast,  but I prefer it this way. More practical  and richer taste (yup, that's true) 

There we go:

Day one, stiff starter:

240g dark rye flour

20g rye starter, unrefrehed

Enough water to make rather dense, but not to dry dough (140g)

Fermentation at 26-28°C for a few hours, then at rt for a total of 16-24 hours (I did 22 total, rt was 18°C)

Day one, altus soaker:

70g of oldish bread (a good slice) torn into pieces

Enough water to cover it completely 

Optionally,  especially if you want to skip yeast,  add a good pinch of rye starter. Soak at rt until ready to make dough, then drain reserving water and break into a pulp with your fingers 

Day two, dough:

All preferment (or save a piece as a starter for a new bread )

All altus

+/- 400 g water (including the one from soaker)

4g  dry yeast 

20g salt

80g dense date paste or plum butter (powidla)

260g wholegrain rye flour 

260g whole wheat flour 

First break starter into pieces and whisk with some liquid to destroy the clumps.  Then add altus and the rest of ingredients.  Mix patiently with your fists, adding tiny amounts of water,  if necessary. The dough should be relatively dense, but soft. It will try to stick to everything it touches.  At some point it will become kind of slick and almost slimy on the surface, will also make specific sound when kneaded,  that means it's ready. Smooth it out and let ferment at 26-28°C for 60min (I did it in the oven with a light on)

Forming the loaf is frustrating,  I always try to do it in the air, but can be done on silicon mat with wet hands

Place the dough in the pan, press it down and smooth with silicone spatula.  Cover and let proof at 26-28°C, 45 min, then, if necessary, another 15 or so, at rt, while you preheat the oven 

Dock and glaze the surface (I used rye flour and water slurry)

Bake 10 minutes at 475°F, 30 minutes at 400 and final 20 minutes at 350. 10 minutes before taking out of the oven glaze the crust again 

This bread is very tasty. The acidity is pronounced,  but at the same time countered and balanced with sweetness of fruit preserves.  The aroma is very rich, typical of hybrid fermentation. The long incubation of preferment assures that there is no chance of enzymatic destruction of crumb. Without any problems this can be baked as a 100% rye


agres's picture
agres

Poilane was and is correct. A sourdough miche of whole wheat is great bread. It is the "Pain de Campaign" that I was seeking.  Such bread can be baked at home, and it is not that hard for someone with some experience with sourdough.

A miche is better without yeast or white flour. Yeast speeds rising, so there is less flavor. White flour also diminishes flavor. I use fresh, (organic) stoneground hard red wheat with 10% spelt, 2% rye, and 2% chickpea flour.  That little bit of spelt does help with texture, and the rye speeds fermentation and gives more flavor. My starter (old dough) is about 20 % of final dough weight. Salt is 2.2 % added mid- way through stretch and folds.  The dough is fairly firm, so I do not bother with a banneton. (I form a good boule. Hydration was a little more than 70%, for whole wheat, that is a firm dough.) Fermentation time varies with temperature, yesterday, the kitchen was ~70F, and  it took about 16 hours from mixing the dough to taking it out of a 450F oven. 

The loaf was 1.6 kg.  Crumb is about the right density for a sandwich bread. It is good with soups and stews, and has a slightly acid, definite bread flavor. It will not over power a fried egg sandwich, but it has a clean definite flavor. 

The dough was mixed/kneaded in a 6 -liter plastic tub with a tight fitting lid. Stretch / folds and final loaf formation were done on the counter. Final rise was done on a piece of parchment paper sitting on the peel. 

Bake it big, cut it into quarters, it freezes well.  

And no, I do not bother sifting out the bran from half the flour.  I have the sieves, I have done that. I like the bread better with the bran in it.  If I was serving the bread with delicate Ille de France menus – Never mind, I do not cook bland stuff any more. I make sure my potatoes taste like potatoes and my bread tastes like bread.

Why does everyone put white flour and yeast in their recipes for Poilane style bread?  It just makes the bread, bigger, fluffier, and mediocre. I have eaten a lot of mediocre bread. I try to serve my friends better bread.

I was pointed  into this style of baking by a story of a party in St. Petersburg, just after WWII when the available food was tea and a quarter of a loaf of "dense brown bread'!  This pushed me back toward baking big loaves of dense brown bread - bread that was not made from high hydration dough produced by bakers that want to produce big bread as fast and as cheaply as possible. This was a story of bread as real food - the staff of life.

I looked at all the images I could find of miche from Poilane.  I decided (rightly or wrongly) they were not raised in banneton. That meant a firmer dough! I started working with firmer doughs. These needed longer fermentation - costly for a bakery, but no problem for me. 

Letting the dough sit before kneading (autolyze) is a extra step for a professional baker, but no problem for me, and it made "kneading" easy.  Stretch and fold is an extra step for a professional baker (more cost), but no problem for me.  Coil folds are an extra step for a professional baker (more cost), but no problem for me.

Overall, ignoring the issues faced in running a commercial bakery lets me bake better bread with almost no effort other than looking at my dough when I go into the kitchen to get another cup of coffee. When I touch the dough, I adjust hydration by either using wet hands or floured hands. It is not much change to hydration, but it helps.  However,  I can pop the dough into the cooler and ignore it for 24 or 48 hours.

Long ago, I went to "Fashion Week" in Paris with my wife.  We spent the next week walking up and down the streets of Paris tasting/eating anything and everything that looked or smelled good.  Yesterday's miche is about as good as any bread we had in Paris, or anywhere in Europe for that matter. It was baked at a home, and I expect you can bake bread just as good or better. Period.

Benito's picture
Benito

When I went to the local sake distillery to get more Koji rice for my various fermentation projects using aspergillus oryzae I noticed that they also sold sake kasu. For those unfamiliar sake kasu are the lees remaining after sake production. The Japanese do not like to waste useable food products so sake kasu can be used to make many things. In fact, I used the sake kasu in this test bake to see if I could use it to build a levain to bake a loaf of bread. I think I had some success with this. I will need to adjust the recipe but to give you an idea of what I did I’ll share the outline.

Using sake kasu:water:bread flour in a 1:1:1 ratio I created a first build levain, Unfortunately I did not have a small jar and didn’t think to use a small water glass to ferment this in. As a result I couldn’t tell if it grew, even after 24 hours at 82°F. Despite the apparent lack of growth I went on and make a second build of a levain using all the first build at a 1:2:2 ratio. Surprisingly after 8 hour it almost quadrupled.

Using an all bread flour SD Hokkaido milk bread as the general guide I made a tangzhong using buttermilk. After this cooled I mixed all the levain with all the tangzhong, more buttermilk, salt and sugar. I then added the bread flour and used the stand mixer to develop the dough moderately. I then added the butter in small pats until fully incorporated and with great gluten development. The dough was left to ferment at 82°F for hour hours. At that point in time there was barely 10% rise. I had expected it to ferment more quickly but I supposed the enrichments slowed it down. Into the fridge it went for the night.

In the morning I removed the dough from the fridge and allowed it to ferment at 82°F until it reached 20% rise at which point in time it was pre shaped, shaped and then placed in a buttered cube pan. Again it was allowed to ferment until it reached less than 1 cm of the top of the pan this was a 120% rise overall. It was given an egg milk wash and baked.

My index of bakes.

dtdayan's picture
dtdayan

36 hour fermentation of final dough. 250g AP flour, 150g Bread four, instant yeast .05%, 100% hydration Levain 15%, Salt 2%, cooked sticky rice grain 12.5%

3-30minute interval for bulk fermentation folding, 36hour refrigerated fermentation, 2.5hour proofing, 280C oven and used a Dutch oven

HeiHei29er's picture
HeiHei29er

Tried my first loaf with Flourless Sourdough Starter this weekend.  White flour loaf with 10% whole wheat (KAF), 10% sifted durum (Janie's Mill), and 5% barley flour.  12% cracked wheat was added as a soaker.

FLAS was prepared by putting 40g of Breiss red wheat malt and 10g of kamut berries in 25g of raisin yeast water and 475g of water.  This was kept at 87 deg F for 36 hours and was fed 1/4 tsp of sugar after 24 hours.  pH after 36 hours was 3.45.  It had a sour apple type aroma, but not like a rye starter sour apple.

Levain was made with bread flour at 125% hydration (all FLAS).  Levain was sized to have 20% PFF.  The levain was fermented at 72 deg for 12.5 hours.  It was roughly doubled and starting to fall in a few spots.  It looked like it was getting mature, but it was "tight".

In the Final Mix, additional FLAS was used to make it half of the hydration (34% FLAS and 34% water).  I also added 0.25% ADY (1g) because I wasn't sure the levain had enough strength to leaven the dough.

Bulk ferment for just over 4 hours and final proof for another 2.5 hours.  All at 76 deg F.  I think it could have gone a little longer, but the dough was quite jiggly and I was worried about it getting too acidic.

Baked at 450 deg F with steam and in a falling temp oven.  Ended the 20 minutes of steam at 375 deg F.  After steam was vented, baked for another 15 minutes at 350 deg F with convection.

Very happy with the loaf profile and the crumb.  However, very little (almost non existent) sour aroma.  The FLAS at 20% PFF did not contribute much sourness.  Maybe the levain wasn't mature enough.  Might not have gone long enough in the FLAS preparation.  Need to do a little more digging before trying it again.  Would be really happy with the method if I can get the same loaf characteristics with more tang.

CrustyJohn's picture
CrustyJohn

I've been baking bread for a number of years now and experimenting with whole wheat and various other grains for about 2 years, mostly in a fairly haphazard, now and then manner.  After purchasing Tartine No. 3, I've been inspired to double down on experimentation with different grains, so it seems like a good time to also get a little more methodical about documenting loaves.

I'm new to the porridge loaf concept.  All the previous loaves I've done involved adding a percent of non-wheat flour.  My first go-round with a corn meal porridge was not great.  I don't think I cooked it long enough and when I went to incorporate it into the dough it was clumpy and rough, tearing the dough and making little corn meal lumps.  Barley was much nicer.  I forgot to crack the barley as the method calls for (soaked in whey at room temperature for a day prior, hoping to add some fermentation), so I just cooked the porridge longer, adding a pinch of salt and cane syrup.  Water evaporated some and burnt on the bottom, but I scraped that in as I cooked, and that probably richened the flavor actually.  Barley porridge is really tasty by itself.  

Loaf specs.:

Total Flour- 500g

Central Milling High Gluten Bread Four- 300g (60%)

Dayspring Farm Hard Red Whole Wheat- 150g (30%)

Sparrowbush Renan Whole Wheat- 50g (10%)

Wheat germ 75g (15%)

Water 375g (75%)

Leaven ~55g (11%)

**********************

Salt ~3tsp 

**********************

Barley Porridge ~250g (50%)


Process:

1. Measure out leaven and water, whisk with fork until roughly combined.  Add in flours, stir with fork until fully combined and dampened.  Set outside (maybe 75-80 deg.) to autolyse for ~1.5 hrs 

2. Pinch in salt

3. Stretch and fold every 30 min. for 3hrs.   After 1.5 hrs. I stretch out the dough into a wide rectangle and spread the porridge evenly across the surface, then did a set of folds to incorporate.  Prior to adding the porridge, the dough was developing a nice elasticity/strength, was slightly wet but very manageable.  Once the porridge was added it became very wet and sticky and hard to manage, though the dough strength was still present.  After later folds, the porridge became more consistently incorporated, less tearing of the dough occurred, but it was still very sticky.

4. leave overnight to continue bulk fermentation overnight ~8 hrs. @ ~60ish degrees

5. scraped out of bowl, pre-shaped, then roughly shaped into a batard, though given the wetness and stickiness of the dough this was not very successful as I was not able to fold/roll it on itself as I'm used to doing.  Dumped it in the proofing basket regardless, hoping that the small basket relative to the amount of dough might force it to conform despite my loose shaping.  

6. Refrigerated for ~ 10 hrs. (then put in the freezer for last 30 min. as I wanted it as firm as possible when I turned it out of the basket because I was fearin' a sloppy mess)

7. Heat over & round dutch oven to 500 deg.

8. Turned out onto board, scored lengthwise, perpendicular full length

9. Bake: covered @ 500 20 min

              uncovered @ 500 10 min

              uncovered @ 450 30 min

              turned off oven and left bread in with residual heat another 10-20 min.


Result:

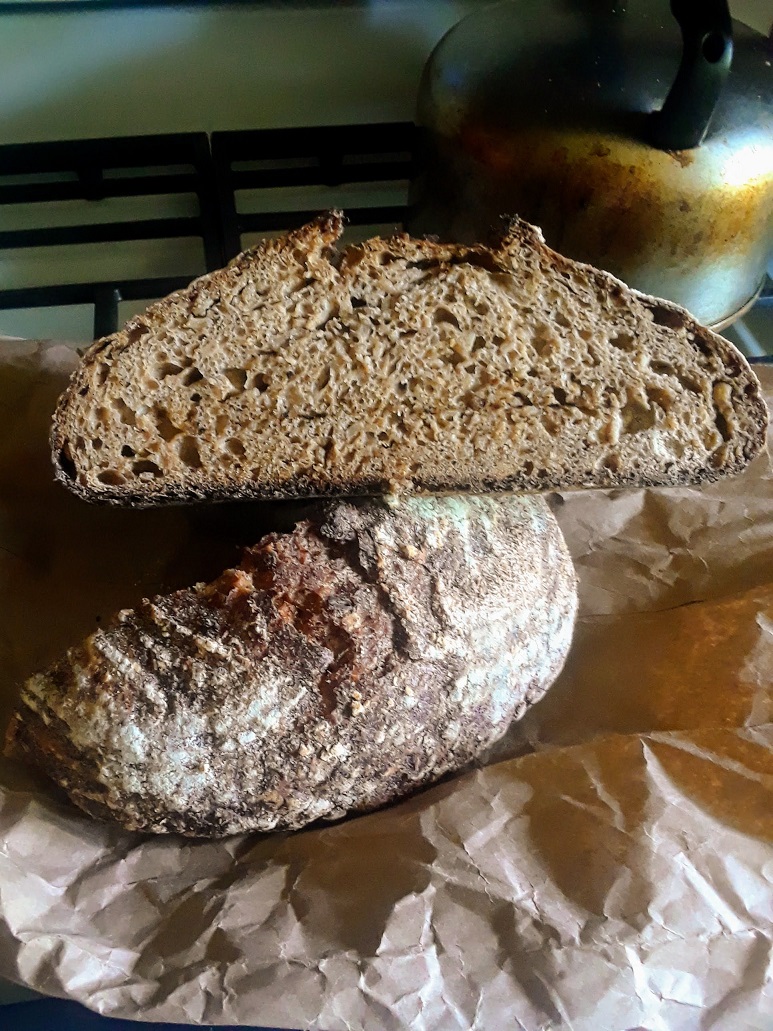
Coming out of the oven, the loaf clearly sagged a decent bit, but it didn't totally loose shape.  With the long bake, it had a nice dark and crispy crust and felt very airy to the touch.  Once I cut into it the next morning, it was less visibly airy than I had hoped, but upon tasting it, I think it is actually really nicely airy.  By the morning it had lost its nice crispy crust due to this cursed Georgia humidity (but I like my bread toasted so it's ok). Cutting into the middle it seemed about fully cooked, perhaps just a tad under cooked at the very center.

Visually, this looks like a very mediocre to poor loaf, but taste-wise it might be my favorite ever!  When I make this again I want to try decreasing the porridge percentage and seeing if that gives me a dough that I can handle better and thus shape tighter.  I think this might address some of the spreading out (though so degree is probably inevitable with such a wet dough).  Also a smaller score might discourage spreading? 


 ---------------

Loaf #2

Pretty similar recipe and approach as #1

No wheat germ, whole wheat flour was all Dayspring Catawba Red.  Porridge was lessened to about 30%.

Due to warmer temperature and fitting it into a modified schedule, the timing was a little different.  Autolyse for 1 hour.  Stretch and fold over ~3 hrs, incorporating porridge after 1.5 hrs.  Shortened the remaining bulk fermentation to 4-5 hrs. since room temp was probably in the 80s.  In retrospect, I think it should have gone longer as the crumb wasn't super airy even with the lower portion of porridge.  The dough was much easier to manage and shape.  Flavor was good, but it was still nothing like loaf #1.  

-----------------

SueVT's picture
SueVT


I've been working on my Lievito Madre for some time, and until recently was unable to bake panettone successfully due to excess acidity. Another contributing issue was my mixing technique, which involved an old KA mixer (the small one) and an even older Cuisinart mixer with a broken hinge; a strap clamp was tightened whenever I needed to  hold the head down.

My new Famag mixer made short work of the panettone impastos; in fact, the biggest challenge is being fast enough with the additions to avoid heating the dough. My improved LM performed very adequately, enabling good gluten development and persistence. I was excited that the dough never showed signs of weakening, and was pretty easy to shape and form. It rose well, within the recipe timeframe, and the resulting panettone is sweet and delicious.

yozzause's picture
yozzause

 I took the opportunity to use up some of the Italian  Rimcinta Macinata (fine ground wholemeal) and some Defiance bakers flour 50/50% along with the first of the oranges off of my tree using both the juice 10% and the peel 4% yeast @ 0.5% butter 3%  sugar 2% water 50%+ and poppy seed 2% and a handfull of sultannas to make things more interesting. Not a sweet dough and probably go nice on a cheese board with some dips. 

i did have a little play with the tops with a braid and a mini epi, OJ AND POPPY SEED LOAVES 


StevenSensei's picture
StevenSensei

Growing up I remember eating whole wheat pita (commercially produced) to have veggie sandwich pockets. I figured it was time to give this a try and see if I could get a nice pocket bread myself. Following the instructions in Whole Grain Breads was not difficult and with the use of a stand mixer to do the actual gluten development I found this to be surprisingly easy. 

RECIPE AND CALCULATIONS HERE

Day 1 - Mix the soaker and biga and leave overnight. 

Day 2 - Mix soaker, biga, and other ingredients together in a stand mixer. Use a dough hook to make a smooth dough that passes a windowpane test. Proof, Shape, Proof, Roll, Rest.....Bake. Easy!

Sensei's Report Card

Tasting Notes: Wow, this is what I was hoping for flavor wise. This is a delicious whole wheat. Earthy, tasty, moist, flavorful, nutty. Looking forward to eating them this week with hummus. 

Time/Effort: 2 days (kinda). The mixing on day one at night after dinner takes maybe 5 minutes and that's it for day one. The second day takes some time because of the double rise and rest and roll out. But like most things with bread you can do a step or two and then do other things while the dough rests. They are baked one at a time on a pizza stone. I followed the time guidelines given in the book (about 3 min each) and while they were cooked I think they could have been baked a bit longer. The ones that were baked the shortest time are moist inside (not gummy) and didn't open up as fully as they could. Feels like something that will be refined with practice.  

Would I make it again: Yes! For a first time bake I am pleased with the results. The flavor is great and I imagine with practice the technique and end result will get even better. In fact, I like the flavor enough that I would like to make a full sandwich loaf using this recipe as opposed to the whole wheat loaf I made recently. 

Pages

Subscribe to RSS - blogs