The Fresh Loaf

A Community of Amateur Bakers and Artisan Bread Enthusiasts.

Blogs

rmk129's picture
rmk129

After a week full of "disaster breads", I am happy to report that I was *finally* able to produce a few loaves that didn't make me laugh when they came out of the oven :) So now I will post some photos as evidence so that when I create my next major flop or paperweight, I can come back and be inspired to try, try again...

***The final results of my baking day:
May 31 042
-
-
***One of the secrets to my newfound ability to rise dough again:
May 31 029
Our apartment is very cold right now (no central heating here), but for some reason I thought my bread baking could continue as normal as long as I just let the dough rise for longer periods of time...apparently not. If you enjoy reading about and laughing at baking misadventures, you can see my previous blog entries for descriptive and *gloopy* & *rock-hard*pictoral evidence of my recent streak of jaw-challenging and vertically-challenged loaves :)
-
My mother-in-law came for a visit yesterday, and when I showed her this photo of my dough rising, she laughed and said she used to rise bread in a similar way...but she actually created a little warm "rising tent" by putting a large piece of fabric over the kitchen table, then putting the heater and the dough under that. Maybe I will try that next time...maybe I will sit under the tent too!!!
-
I was SO happy to see (and taste) these results again...finally! Bring on the cold!!! :)
-
***Whole wheat/flax seed/oatmeal dough
*Before...
May 31 027
*After (it rose!!!)...
May 31 030
-
-
***Baguette dough
*It rose too!!! (I didn't put this dough by the heater because I didn't want it to rise too quickly...I just put it on my kitchen counter while I was baking the other loaf so the room was a bit warmer than usual).
May 31 034

-
-
-
That's all for now...this is one *much happier* baker signing off for now :)

JMonkey's picture
JMonkey

I didn't really intend to become a sourdough fanatic, but it seems that's what I make 80% of the time these days. The pound of SAF instant yeast I bought in February is only halfway gone, despite my having baked just about every weekend since then.

Maybe it's because I've had a devil of a time getting my starter to get a decent "sour" and I've been obsessed with getting it right. It wasn't until last month that I finally I cracked it:

1) Stiff (50% hydration) starter,
2) A long, cool bulk rise at about 64-68 degrees (which means, in my cellar), and
3) An overnight retarding in the bottom of my fridge.

I make at least two loaves of the following bread every weekend. One loaf gets wrapped in aluminum foil for the freezer, and the other goes right in the bread box. It's a well-rounded bread with enough flavor to eat on its own, but also a good accompaniment to any sandwich, from peanut butter and banana (a favorite of my Southern roots, though, unlike Elvis, I refrain from frying it in butter), to mustard, turkey pastrami and a sharp cheese.

I also use it as a base for experimentation, adding spices, or fruits, grains or seeds.

It's 100% whole wheat, but to my mind, doesn't taste "whole wheat," at least, not in the usual sense of the word. There's no strong, bitter grassy flavor, though it's a very different flavor than a white flour bread.

Anyway, here's the recipe for my

100% Whole-Wheat Sourdough Sandwich Bread.

Ingredients

• 19.5 oz whole-wheat flour
• 14.5 oz water (at room temperature)
• 2 Tbs honey
• 2 Tbs Olive Oil
• 2 1/8 tsp salt
• 16.5 oz stiff, whole-wheat sourdough starter (I use a starter at 50 percent hydration)

All the rest Mix everything EXCEPT the salt and the starter together until you get a rough dough. Let it sit for 30-60 minutes so that the whole-wheat flour can absorb the water. This cuts down on the kneading time substantially. Without the "autolyse," you'll have to knead by hand for 30 minutes or more to get it to the right place.

Tear the starter into about 10 pieces. Add the starter and the salt to the rest of the ingredients DON'T FORGET TO ADD THE SALT (like I almost always come close to doing). Tastes awful if you forget it.

Knead the dough until you can stretch a tiny bit of it into a translucent membrane. You'll see plenty of bran blocking the light, but that's ok so long as the surrounding dough is translucent. Oil a bowl or container, put the dough in it and cover.

When it has doubled -- and this may take 3-4 hours depending on the temperature -- fold it and let it rise again. This second rise improves flavor and helps the final loaf rise higher. It should take about half the amount of time the previous rise took.

Once it has risen a second time, remove the dough and divide it in half. Shape each piece into a loaf, and place inside two oiled 8.5 inch by 4.5 inch loaf pans. To shape the loaves, I pat and stretch each portion of the dough into a rough 8"x4" rectangle. I then take one of the 4" ends, and roll it up, pausing every full turn to press down hard on the seam with the edge of my hand. Once the loaf is rolled and sealed, II then stretch it gently so that it's longer than the pan, and fold the edges underneath, again, pressing down hard to seal the seams. I then rock it back and forth quickly while bringing my hands from the middle of the loaf to the edges to stretch it out once again to fit the pan.

Here, you have a choice. You can either cover the pans with food grade plastic and stick it in the fridge overnight, or you can just let it rise and bake immediately. Retarding overnight will accentuate the flavor, and the sourness, of the bread. Depending on how sour your starter is, retarding might overdo the sourness.

Let the loaves rise until they crest about an inch or two in the center of the loaf above the rim of the pan. Try to catch it so that, when you poke the loaf with a damp finger, the indention starts to fill back in slowly. If you've retarded the bread, and it's already at this stage, you can either leave it out (covered) for about an hour to warm up or bake it immediately. I've had more luck getting oven spring if I warm it up.

Otherwise, let it rise until it's nearly fully risen. Meanwhile, preheat the oven to 350 degrees F.

Slash the loaves artfully. These days, I like a few baguette-style slashes on a slight diagonal along the length of the loaf. But, really, it's up to you. As you can see from the photos, I've taken other approaches in the past.

Put the loaves in to bake and, If you wish, steam the oven by pouring 1-2 cups of boiling water into a pre-heated pan or skillet in the bottom of the oven. If find this results in a darker crust, and slighly larger loaves.

Cook for about 40 minutes in a preheated oven at 350 degrees, until the center of each loaf registers 190 to 200 degrees. Remove from pans and cool for 1 hour before slicing.

A couple of variations:

Cinnamon-raisin sourdough: Substitute 2 TBS butter for the olive oil and raise the honey to 4 TBS. Add 2 tsp cinnamon. Near the end of the kneading, add 9 oz raisins and, if you like, 4 oz pecans or walnuts. The extra cinnamon and honey will increase the rising time by about 40%, and you'll need 9"x5" pans. Add 15-20 minutes to the bake.

Multi-grain sourdough Soak 6 oz of your favorite seeds and grains (sunflower seeds, flax seeds, rye chops, wheat berries, oat groats, whatever mix suits your fancy) in 6 oz of water overnight. Reduce the water in the dough to 11.5 oz. Use a 9"x5" pan and add 15-20 minutes to the bake.

JMonkey's picture
JMonkey

My parents were up from Atlanta this weekend, so with five folks in the house, I baked up a storm. We had pizza Friday night, poolish baguettes Saturday night, and on Sunday I baked five loaves:

* Two panned loaves of whole-wheat sourdough.
* Two loaves of potato, rosemary and roasted garlic sourdough (in the "fendu" shape)
* One panned loaf of whole-grain and seed whole-wheat sourdough.

Pictures below:

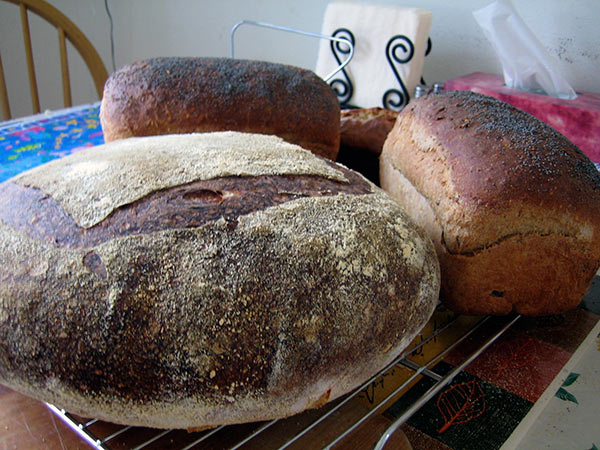
The two loaves of whole-wheat with the multi-grain loaf in the center. I'd bought a bag of King Arthur Flour's Harvest Grains Blend a couple of months ago, and every time I opened the freezer, it stared back at me, saying, "Bake me." So I did. I soaked about 6 oz of the stuff in boiling water overnight and then added it to my regular weekly bread. It made the dough pretty wet, but not so wet that I added any additional flour. Also added enough bulk so that I had to bake it in a 9x5 pan.

It added about 15-20 minutes to the bake, but the flavor was great. The flax seeds and rye flakes added a strong, earthy flavor to the bread, while the oat groats and sunflower seeds gave a nutty undertone and a nice chewy texture. I'll be making this again. A nice contrast with some peanut butter on it!

Here's the rosemary, potato and roasted garlic sourdough loaves. I pretty much converted Jeffrey Hammelman's recipe from a biga to fit my stiff starter, and the results were nice. When I do it again this weekend, I think I'll reduce the rosemary by half and double the roasted garlic. I used 1% fresh rosemary and 3% roasted garlic (about 1 head), and the garlic was a little too understanded for my preference. Still a delicious loaf, but I'd have prefered less rosemary and more garlic.

I'll be baking quite a bit this coming weekend. Our daughter's day care held a fundraising auction, and I auctioned off four loaves of bread. Can't wait to see what they want.

Floydm's picture
Floydm

I made a couple of mediocre loaves of my daily bread today. Too little salt? Something wasn't spot on. We ended up using much of it as dunkers for a batch of white trash chili cheese fondue tonight.

Sunday we hit Winco, a warehouse grocery store kind of like Food 4 Less. They had Saf Yeast for 2.50 a pound! I couldn't believe it: I usually pay 4 times that for 4 ounces at the local grocery store. Needless to say, I picked some up.

tomsbread's picture
tomsbread

Hello all,

Greetings from Singapore from another bread fanatic. This is a wonderful website for learning and I have learnt so much from it. Thanks.

I baked some Ciabatta today. The pics are in

http://www.angelfire.com/planet/tomsbread/index.htm

Tomsbread

Floydm's picture
Floydm

I upgrade the site to Drupal 4.7.1. Knock on wood, it was mostly painless. Contact me if you notice anything acting too squirrelly here.

Hopefully the UI will be a little less confusing now. There are a few little improvements folks will see, but for the most part the site should look and feel the same.

Not too much baking on my part, of late. I did bake pizza last weekend:

pizza

as well as a porridge whole wheat bread that I was pleased with.

Oregon strawberries are finally in season, so we've been having excellent strawberry shortcake lately.

Floydm's picture
Floydm

I'm trying to upgrade the site to Drupal 4.7 tonight. Wish me luck!

rmk129's picture
rmk129

This recipe is the result of a mixture of ideas from a few different recipes. A moist and delicious way to use up overripe bananas and excess zucchini :)

May 31 019

Zucchini Banana Bread

A)Combine these ingredients:
1 cup mashed ripe bananas
2 beaten eggs
3/4 cup vanilla yogurt
1 cup brown sugar
1/4 cup white sugar
1/2 cup vegetable oil
1 tsp vanilla
2 1/2 cups grated zucchini

B)Combine these ingredients and slowly add to first ingredients, mixing well.
2 1/2 cups all-purpose flour
1 cup whole wheat flour
5 tsp baking powder
1 1/2 tsp salt

C) Finally add these (optional):
1/4 cup chopped almonds
1/2 cup raisins (presoaked in hot water)

D) Bake ~45 minutes (until toothpick comes out clean). My gas oven doesn't have a temperature gauge...
I went for what I call "moderately hot". Cool in pans for 5 minutes, then turn out loaves onto cooling rack.

Yummy warm!!!

rmk129's picture
rmk129

Last week I managed to try a few other recipes with mixed results...

1)Rustic Bread
Very nice loaves of bread. Delicious!!! I made it twice (once with rye flour) and my husband and I both thoroughly enjoyed the two different types.

2)Sweet Corn Raisin Bread
I had quite a few laughs throughout the process of making this bread...since I have joined this site, I have read so many pieces of advice about working with wet dough that I think I took it to the extreme while I was making this loaf! After I *poured* the dough out onto my lightly floured counter (using my hands, arms and apron to stop it from oozing into the sink and off the counter!) I realized that I probably should have added more flour in the first stage :) Nevertheless, I persevered and somehow managed to shape it into a fairly round object (this required much patience and a constantly running tap to clean dough off my hands). I then plopped the globular mass of dough into a bowl that I had covered with a heavily floured teatowel and proceeded to clean up the huge mess I had made all over the counter! Sometimes I think it is a blessing in disguise that I have such a tiny little kitchen because then at least even huge messes remain somewhat manageable :) It rose very well, but to finish off my adventure, I really screwed up the scoring process by changing my mind halfway through...after all was said and done, the baked loaf looked like a golden brown loaf that had been attacked from above before it made it into the oven. However, it was scrumptious with a nice crumb...maybe I will have better luck with the process next time. There WILL be a "next time"!!!

3)Whole wheat/flax seed/bran/oatmeal bread
My own "failproof" recipe that has never let me down...until this week. Do you see a pattern here? I bought my whole wheat flour from a bulk health food store this week and it was very coarsely ground (I even found 1" bits of wheat ?chaff? in it!). I also had a very busy day so I ended up leaving the dough in the fridge for most of the first rise...in the end, I produced 2 teeny little loaves. At least they were not rock hard...they were actually quite moist and tasty. Probably a good way to prepare bread for bringing on an overnight backpacking trip :) I guess that is the beauty of baking bread...pretty hard to screw up a loaf so bad that it isn't worth eating!

4)Baguettes Bizarre
In order to keep my current disaster "streak" going, I decided to try out a new recipe for baguettes instead of my usual. So as I type, I am halfway through the process and keeping my fingers crossed. I got the recipe from a website link from this site, and it is completely different than any recipe I have ever tried so I will see how it works...on the website, she admits that this is actually a Reinhart recipe that he got from a parisian baker "Baguettes Ancienne". I had to mix up the flour, salt, yeast and ice water last night, knead it for 6 minutes with my mixmaster, then put it in the fridge overnight. This is not the usual biga/poolish method, because you don't add any additional ingredients the next day...what you start with the night before is what you end up with. Now it says to let the dough rest on the counter for 3 hours, then simply shape the dough (which the website author had huge difficulties with and I'm sure I will too) and throw the baguettes in the oven. Seems like such a short process compared to the way I usually do it, so I thought I would give it a try... Wish me luck!!!

5)Banana Zucchini Bread
On this weekend's list due to the fact that both of these ingredients are approaching the decay stage in my fridge...sounds yummy, doesn't it? :) I was originally going to follow a recipe I got from the web:Banana Zucchini Bread. I didn't have any self-rising flour, but I read somewhere that for every cup of flour you should add 1 1/2 tsp baking powder and 1/2 tsp salt to make it equivalent to self-rising flour. Hmmm...that would mean adding 3.5 x 1.5 = 5 1/4 tsp of baking powder...do I smell another disaster in the offing???? I guess it would make sense to end my week of oozing, non-rising, flopping, slashed-apart bread with a loaf that explodes out of the oven :) I just popped my loaves in the oven 5 minutes ago, and the ingredients I ended up adding actually ended up being a mixture from the original recipe (linked above), Linda's Whole Wheat Zucchini Banana Bread, Floydm's Better Banana Bread, and a few of my own additions :) If it works out, I will post the recipe in my next blog entry so I don't forget what I did!

RichC's picture
RichC

I was originally going to try the Italian bread from BBA this weekend, but I forgot to write down the biga recipe so I had to scrap that idea. So instead I decided to come here and look up something else to try. The victim of my baking experiment would end up being Floyd's daily bread recipe.

As other people did, I found the dough to be extremely wet. I had to add another 1/2 cup of flour for the dough to come together. It was still very slack, but I could still work it. The only problem I had was that I think my attempts to steam the bread resulted in me inadvertently misting the bread itself which made the crust chewier than I would have liked. Also, my lack of baking stone and using the middle rack instead of the bottom caused the bottom crust to be a little soft.

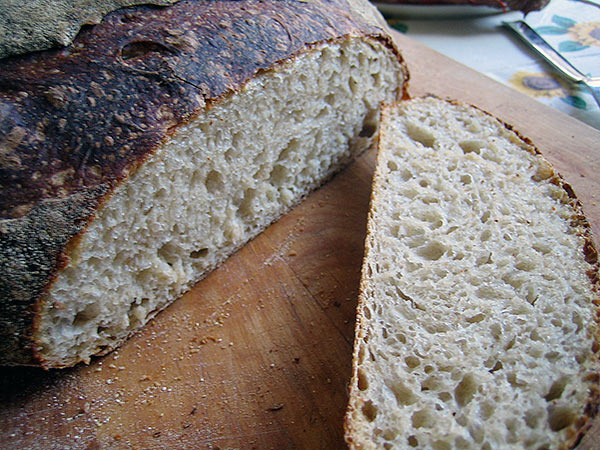
The crumb came out really well too. Very creamy and open.

The flavor wasn't quite what I hoped it would be, but I think that has to do with the crust not coming out as well as it should.

But adding a few accompaniments sure did make it taste good! :)

I also made another 2 loaves of the cinnamon raisin walnut bread but used the correct amount of raisins this time, and substituted pecans for the walnuts. I had a problem shaping one of the loaves because there was a section with to many raisins and the dough broke around them. It caused about one third not to rise all that great. They still tasted great though!

Next weekend I'm going to try and mix it up. Maybe I'll take a stab at bagels instead.

Pages

Subscribe to RSS - blogs