The Fresh Loaf

A Community of Amateur Bakers and Artisan Bread Enthusiasts.

Blogs

AnnieT's picture
AnnieT

I have been trying to locate the pancake recipe that I copied down recently and used this morning. My grandaughters were here overnight and now expect pancakes as part of the deal. I set the starter, flour and water on the counter overnight, then discarded 1/2 cup and added the rest of the ingredients.I ended up with crepe batter! It started out thick enough but by the time everything was mixed in it was way too liquid. The girls didn't seem to mind and ate a goodly quantity ( and they are both petite, no fair!) but I wonder what went wrong? Wish I could remember who posted the recipe so that I could ask for help. The good news is that the Almost No Knead bread was a hit for supper along with Bangers and Mash. Of course the fact that Nana lets them spread the butter more thickly than the parents do might have helped, A.

dolfs's picture
dolfs

I haven't produced much published baking material in the last few months, so here is something new for me.

Bertinet's Croissants & Pain au Chocolat

Since my last post I have been baking plenty, but essentially nothing new. I was baking well rehearsed products (baquette, Tom Leonard's Country French, pizza, sandwich loaf, Challah) for the family and a few parties. Virtually no baking in January: my family and I were in Tanzania on Safari (anybody should be willing to forego baking for a few weeks to see that), and now we're in Montana for our annual winter vacation. Out here I have virtually no tools (no stand mixer, dough scraper or bench knife, no thermometer, limited flour selection), but I needed to bake. I made some bread from Artisan Bread in 5 minutes a day. I made some 50/50 white and white whole wheat dough and produced some rolls one day, and a sandwich loaf yesterday. I'd say both were OK, but not as good as other breads I've made in the past using more traditional approaches. So, it was time for a little more of a challenge.

I had Amazon deliver several bread books to Montana so I had something to read. One of them was Bertinet's "Crust" and I liked the croissant recipe in it. It also comes with lots of description and pictures. So far I had resisted making croissants, despite the fact that my family loves them, because it seemed to involved, and perhaps difficult. Since I am on vacation, and was not skiing yesterday and today (avoiding the President's Day crowds) I decided it was time for croissants. Here is the recipe from the book, scaled and converted through my Dough Calculator. I also converted from fresh yeast to instant dry yeast.

Bertinet's Croissant Recipe

I didn't have whole milk so I substituted 1/3 cream (which is probably too much) and the rest skim milk. I also used 4T of Splenda rather than sugar (Splenda converts on a 1:1 volume basis). I used one large egg for the 50.8 g of egg. The butter listed on the bottom is not part of the dough, but is rolled in later. The egg below it is for an egg wash. Since I had no stand mixer I mixed and kneaded by hand, which is easier for this recipe because no full gluten development is needed.

Directions (very abbreviated - the book has 18 pictures illustrating the steps):

  1. Mix dry ingredients well
  2. Add liquids and mix until well incorporated.
  3. Knead for 3-4 minutes. Full gluten development is not needed, nor desired. It will happen during the rolling process.
  4. Form dough into a ball and cut cross on top.  Chill in refrigerator for 2-12 hours. The dough will ferment and swell.
  5. Take 2 sticks of butter (which is slight more than needed) out of the fridge about 1 hour before you take the dough out.
  6. Take dough out and roll out in 4 directions (use the cross as a guide) into a rectangle about 1/4" thick. Rotate so it looks like a diamond.
  7. Put butter between two sheets of plastic and pound gently with a rolling pin or other heavy object until a rectangle about 1/3" thick is created. Remove top plastic and pick up bottom plastic and butter to turn over on top of middle of square dough (you should have the side triangles of the diamond still uncovered). Try to not touch (and warm up) the butter. Remove final sheet of plastic.
  8. Fold over rest of dough and seal, completely enclosing the butter. Repeat following step three times.
  9. Place dough with short side facing you. Roll out, gently and evenly, in the long direction only, until about 3 times as long. Fold in thirds and press to seal. Place in plastic bag and chill in fridge for 30 minutes (place on flat surface!). Mark with indentations in dough, or a note, so you don't forget whether you are on cycle 1, 2 or 3. Roll gently and evenly to prevent cracks and rips and butter leaking out. If it does, cover with flower and continue. The open spot will be on the inside once folded.
  10. Just before the next step, prepare an egg wash by beating one egg with a pinch of salt. 
  11. After the final chill, after the third cycle, have short side facing you and roll out into a rectangle approximately 3-4 mm (1/5" - 1/8") thick. Keep the rectangle about 12" wide (you may mav to toll sideways as well now) and put the rest in the other dimension. You should end up with approximately 12"x36".
  12. Using a knife, trim edges to make a nice rectangle. Cut rectangle into two strips approximately 6" wide. Cut each strip into triangles with a base  of about 9 cm (3 1/2").
  13. Make a small cut (1.5 cm or 1/2") into the middle of the base of each triangle and then, holding the outside corners of the triangle, stretch a little and roll up towards the top of the triangle. Roll tight, but not excessively so.
  14. Bend the corners of the rolled croissant to create the traditional crescent shape and place on greased cookie sheet, or parchment paper, with the tip of the rolled triangle on the bottom (to avoid unrolling). Leave ample space for expansion during proof and baking.
  15. Brush each croissant with egg wash, from the middle to the outsides to prevent egg wash pooling in the creases. Cover with some non-stick cover, or put in a draft free place, to proof for approximately 2 hours. Do not do this in too warm a place, as the butter may start oozing out. Apply egg wash a second time just before baking.
  16. Preheat at 425F and bake for 17-20 minutes until golden brown. Cool slightly on racks and eat warm!

The recipe made about 14 croissants for me (I rolled them a little tick, so your mileage may be better). I actually started this at night and left the third chill in the refrigerator overnight. Also, please note that all this was done at 6,800 feet altitude so things may be slightly different at sea level. I proofed and baked one half (see photo above) and froze the rest after one egg wash. I placed them in the freezer on a cookie sheet with parchment paper. We'll be baking these tomorrow after a 20 minute thaw (or so), and at a slightly lower temperature. Unless this doesn't work, I will not post about that.

I remembered to take two pictures in the middle of the family eating most of these croissants. Here is a picture of the inside:

Bertinet's Croissants & Crumb
Bertinet's Croissant Crumb

We eat these the way I was taught in Europe. Put some butter and jam on your plate and then, before each bite, apply some of the butter to the end you're going to bite, slather some jam on top, bite, savour, repeat! 

For my first time making croissants I was extremely pleased (and so was the family!). They were extremely light and fluffy, nice color, crisp but thin outside crust, flakey and not greasy on the inside. My son loves chocolate croissants, or pain au chocolat, so I used some of the dough to make three of those (that was all the good chocolate I had in the house as this was an afterthought, and the store is a 30 minute ride into town). That's what you see as the more rectangular shapes in the front of the picture. I took a strip of three chocolate squares and laid them on top of a rolled out rectangle approximately 4"x6". This left about 3/4" on each side. Roll the dough over the chocolate in the long direction and completely roll up and seal the sides. Rest of the treatment is the same as for the croissants.

Conclusion: This was nowhere near as difficult as I had anticipated and the results were fabulous (better than I've had from most stores). Well worth the try and, if my freezing experiment works out, you can make a bunch the day before and freeze them. Everytime you want them it should only take about 1 hour (thaw + bake) before you can have fresh croissants for breakfast! 


--dolf


See my My Bread Adventures in pictures 

rainbowbrown's picture
rainbowbrown

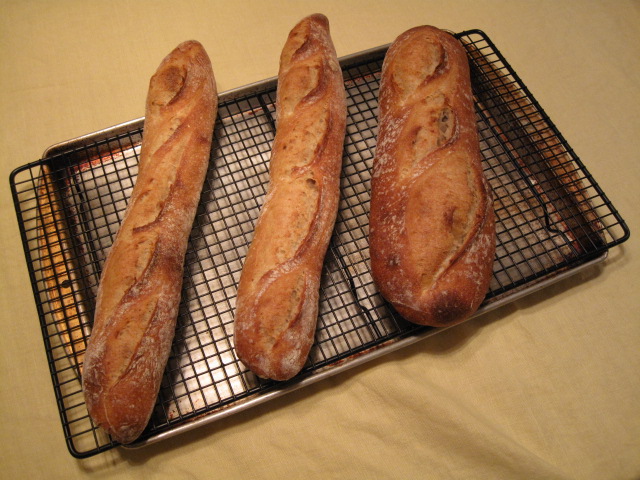
So I decided that after maintaining my starter for almost a year now and being pretty satisfied with it, that I was confused about what I was doing. I've read so many different refreshment ratios for starters that it made me doubt my own, so I split it up to try a new one. Usually I do a 2:1:1 (starter:flour:water) to double it. By the way my starter takes on slightly different forms from time to time. For no particular reason other than I haven't developed a favorite I'll either feed it wheat flour, clear flour or bread flour. Recently I came across directions for a 1:3:2 refreshment and then a 1:2:2 and shouldn't there be a 1:1:1 in there somewhere? I don't know. I figure since all these ratios called for less starter than I use, perhaps I was starving mine a little. So I experimented by using Daniel Leader's recipe for Quintessential French Sourdough. I split up my starter into two batches and put one on a 1:3:2 diet and kept the other on 2:1:1. They both did just fine until I made the final dough when the 1:3:2 became very slow. A lot slower than its brother. It ended up not rising as much as the 2:1:1 (which took about six hours) during bulk fermentation but after about ten hours I had had enough and shaped it anyway. So this is what I got:

Baguettues

The 1:3:2 is on the left. The 2:1:1 is on the right.


And the crumb (same positioning):

crumb


My old 2:1:1 definately won out. It tasted milder and a little better in my opinion. I don't know...I'm still a little weary. I still have to try the 1:2:2 which sounds a little more promising. I know that its been working ok the whole time I've had it so I should just leave well enough alone right? But I really think it can do better with a different approach somehow. Its always a little in the warm area, never bad never outstanding, just pretty good, when it comes to preformance and taste.


A really fun side thing that amounted from all of this was that I had so much trash starter from the experiment that I decided to do a second experiment and see what would happen if I put all my throw-away starter and scraps in a bowl a then in the oven. I used it as shaping practice for the most part. That was pretty fun and here's what arose out of that:


A connected braid and an epi.A connected braid and an epi.

And the crumb:

brumb.crumb.


I thought that these came out really great, much better than I expected...until I tasted them. Oh man, where they ever bad. For one I didn't put any salt in them and for two...well two should be obvious...it was meant to be trash. It was fun though. I dig the shaping practice thing.

Mini Oven's picture
Mini Oven

How I went about it...

I made Leader's Pierre-nury rustic rye dough. I like the dough so much, I'm experimenting again, well....

After following all the directions, carefully laid out the dough before me. I had just prepared all my ingredients:

 Garden rocket, dried tomato pesto, leeks, pimento, ripe olives, cheese stuffed mushrooms

toppings: Garden rocket, dried tomato pesto, leeks, pimento, ripe olives, cheese stuffed mushrooms (they are lurking)

 just smear it on dough with dried tomato pesto


 Leave it flat and finish adding toppings or...fresh leeks, chopped rocket, and pizza spices (chilie peppers?)

Then gently start to fold. First in half, and then again, so I quess that would be a double fold.

fold

Then as you cut off a 2" piece with a bench scraper, pinch one end together so the "guts" stay put. Lay each cut piece on edge, cut side up (pinched side down) and let it just fall open onto the parchment paper.   I got 4 to 5 to a sheet.

cut and pinch

Then sprinkle sloppily with thin sliced red pimento, grated cheese, mushroom chunks, and sliced black olives. ...and into the oven!  Mine actually got to 600°F using fan and lower heat. wow. Throw some water in the lower pan and steam 'em good! Mine took 15 minutes, oven temp had dropped to 450°F after opening the door.

 well that's what it reminds me of...tires

"End of the winter tire sale"

 Toppings are quite heavy but cut these gems into slices, and they're the right size

After baking: Toppings are quite heavy and weigh the dough down.  My dough was made with all purpose wheat.  You might have better luck with the bread flour recommended in the recipe.

But they sure are Good!               (drool, slobber, yum, slobber, drool)

Pierre-nury pizza

Pierre-nury pizza

ENJOY! from your Mini O with all my love!


proth5's picture
proth5

Since the discussion continues on aging flour, this week I had the opportunity to mill and bake all in one day and I thought I would document the results.

I used the milling routine from my former post, but added two “medium coarse” passes prior to removing the bran. Immediately after milling I made the dough using the same method as my prior loaf. I really attempted to go “by the numbers” – number of strokes, dough temperature, fermentation time and temperature, and proofing time and temperature so the only difference would be between aging and not aging the flour.

What I observed was that I really didn’t feel the need for any adjustments. At no point was I thinking “Wow, this is different!” All seemed to move along as it had with the aged flour.

The final loaf (although somewhat more “boldly baked” shall we say) bore this out. Given small variations of shaping and slashing, it was nearly the twin of my other loaf.

The crumb – likewise.

The taste was a bit fresher, a little more lively – in short better to my taste.

My results seem to be consistent with Mr. Reinhart’s advice to bake quickly or wait two weeks. What I really can’t reconcile is the science – that says that oxidation is required to bring the flour to full gluten development potential. I will need to read and research more on this.

Unfortunately, my personal schedule will prevent me from running an experiment on aging day by day for some time – and that would be interesting. But for now, if my schedule permits – fresh flour it is.

Happy Milling!

manuela's picture
manuela

I think these cookies are really wonderful


Ingredients

3 oz. (3 squares, 85 g) unsweetened chocolate

1 lb. (454 g) sifted confectioners’ sugar

1 tsp (5 ml) vanilla extract

3 egg whites (or as needed), slightly beaten

granulated sugar as needed

The egg whites must NOT be added all at once, but little by little or the dough will be too soft and the recipe will fail. 

Melt the chocolate over hot water then add it to the confectioners’ sugar in the bowl of a standing mixer.Using the flat beater attachment mix briefly on the lowest speed, adding the vanilla. The mixture will be lumpy and most of the sugar will not be incorporated. Add the egg white 1 tbsp at a time, mixing on the lowest speed. You won’t probably need all of the amount indicated. The dough is ready when it is stiff and holds together when you work it by hand. The final consistency should be like play-dough.


choclate-hearts-dough.jpg

Keep the dough in a bowl covered with a plate–plastic wrap does not work well—the dough tends to dry if left exposed to the air even for a few minutes.

Preheat the oven to 300°F (150°C). If the temperature is higher, the cookies will puff up too fast and loose their shape.

Sprinkle a very generous layer of granulated sugar on a board and take an orange-size piece of dough, leaving the rest covered. Work the portion of dough briefly between the palms of your hands, then place it onto the sugar covered surface and roll it 1/8-inch (3 mm) thick (not thicker). Flip the flattened dough a couple of times while rolling it so that both sides are well covered with sugar.chocolate-hearts-rolled.jpg

Form the cookies with heart shaped cookie-cutters and place the cookies on a very lightly greased baking sheet. The dough scraps cannot be kneaded again because of the granulated sugar, so try to minimize the spaces between cookies while you shape them. The scraps can be baked as well and will make cookies as delicious as the rest, albeit of less perfect shapes.

Bake the cookies for about 10-12 minutes, they will puff up a little and dry like meringues. When they are ready switch off the oven leave them in the oven for a few more minutes to ensure they are really dry.

Cool the cookies on racks and store in airtight containers.

Note: these quantities will yield approximately 4 baking sheets of cookies. You can halve the recipe, but they are so good it would be a pity to bake a smaller quantity.


from bakinghistory

foolishpoolish's picture
foolishpoolish


For my valentine this year I thought I'd send something a little different. The folks at Poilane did an awesome job.  

 From Bievres, nothing says happy valentines quite like a poilane...  From Bievres, nothing says happy valentines quite like a poilane... 

From Bievres with love.  

proth5's picture
proth5

For those of you who have followed bwraith’s adventures in artisan milling – and I commend them to all – let me say that I am nowhere near his level of attention to detail and analytics. I just thought I might post as I’ve taken an approach that is more accessible to the average home miller.


I am milling on a Diamant 525 which is hand powered and uses metal grinding plates. I hand sift using plastic sieves. Here is a picture:

My last milling effort was as follows:

  1. Temper 16 oz of Hard White Winter wheat with .5 oz of water for 36 hours – wheat is dry to the touch at milling time
  2. Coarse grind – sift through #30 sieve - return what remained in sifter to grinder
  3. 2nd coarse grind – sift through #30 sieve – reserve what remained in sieve which appeared to be fluffy bran (2.5 oz). Use what passed through sieve for next grind
  4. Medium grind – sift through #30 sieve – return what remained in sieve to grinder
  5. 2nd Medium grind – combine all of the material to the grinder
  6. Fine grind – sift through #50 sieve – return material in sieve to grinder
  7. 2nd fine grind – sift through #50 sieve – return material in sieve to grinder
  8. 3rd fine grind – combine all material.
  9. Age flour for 16 days (for no particular reason other than I was away and couldn’t bake)


This seems like a lot of passes, but they go pretty fast and aren’t as strenuous as doing a single fine pass from berry to flour. The flour was fine, silky, and creamy in color.

I am not a whole wheat purist and I have reserved the bran for other uses. The remaining flour (about 85% extraction) was used in a 100% home milled flour levain. I used the technique described in the book “Bread – A Baker’s Book of Techniques and Recipes” in the formula for “Un-kneaded, Six-Fold French Bread” – I however, shaped a single batard.


Again, I am not a whole grain purist and I usually mix white flour with my home milled. Not this time – 100% home milled. This was the first time I considered my results acceptable and I am posting pictures of the finished loaf and the crumb. Despite its many, many flaws, the bread is good and well, a first attempt is a first attempt.

To my bread baking teacher – whose raised voice I can hear telling me that I always focus on what is wrong – I apologize for my negativity. But you gave me this assignment and if you are on this forum and happen to see this post – I am handing in my homework. Yes, tempering makes a big difference for the home miller…

raisdbywolvz's picture
raisdbywolvz

kalamata olive bread and pain d'epi

This is from yesterday's baking session using the Artisan Bread in 5 Minutes recipes -- an epi and 2 small loaves of olive bread using some totally delicious kalamata olives I had to scour the city to find. What's wrong with these grocers? The dough for the olive bread was 11 days old. Great oven spring!

First, the olive bread. I made a loaf on Tuesday following the directions in the book (roll out the dough, cover with olives, roll up like a jelly roll, then form into a ball). Well, the forming into a ball part did a job on the olives, and when the bread was baked, there were olives on the top and on one side and that was it. The rest of the loaf, probably 90 to 95% of it, was just bread. In making it the second time, I stopped after rolling it up like a jelly roll, and just tucked the ends under and baked it on parchment paper. Big difference. The olives went all the way through it and it was delicious and beautiful.

This was my second attempt at an epi. The first one had a very hard crust and had to be cut apart. On this one, I brushed olive oil liberally on the loaf just prior to cutting and baking, and the crust came out thin and crispy, but not so "crusty", if that makes sense. In other words, when you bite into it, the crust doesn't go everywhere. The pieces pulled apart beautifully. I'm actually looking for an even softer crust for that "pull-apart-roll" feel. While my friends are enjoying the crispy crusts, they still want what they want, and I can see their logic, especially in this bread.

I have to be careful now that I have the large pastry board. It's larger than my oven stone. I almost overshot the stone when making the epi. It hung over the stone about 1/2 an inch on each end, but the parchment paper held it up ok.

Picked up a yard of cotton canvas at the store the other day. A friend with a sewing machine cut it into two nice couche-sized pieces and hemmed them up on the edges. Today I'll run them through the washer and dryer, then flour them and see how much fun they are to use. Total cost for 2 couches, $4.74 plus tax. Nice. Methinks my friend with a sewing machine could use a beautiful loaf of bread for her efforts.


foolishpoolish's picture
foolishpoolish

[DELETED BY AUTHOR]

Pages

Subscribe to RSS - blogs