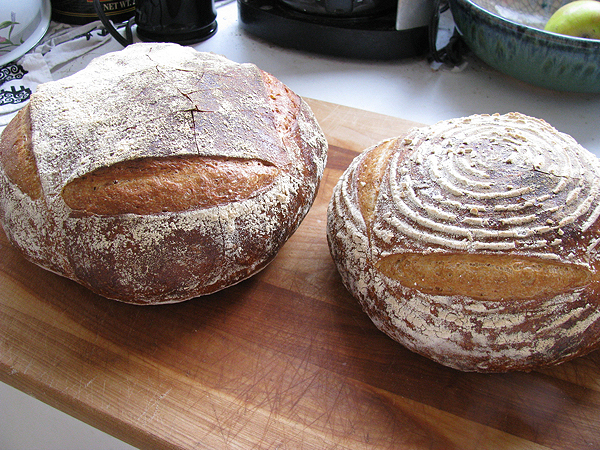
The Fresh Loaf

A Community of Amateur Bakers and Artisan Bread Enthusiasts.

Blogs

manuela's picture
manuela

Potato-rye flatbread with onions


my entry for bbd #7 hosted this time by Cascabel of Chili und Ciabatta and initiated by Zorra. Cascabel proposed a great theme: flatbreads.

Ingredients

2 cups (275 g) (Yukon Gold) potatoes, peeled and diced

2 tbsp (18 g) kosher salt

2 tbsp (15 g) yellow cornmeal (whole grain, stone ground)

1 cup (102 g) dark rye flour

3 cups (400 g) bread flour (King Arthur brand) or as needed

1/2 tbsp (6 g) sugar

1 tsp (4 g) active dry yeast dissolved in 2 tbsp (30 ml) warm water

2 tbsp (30 g) unsalted butter

Topping

1 onion, sliced paper-thin

1-2 tbsp (15-30 g) butter

Cook the potatoes in boiling water until tender. Strain and reserve cooking water. Mash the potatoes and place them in the bowl of a stand mixer. Measure 1-1/2 cups of the potato water (add extra water if necessary to have 1-1/2 cups) place in a saucepan and mix with the salt and cornmeal. Bring to a boil, then take off the heat and add the butter, stirring until it is melted. Pour the mixture on the mashed potatoes and mix briefly. Let cool.

Once the potato mixture is cold, add the flours and then the yeast dissolved in 2 tbsp (30 ml) warm water. Knead until the dough develops, about 7 minutes at low speed. The dough will be tacky, if too sticky and wet you may need to add a little more bread flour. Don’t add too much, the dough should be tacky because of the rye and potatoes.

Place the dough in a buttered bowl, cover and let it rise—preferably overnight in a cool place. The refrigerator might be fine, but a room with a temperature of 50°F (10°C ), such as a basement, is best.

Preheat the oven to 450°F (230°C), place a rack in the middle slot.

Once the dough is fermented, take it out of the bowl and delicately, without kneading it, stretch it and flatten it with the palms of your hands to form a thin rectangle. Place it in a buttered jellyroll pan (11 x 16 x 0.5-inch—28 x 40.5 x 1.27 cm), spread on the surface the onion slices and dot with butter here and there. zwiebelplatz-1.jpg (click on picture to enlarge).

Immediately bake the bread for about 20-25 minutes. zwiebelplatz-2.jpg (click on picture to enlarge)

Notes: it is important that the potatoes are mashed while still hot and mixed with the flours when cold. Warm potatoes make the dough gooey and tend to absorb lots of flour, ruining the final result.

Mashing the potatoes with a fork so that small pieces remain whole is better than using a potato ricer—the potato bits are tasty to find in the finished bread.


From the original recipe by Florence Kreisler Greenbaum

In: “The International Jewish Cook Book: 1600 Recipes According To The Jewish Dietary Laws With The Rules For Kashering: The Favorite Recipes Of America, Austria, Germany, Russia, …”,1919—USA


rainbowbrown's picture
rainbowbrown

Barbari (Iranian Flat Bread)

BarbariBarbari


Bread Baking Day 7 with the theme flatbreads hosted by Petra Chili und Ciabatta . Deadline: March 1st, 2008

bbd7<--- Go on, its a link...

bb

So here is my first entry into bread baking day. The theme is flatbreads and I made this Iranian flatbread, Barbari. This is one of the national breads of Iran. This recipe came from the “Jewish-Iraqi health nut/dietitian”, Clemence Horesh and is from Maggie Glezer’s A Blessing of Bread. I made a few modifications and it turned out great. I halved the recipe so as to only make one loaf rather than two and you’ll see my other modifications as indicated by asterisks (*). I’ll post the halved recipe. Here goes:


375 g bread flour (* I used 300 g bread flour and 75 g spelt flour)

1 tsp instant yeast

252 g warm water (*I used oatstraw tea that I had just brewed instead, I highly recommend trying herbal teas in lieu of water. This was my first time and I liked it)

7 g salt

4 g sugar

28 g vegetable or olive oil (*I used a mixture of olive oil and toasted sesame seed oil)

1 egg, beaten, for glazing

Sesame and poppy seeds for sprinkling (*I also used sunflower seeds)


Mixing the yeast slurry:

Combine 150 grams of the bread flour and the yeast in the bowl of a stand mixer. Turn on with paddle attachment in a low speed. Add the water and mix until smooth. Let this stand for about 20 minutes until it puffs up slightly.


Mixing the Dough:

Still using the paddle attachment beat on low and add the sugar, salt and oil. When the salt and sugar have dissolved switch to the dough hook. Add the remaining flour and mix for about 5 minutes. The dough will clear the sides of the bowl but stick to the bottom just under the hook. The dough should feel very sticky, soft and wet.

Proofing the dough:

Form into a ball, place into an oiled bowl and cover. (At this point you can put it into the refrigerator for up to 24 hours. Just pull it out an hour before shaping.) Let it rise to double, about an hour and a half.


Shaping:

Lay out a piece of parchment paper either on a sheet pan or on your work surface and place the proofed dough on top. Gently flatten your dough to about an inch in thickness and stretch to about 9 by 17 inches. Brush the beaten egg onto the surface. Now take the back end of your wooden spoon and furrow long channels in the dough (I know, I should have photographed this). Take your spoon end and, at a 45 degree angle jab it into the dough until you hit the board below, then lightly drag it down a couple inches, then jab again and over and over from one end to the other. Do this in about four rows across the dough. Like this:


o—o—o—o—o—o

o—o—o—o—o—o

o—o—o—o—o—o

o—o—o—o—o—o


Yeah? Ok. This is to prevent the dough from puffing too much in the oven. Sprinkle the dough generously with seeds.


Baking:

You have a preheated 550f oven right now right? Me neither, my oven only goes to 500f, but it worked. Place your dough either onto a baking stone or onto a preheated sheet pan. If you used a sheet pan to shape the dough initially, leave it (if your using a preheated one too, just stack them). If you just used parchment as I did, then just move it either with a peel or with careful hands and forearms as I did to the oven. Bake for 8 to 10 minutes. The top will look a little pale, but the bottom should be browned.


Serving:

Broil for a minute before serving.

crumbcrumb


Enjoy!

jeffbellamy's picture
jeffbellamy

I got a comment asking what I meant by proofed Starter. What I mean is you take your sourdough starter out of the refrigerator and feed it and wait until it warms up and is frothy.


This assumes you have some starter and know what I'm talking about.


If you don't you can create your own starter but you should give yourself a couple of weeks to get it going.


You can buy sourdough starters online or you can get some free from Friends of Carl  


http://home.att.net/~carlsfriends/.


I just pulled some yougurt bread out of the oven (see attached photo).


I really didn't measure anything, I just poured the largest part of my starter which I've had out (not in refrigerator) for about a week (feeding it 2-3 times a day). I just started adding flour to it until it came together and estimated about how much salt it would take (never forget the salt).


I stuck it out in the garage at about 50 degrees to retard (slow down the rising).


My starter was so exuberant at being out of the refrigerator and being fed reguarly that it just about tripled in volume in about eight hours so I folded it to reduce the volume and stuck it in the refrigerator until morning.


It was back up to the same volume so I turned it out and formed it on a floured board. I didn't want to wait while it got back to room temp (I was a little worried I'd over proofed it) so I stuck it in a cold cast Iron dutch oven and stuck it in a cold oven and baked at 350 degrees for a hour then checked on it.


As expected it had taken this opportunity to rise but had not started to brown at all so I set the oven for 450 degrees and gave it andother 30 minutes.


http://i12etu.com

ohc5e's picture
ohc5e

Just made this bread for the first time with a mixture of KA bread flour and Sir Lancelot High gluten (I can't remember exactly but I think i used 1/4 of the total weight).  It turned out pretty well; I tried to shape them similarly to Zolablue but to no avail...

I used Bob's Red Mill Dark Rye Flour.  It doesn't say anywhere on the package whether or not it is medium or whole rye flour.  It is pretty fine but it has flecks of bran mixed in. Next time I will track down some finer rye to see if it makes a difference in the crumb.  It was pretty open but not as much as I was hoping.  The dough was clearing the bottom of my Viking mixer after 10 minutes, maybe I will also add extra water to see if I can get the crumb more open.  The flavor reminded me a lot of Leader's Pain au Levain.  Seeing as how this bread is to be made over 3 days (from refreshing to baking), I will probably make the pain au levain more often in the future.  Ate it tonight with some French goat cheese...

Pierre Nury's Light Rye

Pierre Nury's Light Rye 

Pierre Nury Crumb

Pierre Nury Crumb 

dmsnyder's picture
dmsnyder

Norm (nbicomputers) has generously posted his (scaled down) formula for Sour Rye Bread. I made this bread this morning.

Sour Rye Bread (Norm's formula) Loaf

Sour Rye Bread (Norm's formula) Loaf


Sour Rye Bread (Norm's formula) Crumb

Sour Rye Bread (Norm's formula) Crumb


Here is Norm's formula with my annotations and the procedure I followed.  

Formula

  • Cake Yeast ...... 1/2 oz. (I used 1 1/2 tsp Instant Yeast.)
  • Water ............. 8 oz
  • Salt ................ 1/4 oz (About 1 1/4 tsp.)
  • Sour (rye) ....... 8 oz (about 1 cup)
  • First clear flour  1 lb
  • Caraway seeds   1 T (not in Norm's formula)

Procedure

  • Place all ingredients in the bowl of a stand mixer with the paddle attached and mix at Speed 1 until all ingredients  are mixed in a ball. Scrape dough off the paddle into the bowl. Remove the paddle.
  • Knead the dough with the dough hook at Speed 2 until the gluten is well-developed. About 10 minutes. Scrape dough onto lightly floured board (I use a Silpat.) and hand knead very briefly. Form into a ball.
  • Lightly oil a bowl and place the dough in it. Cover. Let the dough rest 20 minutes.
  • Divide the dough into two equal parts. Form into long loaves or round loaves. Place the loaves onto parchment paper, placed on an inverted jelly roll pan and sprinkled with coarse corn meal then folded in the middle to form a "wall" between the loaves, so they do not touch when risen. (Essentially, a parchment couche.) Spray the loaves lightly with spray oil and cover them with plasti-crap.
  • Let the loaves rise until doubled in size (or 90% doubled). This took about 100 minutes at 69F.
  • An hour before baking, place a pizza stone on the middle rack of the oven and a cast iron skillet on the bottom rack. Heat the oven to 450F.
  • When loaves have doubled in size, pull the parchment out flat to separate the loaves by at least 3 inches, spray (or brush) them with water, score them with 3 slashes across the long axis of the loaves and slide them, still on the parchment, onto the pizza stone. Pour 1/2 cup boiling water into the skillet, and close the oven door.
  • After 5 minutes, remove the skillet using a hot pad, keeping the oven door open as briefly as possible. Pour out the water and put the skillet where it won't burn anybody!
  • If the bread seems to be getting dark too fast, turn down the oven to 440F (I did this after about 10 minutes.)
  • Continue baking until the loaves are done. The crust is well browned and the bottom sounds hollow when tapped. This was a total of about 25 minutes.
  • Cool on a wire rack before slicing.
  • While the loaves are cooling, brush them with cornstarch solution. (Whisk 4 tsp cornstarch in 1/4 cup of water. Pour this slowly into 1 cup of slowly boiling water, whisking constantly. When the solution is (precisely) somewhat thickened, take off the fire. It can be used while still hot. It can be kept for a few days refrigerated for later use.)

Review of the eating will follow, but I have to eat some first, tonight along with krupnik, a very traditional soup made with beef (tonight, with lamb shank), various beans, barley, lentils (and usually potatoes).   

David


holds99's picture
holds99

I recently purchased Daniel Leader's book: LOCAL BREADS.  After reviewing it I decided to try to bake Pain de Compagne (French Country Boule).  I doubled the recipe so I would be able to bake 2 large boules using 2 different baking methods: 1. Using a covered Dutch oven,  2. On a parchment lined baking pan with steam.  I wanted to see if there was any significant difference in the 2 baking methods.  Instead of making his liquid levain I used my sourdough starter to make a liquid levain starter and placed it in a covered plastic container.  I followed the recipe and left the levain starter out for 12 hours at room temp.  At the end of 12 hours the levain starter had not really kicked in the way it should have.  I decided to press on regardless.  I made the bread dough (water, wheat, rye and A.P - K.A. flour) by hand in the bowl of my Kitchen Aid.  It turned into a very dry ball that wouldn't absorb all the flour (I had scaled the flour).  So, I added a bit more water to get a ragged dough that I thought looked right and then I let it rest for 20 minutes per instructions.  When I went back to the dough in the K.A. bowl it was a SERIOUSLY hard, stiff dough (far stiffer than bagel dough).  About this time I was getting a feeling like... I was arranging the deck chairs on the Titantic.  Anyway, I mixed the salt into the, not so vivacious, levain and added it to the K.A. mixing bowl containing the rock of Gibraltar and turned the K.A. on low speed.  Thoughout the next ten minutes i would mix, stop the K.A., scape the dough off the dough hook, and repeat the process.  Finally I got it all mixed into a smooth, sticky dough.  I then spayed a gallon plastic container with cooking oil, placed the dough in the container, marked the outside of the container (top of the dough) with masking tape, put the top on and set it aside for the 2 1/2 to 3 hour rising time.  2 hours into the rising tme there was only about a 20% rise.  At this point it should be 75% risen (now I feel like I'm re-arranging the chairs on Titanic's deck).  So, I empty the dough onto the counter and examine it to see if it is fermenting.  The patient has some vital signs and pulse but at this point it doesn't look good.  I know if I don't take immediate action I may lose the patient. I spread the dough onto the work counter and stretched it into a large rectangle.  I sprinkled 1 3/4 teaspoons of instant yeast over the entire surface of the dough.  I rolled the dough up and hand kneaded it for 10 minutes to evenly distribute the yeast, put it back into the plastic container, covered it and set it aside.  2 3/4 hours later it had doubled in volume.  I returned to the lightly floured work surface and divided it in half.  Shaped both halves into boules and place each in a heavily floured, linen lined banneton.  An hour ahead of baking I pre-heated the oven with the cast iron Dutch oven in it (sitting on the stone).  I placed one boule in the cast iron Dutch oven, covered it and put it into the oven.  I placed the other boule on the parchment lined baking pan and scored it.  After scoring, the boule started dropping fast so I immediately put it into the oven, dumped the ice cubes onto the tray under the stone.

Anyway, here are the photos of the results.  Both boules turn out fine, despite all MY problems, but the Dutch oven turned out the better of the 2 boules.  Incidentally, it tasted fine, light touch of sourness, good texture.

Pain de Compagne - Exterior - Baked in Dutch OvenPain de Compagne - Exterior - Baked in Dutch Oven

Pain de Compagne - Interior - Baked in Dutch OvenPain de Compagne - Interior - Baked in Dutch Oven

Pain de Compagne - Exterior - Baked on parchment lined baking sheet with steamPain de Compagne - Exterior - Baked on parchment lined

baking sheet with steam

Pain de Compagne - Interior - Baked on parchment lined baking sheet with steamPain de Compagne - Interior - Baked on parchment lined baking sheet with steam

bshuval's picture
bshuval

Hi all,

Today I had the pleasure (together with Susan, Sue, and Kurt) to attend a class given by Peter Reinhart in San Diego. It was a great class in which we learnt how to make some breads from Peter's new book.

Since I have Peter's new book, I already knew a lot of what he was presenting. Still, I got to taste and see some breads I would not have otherwise made; I got to meet Peter Reinhart; and I got to taste some properly made breads.

We all had a great time, and I strongly recommend this workshop. In case you cannot attend, or are undecided, or simply curious, I wrote a lengthy description of the class on my blog with many pictures. I wrote it quickly, so it may not be very elaborately written, and probably has typos and grammatical mistakes studded all over, so I apologize about those in advance. I hope you enjoy my detailed description (and please feel free to ask some questions lest I haven't answered something).

Boaz

My blog: http://foldingpain.blogspot.com

proth5's picture
proth5

I am creating a new blog entry to discuss bwraith’s flour test results just to move it up as his original entry was getting old.  I admit we’re going overboard on this, but I find it all very interesting (no pictures- just discussion of flour test results) – so be warned!

Letters in my responses correspond to letters on bwraith’s test results.

I don’t know how to do that “quote thing” so I’ll just put bwraith’s original words in quotes when I want to respond to something directly.

Also, these are just my humble speculations.  If anyone has a more complete knowledge, I would be most grateful to hear their interpretation of the results that were so graciously provided.

Bill,

As you said…”One main thing that was unexpected for me, was that the lowest ash white flour coming out of the second pass had high protein and wet gluten content, yet it did not have great mixing qualities in the farinograph (low mixing tolerance). My theory is that the first grinding pass may result in some very high protein dust particles being released through the 80 mesh sieve. Maybe that extra protein in the flour out of the first pass is needed for good gluten formation and is proportionately too low in the flour from the second pass. I've been reading that some of the different types of protein vary in size and whether they adhere to the starch granules or not. I guess there are milling operations that use air separation to separate the different sized protein particles and then blends them in various flours to create desired protein specifications.”

What intrigues me is that I am told that the outside of the endosperm is whiter (lower in ash) than the inside of the endosperm and although the protein/gluten is higher it is of lesser quality.  If P2a was producing flour from the outside of the endosperm, this would be consistent with your result of lower tolerance.  What you are getting as flour on P1 would be acting as a balance against the P2a result when blended for baking.I don’t think your process is reducing protein quality – I think that your process may be delivering different parts of the endosperm at different points in the process.Also, if you look at the Seguchi paper that I cite in my other blog post, it may be that the flour was aged insufficiently to see the full potential of its protein.  He is looking at aging periods in excess of 100 days to achieve full potential.

What also intrigues me is that the results for P1 tracked so closely to whole wheat flour.  I frankly would have expected those results to be more like the Golden Buffalo.Nice to know that the multi-pass milling created flour with lower starch damage than commercial flour.  I have seen some discussion that some home milled flours seem to be “thirsty.”  This would be indicative of a kind of starch damage that you did not experience.

Finally – when all is said and done, the values for both of the flours are within those considered acceptable for commercial baking – not necessarily ideal values, but well within tolerances.  This is borne out by the bread that you produce. So, no need to age to maximum potential to get good bread.I know, I need to get enough flour milled to get some tests on my stuff.  I’ll do it – I really will.  I have some other things to attend to in the short term, but I know I’ll do it.  In the meantime –

Happy Milling!

Pat 

cnlindon's picture
cnlindon

Here are some multigrain buns from Bob's Red Mill Baking Book. They are easy and fast to make and very tasty. We try to use them anytime we have burgers, pulled pork(as shown) or any other sandwiches that are served on buns. (I know a fatty hamburger served on a multigrain bun may be counterintuitive, but every little bit helps doesn't it?) The only changes that I made are that I cut the recipe in half and I didn't have any millet flour, so I adjusted with bread flour. I also brushed them with water before they went into the oven and sprinkled with rolled oats.


-Chad

Floydm's picture
Floydm

I made my pain sur poolish today. I was eyeballing the salt and intentionally added a little more than usual, but I think it overdid it. It wasn't bad, but it just had that puckered look and listlessness it gets when you add too much salt. So it goes.

Pages

Subscribe to RSS - blogs