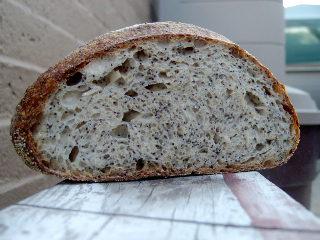
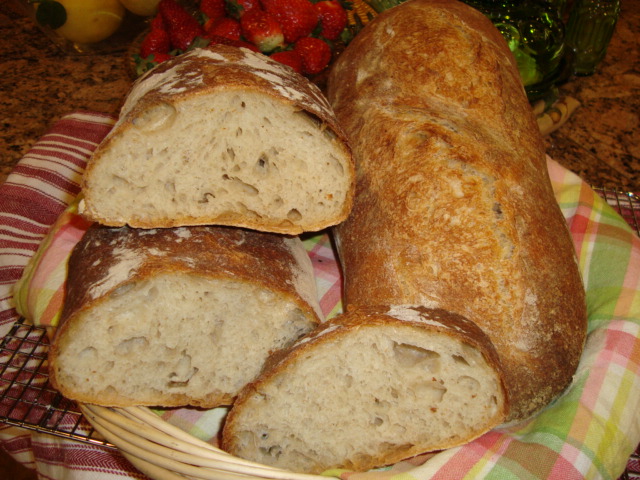
The Fresh Loaf

A Community of Amateur Bakers and Artisan Bread Enthusiasts.

Blogs

Bushturkey's picture
Bushturkey

Panne Siciliano

 Panne Siciliano

Panne Siciliano - crumb

Panne Siciliano - crumb

I found the flavour and texture to be better the next day (and not in the 2 hours after baking), and there was a little sourness. Is the durum flour meant to be sour? (My "sourdough" is not really sour and it's not previously imparted any sourness to breads).

shakleford's picture
shakleford

This was something of an unusual weekend in bread-baking for me in that I made two recipes that were fairly experimental.  I just posted my experience with this week's sandwich bread, a 100% sprouted wheat bread.  My dinner bread this week was the German Sourdough Rye recipe from Laurel's Kitchen Bread Book.  I had not originally planned to make this, but got both whole wheat and rye sourdough starters going this past week and just couldn't resist trying one out.  I was leaning toward this recipe for my first attempt, and decided to give it a try after reading some positive reactions from other Fresh Loafers.

My preparation started Thursday night when I began striving to get my rye starter as active as possible (thanks to advice I got here earlier in the week).  I followed Laurel's directions for this starter, which means that it's around 200% hydration, but even so it was doubling between feedings.  I may stiffen it up in the future, but want to keep it like this for now to experiment (by way of comparison, my new whole wheat starter follows the 75% hydration instructions in Reinhart's Whole Grain Breads).

On Friday evening, I added a bit of rye flour and water to create a much stiffer mixture, what Laurel calls the "basic sour".  This sat overnight, then more rye flour and water were added on Saturday to turn it into the so-called "full sour".  No pictures of these, since they were pretty nondescript.  The basic sour did have a terrific aroma after fermenting overnight, however.

Around four hours after forming the full sour, it was time to add the final ingredients.  These included a good amount of yeast, so I haven't really proven whether my starter can leaven anything, but I decided not to deviate from the recipe on my first try.  Other than the yeast, flour, and water, the only ingredient was caraway seeds, making this a much leaner bread than most of Laurel's.

One piece of advice in the Laurel's Kitchen Bread Book that I've found quite useful is her technique on steaming bread.  The dough is placed into a casserole (a two-quart, round-bottom Pyrex dish in my case) to proof, then just before baking, several tablespoons of water are added to the casserole and the lid is placed on top.  It's a very convenient method of steaming, plus it gives your bread a neat shape.  I'm not yet experienced enough to tell whether it's as effective as other methods.  Below is a picture of the setup at the beginning of proofing.  I added a bit of cornmeal, partly to help prevent the loaf from sticking to the pan and partly because I think it complements the rye very nicely.

After adding the final ingredients, the only recommended rise was a 45-minute proof.  Because the bread was made of 2/3 rye flour and 1/3 whole wheat, I was not expecting much of a rise and did not check on the dough during this time.  Oops!  When I came back, I was greeted with the below site and popped it into the oven as quickly as possible.

I was a bit worried about overflowing my casserole after that proof, but fortunately the bread did not rise much further in the oven.  I rarely get spectacular oven spring from breads with a high percentage of rye, so I'm unsure how much of this was due to my overpoofing and how much was due to the nature of the recipe.  In any case, here are photos of the resulting crust and crumb.

The cornmeal gave a nice color to the sides of the crust, but was invisible on the bottom, so I may try using a bit more there next time.  The crust was thin and crispy, just as I was hoping.  My camera doesn't do so well at closeups, but I was also extremely happy with the crumb (except for a few larger air pockets, which I'll tentatively blame on poor shaping).  Before this, the breads I've made with a high percentage of rye ended up extremely dense, coarse, and crumbly.  This loaf had a much more open and incredibly smooth crumb.  Even better, thanks to reading Whole Grain Breads recently, I think that I sort of understand why.

As far as taste, there was a slight sourdough tang, but probably not as much as I would have liked (it smelled sourer than it tasted).  In addition, while I'm not usually a big fan of caraway seed, I think that this bread could use more.  The recipe recommended 1/4 teaspoon per loaf, I doubled it, and I probably could have quadrupled it.  That being said, the flavor was definitely more appealing and complex than any other high-percentage rye I've made.  I will definitely be making this one again...but probably not until I've tried some of the high-percentage ryes from Whole Grain Breads.

shakleford's picture
shakleford

Almost every weekend, I make one loaf of what I think of as "sandwich bread".  As you might expect from this nomenclature, this is the loaf that I'll be using for sandwiches in the coming week.  I generally pick recipes that are reliable, fairly plain, and light enough to make a good sandwich (admittedly, I like dense breads, so I might be less strict about this last criterion than many of you).  My more experimental recipes, or those including fruit or nuts or lots of herbs or other goodies, or those that are just extremely dense, fall under what I think of as my "dinner bread" category.

This week's sandwich bread was a 100% sprouted wheat bread from The Laurel's Kitchen Bread Book.  My first attempt at this recipe was a few weeks ago.  Since that was my first time sprouting grains I didn't really know what to expect, and for some reason thought that I would be able to easily chop/mash the sprouts by hand.  This didn't work out so well and I was instead forced to grind my sprouts in small batches in an old coffee grinder.  The resulting mess (I hesitate to use the term "dough") rose only very slightly, giving me my first real brick.  It was an extremely tasty brick, but even so, would not have made very impressive sandwiches -- fortunately, that loaf was intended as a dinner bread, so I was able to enjoy it anyway.

Since then I have acquired a food processor to help chop my sprouts, so I decided to try the sprout bread again this weekend, and go all-out by using it as a sandwich bread.  Beginning Wednesday evening, I started soaking 1.25 pounds of hard red wheat berries.  Sprouting is pretty simple; you rinse the berries around three times per day, and other than that, just let them soak on your counter.  Just the same, I get a kick out of this part, as it sort of lets me combine another of my hobbies, gardening, with my baking.

By Saturday morning, the sprouts were just beginning to show.  I drained and dried the berries and stuck them in the refrigerator in anticipation of the heating they would experience when I began to process them.  A few hours later, I combined them with some honey, yeast, and salt in my food processor and gave it its inaugural run.  I initially planned to process half at a time, but it turned out that there was plenty of room for all of it.

Having never used a food processor in my bread-baking before, I was a bit nervous, but things worked out very well.  I processed in increments of around 20 seconds, between which I would scrape the dough together, break up any larger pieces, and check the temperature.  I stopped when the dough was circling around on top of the blades rather than being mixed any further.  At this point, it was still a bit below room temperature and passed the windowpane test with flying colors.

Ground Sprouts

After this, I kneaded for a few minutes, more to get a feel for the dough and to pick out a few whole wheat berries that had stuck under the food processor blade than for any real need to develop the gluten further.  The dough was somewhat sticky, but certainly manageable.  The texture was coarser than dough made out of flour, but still relatively smooth.

After I finished kneading, I put the dough through the two rises and proof standard in Laurel's approach to bread-baking.  Below is an image of the dough just before it began proofing.  As you can see, it is a fairly large amount of dough for one loaf.  This is because sprout bread is not known for its spectacular rises -- in fact, Peter Reinhart recommends significant added gluten as an (optional) ingredient in the similar recipe in Whole Grain Breads.  I'm not necessarily opposed to using gluten (though it does feel a bit like cheating), but wanted to try the recipe at least once without it.

Sprout Bread Proof

Up to the point that I put the loaf in the oven, the rises had been adequate but not spectacular, so I was not sure what to expect for a final result.  Fortunately, oven spring came to the rescue again.  While the below result will not set any records for lightness, I was quite happy with how much it rose for a 100% sprout bread.  What my lousy camera cannot show is the beautiful texture in the crust from the large pieces of bran.

I won't actually cut into this loaf until tomorrow, but right now I am cautiously optimistic that it was a success.  The appearance of the crust gives me high hopes of a terrific texture throughout the loaf, and I'll be pleased if the taste is anything like my previous attempt at this recipe.  The only possible problem I see right now is that the crust does seem a bit tough - next time, I may try cooking with steam.  I'm also interested in sprouting other grains along with the wheat, but would probably not do this in a 100% sprouted grain bread, or at least not one that I planned to make sandwiches with.

rainbowbrown's picture
rainbowbrown

sprouted wheat sd

Since it’s been spring I’ve been back in my springtime habit of sprouting things. I get all into it and sprout anything I can get a sprout out of and then I just eat them in or on everything. They’re just wonderful. This got me thinking about sprouted grain in bread, which is something that has crossed my mind more than once in the past, but I’ve never done.

I wanted to make a sourdough bread that included white and whole wheat flours and a large portion of ground sprouted wheat berries. I looked through all my books and didn’t find exactly what I wanted, so I wrote a formula myself. This is also something I’ve never done before, and boy was it exciting. I spent about an hour and a half the other evening, with a notebook and a calculator perfecting it on paper. Oh my…it was fun. After I was done, I felt a little drained and my boyfriend asked me which class I had been doing homework for. I told him what I had been doing and he said “man, even your hobbies are like homework.” He can’t really wrap his head around the fact that I find playing with calculators to be a lot of fun. :)

I ended up using both Peter Reinhart’s Whole Wheat and Sprouted Grain Bread from WGB and Hamelman’s Five Grain Levain as guides for my formula.

crumb

To sprout: Rinse whole grains or seeds or beans and soak overnight in a mason jar or other glass container of similar shape (for about 12 hours, softer or smaller things such as sunflower seeds or lentils could go a little less and bigger or harder things such as wheat berries and garbanzos could go a little longer). Drain and cover the jar with cheesecloth or muslin or plastic with holes poked in it and secure with a rubber band. Turn jar upside down, place in a bowl and cover with a towel. Twice a day, fill up the jar with water, swirl contents and drain through the cheesecloth. Place drained jar back in the bowl, upside down. I generally do this until the tails of the sprouts are about as long as the grain itself, which can take anywhere from 1 to 4 days, depending on what I’m sprouting. I learned from WGB, though, that when using in bread making, wheat berries should only be sprouted until you see just the beginnings of the tail, so it took me about a day (or two rinsings) after soaking for my sprouts. Note: you can save the initial soaking water and it is close to what’s called Rejuvelac. It’s quite nutritious and you can use it as part of the water in the final dough.

I also used amaranth sprouts in this bread, which ended up not grinding well, so they remained whole. They’re tiny so it ended up good.

I weighed out both sprouts to equal 200 grams and then ground them in a food processor. I’m sure any combination of sprouts to equal 200 grams would work great here. edit note: If you start out with a certain amount of dried grain and sprout it, you'll end up with more than you began with because the grain absorbs water and becomes heavier. So weigh out your sprouts after they've become sprouts and then grind them. If you have leftovers all the better; mix them in with some rice or throw them in your soup or oatmeal or salad or, you know, anything.

So here’s the recipe I used, I’ll skip the page of formula that comes before the final dough part.


· 200 g high gluten flour

· 67 g bread flour

· 116 g whole wheat flour

· 113 g ground wheat berry sprouts

· 87 g amaranth sprouts

· 288 g water

· 10 g salt

· 283 g ripe starter (75% hydration, I used 93% bread flour and 7% rye flour in my final build)

1. Mix and knead. I kneaded by hand for about 8 minutes, rested for 5 then kneaded for another 30 seconds or so. The dough is sticky.

2. Bulk ferment. It took me about five hours to get it to rise by about half. I stretched and folded twice, once at one hour and another two hours later.

3. Shaping. At this point the dough was smooth and pretty great looking. It felt a little heavy, as do many of my sourdoughs at this point. I shaped it into a big batard. Proof for about three hours, or you know, until you feel it’s ready (puffy looking, bigger, finger poke indent remains). Or, I imagine retarding overnight would work nicely. In fact, I think I’ll try retarding next time.

4. Slashing and Baking. I loaded it into a 500 degree oven with steam and turned it down to 450 after about 3 minutes. It baked for 37 minutes.


This bread turned out wonderfully, I’m so happy with it. The loaf is moist and it tastes slightly sweet and very mildly sour. It has an aspect of flavor that is deeper than other sourdough breads I’ve made with large percentages of whole wheat flour. Now I could just be waxing poetics about my sprouts, but I’m going to go ahead and say that this is they’re doing. I highly recommend trying out sprouts in bread, perhaps even as part of the soaker in some other recipe. They’re so nutritious and it’s the perfect time of year.

jessicap's picture
jessicap

I just got Peter Reinhart's The Bread Baker's Apprentice and intend to make many of his breads over the next few weeks. It's slightly unfortunate timing, since it'll be Passover in a month and then summer in a few more weeks (I'll wait, impatiently, until fall to put up a sourdough starter), but that just means I need to make as much bread as possible each weekend.

My first loaf was the pane siciliano, made with semolina flour. The nine-year-old promptly dubbed it "the best bread I've even tasted;" he'll be getting sandwiches made from the batard loaf this week. I'm going to try adding some whole grain flour to the recipe in the future.


I made a triple batch of his pate fermente on Thursday. One pound went into this bread; the other two are frozen for future use. The bread dough is made with the pre-ferment, high-gluten bread flour, semolina flour -- the nubby kind you make pasta out of -- a little honey and olive oil, salt, yeast and water. I kneaded, fermented, and shaped on Friday. It was an extremely flexible dough, stretching out like a baguette with no springing back at all. It went into the fridge overnight to proof. (I was out of sesame seeds, and the nine year old doesn't like them anyhow.)

I baked it this morning in a very steamy oven. (I preheated the oven to 550 degrees, with a cast iron skillet on the floor. I poured in simmering water and closed the door quickly, twice. The oven was incredibly steamy, despite no additional misting of water). When the bread went in, I turned the heat down to 450. After 15 minutes, I separated the breads, because they were touching; ten minutes later, they were done (205+ on the thermometer.)

Unanimous verdict? Yum.

For next time:

  • Try replacing about a third of the flour in the pre-ferment with King Arthur white whole whole wheat.
  • The batard loaf is a little small for sadwiches;maybe make one large batard and one spiral next time? It also should probably be slashed; it split some on the side.
  • After 15 minutes in the oven, take the bread off the pan entirely and put them directly on the rack. The middle load stayed white and soft on the sides because they didn't get enough direct heat.
bwraith's picture
bwraith

I thought it would be interesting to compare four different approaches to sourdough fermentation. I've baked four test loaves, each with 500 grams total flour (using a 50/50 blend of Heartland Mill Strong Bread Flour and Heartland Mill Golden Buffalo for a blended ash content around .85%), 72% overall hydration, and 2% salt. All loaves started with 18 grams 80% hydration white flour storage starter.

The difference in the loaves is in the fermentation method. In one loaf a direct inoculation of storage starter in the final dough (one-step method) was used. In the others a sourdough preferment was built and fermented for different amounts of time. The final loaf includes a spike of instant yeast.

Fermentation Methods Used

  1. Build final dough including 18 grams of starter, bulk ferment for 11.75 hours, final proof for 3 hours all at about 70F. (xls and html spreadsheets)
  2. Build a sourdough preferment constituting 35% of total flour and ferment until just doubled, about 8 hours at 70F. Soak remaining final dough ingredients overnight in the refrigerator. Mix preferment and soaker and bulk ferment for 3.75 hours at 70F then final proof for 4 hours at 70F. (xls and html spreadsheets)
  3. Build sourdough preferment same as in step 2 and ferment for 4 additional hours after it has doubled, about 12 hours at 70F. Proceed same as in step 2. (xls and html spreadsheets)
  4. Build sourdough preferment same as in step 3. Add 1/4 tsp yeast to soaker. Proceed same as in step 3. (xls and html spreadsheets)

The idea is to compare a long fermentation from an initial very small amount of starter to using a sourdough preferment that is immature (just doubled) or more mature (peaked). Finally, in the last one, the idea is to add in a spike of yeast to improve the rise in the case where a large, mature (35% of total flour and fermented until peaked) preferment is used.

In all cases, the final dough was shaped into a loaf when it had a little less than doubled during bulk fermentation.

Photos of the crust and the crumb from left to right:

Test Fermentations 1-4 From Left to Right - Crust

Test Fermentations 1-4 From Left to Right - Crumb

Comparison

Crust

I couldn't tell any real difference in the crusts. It's possible the first one was a touch darker than #2 even though both were baked at the same time. Maybe there was a little more enzyme action in it since the entire dough was hydrated at room temperature for about 14 hours.

Crumb

Although they are more similar than different, the crumb was slightly lighter going from 1-4.

For loaf #1, this may again be a function of the enzyme action, which may have in some way hindered the gluten development. Another explanation might be that I needed to fold #1 one or two more times earlier to improve the gluten development over the longer fermentation, as it did seem a little too relaxed at shaping time, relative to the other loaves.

For loaves 2-4, the more mature preferments did not hurt the gluten in this case. I believe the very strong flours contributed to the better results with the more mature preferments. The more mature preferments probably had a larger organism count than the preferment for loaf #2, as they weren't at the collapsing stage yet. So, with higher organism counts, higher fermentation byproducts, but very sourdough tolerant flour, the more mature preferments ended up with slightly larger loaves in the end.

The oven spring went in opposite order to the loaf volume, not surprisingly, which explains why the result after baking is not as different, but the overall loaf volume before baking was significantly larger for loaf #3 than loaves #1 or #2. In the case of loaf #4, the yeast clearly had a big effect on gas production before shaping. I did deflate it a little during shaping, of course. It again was significantly larger pre-bake than loaf #4, but after baking it was only a little bit larger. In summary, the loaf volume before baking increased significantly from loaf 1-4, but the oven spring, which was greater in 1 and much less in 4, offset much of the difference. Nonetheless loaf #4 had a noticeably lighter feeling in the mouth.

Flavor

All of the loaves were fairly mild in flavor. However, without a doubt, loaves #3 and #4 were more sour than loaves #1 and #2. Everyone who I had test the loaves was able to discern the more sour flavors in #3 and #4. There was some debate about the order of #1 versus #2 and #3 versus #4. My youngest son, William, noted a sweetness he seemed to like in loaf #1. I believe he may be detecting, once again, some effect of the enzyme action that was probably greater in that loaf, which soaked for so long at room temperature, and may have resulted in more starch broken down into sugars. My oldest son thought #2 was more sour than #1, which may be correct, given that it had a slightly longer total fermentation time. My son's girlfriend felt the order was 1,2,3,4 from least to most sour, but others had no opinion on #3 versus #4.

Comments

I believe the following are true, all other things, particularly the temperature and amount of enzyme action in the process, being equal.

The difference between #1 and #2 is minimal. You can do a one-step or two-step process timed for convenient stopping points, and the results will be nearly alike, provided that the preferment is not allowed to get very ripe. A two-step process where the preferment is allowed to ripen significantly more will have a more sour flavor.

The least sour result comes from a one-step process run from a very small initial amount of starter.

At some point, I would like to test out effect of temperature in a side by side comparison. I believe if you adjust the fermentation times so that the relative ripeness of the preferments is similar to the loaves above, that the results may not be very different from above. I suspect the slight favoring of lactobacillus versus yeast at temperatures around 65F will have a smaller effect on flavor than overall relative ripeness of preferments and final dough, but I don't know if that test will get done at my house any time soon.

Susan's picture
Susan

Thanks, Norm, for this recipe. Boy, are these good! This is the first recipe in a long time that tempted me to stray from straight sourdough!


I think I should have used convection for the last half of baking. And I should probably smush them down more and give them a bit more room on the sides next time.


You can see that I started out with 15 two-ounce rolls and now have only eight left, and they just came out of the oven! Mmmmmmm.

Susan from San Diego

Half-baked Onion RollsHalf-baked Onion Rolls

Norm's Onion RollsNorm's Onion Rolls

Here's the link to Norm's recipe: http://www.thefreshloaf.com/node/6245/another-one-norm-onion-rolls#comment-31799


Bushturkey's picture
Bushturkey

I had a go at the a l'ancienne method with 27% organic rye flour (I think it was wholemeal - there were gritty bits in it), 73% organic bread flour and a 75% hydration. I threw in half a handful of caraway seeds. I also used 4% organic raw sugar (in Reinhart's "The Bread Baker's Apprentice" there is a recommendation to use some sweetener when using rye flour).
I fermented the starter overnight (about 12 hours) but the finished dough fermented in the fridge for about 20 hours. When I took it out to shape it, the internal temperature registered 6.1 C (43 F).
The flavour of the baked loaves was amazing! A l'ancienne - The Money Shot!

 A l'ancienne - The Money Shot!

My wounded baguettes

My wounded baguettes
dmsnyder's picture
dmsnyder

Bread awards

Bread awards: Grandaughter, Naomi, really likes my SF Sourdough Bread.

You can have your James Beard Prize and your Coupe du Monde. This is enough of a reward for me.

David

AnnieT's picture
AnnieT

I decided to try the Pain a l'Ancienne from the BBA after reading all the latest success stories with this recipe. My Cuisinart isn't big enough for the full amount so I halved it and all was well. I was so scared of overmixing that I probably could have let it go longer but the dough seemed fine and went into the refrigerator overnight. I was totally amazed to find it had more than doubled by this morning - so now what to do? PR says to let it sit out for 2-3 hours to warm up and continue fermenting. I gave it over an hour while the oven heated, and maybe I should have believed Peter. No problems cutting and stretching the dough, and got a fantastic amount of steam from the cast iron skillet I had decided to sacrifice to the cause. The baguettes have a crispy crust and taste good but the crumb isn't very holey, or not as open as I had hoped. Oh well, I'll just have to try again.

On the other hand, the loaf of Almost No Knead bread was really sloppy and hard to shape into a boule. I let it rise for 2 hours and was convinced I would find a pancake when I removed the ss mixing bowl after 30 minutes. In fact it was well risen and had "bloomed" where I had snipped with scissors. Gave it another 20 minutes with the cover off, then 5 more with the door ajar. It "sang" so loundly I could hear it in the next room! I suppose it would be better to be sure of the results each time but I rather like the unexpected, especially when they are good. Now I have to work on my roast spuds, my part of the Easter dinner with the family, along with baguettes and the happy loaf, A.

Pages

Subscribe to RSS - blogs