The Fresh Loaf

A Community of Amateur Bakers and Artisan Bread Enthusiasts.

Blogs

shakleford's picture
shakleford

I've been baking bread occasionally for several years, but it's only within the last year or so that I've started to become particularly interested in it.  I've also shifted gradually to baking more and more with whole grains, until these days probably only 5% or so of the loaves I make use white flour.  I've been wanting to purchase a grain mill for quite some time to use in my bread-baking, but kept putting off the purchase.  I knew very little about mills, and wanted to be sure that I researched my decision thoroughly.  In addition, I'm a serious tightwad and mills aren't cheap.

However, I finally made a purchase and received my mill yesterday.  After repeatedly reading about every website about grain mills written in English and most of those in German (seriously), I decided to purchase the German-made KoMo Fidibus Classic mill, more commonly known in the US as the Wolfgang or Wolfgang Tribest mill.  Those of you who own mills likely know more about the pros/cons of this and other models than I do and those of you that don't probably don’t care, but in brief this is a small stone mill.  It has the advantage of being able to grind any coarseness, from cracked grains to fine flour.  It has the disadvantages of not being able to handle beans, nuts, and seeds and the fact that stone-ground flour tends not to rise as well (though I've found this difference minor when purchasing commercial stone-ground flour).  It's small size means that I can easily fit it into my kitchen and that it's cheaper than many alternatives, but also that it requires around five minutes to produce one pound of fine flour - fast enough for me, but perhaps not for others. 

Fidibus Classic mill

Of course, a grain mill isn't much use unless you also have some grains.  There are some grains that I can get locally, but even with shipping, most are cheaper (and arguably higher-quality) online.  I purchased a few items from Wheat Montana and the rest from Azure Standard.  Grains will keep for quite some time, so I bought in fairly large quantities.  My long-term storage solution, utilizing the gamma seal lids that I've seen recommended on TFL and elsewhere, is pictured below.

Digging into those buckets every time I'm baking is not real practical, so I also needed a more kitchen-friendly, short-term storage solution.  I ended up going with a set of metal canisters ranging is size from 2 to 4 quarts.  This is large enough that I will not need to refill them too frequently, but small enough that I can remove them from the top of my cupboards without too much work.  Many of the canisters shown below are empty since not all of my grains have arrived yet, but 11 of the 12 are earmarked for something.  I haven't decided what to put in the last one...maybe wild rice?

Metal Canisters

Because I just got the mill and haven't gotten many of my grains, I've only used it in one loaf so far (Peter Reinhart's multigrain struan, pictured below).  I haven't cut into it yet, but the rise appears to be just fine (higher than I'd expect in fact, considering that it contains 12 ounces flour and 6 ounces whole grains).  I have a list of at least a dozen recipes that I immediately want to try with the mill...it will take a bit to work through them all, but then that's the whole point!  Thanks to everyone here who has posted anything about mills at one time or another; I can pretty much guarantee that I've read your comments at least half a dozen times.  If anyone is considering a mill purchase and has questions, I'll be happy to go into greater detail on why I purchased what I did (though I'm certainly not an expert, and once you get me started on mills these days it's hard to get me to stop).

Susan's picture
Susan

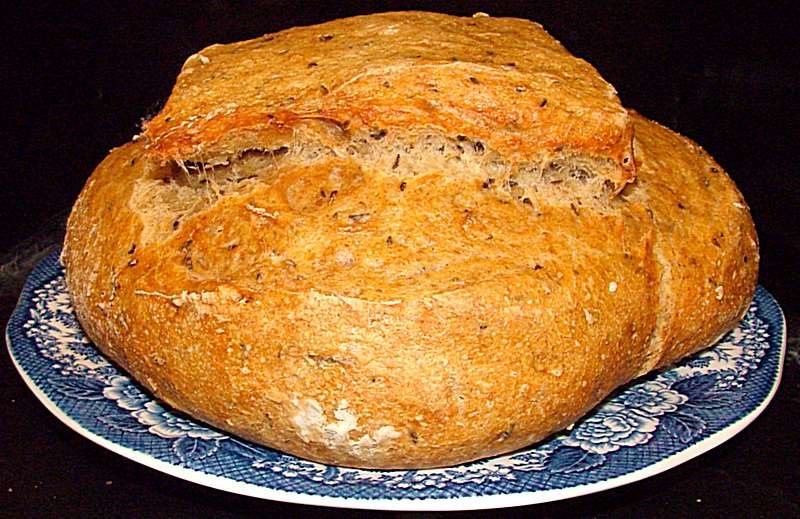
Today I baked the sourdough bread I've been looking for ever since starting this odyssey. It has a crispy crust and a stretchy, holey crumb. And it's easy. As I told a couple of friends earlier, "...it's reproducible, if the weather stays exactly how it is today."

I'm not suggesting that this could be anyone else's ultimate sourdough, but it sure is mine, at least for right now. Thanks to all who have helped me over the past year or so, even unwittingly. It continues to be great fun. The recipe is below.

My Ultimate Sourdough

Susan's Ultimate Sourdough

Starter is made the way Peter Reinhart suggested to us in class: 1:3:4 (starter:water:flour)

A single small boule, made by hand:

12g starter

175g water

25g whole wheat flour

225g hi-gluten flour (All Trumps, to be exact)

5g salt (I use Kosher)

Mix starter and water, mix in flour. Rest a few minutes, then re-mix. Dump into a greased bowl, let rise until doubled, about 8 hours. Turn the very soft dough onto your counter and pat it out, then sprinkle salt over the top. Roll it up, then gently knead a few times to distribute the salt. Let relax. Do the following until the dough is hard to fold: round up, let the dough relax, stretch and fold. Round up, let relax, shape, and put it in a banneton for proofing 3-4 hours in a warm spot.

The oven was preheated for 30 minutes at 500F, and reduced to 450F after I put the loaf in. It was baked on a tray, covered, for 18 minutes. The cover was then removed and the loaf baked until dark brown, about another 8 minutes.

GlindaBunny's picture
GlindaBunny

I had to bring cookies to a church function.  My husband recommended the Sierpinski Carpet fractal cookies shown on evilmadscientist.com.  I thought the square shapes might be a little boring and decided to do Sierpinski triangle cookies instead.

 I made them green and added peppermint extract.  The recipes I used were:

1 1/4 cups all-purpose flour

1/2 cup unsweetened cocoa powder

1/4 teaspoon salt

1/2 cup butter, softened

1 cup white sugar

1 egg


for the chocolate part and

3 cups all-purpose flour 

3/4 teaspoon baking powder 

1/4 teaspoon salt

1 cup unsalted butter, softened 

1 cup sugar 

1 egg, beaten 

1 tablespoon milk

for the green part.  I didn't chill the dough at all because I wanted it flexible to work with.  It was tougher than I thought it would be to shape the triangular logs of dough, but they look pretty decent for cookies.


I ended up with lots of scraps.  I rolled them into a log and made swirled round cookies (I didn't want to waste the cookie dough).

Sadly, nobody at church even noticed that they were fractals.  *sigh*

baked cookies:


jpfridy's picture
jpfridy

I have a fledgling food blog, and I've recently posted about my travails in making simple white sandwich bread from BBA.

The story has two parts:

- Part I: failure

- Part II: redemption

As I post more about bread, I'll be sure to cross-reference here.

JP

foolishpoolish's picture
foolishpoolish

Gosh it's been too long since I posted any blog entries. 

Anyone who's seen my recent posts scattered throughout the forums will know I've been having difficulties with maintaining shape in my sourdough attempts as well as getting too much sour flavour (yes there really is such a thing...at least for my tastes! :) )

Today, a breakthrough came in the form of a 100% (no sifting) whole wheat miche  - it was less sour than recent attempts, still wonderfully nutty and flavourful and retained excellent shape throughout (with plenty of oven spring as a bonus).  It came out pretty much exactly as I planned it.  I'm really pleased, of course, and must give a lot of thanks to Eric and Bill - your tireless theorizing,  testing and experimentation were invaluable.  

More important than the delicious bread which I'm currently enjoying with slivers of Gjetost (mmmm brown norwegian yumminess!) - was what I learnt about my starter (Bubbles...yes I went ahead and christened my starter!).  I'm still organising and assimilating all the information in my mind but much has to do with the feeding cycle - something I already had suspicions about before.  Also learned a lot about how to apply a different strategy to whole wheat bread - using more starter/intermediate build in the final dough to get a milder result.

Well, that's all for now.  More stuffing my face to follow....

FP


Yumarama's picture
Yumarama

Well, I thought I could sail on through to the actual bread making but it seems not without a slight hitch that needs some sage minds to help out.

Meet Clem.

Clem is Audrey's first child. He was made of the following:

30g Audrey stiff starter (rye)
100g spring water
100g UAP flour

Clem grew up in a warm, cozy 81F environment and is now 18 hrs old. Soon he'll be expected to get a job raising bread. But he seems decidedly reluctant. At 18 hrs, he's barely managed to increase from his original 200ml to 250 ml when we are expecting him to reach 400 within 12 to 24 hrs. Clem is quite bubbly on the surface while rather mild natured but clearly lacks ambition to reach higher goals.

Clem at 18

What shall we do about Clem? I'd really like him to move out soon.

AnnieT's picture
AnnieT

This week I borrowed "From a Baker's Kitchen" from the library. The author is Gail Sher who was the first head baker of Tassajara Bread bakery, and it was first published in 1984. In the ingredients section she mentions bread flour and goes on to describe Spring wheat and Winter wheat and their different features. Then lower down she talks about Bread Flour introduced in 1982, a combination of high gluten flour and barley malt flour with potassium bromate added (a dough conditioner.) She states "This new product causes the dough to rise overly fast so that the true texture and flavor of the wheat do not have sufficient opportunity to develop. Therefore it is not recommended." I'm curious - is she referring to what we now mostly use for bread? Was it such a radical invention? Also, to hark back to my other post about low temperature baking, it seems that most of her breads are baked at 350*. Some, like the fougasse, are started at 400* for 10 minutes then lowered to 350*. Was this the old way, and how and when did we start using the high temperatures to create what I for one consider to be much superior bread? A.

Yumarama's picture
Yumarama

So it's now 9 a.m. (about) and we're ready to go with feed number three. We've taken apart the previous feed ball and scooop out 30g of that starter from the bubbly center.

I might note here that there's a slight sour smell present although not terribly strong.

In the meantime, Mini has added a post to the original forum thread, saying she's started up a stiff ball as well so we'll then be able to track the two stiff starters at the same time to see what happens.

She also makes mention that she's added 70g of flour to her ball so that's what we'll do as well.

So for this third feed we have:

30g starter
50g spring water
70g organic rye flour

And here it is after getting a final dusting:

Audrey Feed #3

Off she goes into the proofing box and we'll check on progress and post any new pics if there's something noteworthy.

I'll also update the forum thread itself in case anyone's interested in following this little saga/experiment.

http://www.thefreshloaf.com/node/6826/oh-please-oh-oh-oh-please-grow-me


Part Deux:

So Mini says Audrey's all growed up and ready to go raise bread of her own. Awww... <sniff..>

They leave the nest so soon...

Anyway, since I didn't get that message until just a minute or two ago (gasp, I did stuff AWAY from the computer??!?) here's another update on where Audrey is right now...

Audrey goes flat again


So I'll now start using her and feeding her over to All Purpose then pop her in the fridge after keeping a chunk for some first run test bread.

Weekly feedings, I assume, pulling her out before the weekend to get some bread going.

Now to go hunt up a recipe or two. I suppose I need to also figure out what hydration ratio she actually is in case I need to use her in a normally comm. yeast recipe (no not right now, in the future). I'll add this to the thread when I get that done so that if anyone else folows along, they'll have the info.

So there we go, the Audrey Saga is sort of at an end already. Who'da thunk it would be so quick!

Of course the REAL end will be posting some bread pics. Since it's Sunday night here, not sure if I'll get time to make any for a few days... Those who are watching, keep an eye out!

Thanks a BAZILLION to Mini and Mike for their help. You guys are beyond great.

See you all in a couple of days or so with the first batch of Audrey Bread!!

Yumarama's picture
Yumarama

So at this point, we're at the 10 hour mark and it's getting late so I mix up a fresh ball. I gather grab some of the previous ball's insides and mix up the following:

30g stiff starter
50g spring water
50g organic rye

Here I cut back from the previous 88 grams of flour which made, in my opinion, too stiff a ball. I'm still just guestimating at this point.

And here is the resulting ball:

Start of Feed no. Two


Audrey now goes into the proofing box, a cooler with a 15w bulb with the cover open enough to keep the temp inside a reasonably cozy 81F. Tucked in for the night, we'll return to see how well she slept.

<tick tock tick tock>

<cue SFX of rooster crowing and first few bars of Tchaikovsky's William Tell Overture>

Good morning! Let's check how our little dear did overnight...

Well, there's no question the dough is softer now! Flatness galore and several cracks showing but whether they're from the flattening and changing shape of from actual expansion, I dunno. So we'll go from here and assume out next step will be doing the third feed. But first, Audrey goes under the knife again.

Although the very action of slicing into this soft ball caused the exposed surfaces to get somewhat messed up, it seems from the dupicate holes on each side that there was indeed some bubbling going on. Let's continue with the dissection...

Peeling away the slightly dryer outside skin, we can now see that the insides are full of little bubbles and the texture is decidedly softer than the original 2nd feed ball was, which indicates feeding activity by the little critters. Excellent.

On to Feed #3...

Yumarama's picture
Yumarama

I'm starting this blog to track the events in the life of little Audrey 2, a reluctant starter that began as a rather wet batter form and, as recommended by Mini, was transformed into a ball of stiff starter. In a forum thread I started in order to get help figuring out why my then 13 day old starter was doing nothing, Mini's thought was that possibly I was underfeeding the starter in the wetter form (basically I was doing 50% starter, 25% each water and flour for each feed) which may have been the reason it went all hoochy rather fast: not enough flour to feed the yeasties and the acid bacteria was overtaking - or that was my thought on it anyway.

I'm also doing this as a blog so the forum thread isn't taken over by too many images and so it's easier to follow along, should anyone care to.

Since this starter, third time trying over a three month period btw, was pretty much destined for the recycling bin anyway in favour of starting yet again with a recipe Mike has on his site (Professor Calvel's Starter) as a likely successful candidate for starter if the previous verion failed. Since this was try #3 and I was already on day 13 with no real success, I was game.

So while I was/am waiting to locate a source for just 5g - about a tablespoon - of malt extract (it seems to come in 600g sizes or bigger running at nearly $10 a pop) to follow the Clavel reicpe, I got going with the stiff starter. So here's the saga.

As per Mini's sugegstion, I took 30g of the "going nowhere" batter starter, added 50g of water and "enough flour to make a stiff ball". Out came the flour and off we went.

Here's our first image, Audrey 2 after being mixed up. In all, I added about 88g of flour to get to this.

I now think that 88g of flour was too much but that's where we were then, so on we go. I had followed Mini's suggestion to drop the ball into the flour and coat it so that any developing cracks would be obvious which is why, even though it's a ball of wet rye, it looks very pale.

Three hours later:

At this point, there's either a shrinkage of the surface or it's expanding a little. Since the surface was still moist-ish to the touch, I'll say we had expansion.

At the six hour mark:

More activity although the ball is showing no signs of softening and flattening out as Mini suggested it would. I'm starting to think I went too far with the added flour.

At the 10 hour mark:

Definitely some activity and expansion has occured but now I'm sure the ball was made TOO stiff. Yes, the critters have lots of flour to munch on, but nothing to drink. Because I wasn't staying up much longer, I decided to do feed #2 at this point so it was time to cut up our ball and see what was going on inside.

Even manhandled like this, the ball is stiff enough to stay in shape. Slicing it open, thetexture inside is realtively smooth, if there are any bubbles, they're hard to see and distinguish from the texture of the rye flour. There's little sour aroma to this, mostly it smells like wet rye.

Time for feed #2...

Pages

Subscribe to RSS - blogs