"Adjusting" sourdough starter
Last week's result

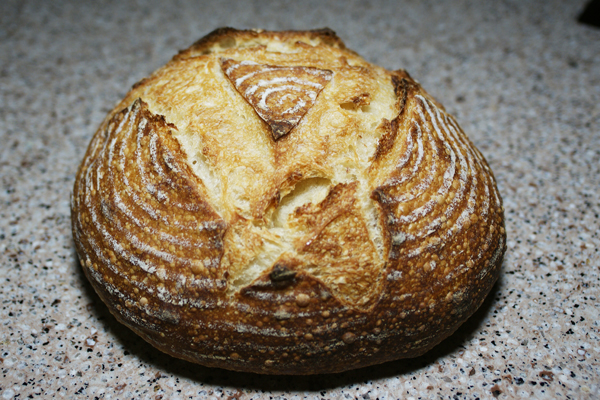
Yesterday's result
- Log in or register to post comments
- 11 comments
- View post
- davidg618's Blog
Last week's result
Yesterday's result
Chinese had been poor throughout history. It's customary to greet people, "Have you eaten?" Up until recently, when I had to call someone on the phone, the first thing I said was, "Have you had lunch (or dinner)?" This is my hello, how's it going sort of greetings. Lately I've found that must have sounded absurd to people. I ran into Carol, our neighbour, and two (or should I say, three) nice looking lady friends of hers saying good-bye to each other at our cul-de-sac around mid-day today. What did I say?
Last night, I refreshed a liquid levain with the intension of baking a batch of Pat's (proth5) baguettes today. I made a slightly higher hydration dough with Giusto's Baker's Choice flour and 10% KAF White Whole Wheat.
This morning, I mixed the dough, did the autolyse, stretched and folded, and put the dough in a bowl to bulk ferment. After the first folding, my wife and I dashed out to run a couple errands. As we drove, we discussed dinner and decided we felt like pizza.
Many times when I give a loaf as a gift it is still warm and I am reluctant to put it in a plastic bag to risk ruining the crust. I have used teatowels but then the recipient feels obliged to return the "wrapper". I am also a quilter and as anyone who quilts or is related to a quilter can tell you - we have fabric! Yards and boxes and closets full of fabric. So my latest idea is to sew bread bags. No more lost teatowels, no more huge ziploc bags to accomodate sharp "ears" which can tear a 1 gallon bag.
Peter Reinhart's recipe for San Francisco Sourdough Bread in "Crust&Crumb" is one I keep coming back to. I have enjoyed many French-style levains with a more subtle sourness, but I still prefer the assertively sour San Francisco-style Sourdough. Reinhart's formula in C&C is the one with which he won the James Beard Award, and it is a winner in my book too.
I would like to thank everyone who weighed in when I was looking for advice for the class, "Chemistry and Culture of Bread" that I co-taught this spring. It was an amazing experience. We had 15 students in the class and the local Congregational Church allowed us to use their kitchen with two regular ovens and two huge convection ovens.
This is a loaf of Susan's sourdough that I was sure was way overproofed. In fact it surprised me and produced a lovely set of ears. Note the stainless steel stirring spoon, perfect for whipping up my starter. Susan is going to enter the picture! A
I tried to include a picture, but I'm not adept enough with my photo editor and the online host. Maybe another time. But, trust me, they look and taste good.
They're the Four-Seed Snack Crackers on page 122 of Brother Juniper's Bread Book by Peter Reinhart.

