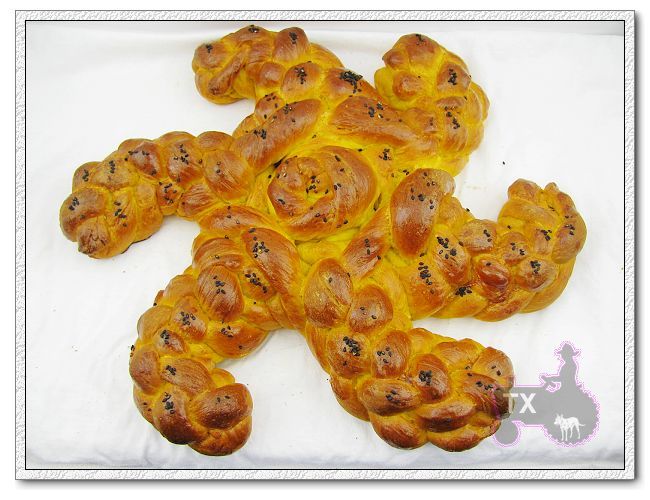
The Fresh Loaf

A Community of Amateur Bakers and Artisan Bread Enthusiasts.

Blogs

jj1109's picture
jj1109

Necessity is the mother of invention, it is said. And last night, it was necessary in my kitchen. We were having Honey Chicken, a delicious deep fryed dish of loveliness, and my regular (read - the last time I made it) batter recipe called for beer. After all, everyone knows that beer batter is just the best.

Not any more! I couldn't be bothered going out to get the beer. I was just going to make a very boring yeasted batter, but then remembered Peter Reinhart saying "Beer is liquid bread, bread is solid beer"... I ran to the refrigerator and pulled out the sourdough starter.

50g mature starter (100% hydration)

308g water

35g rye flour

107g bread flour

I whisked all that together and left that to sit in a warm place for about 2-3 hours, and it went very well. Delicious odour to it...

toss the chicken in some cornflour, coat in the batter and deepfry until done. This sourdough batter was the best I have made in 6 years making this dish (ok, so I usually only make it 3 or 4 times a year ;)) It was crunchy crisp and had an amazing flavour, and when I tossed the fried chicken in the honey mixture (stirfry a finely chopped chunk of ginger, add 1/3 cup honey, add chicken when honey is bubbly, once honey is coated mix together 1 tbs soy sauce and 1 tbs cornflour then stir that through) the batter stayed crisp!

A great meal. Now I'm on the lookout for more things I can deepfry in this batter! Unfortunately no pictures as we ate it too quickly!

Anonymous baker's picture
Anonymous baker (not verified)

This was a delicious bread! It was everything I hoped for (thank you David!). This massive loaf had a delightful sourness with a nice rye flavor, a well-developed structure without any hint of heaviness, and a wonderful aroma. I would definitely make it again.

This was a three-build bread: I made the German rye sourdough Thursday night and the rye sourdough Friday night. I used KA bread flour and home-ground unsifted rye (the formula called for white rye so this was a substitution). Everything ticked along exactly as expected. I put the final dough mixture together Saturday morning and mixed it in my Kitchen Aid on speed 4 for 14 minutes (again, thanks for your help on this David!), scraping the sides down twice. After I literally poured the mixture into a dough bucket, I let it ferment at room temperature for about 2 1/4 hours. Meanwhile I scoured the house for an appropriately sized proofing basket for my 2 1/2 pounds of dough finally turning up a basket from a closet.

After rubbing a considerable amount of rye flour into a flour-sack couche, I emptied--again almost poured--the dough into its center. The dough was too slack to shape, so I just lifted the whole thing into the basket, covered it with plastic wrap, and let it proof for another 1 3/4 hours during which time it nearly doubled. I then placed a piece of parchment paper on a baking sheet, sprayed it with PAM, placed it over the basket, flipped it over and watched the dough come tumbling out.

After three quick scores about 1/2-inch deep, I slid the spreading mass onto a preheated oven stone on the middle rack, plopped 3/4 cup of ice cubes in a skillet beneath the stone for steaming, shut the door, and hoped for the best. As I watched through the oven window I was delighted to see a lot of oven spring. The dough expanded both upwards and sideways increasing in volume nearly 50%. I was very pleased and hopeful. I threw a piece of foil over the loaf after 20 minutes because I worried that it was getting brown to quickly and then checked it to see if it was done at 40 minutes. It registered 96º C. so I removed it to a cooling rack. I was very happy to feel that the loaf was wonderfully light. I knew I had a winner.

Notes: I used the rye sour from Leader's book. It had sat in the refrigerator un-refreshed for a month but seemed to perform just fine after only one feeding and 12 hours on the counter (actually, I let it sit on the counter for 24 hours before using it); no doubt, this is a testimonial to the rehabilitation properties of rye flour.
You can see the hole in the top of the loaf where I injected the helium. polish cottage rye
I took some more pictures but didn't have the CF card in the camera so I'll post more tomorrow.
Here are some more pictures. Vodka is the traditional accompaniment.
polish cottage rye
polish cottage rye crumb
This is a picture of about one-third of the loaf in its proofing basket; I'm including it so you can see how really large this massive loaf was.


After our dinner of sausages, grilled red peppers, and sautéed onion relish, we enjoyed a fre$h cherry pie. The pie's crust was perfectly flakey and delicious owing to the incorporation of a small amount of solid Crisco with the butter (as usual, I promised myself that this was absolutely the last time I would use the white stuff!).
fresh cherry pie

--Pamela

hullaf's picture
hullaf

In past writing I've mentioned that I've been looking for a bread bowl. I own an antique kneading bowl that didn't clean up well and was too cracked to use so I have been on the prowl. Well, in the woods here in TN we have a variety of trees and my hubbie and I found a very big burl on a white oak tree on our property. We had the tree taken down (too big for us), got the burl off, and have set about making a bowl. It's an undertaking I tell you. We think the original whole burl and associated bark, etc. was over 120 pounds and about 3x2x2 feet big. My hubbie is doing all this work, he has experience with wood as he has been an amateur carpenter of sorts for the last 30 years. Here is the burl with most of the original excess wood removed, mostly by chainsaw.  

   white oak burl  

Then he removed the bark and more excess wood. It went down to 70 pounds, weighed on the bathroom scale! Still quite cumbersome.  

   burl without bark  

No bark-no bite to this burl! The wood is very hard and there are nice swirls inside the hollowed area. He's had to chisel and chainsaw, practically had bend over backwards to move it around. Then he started sanding and carving and measuring and balancing and deciding where the wood was good and what the best shape would be. Leftovers - there has been more than three wheelbarrows full of sawdust and wood chips. 

   starting to decide the shape of the burl bowl 

The weight has decreased to 40 pounds now, roughly about 20 inches in diameter, 8 inches deep and 1 1/2 inch walls -- (which eventually will be carved down to 1/2 inch thick.) More than that and it would be too heavy to lift and carry effectively for making bread! 

So, now it needs to dry out. And that might take a year or so. Hubbie has sanded out irregularities, made it sort of smooth, already noticed a few teeny cracks thus he put on a sealer made for wood so that it can dry out slower and more evenly all around. And since we live in a humid area it'll help to prevent any mold spores from seeping in too. Humidity can really creep into everything. 

Well, I'll let you all know how it turns out . . . in a year or so? We'll weigh it every now and then and when it starts to be stable we'll start carving some more. Or Hubbie will. I'm the recipient, the bread maker.  

 Anet 


trailrunner's picture
trailrunner

I had an abundance of discard yesterday so got creative and made some delicious treats. My discard is made up of "alto" and "sax" a white and a rye wild yeast starter. I add to it on a weekly basis. I regularly make the banana nut bread that I have posted before. I wanted to try a bread solely made from the discard. I used the 1-2-3 formula and 2% salt also added 2 scant tsp inst. yeast for good measure. The final dough was 500g starter discard- 1000g tap water-1500g GM bread flour- 30g Kosher salt. I dissolved the starter in the water and added the inst yeast. Mixed and autolysed for 30 min. Added the salt and did folds every 20 min x 4 times. Retarded overnight. where it quadrupled in the buckets. Removed this AM and shaped and let proof for about 1 1/2 hrs. While it was proofing I made the waffles that I had started yesterday evening from the discard. Recipe is on the KA site . It is a fantastic recipe and a great way to use discard. Photobucket Oven preheat to 500 and loaves were slashed and very heavily sprayed with water. I don't do any other steaming and have found the crust and oven spring are perfect. Bake 10 min and lower to 460 and bake an additional 25 min to 210 degrees. The loaves "sang" for 10 min on removal from the oven. The crust is very crisp and the crumb very tender and quite flavorful. Pleasantly sour and lots of grain flavor came through. I am well pleased with my experiment.

Photobucket Photobucket Photobucket

hullaf's picture
hullaf

I went to a local grist mill, called Fall's Mill in TN, and found some fresh cracked wheat. This is the bread recipe on the side of the bag: 

In a large mixing bowl pour 1 1/2 cups of boiling water over: 

2 cups cracked wheat

1 stick butter

1/2 cup brown sugar

1 tablespoon salt

1 cup wheat germ 

Let cool. Meanwhile dissolve 1 package yeast in 1/2 cup warm water with 1 tablespoon sugar. Set aside to cool. 

Add 1 egg and 1 1/2 cups warm water to cooled wheat mixture. Add yeast and beat in 4 cups of bread flour. Work in additional 4 cups of bread flour by hand to make a fairly firm dough. Knead 5-10 minutes and turn into a greased bowl. Let rise for 1 1/2 hours in a warm place. Punch down and divide into thirds. Form 3 loaves and let rise an additional 1-1 1/2 hours. Bake at 350F for 30 minutes or more. Check often for even browning. Pull out pan, put back in oven for 1-2 minutes to crisp the crust. 

Now, my changes to the above were (don't we all tweak a bit?) -- I only made half the recipe as 3 loaves is way too much for just me and hubbie. I used half bread and half AP flours. I made a poolish with 6 ounces warm water + 6 ounces flour + 1/8 tsp of ADY and let it sit at room temp for 3 hours. I only kneaded 5 minutes by machine and 5 by hand. The final dough was shaped into one large loaf (9x5 pan) and a smaller (7x3x2). Total baking time was 45 min. and 25 minutes respectively. 

    cracked wheat    

The taste was very nice with the cracked wheat kernels soft and detectable. Next time I think I would put in a portion of whole wheat flour.   

Now I was so enamored with the cracked wheat that when I found a recipe in "Breadtime" by S.J. Cheney with sourdough I thought I'd try that too. The recipe is similar to the above, called Yeasted Sourdough Cracked Wheat Bread and the ingredients are: 

3 cups spring water 

1 cup cracked wheat or rye 

1 cup sourdough starter 

7 1/2 cups whole wheat bread flour 

1/4 tsp active dry yeast 

2 teaspoons sea salt 

2 tablespoons corn or other vegetable oil 

This time I made the whole amount, a lot of dough it is! I had been grooming my whole wheat starter a couple days before so that was used and I did soak the cracked wheat overnight with a pinch of salt. I didn't want a totally wheat bread so I used 1/3 whole wheat flour and the rest AP. I shaped the final amounts into one large boule which I baked in a preheated covered cast iron pot and the remaining into a 9x5 loaf (which turned out to be too big - next time I'll use an 8x4). Baked at 400F for 20 minutes, then uncovered with heat decreased to 350F for 28 more minutes. They both were removed from pans and set in oven with door slightly cracked for an additional 5 minutes to crisp the crust. 


This taste of cracked wheat with the sourdough was more tasty with a light sourdough flavor, but the cracked wheat was less pronounced. I think I should have not soaked it so long.  But, I liked this as well if not better than the non-sourdough one. 

I'm so pleased with my whole wheat sourdough starter. I know more and more every week how it reacts to temperature and technique, when it is ready and at it's best. It's nicely active -- which means every week I feed it, and each time I want to bake bread I "groom" it by refreshing/feeding it for 2 or 3 times every 12 hours beforehand. I do use the ratio of 1 part starter/3 parts water/4 parts wheat flour. Works for me. 

I also used my starter for Hamelman's Light Rye bread. It turned out so nice. I do think it is because of my sourdough starter and some newly bought whole rye flour from KA. But Hamelman's recipes always seem to work for me, too. 

   Hamelman's light rye 

So, my freezer is full of saved bread and I'm still eager to try some more recipes before the heat of summer makes me wish I had a southern outdoor kitchen out back. 

Anet


AnnieT's picture
AnnieT

Just in from a family dinner at a very nice bistro in town, our all time favorite. When the waiter brought the obligatory basket of bread the grandgirls fell on it like gannets as though they hadn't eaten in days. Imagine my delight when they announced, quite without prompting, that the bread wasn't as good as Nan's. Made my day! A.

Marni's picture
Marni

So, I've read David's scoring tutorial and now I have a question.  Knowing me, it was answered there and I've somehow missed it, but I'm wondering about different cuts.  I think it said that cutting a simple cross will help with upward expansion, my loaves here rose well, but I'm wondering if they would have risen more if I had cut at an angle.  These cuts were 90 degrees.  The tutorial said that straight angle cuts open faster and can halt the oven spring. 

So, should boules be cut at an angle, as a batard would be?  I haven't sliced these yet, so I don't know about the crumb, but my novice question is would a greater rise equal a more open structure or are too many variables involved (like hydration) to know.

sourdough scoring


The one on the left is a rosemary herb, and the right is regular sourdough, slightly undercooked to my taste.  They look flatter in this picture than they really are, they rose nicely, I just wondered if they could have risen even more.

proth5's picture
proth5

 Inspired by dmsnyder, I have been inching along on the challenge of making straight dough baguettes.

 I'm still getting over the fast action of commercial yeast, so I will try not to enthuse too much.

 This time I used my standard baguette formula (65% hydration) with 10% of my home milled high extraction flour and 90% King Arthur All Purpose.  Instant yeast was used at .5%.  I changed nothing else in the process - just the mix of flours

 I tried the trick of turning off the oven, but chickened out at two minutes.  The crust immediately out of the oven was very crackly, but did get softer as the baguettes cooled, but not nearly as much as the last batch.

 This time I was able to concentrate on my scoring.  The cooling baguettes are shown below.  I don't want to k'vel, but I think they look pretty nice. I love this oven spring with commercial yeast!  If anything they were a touch under proofed (gotta be me) but not by much.  Oh, OK, a little uneven on a couple of slashes and some tearing.

 Cooling Loaves

And here are the money shots.  The crumb.

 Crumb End

Crumb Tartine

Not bad.  So much depends on where the slice hits, but not bad.

 The taste? Again, lacking my little levain tang but pretty good.  I would say a tad better than all white.  The texture was fluffy.  I'm sure that toasted tomorrow they will be very nice.  Again, I would think this bread would be better in combination with "something else."  I feel that it has a sweetness to it that David didn't taste.

 Here are my observations on technique:

  • I add the salt at the beginning of the process.  I just don't think it makes a big difference and the voice in my head doesn't mock me about my irrational fear of salt.
  • Leaving the loaves in the oven for even two minutes had a significant effect on the "crackliness" of the crust.  Five minutes would be better.
  • I'd like to try these with even less yeast.  After 1 hour of bulk ferment these guys were definitely doubled.  If I pulled down the yeast a bit, the bulk ferment would take longer and I might get a better flavor (remembering that we want to get our loaves in the oven in 4-6 hours.)  My formula has about 1% less yeast than David's and this may have made a difference.  From past experience, I think it did.
  • I might (and I emphasize "might") up the hydration a bit.  The dough did feel a little stiff.  However I am standing firm that it is getting the fermentation correct, not just upping the hydration that creates the proper baguette crumb.  I only feel that the hydration should be increased ever so slightly to compensate for the whole wheat.
  • Folks who have watched me pre shape and shape dough remark on the quality of "the iron hand in the velvet glove" that I bring to my shaping (after years of practice).  I could be gentler I guess, but the voice in my head tells me that this is not the major factor (once you get to the "iron hand in velvet glove" phase - I mean if you are treating your baguettes like a stress relief ball, you need to back off) and I agree.  I think "gentle shaping" can be taken too far and this results in an unattractive end product.
  • I would make sure I concentrate on my scoring as this does have an impact.
  • I would steam normally.  The extra steam will probably just mess up the scoring.

Well, that's quite a binge of baguette baking.  I'm not prepared to give up my levains and pre ferments, but it's nice to know I can start a bread at noon and have it by dinner if I am pressed.

 David, I hope these observations are useful.

davidg618's picture
davidg618

My wife and I love ciabatta, especially for soaking up soup, a handle for bruschettas, or a base for cheese. It was only natural I, obsessed with improving my bread baking skills (especially sourdoughs), would try a ciabatta.

I've been running a set of experiments trying to decide two things: 1) what hydration I should keep my SD seed starter at, and 2) is it worth the effort to do multiple builds to arrive at the formula starter I choose to use? This ciabatta was constructed with 250 gm. of 73% hydrated starter built with three intermediate stages. The initial seed starter was 10 gm. at 200% hydration. The target dough weight was 1050 gm. (three 350 gm. loaves) at 73% hydration.

My tentative conclusions are: 1) the 200% Hydration favors yeast, not bacteria, development. This results in short bulk, and final proof times, and good oven spring, but nearly indiscernable sourness. (This conclusion includes the results of two previous baguette bakes.), and 2) the three build starter time is worth it. This ciabatta has a distinctive, yet still mild, sour flavor: a nice compliment to bleu cheese, or French onion soup.

The crumb, is, to our needs, also near perfect. I expected an even more (undesired) dense crumb. I folded the dough more than its feel deemed necessary. However, neither I nor my wife are fans of the "more-holes-than-bread" crumb other bakers seem to strive for in ciabatta.

I've developed two spreadsheets:  The first helps us baker's calculate the flour and liquid for a target dough weight and target hydration, using (or not using) a SD starter, poolish, or sponge while also allowing choices re which flours ahd how much of each, as well as fluids--water isn't the only choice (i sometimes use beer). The second spread sheet calculates the required seed starter needed to create a desired starter weight and hydration, achieved with three builds--the necessary flour and water for each build is calculated also.. Each build triples the starter's beginning weight, and increases (or decreases) by one-third its hydration %. If anyone is interested, send me a message with your email address and I'll send you the spread sheets. They were built with Microsoft Excel (.xls extension.)

David G.

SylviaH's picture
SylviaH

I thought I would try D.T. DiMuzio's recipe from his book 'bread baking' for Sicilian Semolina Bread.  Everything went according to plan and the dough tested close to the goal Temperature of 77F.  Things could not have looked better...then I realized...Oh My Gosh!...I forgot to put in the Olive Oil...I knew I should have had it measured and ready to go....because if I don't have ingredients right in front of me...this happens!  I didn't even have the bottle of oil out on the counter...so much for earlier thoughts about the oil!  Oh it would probably be great even without the oil...but no...I wanted my oil.  No matter what!!  In it went.. all of it...slooooshing all around the dough...not mixing in very well ...what now!  I picked up about a Tablespoon of flour tossed it in around the dough and things seemed to come to together pretty good.  I don't think I will ever forget my oil again...lesson learned!  Things looked pretty good...other than I had a very puffy wet dough to try and form into an S...so I did the best I could and made 2 scrolls..one with a backward S and one batard.  We had several slices with dinner and we thought the flavor was great.  So good in fact I thought I would take the one S out of the frig that I was going to retard for tomorrow.  I thought I would let it proof a little longer and see if that would help the S not to get so blown away as in the first loaf.  The first two were done on a pan with added steam>my new Lava Rocks!...I would do this last loaf in my Bell Cloche and see if there was any difference.  Well, not really anything that noticable..they looked pretty much the same both even had the S pretty much blown away...I think my dough was a little on the wet side...then maybe again it was the oil being added later on made the dough slack...Any comment on this will be greatly appreciated.  This was a first forgetting to add the oil and Im sure it must affect the gluten formation some how..so any comments and advice are very much appreciated.

2 S Scrolls - One S and Batard baked with steamed oven - One S  in a La Cloche

Goal Temperature is 77F    This is when I realized I had forgotten the Oil! :>/

Olive Oil has been added and Temperature holding at 77.7   Im thinking I need these lucky numbers!

Batard was nearly all eaten! It had a very nice buttery flavor from the duram flour...we are not crazy on the seeds..but I wanted to stick with tradition and they did add a nice toasty flavor. Things had turned out better than I thought  adding the oil so late didn't seem to do to much harm.

S on the Left was Oven Steamed                                               S on Right was baked in the Bell Cloche and retarded for about 2 hrs. in the frig.

                                                                                             longer before baking.

Crumb on Batard

Sylvia


Pages

Subscribe to RSS - blogs