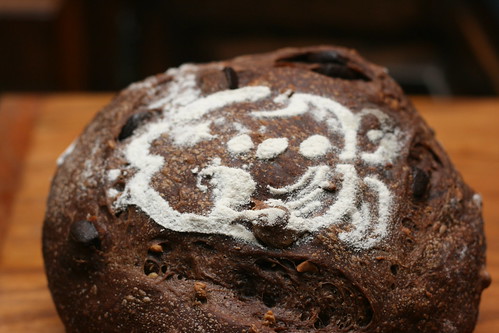
The Fresh Loaf

A Community of Amateur Bakers and Artisan Bread Enthusiasts.

Blogs

ehanner's picture
ehanner

I was interested in this one day bread that is reported to be a flavorful and beautiful direct ferment dough. I followed Shiao-Ping's formula precisely, even to the point of obtaining a bag of King Arthur flour. I figured if she can spring for it in Brisbane, I'll dig deep here where it's only 3 times the cost of my usual bread flour.

I was pleasantly surprised at how nice the dough felt as it proceeded through the folding stages. It was a thing of beauty by the last stage. All of the times and temps were right on. I planned for a 72F dough temp and it stayed there all through the ferment. At 4-1/2 hours I shaped and let it rest on the counter as advised. I wanted to skip the banneton, the gluten was well developed and I think it would have stayed in shape for 45 minutes. Surprising for an 80% hydration dough.

Anyway I watched the proofing progress as advised and at 40 minutes it was right according to my floured digit. After a sloppy pineapple slash into the oven it went. Yes, a scant 1/4 Cup of water in the steam pan.

I have never baked a white flour loaf for an hour and was hoping it would look right. I read Shiao-Ping's note about how the author suggested up to 70 minutes but I wasn't that brave. 60 minutes of oven time, the last 50 being at 350F was my plan.

You can see the crust is nicely browned and not overly thick all around. I got a nice oven spring and the shape is about what I would expect. The crumb is reasonably open and has a nice chew.

For a short 4.5 hours of floor time this is a nice bread. It isn't the best direct bread I have eaten but it's very good considering the time it took to make it. I did think the crust was more chewy than crispy. Perhaps the additional 10 minutes in the oven would fix that.

I plan to make this again or rather the Sourdough/yeast  version tomorrow. I'll probably add a little rye in the flour mix just to try to maximize the flavors. If the dough feels as good as it did today, I'll do a free style bake and proof in a couch cloth. I might split the dough and make a baguette also.

We are going to a dinner party Sunday with some friends who like to think they are well traveled. I want to take some baguettes that will make them beg for the source and then tease them with the name of a fictitious new bakery. It will drive them nuts for a while trying to find it. Lol I was planning on doing the Anis method but this is in the running.

So that's it. Thank you Shaio-Ping for your inspiration to try this formula and method.

Eric

Anonymous baker's picture
Anonymous baker (not verified)

I really like Norm's method of using re-hydrating dried onions. They tasted fabulous on the rolls. The dough was very stiff and tight when I removed it from the mixer for bulk fermentation, but when I went to shape it was amazingly light and easy to work with. I don't know why I expected the finished product to be bagel-like. These rolls are light, tender things with a mild onion and poppy seed flavor, and nothing like bagels! I couldn't help myself and gobbled one down before they were even cool. Thanks, Norm, for sharing this terrific recipe with us at TFL.

I think these rolls would also make great hamburger buns too either with or without the onions.

The original thread is here: http://www.thefreshloaf.com/recipes/normsonionrolls

Ready to proof

Out of the oven

Being eaten


My interpretation of Norm's formula and method:

The onion mixture

Rehydrate 1/3 cup dried, minced onions in about 1 1/2 cups of boiling water. When the onions have absorbed all the water that they can, drain them (I pressed them with a spoon when they were in the strainer to make sure I got most of the water out), and add a little salt (I added 1/2 teaspoon kosher), 1 tablespoon of canola oil (I forgot to add the oil so I just dapped a little on the top of each roll before baking them), and 2 teaspoons of poppy seeds to the mixture. Refrigerate until ready to use. Norms says that you have to used dried onions to get the authentic taste of these rolls.

The roll dough

21 g sugar
7 g malt syrup (I used 14 g by accident because I was pouring from the bottle and it got away from me)
7 g salt
21 g egg, beaten
21 g vegetable oil
454 g bread flour
227 g water
7 g instant yeast

Place all ingredients in the bowl of your mixer and mix with the paddle until everything is incorporated, about 1 minute. Let dough rest 5 minutes to hydrate. Change paddle to dough hook and knead on speed 2 for 10 minutes until dough is quite smooth. Norm cautions that this is a very stiff dough and that you should keep an eye on your mixer so that you don't overheat it. I think this dough might knead very well in a food processor; of course it would probably only require a couple of minutes of kneading.

Place dough in a bowl, cover and let rise until double, about 2 to 2 1/2 hours.

Gently deflate dough and cut into 2 to 4 ounce pieces (I used 3 ounce pieces for my rolls), form pieces into balls, cover with plastic wrap, and let rest for about 10 minutes.

Meanwhile, dump the onion mixture onto a lipped cookie sheet and spread it out.

When the 10 minutes are up, pick up the relaxed dough balls, turn them over onto the onion mixture, and press them flat with the palm of your hand. You want to balls to be flattened to about 1/4 to 1/2 inch.

Place the rolls onion side up on a baking sheet, and preheat your oven to 450º.

Cover the onion rolls lightly with plastic wrap and let fully proof, about 1 hour. Just before they are ready to go into the oven, press down in the center of each roll with your thumb to make an indentation.

Bake for about 20 minutes on the middle oven rack until nicely brown and crisp, spritzing them with water once a minute during the first 5 minutes of baking and rotating the pan 180º after the first 10 minutes. Watch them closely near the end of the 20 minutes because they can burn fast--I caught mine just in time. (Next time I make these I might try 425º for 25 minutes.)

Makes 9 three-ounce rolls

Salome's picture
Salome

I could withstand the Leader's "Alpine Baguettes" and decided to give Hamelman's "5-grain levain" a try. I thought that there can't be anything wrong with a bread that Hamelman himself describes as "one of the most delectable breads".

It's made of whole-wheat flour, bread and high gluten flour, and it includes a soaker (sunflower seeds, flaxseeds, chopped rye and oats.) In my case it includes as well some sesame seeds as I was running low on sunflower seeds and had to substitute some of them trough sesame. The fermentation process is speeded up by a little addition of yeast. I can't get high-gluten flour here in Switzerland, therefore I added 12 grams of Vital Wheat Gluten to the flour.

While I was letting the dough ferment for the first time, I was thinking about how I should shape this batch of bread. I felt a little bit bored by my "standard shape", the round loaf baked in the iron pot. I remembered the special Couronne shaping that I discovered a long time ago on wildyeastblog.com and that I had on my to-do-list for a long time. So I gave it a try. Thank you Susan, You're a great inspiration to me and your directions are clear and easy to follow, thanks for that!

Well, my Couronne doesn't exactly look as perfect as Susan's. It's a little bit out of shape because my "proofing banneton" was probably a little to big, so the balls didn't form a tight unit and moved around when I slided them into the oven.

That's the way I constructed my "banneton", inspired by Susan's description. I used the lid of my scouting cooking pot and a newspaper-ball. (I'm sorry for the bad image quality, all the good cameras are out today and I had to use my old camera, bought in 2002.) I covered this "banneton" with a well floured towel to prevent dough from sticking.

I had about 1.1 kg of dough alltogether, so I used 750 grams as recommended for the Couronne and made a small boule out of the rest.

To shape a couronne like the one above, divide the 750 grams of dough into six pieces of 100 and one piece of 150 grams. Shape the pieces into balls and let them rest for about 10 minutes. Roll the 150 gram - ball into a flat disk, about 15 cm wide. Place it over the newspaper ball, then arrange the other six balls seamside up around it. Then you have to cut a "star" into the flat doughpiece in the mittle with a sharp knife (look below or read Susan's instructions) and fold the "star-edges" over the balls.

Then let it proof as usual (cover it with a towel while proofing) and bake as you'd bake your recipe normally, maybe slightly shorter, because this shape is not as compact as a normal boule or batard.

I just tried two slices of the small boule - I planned on giving the couronne away, but now the person who was supposed to receive it isn't at home, therefore I put it into the freeze and I'll have it another time when more people are around. Right now, I'm not able to eat 750 grams of bread on my ownin a reasonable time. (as I said, everybody's gone, like the cameras . . .) I'm better off with 300 grams . . .

The flavor of the 5-grain levain is very good, as far as I can say right now. The bread is still somewhat warm. Nearly every bread tastes great while it's still warm. But I'm optimistic that the bread will taste great tomorrow for breakfast, as well.

I'm planning on baking this one again. Not only because it seems to be a tasty bread, but because I've got the feeling that I could simply do better. It was a hot day today, so the fermenting and proofing was difficult to get right, especially because the dough turned out to warm as well.

I'm sure that I'll shape Couronnes again. But then I'll probably scale the "banneton" a little bit down. The newspaperball more like 9 and the "pot lid" around 23 cm in diameter.

Yippee's picture
Yippee

This was the most difficult formula I've encountered.  I'm somewhat discouraged by the outcomes of my breads.  Even though I've tried it twice, I still didn't get that confident feeling I normally have with my dough. 

In this trial, I used all the 10% rye flour to make a water roux starter.  The reason that prompted me to use a roux starter was that, even though at a lower % of rye (10%) flour than my 090602 sourdough rye (20%) bread , the dough in my first trial of this formula , at which I used KA organic AP flour and no rye roux, turned out to be much messier and the crumb was very gummy.   Without going through the heating process of making a roux starter, the amylases, which contribute to the gumminess in rye dough, remain actively alive.  The combination of lower gluten flour (AP) and the presence of lively amylases, I believe, was the culprit to the failure of my first attempt. 

In my second experiment, in addition to the rye roux starter, I also sustituted AP with bread flour.  I made baguette and batard so that I could practice different forms of scoring.  The crust was very crackly and the taste was good. However, I did not get as much oven spring as I'd hoped for.  Well, I can always give it another try.  We'll see.  

http://www.flickr.com/photos/33569048@N05/sets/72157621430357953/


Shiao-Ping's picture
Shiao-Ping

I wanted to see if James MacGuire's Pain de Tradition procedure would improve my San Francisco Sourdough.  My formula is as follows:

220 g San Francisco starter @75% hydration (ie, 126 g white bread flour and 94 g water)

374 g white bread flour

306 g water

10 g salt

2 g instant dry yeast

(ie, total flour is 500 g and total water is 400 g)


(left) SF starter with some water to loosen it up first   

(center) mix in all remaining recipe water 

(right) combine all ingredients 

After which I followed James MacGuire's pain de tradition procedure as in my earlier post.   And, here is what I've got:


    San Francisco Sourdough Bread using James MacGuire's pain de tradition procedure


                      The crumb

I went a bit heavy handed, dusting too much flour on the banneton before I put the shaped dough in.  James specifically advises against it because too much flour will hinder browning and crispness.   Other than that, I am very pleased with the result.  Essentially this is the same as the white Pain de Tradition with an extra depth in flavor - due to the San Francisco sourdough starter.  With the help of a little yeast, the crumb opens up so well.

Not sure if I can call this boule a genuine sourdough, but, the heavily floured crust notwithstanding, it is a great bread that my family enjoyed.   My husband said to me, "I don't think that I've ever had bread that good; it's the simplicity of the flavor ...."  He said, "I don't know if I'll mature into rye and other grains but ... the intensive flavor of this one is just bloody sensational!"   Sometimes I'm not sure if I would ever be accustomed to Aussie lingo.

Shiao-Ping

SylviaH's picture
SylviaH

This is my attempt at this lovely bread posted by Shiao-Ping.  I did a long write-up but just deleted it and would like to say..My loaf leaves a lot to be desired...but the 'Flavor is amazingly delicious'  I couldn't believe how lovely, creamy, smooth and flavorful this bread tastes..the flavors that developed over the long fermentation are delicious...my crust did soften somewhat and I don't think as crispy as it should be..  I think my next attempt I may adjust my flour so there is a little less hydration.  My dough stuck on part of the banneton when I was putting it onto the board..but I don't think it did to much harm.

My lighting is pretty bad in my dark kitchen tonight!

Sylvia

davidg618's picture
davidg618

This bread is fast becoming a favorite with us.

I won't have a crumb shot for these, because they are both marked for neighborhood dinner parties. Although I've not been disappointed in past bakes,I got more ovenspiring with these two loaves, baked individually, then ever before. The past three times I've baked this formula I've retarded the dough overnight. This time I scheduled the formula-ready levain to peak early in the morning, and proceeded from there to make the dough, autolyse, bulk ferment, shape, and proof. I proofed the left-hand loaf at room temperature, and retarded the final proof of the right hand loaf at 55*F. I did this only to bake the loaves individually. They are different weights (left:750g, right:1000g). I like to use a different temperature schedule for the each: 480*F for 10 mins. with steam for both; finish baking the smaller at 450*F, and the larger at 440*F. Both loaves had excellent oven spring, but the smaller, room temperature proofed loaf had the most.

David G


Shiao-Ping's picture
Shiao-Ping

As I had such a lovely result from my last Pain de Tradition using white flour, I thought I'd give it a try with whole-wheat flour.   James said to make a miche de campagne, substitute 15% whole-wheat or up to 10% medium rye for part of the white flour, so my 100% whole-wheat version isn't conventional. 


   100% Whole-Wheat Miche de Campagne - James MacGuire's Pain de Tradition formula


                  The crumb


                                                                                     close-up

There is one major difference in the procedure from my previous one.  I retarded the shaped dough overnight, for 8 hours, and then let it come back to room temperature for an hour and a half before it's loaded to oven to bake.  The whole process seems to be long but is not at all cumbersome for a housewife - there are always a million things to be done in the kitchen and around the house any way.

The result is very pleasing for me.  I think the high hydration dough loves to sing, I could hear it crackling even 5 meters away.  It has a very strong nutty and wheaty aroma.  The crust is very crispy and the crumb is lovely.   So often wholemeal bread is dense and heavy, but this high hydration pain de tradition formula makes this 100% wholemeal bread light and delightful to have.  I will have no trouble at all getting my son to have a piece of this.  Done!

Shiao-Ping    

Shiao-Ping's picture
Shiao-Ping

Many TFL users would recognise Mr James J. MacGuire's name as he is the technical editor for Prof. Raymond Calvel's "The Taste of Bread."   In a 10 page article entitled, "The Baguette" in the Winter 2006 issue of Mr Edward Behr's quarterly magazine "The Art of Eating," ie. No 73+74 issue, Mr  MacGuire's message about a good French traditional bread is very clear: slow & gentle mixing with autolyse, long fermentation, and high hydration.  

A 4-page formula follows The Baguette article in the same issue and is entitled "A Full-Flavored, Minimum-Kneading, All-Included Recipe for a Round Loaf with Many of the Advantages of the Baguette."    This is an old-style straight-dough formula which is superhydrated and can also be used for baguette.   My understanding from reading the article is that the method in the formula is like that applied in Prof. Calvel's younger days.  I made my bread using Mr MacGuire's formula in the magazine and I called it "James J MacGuire's Pain de Tradition" which may not be entirely accurate but it is how I understood it to be.   I would strongly encourage any one who is interested in Mr MacGuire's detailed formula to have a look at his well-written article in the Art of Eating magazine.  As a home baker, I can finally say that I have found a method that I can rely upon with consistent result, and I thank Mr MacGuire for making the formula available to home bakers as well as Mr Behr's for publishing such a quality magazine. 

As Mr MacGuire says in Prof. Calvel's "The Taste of Bread" that bakers have always been known for their desire to form friendships and for their willingness to share, to me no sharing is as useful as pointing to the right direction.   I first learnt about the MacGuire's article through the Q & A with Daniel T. DiMuzio when Floyd and Eric interviewed Mr DiMuzio back in May this year.  If Mr DiMuzioh had not mentioned about it, I would not have known about Mr MacGuire's recipe. 

The following is the bread that I made based on Mr MacGuire's formula:      


When it came out of the oven, it sang for the best part of 6 to 7 minutes.   There was a very strong nutty aroma in the crust.  The crumb was a beautiful creamy color; it's light and delicate to taste.

Shiao-Ping  

Pablo's picture
Pablo

Hamelman's 40% Caraway Rye without commercial yeast:

I haven't cut into this yet, but I'm so pleased!  I modified the recipe and only used the rye levain.  It looks great.  This bodes well for paying attention to fermentation temperatures.

I cut the recipe down to make a single loaf:

Rye Sourdough:
dissolve together
8.5g ripe starter
150g water
mix in
181g Giusto's whole dark rye flour
It makes a putty-like starter.  Let ferment 17 hours at 70F.  I floated the container in the bathroom basin with 70F water.

Next day:
Dissolve rye starter in 151g 105F water
Mix together:
265g 12% protein bread flour
7g Giusto's Vital Wheat Gluten (to approximate 14% protein flour)
8.5g salt
8.5g caraway seeds
Combine dry and wet and knead vigourously for 10 minutes.  Dough was initially sticky but soon came together and was easy to knead without any flour on the counter.
Ferment at room temp 90 minutes with two stretch and folds
Life intervened with a Dr. apt., so dough to 'fridge for 2 1/2 hours.  Upon return dough is domed but not doubled
Ferment an additional hour at room temp, altogether doubled from the beginning now
Lightly degas and form into a batard.  Proof on parchment at room temp for 2 hours
Sprinkle with caraway seeds, mist, and slash
Bake 460 with steam 15 minutes, peek in the oven and jump up and down, bake an additional 20 minutes without steam

I'll post a crumb shot once I've cut into it.

:-Paul

Pages

Subscribe to RSS - blogs