The Fresh Loaf

A Community of Amateur Bakers and Artisan Bread Enthusiasts.

Blogs

Danni3ll3's picture
Danni3ll3

This recipe from Cedar Mountain was perfect for the new batch of grain berries that I received from Daybreak Mills. It took a bit of work when you consider caramelizing the onions, milling and sifting the bran out of the flour and toasting the seeds, but the one thing I didn’t count on, was how sticky the rye made the dough. Coil folds started off nicely but as the dough warmed up, it became super sticky. I took it out of the warm spot near the end of bulk hoping to make it a bit more manageable. And I preshaped it right after the last coil fold. That part went okay but the dough felt kind of heavy. I might be baking bricks in the morning. 🤦🏼‍♀️


Recipe

Makes 3 loaves 


Add-ins

180 g caramelized onions

40 g white sesame seeds 

40 g black sesame seeds 

40 g poppy seeds


Dough

440 g strong bakers unbleached flour 

320 g freshly milled rye flour, sifted 

320 g freshly milled Selkirk flour, sifted

650g filtered water

180 g Sleeping Giant Imperial Brown Ale

24 g pink Himalayan salt 

250 g levain (procedure in recipe)


A few days before:

  1. Slice several large sweet onions and caramelize either in a large pan or in a slow cooker. I do mine in a slow cooker. Here is the recipe I use: https://www.gimmesomeoven.com/slow-cooker-caramelized-onions/ (Note that it took 21 hours for my onions to be the way I wanted them. I used a large crockpot filled to the rim.) Measure out what you need and refrigerate.  Extras can be frozen. 


The night before:

  1. Mill enough Rye and  Selkirk berries to obtain the needed amount of flours. Sift out the bran. Place the required amounts in a tub.
  2. Add the unbleached flour to the tub. 
  3. Toast the sesame seeds and poppy seeds in a dry frying pan. Cool, cover and set aside.
  4. Take 10 g of refrigerated starter and feed it 20 g of filtered water and 20 g wholegrain flour if your choice. Let rise in at room temperature for the night. 

Dough making day:

  1. Early in the morning, feed the levain 100 g of filtered water and 50 g each of wholegrain flour and unbleached flour. Let rise 5 hours in a warm spot.
  2. Two hours or so before the levain is ready, put the filtered water and beer in a stand mixer’s bowl and add the flours from the tub.  Mix on the lowest speed until all the flour has been hydrated. This takes a couple of minutes. Autolyse for a couple of hours at room temperature. 
  3. Take out the onions so they warm up to room temperature. 
  4. Once the levain is ready, add the salt, the seeds, the onions, and the levain to the bowl. Mix on the lowest speed for a minute to integrate everything, then mix on the next speed for 9 minutes. 
  5. Remove dough from bowl and place in a covered tub. Let rest 45 minutes in a warm spot. 
  6. Do 2 sets of coil folds at 45 minute intervals and then 2 more set after 30 minute intervals. Since the dough seemed to get stickier with each coil fold, I took the dough out from my warm spot and set it on the counter. I also moved on to the next step immediately after the last coil fold. 
  7. Tip the dough out on a bare counter, sprinkle the top with flour and divide into portions of ~830 g. Round out the portions into rounds with a dough scraper and let rest 30 minutes on the counter. This actually went surprisingly well. I did use a bit extra flour to help with the stickiness but the dough rounded up nicely even though it felt heavy. 
  8. Do a final shape by flouring the rounds and flipping the rounds over on a lightly floured counter. Gently stretch the dough out into a circle. Pull and fold the third of the dough closest to you over the middle. Pull the right side and fold over the middle and do the same to the left. Fold the top end to the center patting out any cavities or big bubbles. Finally stretch the two top corners and fold over each other in the middle. Roll the bottom of the dough away from you until the seam is underneath the dough. Cup your hands around the dough and pull towards you, doing this on all sides of the dough to round it off. Finally spin the dough to make as tight boule as you can.
  9. Sprinkle half rice/half AP flour generously in the bannetons. Place the dough seam side down in the bannetons. Cover with plastic bowl cover or shower caps. Let rest for a few minutes on the counter and then put to bed in a cold (38F) fridge for 12 hours. 

Baking Day

  1. The next morning, heat the oven to 475 F with the Dutch ovens inside for 45 minutes to an hour. Then take the loaves out of the fridge. Turn out the dough seam side up onto a cornmeal sprinkled counter. Place rounds of parchment paper in the bottom of the pots, and carefully but quickly place the dough seam side up inside. 
  2. Cover the pots and bake the loaves at 450 F for 25 minutes, remove the lids, and bake for another 22 minutes at 425 F. Internal temperature should be 205F or more.


Well, surprisingly, there was some decent oven spring! The house smells incredible of toasted seeds and onions!

trailrunner's picture
trailrunner

1-2-3 bread with 20% Caputo Semola Rimacinata. Add ins as part of liquid EVOO/honey / buttermilk( ran out of yogurt) levain all raisin YW. Crumb shot later. 

Edited to add crumb shot from 2 baguettes that I shaped with some of the dough just to see what would happen. Wow… cool custard open. Perfect. The book couldn’t be judged by the cover! 


Dabbler's picture
Dabbler

As per my last entry, I was making a 12 hour fermentation no knead bread and my brain for some reason said 24 hours... 


So, although it did not get much bigger for the proofing, it did still manage to have a decent crumb considering. The flavour is outstanding, but I'm sure it would have also been amazing after the 12 hours too. Lol so I shall continue this journey and we'll see what happens next time! 

Dabbler's picture
Dabbler

I'm making myself a 12 hour fermentation no knead bread and my brain decided it needed 24... I noticed my mistake around hour 23... I should have noticed it earlier as I've been scrambling for hours trying to soften the "rind" that formed during the rise. 

I'm soldiering on. But I don't think there will be anything left for the second rise now that I've folded it.

It smells fantastic, but I think it will be small.


idaveindy's picture
idaveindy

Nov. 11, 2021. 68th bake.

Almost the same as #67:  same types and amounts of flour, same amount of starter (though a little fresher), 8 grams less water, 8 g salt instead of 7, and added 1/2 tsp of ground toasted bread spice.  Same day bake instead of an overnight bulk ferment.


CalBeachBaker's picture
CalBeachBaker

Valais Rye   Walliserbrot (Switzerland)  from The Rye Baker by Stanley Ginsberg

The latest new bake is a Walliserbrot courtesy of The Rye Baker by Stanley Ginsberg. I had to scale this one for a single large pan.  Note to self, always use parchment paper on the bottom of the pan for ease of extracting the loaf. Another improvement would be to bake it maybe 5 mins less, the internal temp got a little above the recommended 198 F, I think due to the heating efficiency of the pan. Overall I am pleased with the outcome.

Tasting notes:

The crumb has a nice firm, slightly grainy texture that I enjoy. In addition the crumb has slight sour/fruity taste.  The crust has a toasty taste with notes of malt.

For those who are interested the recipe and process are included below.


naturaleigh's picture
naturaleigh

After requesting and receiving some nice feedback last time, I applied some good tips with, I think, better results in crumb and flavor.  Many thanks to trailrunner and JonJ! 

trailrunner's tips:  I didn't have a mister that I could use on food, so I just sprinkled in some moisture on the dried fruit before zapping it in the microwave for 30 seconds.  I decided to try orange juice instead of just water, which worked nicely; also used a couple teaspoons of cinnamon, sprinkled over the fruit after rehydrating.  This method worked much better as far as improving the flavor of the fruit and adding a bit of interest with the cinnamon.  

Per JonJ: I tried to make good contact between the dough and fruit during lamination, which I think helped with cavitation too.  I don't think the crumb was quite as custardy, but it was still moist and I like the better contact between the fruit and nuts with the dough.

The dough definitely seemed a little heavier, but I included a few more add-ins this time (raisins and walnuts in addition to the others, although I had to use dried cherries instead of cranberries since I used all those last time).  The tighter crumb will work better in the toaster.

All in all, a better bake as far as crumb and flavor!  Many thanks for the much-appreciated advice...so grateful for this forum!

idaveindy's picture
idaveindy

Nov. 8 to 9, 2021.  67th bake.

 Ingredients:

  • 24 g, 100% hydration starter, from fridge, last fed 3 days ago. 
  • 300 g bottled spring water. 
  • 103 g Patel brand stone ground whole wheat durum flour. 
  • Mixed and Let above sit for about 5 minutes to hydrate well. 
  • Added 7 g salt. 
  • Added 1/8 tsp active dry yeast, and mixed.
  • Added 309 g Bob's Red Mill stone ground whole wheat, and mixed. 
  • folded in 20 grams more water. 
  • folded in 20 grams more water. 
  • Kneaded for a little while. 
  • Folded in 8 g more water, and kneaded just a little. 
  • % WW: 412 / 424 = 97%. (12 grams bread flour in starter.)
  • % Hydration: 12 + 300 + 20 + 20 + 8 = 360. 360 / 424 = 85%.
  • finished mix/knead at 6:55 pm. 
  • 7:34 pm, kneaded some. 
  • 8:50 pm, kneaded some. Oiled the steel mixing bowl, turned the dough to coat with oil, covered with clear plastic film, and put in fridge overnight.

(Baking info to be filled in later.)

The taste was a little bland. Could have used more salt, or bread spices (coriander, fennel, caraway.)

Crumb is not as open as a higher hydration and all sourdough loaf, but it is very light and airy.


HeiHei29er's picture
HeiHei29er

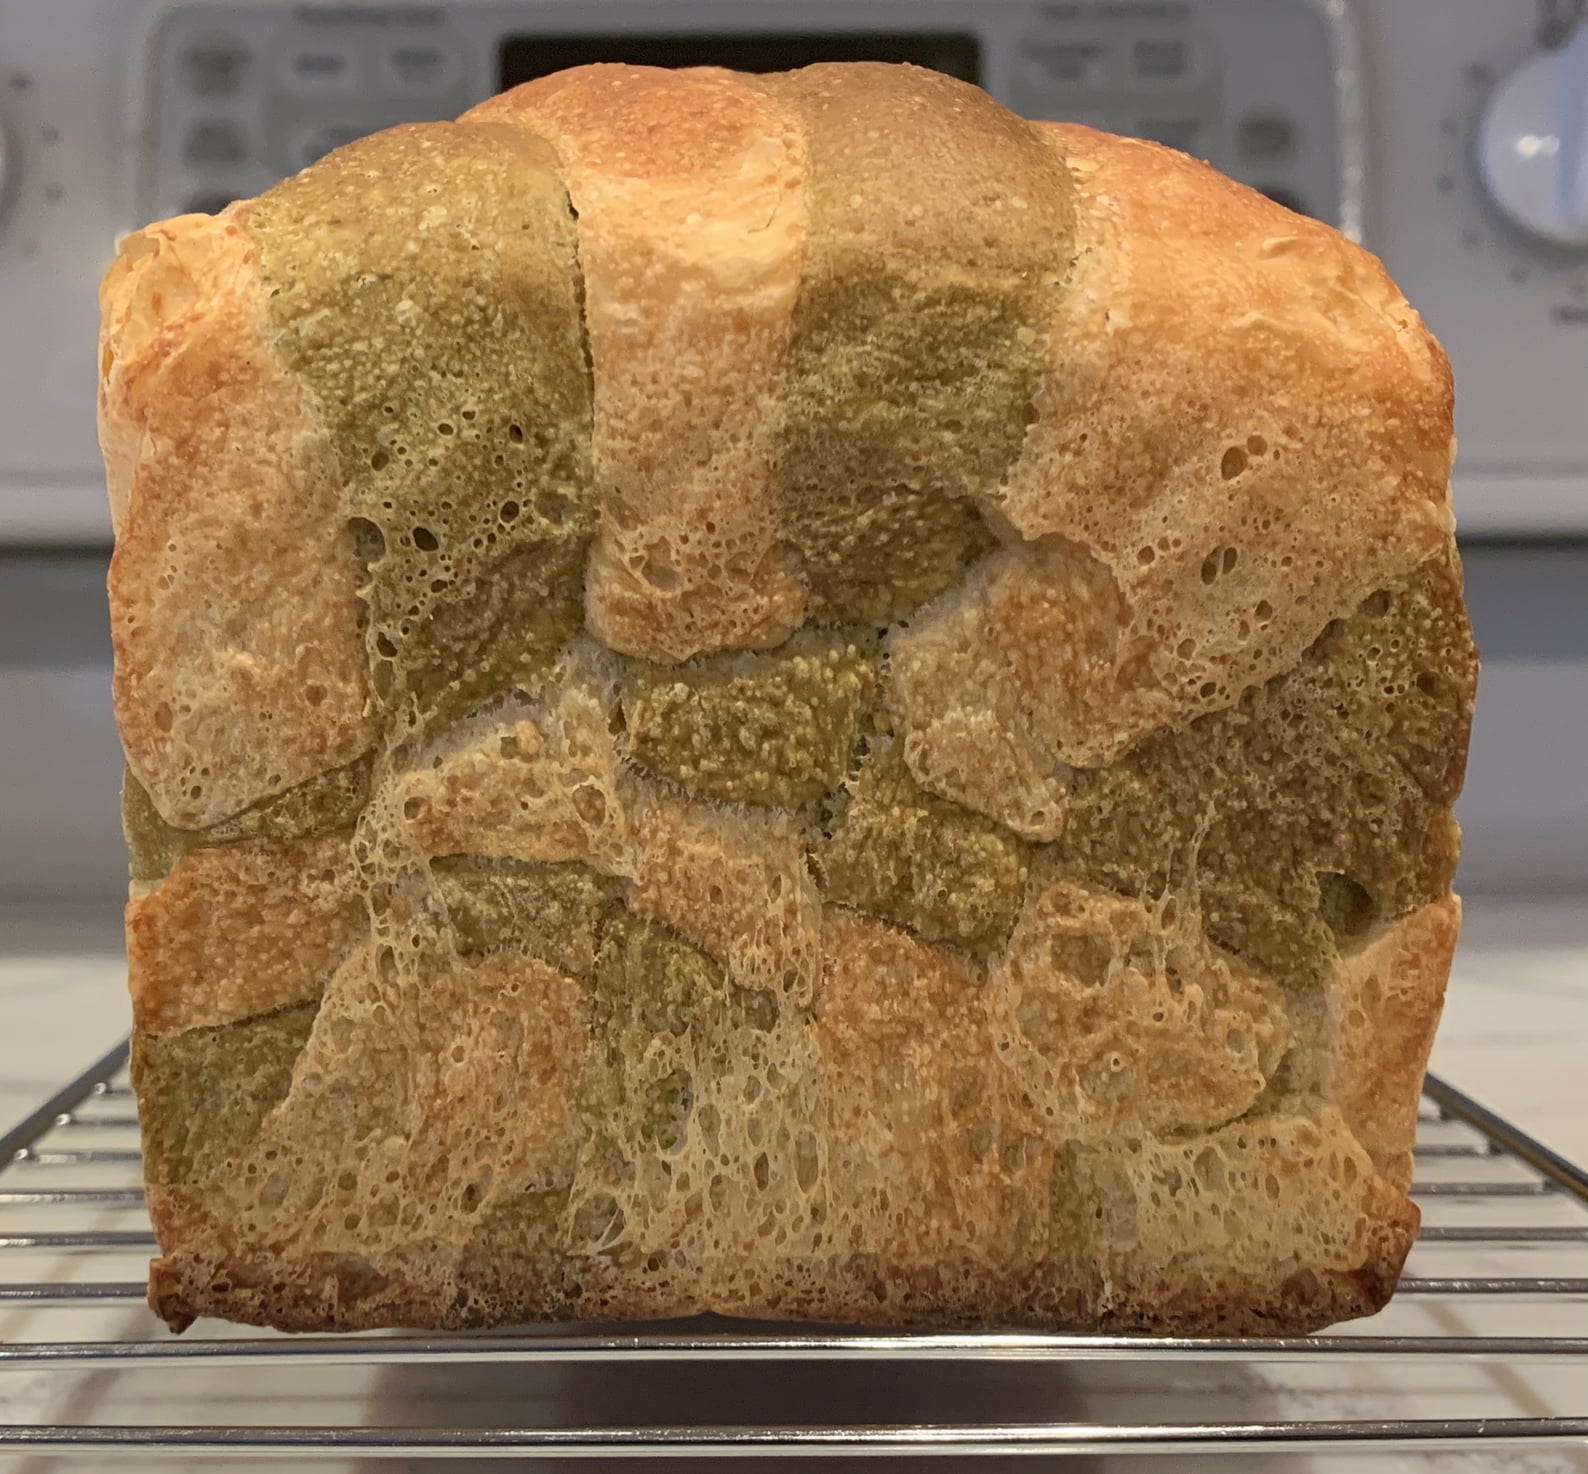
It's funny how you walk by something in a store a thousand times and never notice it.  I had never heard of matcha until seeing it in Benny's and Kristi's bakes.  Looking for some tea at the store and there it was.  Had probably been there all along.  So, I decided to get some and come up with a bake for it.

I've been using ginger root in some of my cooking and wanted to try it here.  Decided to make a porridge with jasmine rice, honey, and the ginger root.  Added the matcha powder to half the loaf and made this checker board pattern.  The basis for this bread recipe is a combination of Hamelman's Rice Bread and Danni's porridge breads.

The night before (12-16 hours prior to Final Mix)

Pate Fermente

72g AP flour

48g Bread flour

72g water

2.4g salt

0.2g ADY

Combine all ingredients and mix until just smooth.  Ferment at ~70 deg F.

Porridge

40g jasmine rice (mill to coarse flour if you can to reduce cooking time)

6g minced fresh ginger root

20g honey

80g whole milk

Combine all ingredients in pot and cover.  Cook on low heat stirring regularly until creamy.  Acidity of the ginger root will cause the milk to separate.  Keep stirring occasionally until all the free liquid is absorbed.  Refrigerate overnight.


Day Of

168g AP flour (divided)

112g Bread flour (divided)

168g water (divided)

5.6g salt (divided)

6g ADY (divided)

1.5 tsp matcha powder

Remove porridge from refrigerator and divide in two halves and add the matcha powder to one of the halves. Divide the pate fermente in equal halves.  Divide all final mix ingredients in half. 

For each half, combine the ADY with the water.  Combine all dry ingredients.  Add the water/ADY mixture and the porridge to the dry ingredients and start to mix.  Break up the pate fermente into small chunks and add it to the mixture.  Continue mixing and focus on breaking up the pate fermente chunks.  Fermentolyse 15-20 minutes.  Perform 4 sets of bowl kneading to incorporate the pate fermente and develop full gluten.  Bulk ferment for 1-2 hours until dough has doubled in size.

Roll out dough into a 18-19cm wide by 30cm long rectangle.  Flour each side well to avoid sticking to the counter.  After rolling, slice each dough in 2cm wide strips and alternate placing them on parchment paper building a checkerboard pattern that's 5 strips wide. Lightly mist each layer when built to make sure the next layer sticks to it.  When complete, lower the loaf into a pan using the parchment paper as a sling.  When in the pan, lightly press the dough to spread it into the pan and make sure the loaf is solid.


Allow the dough to roughly double in the loaf pan and then bake.  Pre-heat oven to 400 deg F.  Add 1/2 cup boiling water to steam pan on bottom oven rack. Bake for 7 minutes at 400 deg F and 8 minutes at 375 deg F.  Vent oven and remove steam pan.  Lower to 350 deg F and bake for 15 minutes.  Remove loaf from pan and take off parchment paper.  Bake directly on the center oven rack for 5 minutes at 350 deg F to set the crust.


Should have waited till tomorrow morning before slicing, but I got impatient!

Crumb looks nice and custardy.  Will be having this with fried eggs for breakfast in the morning.  It has a very nice aroma from both the jasmine rice and the ginger root.  However, the aroma is unlike anything I've experienced before.  Curious how this one will be.


In case you're looking for gift ideas and haven't seen them before...  My wife got me an early Christmas gift, and this bow knife is pretty slick.  You can slice a soft bread very thin and precisely without deforming the loaf.  


Kistida's picture
Kistida

While reading about types of flat breads (made just a few so far like naan, chapati, Barbari bread, puran poli and qatlama patir), I came across interesting ways to make obi non. Some of these use chopped onion in the starter as it boosts fermentation and provide a lovely flavor.

The articles can be found here: http://brotgost.blogspot.com/2017/02/obi-non.html
http://hlebinfo.ru/uzbekskie-lepeshki.html
They're in Russian but Google helped translate. :)

For my small batch of 3 or 4 breads, I decided to use some atta flour and more water was added in the dough to make it soft enough. Also, yogurt or soured milk add extra flavor to this bread :D

Obi non
Stiff starter (12 hours)
20g starter (100% hydration)
80g whole wheat flour
44g water
1g salt
10g onion, chopped fine

Dough
All of the starter
60g whole wheat flour
200g all purpose flour
10g sugar
110g water
80g plain Greek yogurt
1g instant yeast
6g salt
15g ghee

Topping
Milk wash
Sesame, caraway seeds

It took me 2 days to make these as I prepared the starter early in the day, the dough at night. After mixing the dough ingredients with the stiff starter, I left the dough to chill overnight as it was getting late. Preparing the starter at night would have been better. The first proof should take 1.5 to 2 hours (longer if using only sd) at 26-28°C

After the first proof, divide the dough to 3 or 4, shape into boules. Cover and let these rest for 15 minutes.

Final shape: gently flattened discs to about 15-20cm in diameter with wet fingertips. Then, gently press a circular indentation in the middle, so that the border is thicker and puffier.

Cover and let the dough discs rest for their final proof for 45 minutes. Preheat the oven to 180° or 200°C about 20 minutes into the first proof.

Lightly brush oil over the middle of the dough. Then, if the middle is puffy again, press with fingertips or base of a glass into the middle of each dough until a deep indentation forms (this prevents it from rising during the bake), followed by designs with chekichs, fork, spoon, cookie cutter, pinching with fingertips, or even a toothpick. Optional: score or leave light indentations on the border.

Cover and let the shaped dough rest for 10 minutes.

Brush with cream or milk and sprinkle sesame or caraway seeds.

Bake at 180°C with steam for 20 minutes, followed by 5 to 10 minutes without steam until the top of the loaf is golden brown. Or
Bake at 200°C with steam for for 15 minutes, followed by 2 to 5 minutes without steam until the top of the loaf is golden brown.

Brush baked loaves with melted butter or ghee and let them cool for at least an hour before serving.


The next bakes were honey-lemon loaves. I made 3 of these in a week while preparing candied citrus peels (I've yet to start on the fruit loaf). They had lemony scent and hint of honey that we enjoyed! Also, I wanted to see if I can create vertical lines with the swirls too! A bit tedious, but it was like making monkey bread. :)


Honey Lemon sandwich loaf with butterfly pea swirls
(& lines!)
Tangzhong
20g all purpose flour
100g milk

Dough
All of the Tangzhong
40g cream
30g milk
35g honey
1 large egg
110g starter (100% hydration)
10g sugar
Zest of 1 to 2 lemons
1/4 tsp pure lemon extract (optional)
240g all purpose flour
80g Kamut flour
5g vital wheat gluten
2g instant yeast
6g salt
40g unsalted butter
10g light olive oil

Butterfly pea tea
3g butterfly pea petals + 100g freshly boiled water.
Steep 15 to 20 minutes while preparing dough.

For butterfly pea blue swirls:
Divide dough in half.
Plain dough: add 15g milk
Blue dough: add 14g butterfly pea tea


Honey Lemon sandwich loaf with matcha swirls


Tangzhong

20g all purpose flour
100g milk

Dough
All of the Tangzhong
40g cream
40g milk
35g honey
1 large egg
100g starter (100% hydration)
10g sugar
Zest of 1 lemon
1/4 tsp pure lemon extract (optional)
240g all purpose flour
80g Kamut flour
5g vital wheat gluten
2g instant yeast
6g salt
40g unsalted butter
10g light olive oil

For matcha swirls:
Mix 2g sifted matcha powder + 4g milk into a paste. Mix this into 350g of dough.

Divide each dough into 8 equal pieces. Roll each into dough balls, cover and let them rest for 15 minutes.

Roll each piece about 15cm/6". Overlay the colored dough over the plain dough. Roll the dough out to about 10cm/4" wide and 20cm/8" long. Roll each pair up, then divide them in two. Place them in alternate directions in 2 rows in greased loaf pan.

They were baked at 180°C with lid for 25 minutes, followed 25 minutes without. Loaf was tented with foil in the last 10 minutes


The next bake took a long time! All because I wanted to make bubble buns (from this post), with espresso mochi in them. These turn out bigger and less cuter than bubble buns though!


Almost-bubble buns with espresso topping and mochi filling (ha!)
The dough is from that recipe.

Small batch espresso mochi filling
80g mochiko/glutinous rice flour
20g tapioca flour
2g espresso powder
a pinch of cocoa powder
40g brown sugar
10g vegetable oil or melted butter
140g milk
For dusting: cornstarch

Bring water in a steamer to a boil while preparing the batter.

In a medium bowl, whisk together glutinous rice flour, tapioca starch, espresso powder, cocoa powder, brown sugar and milk.

Stir in oil or butter and mix until well combined and there are no lumps. Strain the mixture, if necessary to remove lumps.
Transfer the batter to a greased bowl and place this in the steamer.

Steam the batter over high heat for 20 minutes, making sure the lid of the steamer is wrapped tightly in a towel to prevent condensation from dripping into the bowl.

The mochi is done when the mixture changes from a solid color to slightly-translucent.

Remove from the steamer, and let it cool while covered for 5 minutes.

Then, transfer the mochi to an oiled counter and knead it (with gloved hands) for 2 minutes until it is smooth.
Wrap the mochi with plastic wrap and refrigerate for 30 minutes. Once chilled, slice the mochi into smaller pieces with a silicon dough scraper and dust each lightly with cornstarch to prevent sticking.

Skipping ahead of preparing and the first proof:
After dividing the dough into 40 equal pieces (20-30g each) and resting them, they were each filled with roughly a teaspoon of mochi and rolled into little balls. They were then arranged on parchment lined bake sheet with about 3cm/1" distance between them. Cover and let these proof at room temperature until they're puffy and are now stuck to one another. Pipe cooking topping over each bun (I managed to stick to one swirl this time). Bake at 180°C for 15 minutes until edges are golden brown and the internal temperature is at least 88°C. Turn off the oven, leave the oven door slightly ajar and leave the buns to continue baking in the cooling oven for 5 to 10 minutes. Then, remove the buns from the oven and let them cool completely on a cooling rack.


The latest bake was from last night using leftover syrup from making candied citrus peels. This bake felt rushed as I started preparing quite late in the evening. The baked loaf burst on one side during the bake - I believe I rolled the doughs a bit too tightly and should've used steam in the bake. (Lesson learned: do not make anything while half asleep!)


From the photo here, was the loaf under-proofed?

Orange and chocolate sandwich loaf
Dough
70g starter discard (100% hydration)
50g plain yogurt
80g milk
100g citrus syrup
250g all purpose flour
125g Kamut flour
2 tsp orange zest
2g instant yeast
6g salt
1 large egg
40g unsalted butter
10g light olive oil

Chocolate dough
15g melted dark chocolate
2g cocoa powder
120g dough

The chocolate dough was letter-folded with plain dough. Then, turned 90° and rolled out to about 20cm/8" wide and 46cm/18" long. The dough is then rolled into a log and left to proof a second time until it filled about 80% of the pan. Baked at 180°C 45 to 50 minutes. It was tented with foil in the last 10 minutes and reached an internal temperature of 98°C. Then, I left it overnight to cool on a rack.

That's it for now! :D

- Christi

30 Nov 2021 update: Made the orange chocolate loaf with SD discard. I added a lil bit of baking soda into the discard as this was a mixture of stiff and liquid starter from multiple feeds. The doughs were letter-folded once, sliced and braided to fit a 9x4x4 Pullman pan.


Tangzhong

20g all purpose flour
100g milk

Dough
All of the Tangzhong
30g cream
45g milk
1 large egg
120g starter discard with 1/8 tsp baking soda  (100% hydration)
235g all purpose flour
5g vital wheat gluten
80g Kamut flour
3g instant yeast
20g sugar
6g salt
40g unsalted butter
10g olive oil

Chocolate dough (to 1/3 of the dough)
15g dark chocolate, melted
2g cocoa powder

Pages

Subscribe to RSS - blogs