The Fresh Loaf

A Community of Amateur Bakers and Artisan Bread Enthusiasts.

Blogs

The Roadside Pie King's picture
The Roadside Pi...

Mafalda The Semolina bread of SicilyBy: Will Falzon. The Brooklyn Maltese350g Semolina Rimacinata150g K.A. A.P. Flour10g Salt7g Instant Dry Yeast1 tsp. Barley Malt Syrup330g Water1 Tbs. Olive Oil3 Tbs. Sesame Seed1tsp. Anise SeedSimple straight dough method.1. Mix all ingredients except the olive oil until the dough ball clears the sides of the Bosch mixer.2. Slowly add the oil drizzling it down the side of the mixer bowl3. Move to a lightly oiled bowl.4. allow to rise at room temperature covered until doubled in volume. About 1hr5. Scale into two equal weight balls. Rest for ten min. Covered6. Pre-shape each ball into a 30” long rope. Rest for 15 min. covered7. shape into the serpent or the eyes of Saint Lucy shapes.8. Proof covered at room temperature until the loaves are double in volume. (about 1hr.)9. Pre-heat the oven to 550F and prep the steaming apparatus10. Bake for 8 min. at 550F with full steam11. Remove the steaming apparatus and purge the oven12. Lower the heat to 475F13. Bake for an additional 8 min. until golden brownEyes of Saint Lucy (Maflada Bread)

dmsnyder's picture
dmsnyder

Today's bake is loosely based on Ken Forkish's "Overnight Country Brown." I increased the levain and did the "overnight" in the fridge after dividing and shaping rather than in bulk at room temperature. Well, the hydration is higher too - 85.5 versus 78%. The result is a moderately sour, crusty loaf with a fairly open, deliciously moist and tender crumb. The flavor is more straight ahead wheaty than my favorite multigrain sourdough, but this is also a spectacularly delicious bread. I had some almost cooled with a light smear of butter, along with a bowl of split pea soup for lunch.

Here is the formula and method and some photos:

Sourdough Bread with 31% Home-Milled Whole Wheat Flour

David M. Snyder

January, 2022

Total Dough 

Ingredient

Wt (g)

Bakers' %

Bread Flour

675

67.5

Whole Wheat flour

314

31.4

Water

855

85.5

Salt

21

2.1

Total

1865

186.5

Note: The whole grain wheat,is milled in a Mockmill 100 mill set at its finest setting. The flour is milled immediately before mixing.

Levain


Ingredient

Wt (g)

Bakers' %

Bread flour (hi protein)

144

75

Whole Wheat flour

36

25

Water

144

75

Active starter

36

25

Total

360

200

  1. Dissolve the starter in the water. Add the flours and mix thoroughly.

  2. Transfer to a clean container, cover and ferment until ripe. If you don't use it immediately, it can be kept in the refrigerator for up to 3 days.


Final Dough


Ingredient

Wt (g)

Bread flour (AP)

524

Whole Wheat flour

276

Water (85-95ºF)

684

Salt

21

Active levain

360

Total

1865


Procedures

  1. Mix the flours with the water to a shaggy mass.

  2. Cover and let sit at room temperature for 20-60 minutes. (Autolyse)

  3. Sprinkle the salt over the dough surface and add the levain in 4 to 6 portions.

  4. Mix thoroughly. (I start by folding in the salt and levain with a silicon spatula. Then, I use the method Forkish specifies – squeezing the dough between my fingers alternating with stretch and folds in the bowl. I wear a food service grade glove and dip my working hand frequently in water.)

  5. Transfer the dough to a lightly oiled, clean bowl large enough to accommodate doubling in volume. Cover well.

  6. Ferment at 80ºF for 3 – 3.5 hours with stretch and folds in the bowl at 30 and 60 minutes, then a stretch and fold on the board at 1:45-2:00 hours. The dough should have nearly doubled in volume and be quite puffy.

  7. Transfer the dough to a well-floured board. 

  8. Divide the dough as desired and pre-shape in rounds. Cover with a cloth and let rest for 20-30 minutes.

  9. Shape as boules or bâtards and place in floured bannetons. Place these in food-grade plastic bags sealed with ties and let proof for 30-60 minutes at room temperature. Refrigerate 8 hours or up to 36 hours at 40ºF.

  10. The next day, pre-heat oven. Let the loaves sit at room temperature while the oven pre-heats. You can bake on a baking stone with steam for the first part of the bake, or in Dutch ovens, as you prefer. The oven temperature and length of the bake will depend on which of these methods you choose and on the weight and shape of your loaves, as well as on how dark you prefer your crust. When done, the loaves should sound hollow when thumped on their bottoms. The internal temperature should be at least 205ºF.

  11. Let the loves cool completely on a rack for 1-2 hours before slicing.

I baked in Cast Iron Dutch ovens at 475ºF for 30 minutes covered, then 20 minutes un-covered at 460ºF.


Happy baking!

David

gavinc's picture
gavinc

Background

My first attempts at this bread were flawed in that I got very little rise. Debra Wink (DW) contacted me and suggested some tweaks. As a result, I introduced some Vital Wheat Gluten (VWG) to increase the protein percent of my whole-wheat flour. I also pre-fermented 5 percent of the flour in a stiff levain. I wasn’t sure what effect the levain would have; rise, flavour enhancement, crumb or all. I’ve had a great result by incorporating both the VWG and the levain now for many weeks.

Today’s Experiment

I wanted to check what effect the levain was having on the rise, crumb, and flavour of the baked loaf. Today’s bake: I eliminated the levain and recalculated the formula.

Result

I compared the rise, crumb, and taste of both loaves (my lovely wife was also a judge).

Rise: at all stages throughout the process, the rise hit the milestones. Picture 1 is at the start of the final proof. Picture 2 is at the end of final proof after 3 hours at 22C/71F. I concluded that the levain did not enhance the rise in speed or volume over time. The baked loaf had a good oven spring and baked with a nice golden colour. Pic 3.

Crumb: The crumb of both loaves was identical. I put this down to the low per-cent of pre-fermented flour. DW advised that 4-5% would not have a detrimental affect of the crumb. Both were soft as a sandwich loaf should be. Pic 4.

Taste: This was the only discernible difference. The loaf with the levain had an enhanced flavour. The loaf baked without the levain was very nice but lacked the flavour of the levain loaf.

Conclusion

I will continue to include the 5% PFF in the formula.

Cheers,

Gavin

Yippee's picture
Yippee


To learn more about concentrated lactic acid sourdough (CLAS), please see here and here


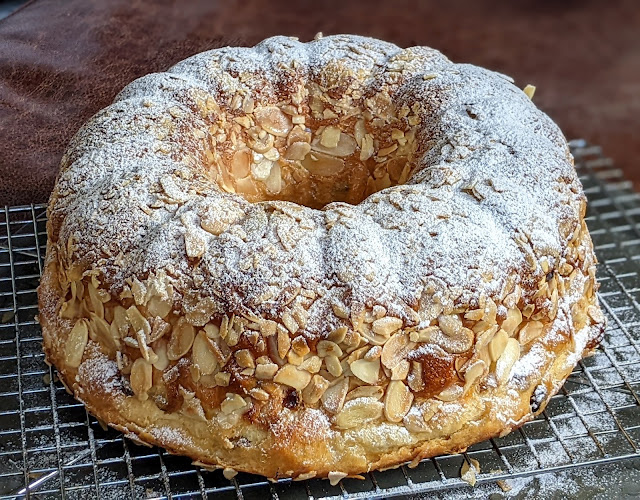
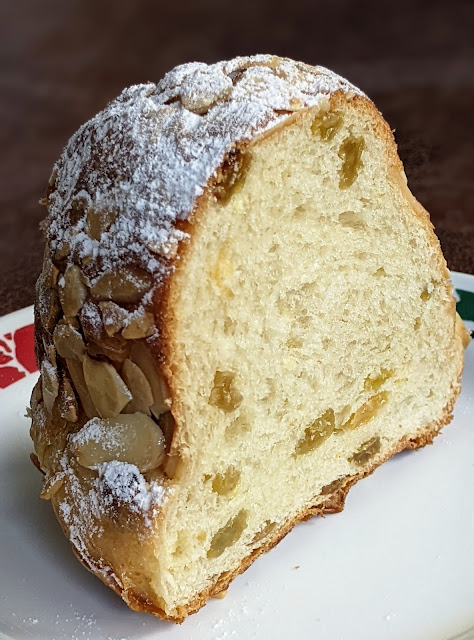
After eating the entire gigantic (2.4kg) Pain de Rois I made during the holidays, neither my family nor I could stand to eat another slice of "orangey" bread. Hence, the idea of making lemon-flavored bread came to mind. Many thanks to Derek, aka yozzause, who inspired me to perfect Le Cordon Bleu's Kouglof recipe; his brilliant idea and my beloved CLAS took the recipe up a notch and transformed it into a super flavorful and refreshing lemony dessert bread that I can't wait to share with you!


Kouglof = Alsatian brioche

"OR" = original recipe

"tweak" = adjustment to OR


A.


39% eggs

3% rye - CLAS, tweak

5.7% water - CLAS, tweak

10% sugar

5% lemon juice, tweaknone in OR

0.5% lemon extract, tweaknone in OR

0.25% vanilla extract, tweaknone in OR

97% Beehive AP


B.


27% full-fat milk, boiled and cooled( tweak; no pre-processing in OR)


C.

1.6% gold yeast, tweakOR uses fresh

1.5 % salt

zest of 1 lemon


D.

29% butter, diced


E.

40% golden raisins, rum-soaked, tweakOR uses much less


Total dough weight ~ 1140g


Mix

by Zojirushi bread machine


1. x10mins

+ A.

then gradually + ~ half of B


2. x10 mins

+ remaining B.

develop the dough to "medium-well" 


3. x10 mins

+ C.

The dough must be fully developed before proceeding to the next steps. 

+ D. gradually


4. x5 mins

+E.


DT 29C


Bulk

32-33C until doubled ~ 60-75 mins


In the meantime


generously butter a 9” bundt pan 

Then coat it with almond slices, tweakOR uses very little 

Refrigerate the pan, tweak; not done in OR


Make lemon syrup, tweakDerek's idea; none in OR; 

juice of 3 lemons : sugar

1:1 by weight

microwave until sugar dissolves


Shape

round

poke a hole in the middle and dump it in the bundt pan


Proof

32-33C x 30-45 mins


Bake

preheat 350F, tweak; OR temp too high; no stone; my oven takes ~ 15 mins

egg wash, tweak; not done in OR (this part of the dough will become the bottom of the Kouglof)

sprinkle almond slices on top, tweak; not done in OR


350F x 30 mins, no steam

start checking doneness with a skewer

cover with foil

insulate the bottom of the bundt pan; I use a few pizza pans


350F x ~ +5 mins


Glazetweak; Derek's idea; not done in OR


Before inverting the Kouglof onto a wire rack, gently brush it with lemon syrup


Invert the bread onto a wire rack, which sits on top of a pan that collects syrup dripping


Gently brush or dab lemon syrup onto the bread


Let cool/dry overnight


Decorate with powdered sugar before serving


Glazed and dried overnight


 20210124 Kouglof 2.0

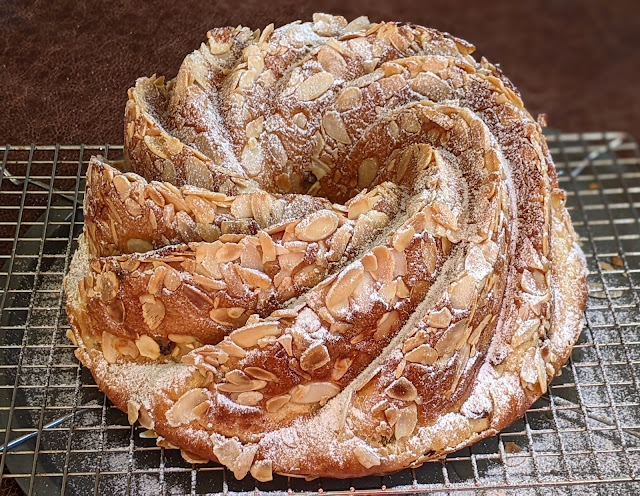
This time I used the tricks that Leigh, aka Naturaleigh, shared to enhance the lemon flavor. 


Rubbed the zest with sugar


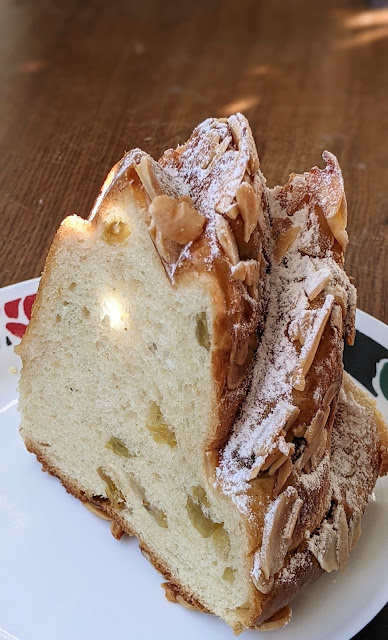
Poked holes in the Kouglof to let the lemon syrup seep through


And I used my flower mold
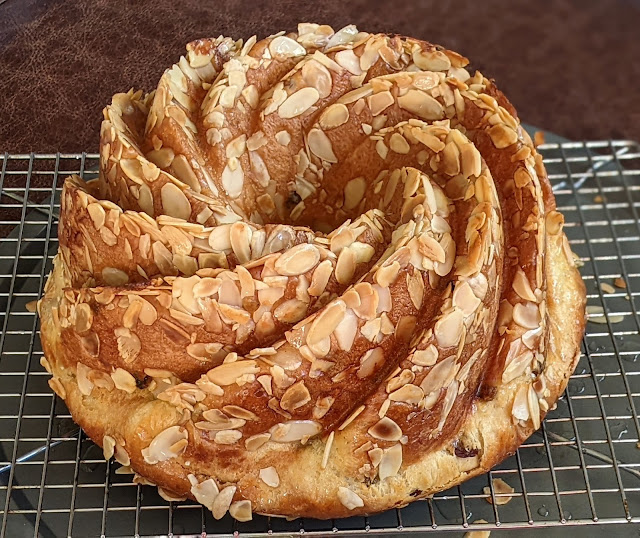


The lemon flavor is more intense and the crumb is moister this time,  I 💕💕💕 it!  Thank you, Leigh!

HeiHei29er's picture
HeiHei29er

I detailed the first bake with this recipe here.  I wanted to revisit it without the matcha powder and see how it worked as a hearth loaf.

Happy to say that it turned out great!  Made loaves for friends as well (needed independent tasters) and everyone really liked it.  The ginger really stands out (but isn't overpowering) and there are also noticeable aromatics from the jasmine rice.  It has a crisp texture when toasted, but my favorite way of eating it so far is a simple PB&J with raspberry jam.  Something about the aroma you get from the ginger as you take a bite combined with the sweetness from the peanut butter and jam makes a really good combination.

Very happy with how these loaves turned out.  Not sure what happened with the crumb in the center of this loaf.  Don't think it's under/over proofed.  The overall crumb looks good and even.  Guessing it was a lack of degassing during the final shape.  Crumb shot is of the tallest loaf.  Not sure what the cause of the lack of bloom is with the other two loaves.  I think it's just lack of consistency in my shaping/scoring technique.

Next time (and there will definitely be a next time), I will bake at a slightly higher temp to try and get better spring.  Reduced the heat a little because I was worried about burning the loaf bottom with the milk in the recipe.  Bottoms looked good, so I will bump it up a bit.  That being said, I do like the thin, soft crust with the lower temps.


Makes one loaf and assumes a morning bake with hand mixing/kneading.

Pate Fermente (early evening before bake)
72g - AP flour
48g - Bread flour
72g - Water
2.4g - Salt
0.2g - Active Dry Yeast

  • Dissolve yeast in water. 
  • Combine flours and salt in a separate bowl and create a well. 
  • Add water/yeast to flour well and mix until flours just wetted. 
  • Saltolyse 15 minutes. 
  • Fold/knead until dough is just smooth with no lumps. 
  • Form into tight ball and place in covered, oiled bowl. 
  • Ferment for 12-16 hours at 70 deg F.


Porridge (night before bake)
40g - Jasmine rice
6g - Ginger root (minced)
20g - Honey
60g - Water
60g - Whole milk

  • Combine all ingredients in covered saucepan and cook over low heat until wet ingredients are fully absorbed by the rice. I have an electric cooktop with burner settings of Lo, 1-9, Hi.  I set the burner on 1 and it takes 60-90 minutes.  I don't bring the mixture to a boil.  Just a low, slow heat up.
  • Stir periodically to insure rice doesn't burn and set up too much.   
  • The milk fats will coagulate fairly early in the heat up (I think from the acidity in the ginger), so don't be alarmed by that. 
  • When done, cover and leave out overnight to fully cool.  Refrigerate if not using within 8 hours.  Alternatively, make this just before the bake, but allow it to cool enough to be used in the final mix.


Final Dough
148g - AP flour
112g - Bread flour
20g - Semolina flour (remilled)(can replace with white flour if unavailable)
220g - Water
20g - Hold back water
5.6g - Salt
5.4g - Active Dry Yeast

  • Dissolve yeast in water.  Combine flours in separate bowl and make a well. 
  • Combine water/yeast mixture with porridge and break up the porridge chunks.  Mix until uniform.
  • Combine water/yeast/porridge mixture with flours.  As mixing, add small chunks of pate fermente to evenly distribute it into the dough.  Mix until flours are just wet.  Add Hold Back Water (if needed) in small amounts to desired hydration.  Dough will be somewhat sticky and should feel something like a 65% hydration white flour dough.
  • 15-20 minute fermentolyse to hydrate flours
  • Develop medium to high gluten strength.  Dough may still be a bit sticky from the rice, so use wet hands or food service gloves.  
  • Bulk ferment in oiled bowl at 76 deg F.  One fold at 30-45 minutes.  Dough should be roughly double at 60-90 minutes.
  • Pre-shape into a boule
  • Bench rest 20-30 minutes
  • Final shape for banneton and proof at 75-76 deg F (roughly 45-60 minutes)
  • Preheat oven to 425 deg F.  Bake with steam for 10 minutes (425 deg F), 5 minutes (400 deg F); vent oven; 20-25 minutes (375 deg F); Final temp target of 208 deg F

justkeepswimming's picture
justkeepswimming

I have never had much luck making crumpets. I came across this recipe elsewhere,and decided to give it a try. Success at last!! There used to be 8 (I scaled the recipe down a tad), but two were eaten hot off the pan. The rest have cooled and are frozen.

A few notes of possible interest:

 - He appears to be in Australia, so when the recipe called for bread flour, I thought about it for a minute. I'm not always fond of the chew/texture US bread flour can give some things, but wasn't sure how US AP flour compares to AU bread flour. I decided to split the difference and used half of each (edit, half KAF bread flour, half KAF AP flour). That worked. I might try it with all AP flour next time, just to compare results.

 - He cooks them in egg rings, but we don't own any. While shopping on Amazon to see what my options are, they suggested this nifty little pan. I decided to give it a try. It was perfect, for this recipe and for our eggs this morning too. 

All successful experiment on all fronts. 


zestandfizz's picture
zestandfizz

YouTube   Instagram   Facebook

Crumpets are one of my favorite things to make and eat, so it’s strange to think that I wasn’t a big fan of them growing up. I found the store-bought variety too dense and quite often stale. Homemade crumpets — on the other hand — are a revelation, and the sourdough variety are a cut above. They taste incredible slathered with marmalade, peanut butter, or a drizzle of maple syrup and served with a side of black tea

Many sourdough crumpet recipes appear to have been invented as a way to use up discarded sourdough starter, as if crumpets are some sort of afterthought, a support act for the more popular line-up of sourdough loaves, pizza and focaccia. While I’m 100% behind minimizing waste, I honestly believe that crumpets deserve their time in the spotlight. Because when they’re made well, they are up there with the best — as good as a plain croissant, or a slice of fresh bread slathered with butter.

That’s why I’d like to give you a recipe that’s specifically for these babies and not a way to repurpose a waste product. Well, that and everyone’s sourdough starter is different. For instance, I keep a relatively low-hydration starter, made up of a blend of rye and bread flours. If my crumpet batter was made up entirely of discarded starter, then a third of it would be rye. I’m a huge fan of rye in my loaves, but in crumpets I find it leads to a denser result.

A nice thing about this recipe is that there is little difference between a starter and a levain, or a ripe starter and a discarded one, so if you’d prefer to use your leftovers — or if your starter is already big enough to cover the quantities I’ve stated — then you can easily adapt it to your needs. Just make sure you aim for the right hydration level and you’ll be singing.

Speaking of hydration, the ratio in this recipe comes in at just under 140%; and paying attention to the batter’s consistency is of utmost importance. By all means, substitute bread flour with another variety, but pay attention to the amount of water your flour likes to soak up — you may need to be sparing with it. I highly recommend reserving some of the water first and only adding in the rest a quarter of a cup at a time if the batter looks dry. You’re after a consistency close to that of thickened cream; still a bit clumpy and thick, but just loose enough to pour off your spoon and conform to the shape of your egg rings. Check out my video for an example of what you’re after.

Even with a lot of care, it’s possible to go too far. If that happens, then a little bit of flour can be added to thicken the mixture up again.

Do also keep in mind that the longer your batter has been sitting around, the weaker it will be; and that means you won’t get as much rise out of your crumpets. That’s another reason I prefer to mix up the batter ad hoc and not use old starter — you have better control over the fermentation.

The sweet-spot for this recipe is somewhere between well-proofed and stale, a mass of batter that has more than doubled in size, in what you’d probably consider over-proofed-land for a loaf of bread. The nice thing about slow ferments is that you have some wiggle room. You can opt to leave this on the bench overnight in the milder months or in the fridge in summer and it should be just-right by morning. The timings below are a general guide for how long to leave the batter fermenting, but be patient and watch for signs of fermentation rather than the clock.

TemperatureApproximate Proofing Time (hrs)
°C°F
155915
20687
25774
30863

Once you’ve left the batter sitting for long enough, mix up the baking soda, sugar and water and add them in. What we really want is an overripe ferment that has had enough time to develop nicely and reach the point where it’s started to sour; that twinge of acid is necessary for the baking soda to foam and generate small bubbles. If you use a younger starter, you may need to substitute some of the baking soda for baking powder.

Give it a really good mix; I find that the manual work of whipping up the batter ensures the baking soda is well distributed and gets the aeration really going. It can take a beating, but don’t stress — dough strength is not a huge factor here as the crumpet rings will make sure the crumpets hold their shape, much like a loaf tin.

A top down view of crumpets packed into a box

Now you’re all ready, so preheat your pan. When it comes to cooking these on the stove, use the heaviest-bottomed pan you have available; cast-iron is really the best option here — the frying time is quite long, so you need a slow and strong heat. You’ll likely want to aim for medium to high heat, but be careful — too high and you’ll burn the bottoms, too low and they’ll set before bubbles form. Getting the temperature right will take a bit of practice and I highly recommend you take notes (mental or otherwise) once you get things spot on.

Egg rings are also an essential part of making crumpets; otherwise, you’ll end up with pikelets, and sure, they’ll still taste amazing, but you’ll be missing out on half the fun. Be sure to grease your pan and the egg rings well. I’ve lost count of how many times I’ve cursed at a stray crumpet that gets stuck in its ring. My egg rings are 7cm in diameter, so an 80ml measuring cup makes light work of dispensing the batter.

All up, one round of crumpets should take about 10 minutes to cook on their first side. When their tops have started to dry and harden, flip them over onto the hot pan and leave them for half a minute or until their tops have browned nicely. This last step is another great thing about home-made crumpets, and guarantees they never look as insipid and rubbery as their store-bought counterparts.

Take them off the heat and wait 10 minutes or so for them to firm up; you’ll know that they’ve been successful if a finger pressed lightly into the middle gets some springy resistance. All that’s left to do is slather those griddle cakes with whatever takes your fancy. Honestly, though? Even 10 minutes is a long wait and I’ve been known to sneak in some plain ones at the stovetop. They really are that good; and if you haven’t tried them, then I urge you to put this recipe on your to-do list for next Sunday’s breakfast so you can give them a go too.

A top down view of a plate of crumpets

naturaleigh's picture
naturaleigh

This was an experiment with walnuts and some purple barley that I had on hand.  I modified my everyday loaf to incorporate the nuts and soaked barley during lamination (after an initial 2 S&Fs).  Although I nearly let the fermentation get away from me while busy cooking dinner last night, I'm happy with the crumb all things considered, not the least of which was the weight of the walnuts.  The areas of the crumb that have more purple are actually from the barley and not the walnuts (since those got toasted first).  The flavor is really nice and the crumb is quite delicate and soft.  The barley compliments the walnut flavor very well.  I will probably up the honey in this by 10 g or so next time, but, all in all, I'm quite pleased with how it turned out.  This should make some awesome toast or would be great with some cheese.  The inside looks lots better than the outside--I decided to go with a natural 'score' and let the loaf do what it wanted (baked seam side up) but the results were not pretty, which the bold bake did not improve...one of the homelier loaves I've ever made, so it gets bottom billing ;-)

Danni3ll3's picture
Danni3ll3

It was time to revisit this one after taking a break for the holidays. 


Recipe

Makes 3 loaves 


150 g Spelt flour (~150 g Spelt berries)

150 g Kamut flour (~150 g Kamut berries)

50 g rye flour (~50 g Rye berries)

700 g strong bakers unbleached flour

725 g of filtered water 

10 g Old Bay seasoning

15 g Pink Himalayan salt 

30 g yogurt 

250 g levain (procedure is in recipe and will need additional wholewheat flour and unbleached flour)


Add-ins

145 g of drained sliced mixed olives (50 g Kalamata, 50 g Manzanilla and 45 g Black)

130 g crumbled Feta 

72 g Seasoned Sun-dried Tomatoes in oil, drained and 25g of oil reserved 


The night before:

1. Mill the grains on the finest setting of your mill. Measure the Spelt, Kamut, and rye flours and place in a tub. 

2. Add the unbleached flour to the milled flours and reserve.

3. Take 10 g of refrigerated starter and feed it 20 g of water and 20 g of wholegrain flour. Let that rise at cool room temperature for the night.  


Dough making day:

1. Feed the levain 100 g of filtered water and 100 g of unbleached flour. Let rise in a warm place till double. This took about 5 hours.

2. Measure the feta, crumble if needed, and set aside.

3. Drain (save the oil) and weigh the sun-dried tomatoes, (slice if not sliced), measure out 25 g of the reserved oil, and add both to the feta. 

4. Drain the olives, weigh, and add to the feta mix.

5. An hour or two before the levain is ready, mix the water with the flours and autolyse. This takes a minute or two in a mixer. Let autolyse until

the levain is ready. 

6. Once the levain has doubled, add the Old Bay seasoning, the salt, the yogurt, the feta/olive/tomato mix, and the levain. Mix for a minute on low until the levain is integrated, then mix on speed 2 for 9 minutes.

7. Cover and let rest 45 minutes.

8. Do 2 sets of coil folds with 45 minute intervals and then 2 more set with 30 minute intervals. Let rise until you see lots of small irregular bubbles through the wall of your container. The dough should have risen about 30-40%.

9. Tip the dough out on a bare counter, sprinkle the top with flour and divide into portions of ~825 g. Round out the portions into rounds with a dough scraper and let rest 30 minutes on the counter. 

10. Do a final shape by flouring the top of the rounds and flipping the rounds over on a lightly floured counter. Gently stretch the dough out into a circle. Pull and fold the third of the dough closest to you over the middle. Pull the right side and fold over the middle and do the same to the left. Fold the top end to the center patting out any cavities. Finally stretch the two top corners and fold over each other in the middle. Roll the bottom of the dough towards you until the seam is underneath the dough. Cup your hands around the dough and pull towards you, doing this on all sides of the dough to round it off. Finally spin the dough to make a nice tight boule.

11. Sprinkle rice flour in the bannetons. Place the dough seam side down in the bannetons, cover, let rest for a few minutes on the counter and then put to bed in a cold (38F) fridge overnight. 

Baking Day

1. The next morning, heat the oven to 475F with the Dutch ovens inside for 45 minutes to an hour. Turn out the dough seam side up onto a cornmeal sprinkled counter. Place rounds of parchment paper in the bottom of the pots, and carefully place the dough seam side up inside. 

2. Cover the pots and bake the loaves at 450 F for 25 minutes, remove the lids, and bake for another 22 minutes. Internal temperature should be 205 F or more.

Pages

Subscribe to RSS - blogs